Table of Contents
Advertisement
Quick Links
Centrometal d.o.o. - Glavna 12, 40306 Macinec, Croatia, tel: +385 40 372 600, fax: +385 40 372 611
ENG
using of CONTROLLER
hot water boiler PelTec II Lambda 69/96
THE FIRST START-UP MUST BE DONE BY AUTHORIZED
PERSON, OTHERWISE PRODUCT WARRANTY IS NOT
VALID.
TU-R-PLTII-69-96-9-2024-v3.02t-ENG
H E A T I N G T E C H N I Q U E
H E A T I N G T E C H N I Q U E
TECHNICAL INSTRUCTIONS
You can find the latest technical instructions
for PelTec II Lambda by scanning the
QR code or at the web address:
https://www.centrometal.hr/en/portfolio/peltec-ii-lambda-eng/
PelTec II Lambda 69/96
9%
BOOK 2/2
Advertisement
Table of Contents

Subscribe to Our Youtube Channel
Related Manuals for Centrometal PelTec II Lambda 69/96


Summary of Contents for Centrometal PelTec II Lambda 69/96
- Page 1 H E A T I N G T E C H N I Q U E H E A T I N G T E C H N I Q U E Centrometal d.o.o. - Glavna 12, 40306 Macinec, Croatia, tel: +385 40 372 600, fax: +385 40 372 611 TECHNICAL INSTRUCTIONS...
-
Page 2: Table Of Contents
5.7.4. TEMPERATURE ..................................74 5.7.4.1. MINIMAL SENSOR TEMPERATURE ............................75 5.7.4.2. MINIMAL SENSOR DIFFERENCE ............................75 5.7.4.3. MINIMAL OUTDOOR TEMPERATURE ...........................75 5.8. Wi-Fi NETWORK & INTERNET SUPERVISION ..........................76 5.8.1. CHOOSE Wi-Fi NETWORK ................................77 5.8.2. INTERNET SUPERVISION .................................77 Technical instructions Controller PelTec II Lambda 69/96... - Page 3 OPERATION STAGES (SHOWN ON THE SCREEN) .........................104 POWER MODULATION PRINCIPLE ..............................105 MARKS ON THE SCREEN - the boiler goes into the shutdown phase, perform a certain activity and continues to operate if necessary ......................................105 Technical instructions Controller PelTec II Lambda 69/96...
-
Page 4: Switching On The Controller
"Main switch (0/1)" and switch it on again without touching the screen. The boiler cannot be switched on nor the user menu displayed if value of the weighed pellets is not entered (menu Installation -> Commissioning -> Pellets weighing). Technical instructions Controller PelTec II Lambda 69/96... -
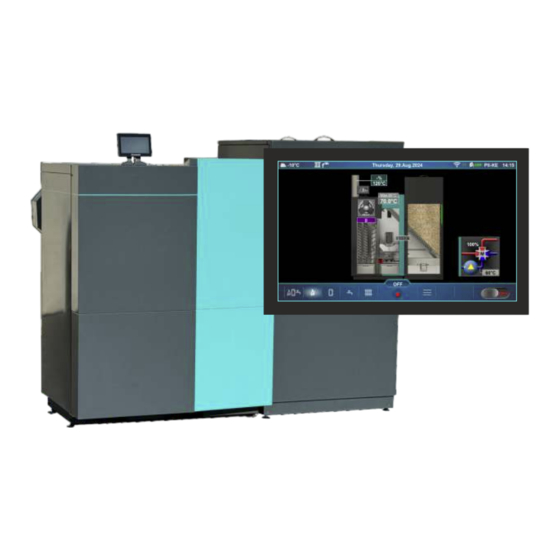
Page 5: Main Screen (Pii-Oe) And Main Menu
Shortcuts to Current Menu Errors (Boiler ON/OFF) different screens button boiler (Main screen (PII-OE), status Boiler screen (PII-KE), (operation Accumulation (buffer) stages) tank screen (PII-PE)...) Main screen - Schematic view (PII-OE) Main screen (PII-OE) Technical instructions Controller PelTec II Lambda 69/96... - Page 6 Shortcut to the previous menu BACK button Menu with submenus Menu without submenus Menu button There are 9 to 11 menus in total (depending on the selected configuration). Technical instructions Controller PelTec II Lambda 69/96...
-
Page 7: Shortcuts For Different Screens
"Main screen (PII-OE)" button Main screen (PII-OE) Main screen - Schematic view (PII-OE) Boiler screen (PII-KE) Suction system screen (PII-VE) (additional equipment) Accumulation (buffer) tank screen (PII-PE) Domestic hot water (DHW) tank screen (PII-SE) Technical instructions Controller PelTec II Lambda 69/96... - Page 8 flow temperature is pressed) 15 - Room thermostat / Reg. control (thermostat that switches the heating circuit pump on/off) *The symbols will be shown only if corrector is selected in the heating circuit. Technical instructions Controller PelTec II Lambda 69/96...
-
Page 9: Symbols On The Boiler Screen (Pii-Ke)
19 - Electric heater symbol (when operating, the symbol changes color) 20 - Turbulator symbol (when operating, the symbol moves) 21 - Rotary valve (RSE) (additional equipment) 22 - Fan speed (rpm) 23 - Fan symbol (when operating, the symbol is rotating) Technical instructions Controller PelTec II Lambda 69/96... - Page 10 Position of burner grate grate is open (Open - cleaning) (opening grate is closed (Closed - ready to operate) (closing The option is disabled The option is enabled Technical instructions Controller PelTec II Lambda 69/96...
-
Page 11: Configuration Symbols
(indicates direction of the tank flow, AB-A) 65°C The symbol appears only if recirculation exists in the configuration and if the authorized service technician has switched it on in the Installation menu (option "Recirculation installed"). Technical instructions Controller PelTec II Lambda 69/96... -
Page 12: Changing/Entering Parameters
Changing/entering parameters CHANGING/ENTERING PARAMETERS Drag the slider button / press the button to increase/decrease the value Keyboard: Value entry Button for multiplication change (left / right) x1, x10, x100 Technical instructions Controller PelTec II Lambda 69/96... -
Page 13: Maintenance
''OFF'' button (4) to stop the fan (the same thing will happen if you press the ''BACK button'' (5)). When exiting this menu (press the ''BACK button'' (5)) the burner grate returns to the closed position (0 %). After cleaning, it is necessary to empty the ash box. Technical instructions Controller PelTec II Lambda 69/96... -
Page 14: Filling Feeder Screw
Manually open the other mixing valves of the heating installation (to 50 %) as needed. When exiting this submenu, the 4-way mixing valve (in the boiler circuit) starts to close. Technical instructions Controller PelTec II Lambda 69/96... -
Page 15: Boiler
(buffer) tank main flow) 9 - Room corrector CSK ((K1) Heating circuit 1) / 5 - Temperature sensor domestic hot water CSK-Touch (additional equipment) (DHW) ((K2) Heating circuit 2) 6 - Outdoor temperature sensor Technical instructions Controller PelTec II Lambda 69/96... - Page 16 5 °C. (automatically calculated) (see **Example of maximum boiler temperature setting: Configuration 2) Boiler difference = Boiler temperature difference Hydraulic crossover temperature = Hydraulic crossover temperature **Example of maximum boiler temperature setting: Configuration 2 Technical instructions Controller PelTec II Lambda 69/96...
- Page 17 5 °C. (automatically calculated) (see **Example of maximum boiler temperature setting: Configuration 2) Boiler difference = Boiler temperature difference Hydraulic crossover temperature = Hydraulic crossover temperature **Example of maximum boiler temperature setting: Configuration 2 Technical instructions Controller PelTec II Lambda 69/96...
- Page 18 5 °C. (automatically calculated) (see **Example of maximum boiler temperature setting: Configuration 2) Boiler difference = Boiler temperature difference Hydraulic crossover temperature = Hydraulic crossover temperature **Example of maximum boiler temperature setting: Configuration 2 Technical instructions Controller PelTec II Lambda 69/96...
- Page 19 5 °C. (automatically calculated) (see **Example of maximum boiler temperature setting: Configuration 2) Boiler difference = Boiler temperature difference Hydraulic crossover temperature = Hydraulic crossover temperature **Example of maximum boiler temperature setting: Configuration 2 Technical instructions Controller PelTec II Lambda 69/96...
- Page 20 (Main screen - Schematic view (PII-OE)). Main flow sensor - for information only (Configuration 4,5,8) Authorized service technician can turn on or off the "Main flow sensor" display. **Example of maximum boiler temperature setting: Configuration 4 Technical instructions Controller PelTec II Lambda 69/96...
- Page 21 Temperature **Example of maximum boiler temperature setting: Configuration 5. 1. (Temperature DHW + 5 °C) </= Maximum boiler temperature (manual entry): 2. (Temperature DHW + 5 °C) > Maximum boiler temperature (manual entry): Technical instructions Controller PelTec II Lambda 69/96...
- Page 22 5 °C. (automatically calculated) (see * *Example of maximum boiler temperature setting: Configuration 8) Boiler difference = Boiler temperature difference **Example of maximum boiler temperature setting: Configuration 8 1. Temperature DHW < 65 °C Technical instructions Controller PelTec II Lambda 69/96...
- Page 23 Temperature 2. Temperature DHW >/= 65 °C Technical instructions Controller PelTec II Lambda 69/96...
- Page 24 (DOWN) sensor) is smaller than the set value "Stop buffer tank difference", the request for heating of the buffer tank is interrupted (the buffer tank pump does not require operation). **Example of maximum boiler temperature setting: Configuration 11. 1. Buffer tank temperature set to >/= 65 °C: Technical instructions Controller PelTec II Lambda 69/96...
- Page 25 Temperature 2. Buffer tank temperature set to <65 °C: Technical instructions Controller PelTec II Lambda 69/96...
- Page 26 (the buffer tank pump does not require operation). **Example of maximum boiler temperature setting: Configuration 13 1. Buffer tank temperature set to >/= 65 °C: 1a. Buffer tank temperature set to >/= DHW set temperature Technical instructions Controller PelTec II Lambda 69/96...
- Page 27 Temperature 1b. Buffer tank temperature set to < DHW set temperature 2. Buffer tank temperature set to <65 °C: 2a. Buffer tank temperature set to >/= DHW set temperature Technical instructions Controller PelTec II Lambda 69/96...
- Page 28 Temperature 2b. Buffer tank temperature set to < DHW set temperature 2c. DHW set temperature > Buffer tank temperature set and DHW set temperature >/= 65 °C Technical instructions Controller PelTec II Lambda 69/96...
- Page 29 (DOWN) sensor) is smaller than the set value "Stop buffer tank difference", the request for heating of the buffer tank is interrupted (the buffer tank pump does not require operation). **Example of maximum boiler temperature setting: Configuration 17 1. Hydraulic crossover temperature >/= Buffer tank temperature Technical instructions Controller PelTec II Lambda 69/96...
- Page 30 (measured on the lower (DOWN) sensor) is smaller than the set value "Stop buffer tank difference", the request for heating of the buffer tank is interrupted (the buffer tank pump does not require operation). Technical instructions Controller PelTec II Lambda 69/96...
- Page 31 Temperature **Example of maximum boiler temperature setting: Configuration 17 1. Hydraulic crossover temperature >/= Buffer tank temperature 2. Hydraulic crossover temperature < Buffer tank temperature Technical instructions Controller PelTec II Lambda 69/96...
- Page 32 (DOWN) sensor) is smaller than the set value "Stop buffer tank difference", the request for heating of the buffer tank is interrupted (the buffer tank pump does not require operation). **Example of maximum boiler temperature setting: Configuration 17 1. Hydraulic crossover temperature >/= Buffer tank temperature Technical instructions Controller PelTec II Lambda 69/96...
- Page 33 (measured on the lower (DOWN) sensor) is smaller than the set value "Stop buffer tank difference", the request for heating of the buffer tank is interrupted (the buffer tank pump does not require operation). Technical instructions Controller PelTec II Lambda 69/96...
- Page 34 Temperature **Example of maximum boiler temperature setting: Configuration 17 1. Hydraulic crossover temperature >/= Buffer tank temperature 2. Hydraulic crossover temperature < Buffer tank temperature Technical instructions Controller PelTec II Lambda 69/96...
- Page 35 The way of changing the set temperature: - example of changing the default Hydraulic crossover temperature: Possible min/max values, factory value and the reasons (descriptions) for some restrictions: Example: Configuration 20, Example: Configuration 20, Buffer tank temperature DHW temperature Technical instructions Controller PelTec II Lambda 69/96...
-
Page 36: Dhw / Heating
Factory: Min/Max Unit 0 / 40 °C 1. Outdoor temperature 2 / 10 °C 2. Outdoor temperature difference 0 / 10080 3. Time (Heating OFF) 0 / 10080 min 3. Time (Heating ON) Technical instructions Controller PelTec II Lambda 69/96... -
Page 37: Boiler Schedule
Table 3 - Table 3 is activated and boiler works according to the settings in Table 3 Example of Table 1 activation. The icon indicates that the "Boiler schedule" is activated (example: Table 1 is activated). Technical instructions Controller PelTec II Lambda 69/96... -
Page 38: 2.2.4. Table 1, Table 2, Table 3
6:00 p.m. and from 7:00 p.m. to 10:00 p.m. In the periods from 00:00 to 4:59 a.m., from 9:16 a.m. to 1:59 p.m., from 6:01 p.m. to 6:59 p.m. and from 10:01 p.m. to 11:59 p.m. the boiler will not operate. The schedule for Monday is copied to Tuesday, Wednesday, Thursday and Friday. Technical instructions Controller PelTec II Lambda 69/96... -
Page 39: Forced Shutdown
During the time period set in the table, cleaning of the flue passages is disabled. Schedules can be set in the same way as in the ''Table 1, Table 2, Table 3''. Technical instructions Controller PelTec II Lambda 69/96... -
Page 40: Not Working Schedule
Not working schedule 2.4.1. NOT WORKING SCHEDULE ''Not working schedule'' option allows activation or deactivation of the boiler operating schedule. Factory: ON Possible selection: ON, OFF Technical instructions Controller PelTec II Lambda 69/96... -
Page 41: Table
flue passage cleaning is not allowed. This means that flue passage cleaning will be carried out only between 7:01 a.m. and 6:59 p.m. The schedule for Monday is copied to Tuesday, Wednesday, Thursday, Friday, Saturday and Sunday. Technical instructions Controller PelTec II Lambda 69/96... -
Page 42: Fuel Level
Fuel level in percentage This option is independent of the W1 FUEL LEVEL alarm and the E22 FUEL LEVEL error. NOTE: "Fuel level", "Suction system" or "Screw refill" cannot be activated at the same time. Technical instructions Controller PelTec II Lambda 69/96... -
Page 43: Boiler Components
Boiler components, Cleaning, Flue passage cleaner, Grate cleaner 2.6. COMPOSANTS DE CHAUDIÈRE 2.6. COMPOSANTS DE CHAUDIÈRE 2.6. COMPOSANTS DE CHAUDIÈRE 2.6. BOILER COMPONENTS This submenu allows only an overview. 2.6.1. CLEANING 2.6.1.1. FLUE PASSAGE CLEANER 2.6.1.2. GRATE CLEANER Technical instructions Controller PelTec II Lambda 69/96... -
Page 44: Heating Circuit
Heating circuit NOTE: All displayed menus are based on configuration 18. 3.0. HEATING CIRCUIT In certain configurations, the menus will be different (with or without the Heating circuit/Domestic hot water menu). Technical instructions Controller PelTec II Lambda 69/96... -
Page 45: Pump Off
*Not displayed when a constant temperature (Heating type) is selected and the corrector is OFF. ** Only displayed if a constant temperature (Heating type) is selected. *** Only displayed if the corrector (CSK (2 wires or 3 wires)) is ON. Technical instructions Controller PelTec II Lambda 69/96... - Page 46 Measurement correction - Corrector -5.0 / 5.0 °C *** Only displayed if the corrector (CSK (2 wires or 3 wires)) is ON. Technical instructions Controller PelTec II Lambda 69/96...
- Page 47 CSK is placed in a part of the room that is for some reason warmer or colder than the rest of the room) *** Only displayed if the corrector (CSK (2 wires or 3 wires)) is ON. Technical instructions Controller PelTec II Lambda 69/96...
- Page 48 *** Only displayed if the corrector (CSK (2 wires or 3 wires)) is ON. Technical instructions Controller PelTec II Lambda 69/96...
- Page 49 *** Only displayed if the corrector (CSK (2 wires or 3 wires)) is ON. Technical instructions Controller PelTec II Lambda 69/96...
-
Page 50: Day / Night Temperature
Day temperature - the heating circuit operates according to the set Day temperature Night temperature - the heating circuit operates according to the set Night temperature Table 1/Table 2 - automatically switches between day and night temperatures which are set in the table Technical instructions Controller PelTec II Lambda 69/96... -
Page 51: 3.7. Table 1, Table 2
1:31 p.m to 3:14 p.m., 4:16 p.m. to 7:44 p.m. The schedule for Monday is copied to Tuesday. Other days have set Night room temperature mode from 00:00 to 5:59 a.m., 10:01 p.m. to 11:59 p.m. and Day room temperature mode from 6:01 a.m. to 10:00 p.m. Technical instructions Controller PelTec II Lambda 69/96... -
Page 52: Heating Curve
Heating curve 3.8. HEATING CURVE Setting of the heating curve. Heating curve is one of the parameters for main flow temperature calculation. Coeffiicent Outdoor temperature Technical instructions Controller PelTec II Lambda 69/96... -
Page 53: Domestic Hot Water (Dhw)
*Displayed only if the authorized service technician (in the Installation menu) has switched on the option "Recirculation installed". When the option is switched on, on the "Main screen - Schematic view (PII-OE)" will be displayed the recirculation symbol. Technical instructions Controller PelTec II Lambda 69/96... - Page 54 *Displayed only if the authorized service technician (in the Installation menu) has switched on the option "Recirculation installed". When the option is switched on, on the "Main screen - Schematic view (PII-OE)" will be displayed the recirculation symbol. Technical instructions Controller PelTec II Lambda 69/96...
- Page 55 *Displayed only if the authorized service technician (in the Installation menu) has switched on the option "Recirculation installed". When the option is switched on, on the "Main screen - Schematic view (PII-OE)" will be displayed the recirculation symbol. Technical instructions Controller PelTec II Lambda 69/96...
- Page 56 *Displayed only if the authorized service technician (in the Installation menu) has switched on the option "Recirculation installed". When the option is switched on, on the "Main screen - Schematic view (PII-OE)" will be displayed the recirculation symbol. Technical instructions Controller PelTec II Lambda 69/96...
- Page 57 Domestic hot water schedule (DHW) - Domestic hot DHW temperature 40 / 80 °C water schedule DHW difference 4 / 40 °C Factory: Possible selection: (K1) Circ 1, (K2) Circ 2 OFF/Table 1/ Domestic hot water schedule (DHW) Table 2 Technical instructions Controller PelTec II Lambda 69/96...
-
Page 58: Operation
Submenu 5.1. DHW/Heating is only displayed if the configuration with Domestic hot water (DHW) is selected. Factory: DHW+Heating Possible selection: DHW+Heating, DHW only, Heating only, Auto DHW+Heating - the boiler operates as needed for heating or for domestic hot water (DHW). Technical instructions Controller PelTec II Lambda 69/96... - Page 59 Heating only - boiler operates only when there is demand for heating. Auto - boiler switches automatically between DHW+Heating and DHW only operating mode. Example: factory setting of Outdoor temperature, Outdoor temperature difference, Time (Heating OFF), Time (Heating ON) Technical instructions Controller PelTec II Lambda 69/96...
- Page 60 DHW/Heating If the outdoor temperature is >/= 20 °C for more than 30 minutes. If the outdoor temperature is <(20-3) °C for more than 30 minutes. Technical instructions Controller PelTec II Lambda 69/96...
-
Page 61: Dhw Priority
Possible choice: OFF, ON Current: OFF Current: ON If the option is active, the domestic hot water (DHW) icon changes color from white to red and changes position in the top bar of the screen. Technical instructions Controller PelTec II Lambda 69/96... -
Page 62: Control Unit Settings
(CRO) is managed by another regulation independent of the boiler regulation. When this option is activated, the authorized technician cannot adjust the boiler to maintain the temperature required by the installation (see "Boiler temperature maintenance"). Technical instructions Controller PelTec II Lambda 69/96... -
Page 63: Boiler Temperature Maintenance
By turning on the "Chimney sweeper" option, the controller is automatically set to "Boiler temperature maintenance: Boiler" and this menu disappears. By turning off the "Chimney sweeper" option, everything returns to its previous state. Technical instructions Controller PelTec II Lambda 69/96... -
Page 64: Manual Test
Parts of the boiler that can be tested manually: 1 - Fan 2 - Electric heater 3 - Flue passages cleaner 4 - P0 + 4-way mixing valve 5 - Grate 6 - Feeder screw Technical instructions Controller PelTec II Lambda 69/96... -
Page 65: Fan
Fan speed: 1200 rpm - fan speed must be 1200 rpm Fan speed: 1800 rpm - fan speed must be 1800 rpm Fan speed: MAX - the fan speed must be on maximum (around 2800 rpm) Technical instructions Controller PelTec II Lambda 69/96... -
Page 66: Electric Heater
Press the "ON" button and check if the motor of the selected equipment is operating, if turbulators are moving. Every time you press the "ON" button, it lights up green. After pressing the "OFF" button the motor of the selected equipment will stop operating. Flue passage cleaner Technical instructions Controller PelTec II Lambda 69/96... -
Page 67: P0 + 4-Way Mixing Valve
Every time you press the ''ON'' button, it lights up green. When this option is active, the burner grate symbol moves on the screen. When the grate arrives in one of the two final positions, on the screen is displayed Technical instructions Controller PelTec II Lambda 69/96... -
Page 68: Feeder Screw
Every time you press the "ON" button, it lights up green. After pressing the ''OFF'' button, the pump will stop. Example: Configuration 18 Example: Configuration 36 Technical instructions Controller PelTec II Lambda 69/96... -
Page 69: K1 3-Way Valve (If Exists In Configuration)
(if the motor of the selected equipment is operating). Every time you press the "ON" button, it lights up green. After pressing the ''OFF'' button, the motor of equipment will stop. 5.4.9.1. 5.4.9.1. Technical instructions Controller PelTec II Lambda 69/96... -
Page 70: Screw Refill
''Ash screw'' and check if the symbol of the selected equipment moves (if the motor of the selected equipment is operating). Every time you press the "ON" button, it lights up green. After pressing the ''OFF'' button, the motor of equipment will stop. 5.4.9. 5.4.9. Technical instructions Controller PelTec II Lambda 69/96... -
Page 71: Weighing Check
If currently weighed amount of pellets is 30 % more/less than the ''Last weighing'', it is necessary to call the service technician to adjust the boiler controller. Technical instructions Controller PelTec II Lambda 69/96... -
Page 72: Pumps & Mixing Valve Protection
NOTE: The boiler must be connected to the power supply and ''Main Switch (0/1)'' must be switched on, for this function to be active. 5.6.1. PUMPS & MIXING VALVE PROTECTION This option enables activation/deactivation of pumps and valves protection. Factory: ON Possible selection: ON, OFF 5.6.2. TIME Technical instructions Controller PelTec II Lambda 69/96... -
Page 73: Freeze Guard
5.7.1. FREEZE GUARD Possibility of activating or deactivating of the ''Freeze guard'' option. When this option is activated, a snowflake icon appears on the top bar of the screen. Factory: OFF Possible selection: ON, OFF Technical instructions Controller PelTec II Lambda 69/96... -
Page 74: Outdoor Temperature
Possible selection: 1. Boiler, 2. (K0), 3. (K1), 4. (K2) 5.7.4. TEMPERATURE This option allows setting the minimal sensor temperature and minimal sensor difference, as well as the minimal outdoor temperature at which the ''Freeze Guard'' option will be activated. Technical instructions Controller PelTec II Lambda 69/96... -
Page 75: Minimal Sensor Temperature
Possible selection: 2 - 15 °C (set by an authorized technician) 5.7.4.3. MINIMAL OUTDOOR TEMPERATURE Setting the outdoor temperature at which the ''Freeze guard'' option will be activated. Factory: 0 °C Possible selection: -5 - 5 °C Technical instructions Controller PelTec II Lambda 69/96... -
Page 76: Wi-Fi Network & Internet Supervision
Internet supervision. The control is connected to the web portal. (Internet supervision is possible) The control is not connected to the web portal. (Internet supervision is not possible) Technical instructions Controller PelTec II Lambda 69/96... -
Page 77: Choose Wi-Fi Network
"JOIN", enter the password if necessary and confirm with the "OK" button. If you want to disconnect from a Wi-Fi network, press the button "DISCONNECT". DISCONNECT 5.8.2. INTERNET SUPERVISION This option is used to set and enable/disable "Internet Supervision". Factory: Supervision+control Possible selection: OFF, Supervision, Supervision+control Technical instructions Controller PelTec II Lambda 69/96... -
Page 78: Advanced Functions
This option allows entering a password for the local Wi-Fi network. The correct password for the local Wi-Fi network must be entered, otherwise the boiler will not be able to connect to the Wi-Fi network. Technical instructions Controller PelTec II Lambda 69/96... -
Page 79: Time Synchronization
(WiFi ID). You can see the registration procedure on the video instructions. Please scan QR code with your smartphone or open web page from link below. https://portal.centrometal.hr Technical instructions Controller PelTec II Lambda 69/96... -
Page 80: Alarms (Cal)
(errors, low fuel level, etc.). "Delay" is the time between two alerts. 5.X.1. OUTPUT 1 This submenu allows configuration of "Output 1". It is possible to select the mode of errors or fuel level signaling. Technical instructions Controller PelTec II Lambda 69/96... -
Page 81: Errors
Factory: OFF Possible selection: 1. OFF, 2. Continuous, 3. Fast 1 time, 4. Fast 3 times, 5. Slow 1 time, 6. Slow 3 Times, 7. Table 5.X.1.3. BUFFER TANK Technical instructions Controller PelTec II Lambda 69/96... -
Page 82: Buffer Tank
(this parameter is not valid if a continuous signal is chosen). Factory: 20s Possible selection: 5-3600s 5.X.2. OUTPUT 2 In the same way as for "Output 1", the parameters for "Output 2" (5.X.2.) can be set. Technical instructions Controller PelTec II Lambda 69/96... -
Page 83: Table
This submenu allows you to activate/deactivate the pellet suction system (additional equipment) and to define the time during which the suction system will not operate (for a detailed description, see Technical instructions Pellet suction system). Technical instructions Controller PelTec II Lambda 69/96... -
Page 84: Chimney Sweeper
Flue gas measurement performed while the counter is even briefly red is not valid. Factory: OFF Possible selection: ON, OFF Technical instructions Controller PelTec II Lambda 69/96... -
Page 85: Minimal Boiler Temperature
The factory set temperature that must be achieved to start the measurement (except for conditions that can be changed - boiler power and time): - Minimal boiler temperature: min. 60 °C (it cannot be changed) Factory: 60 °C Technical instructions Controller PelTec II Lambda 69/96... -
Page 86: Time
Period of time during which the boiler operates at the chosen power (D6/D2), after the "Minimal boiler temperature" is reached (so that the flame stabilizes). After this time, the text on the counter turns green and only then you can start measuring flue gases. Factory: 600s Possible selection: 600-3600s Technical instructions Controller PelTec II Lambda 69/96... -
Page 87: Power
- the external control is automatically deactivated. Once the option is deactivated, the boiler and its peripherals devices continue to operate. - the boiler shutdown option due to grate cleaning is automatically deactivated if the "Chimney sweeper" option is activated. Technical instructions Controller PelTec II Lambda 69/96... -
Page 88: History
Possible cause: Temperature of the pellet supply tube PELLET SUPPLY PIPE above 80˘C, disconnection in the electrical cables between the bimetallic sensor and the boiler, connection to the boiler, cold connection or defective bimetallic sensor. Technical instructions Controller PelTec II Lambda 69/96... - Page 89 Error occurs in all phases except "OFF” - The problem is ERROR with el. heater which is integrated into the lambda probe or with the communication system within the lambda (Cables, connectors, el. boards, software). Technical instructions Controller PelTec II Lambda 69/96...
- Page 90 (if configured) and the COMMUNICATION CM2K regulator (if installed). ERROR WITH CM2K- E28.3 Possible cause: Problem with the UTP Ethernet cable CIRCUIT C5 & C6 (connections between CM2K and the boiler controller). Technical instructions Controller PelTec II Lambda 69/96...
-
Page 91: Safety Thermostat
Troubleshooting: It is necessary to replace the battery of the 7" screen (CR 1632). Errors of additional equipment: CMNET (module for boiler cascade) COMMUNICATION Boiler status: Boiler immediately goes to phase OFF. ERROR WITH CMNET Technical instructions Controller PelTec II Lambda 69/96... - Page 92 Vacuum COMMUNICATION supply of pellets (Pellet suction system). ERROR WITH CMVAC Troubleshooting: Check the UTP Ethernet cable and its connections to the boiler controller and the suction system. Technical instructions Controller PelTec II Lambda 69/96...
- Page 93 What needs to be done: It is necessary to change the battery on the 7" controller screen (CR 1632), set the date and time on the controller. Technical instructions Controller PelTec II Lambda 69/96...
- Page 94 IGNITION TOO HIGH TEMPERATURE OF PELLET SUPPLY PIPE FLAME DISAPPEARED IN WORKING PHASE Re-ignition due to the disappearance of the flame during RETRY I19.1 the working phase (D2 - D6). IGNITION Technical instructions Controller PelTec II Lambda 69/96...
-
Page 95: Statistics
Software information (Boiler power, Software version, Wi-Fi ID, Active file, MB). (The active file can be a user (USR) or service (SRV) file that is selected in the File menu by user or authorized service technician). Service man information USR:test2" Technical instructions Controller PelTec II Lambda 69/96... -
Page 96: Service Man Information
9.0. FILE 9.1. OPEN SERVICE FILE After pressing ''Open service file'', it is possible to choose and open the service file (press the ''Open'' button). Press the ''Cancel'' button to return to the submenu. Technical instructions Controller PelTec II Lambda 69/96... -
Page 97: Save User File
(selected) is marked with a green tick. 1a - Example if service technician did not save the user file. 1b - Example of saving a user file under a different name. Technical instructions Controller PelTec II Lambda 69/96... -
Page 98: Open User File
(selected) is marked with a green tick. Example when multiple user files are saved and when was made a change in the active (selected) file. Active file (selected) is showed in menu 8.1. Software info. "USR:test1" Technical instructions Controller PelTec II Lambda 69/96... -
Page 99: Delete User File
If the screen is not pressed within the set time, the screensaver will be activated to protect the screen against screen burn. When the screen is touched, the screensaver will turn off. Factory: 600 s Possible selection: 10-3600 s Technical instructions Controller PelTec II Lambda 69/96... -
Page 100: Language Selection
Possible selection: OFF, Volume 1, Volume 2, Volume 3 10.5. SOUND TYPE This option is used to set sound type. It is possible to choose between 10 different types of sounds. Factory: Type 3 Possible selection: Type 1 - Type 10 Technical instructions Controller PelTec II Lambda 69/96... -
Page 101: Sound
Sound, Installation 10.6. SOUND This option is used to enable/disable the controller sound for display, warnings, errors. Factory: DISPLAY, WARNINGS, ERRORS Possible selection: DISPLAY, WARNINGS, ERRORS 11.0. INSTALLATION MENU FOR AUTHORIZED SERVICE TECHNICIANS ONLY. Technical instructions Controller PelTec II Lambda 69/96... -
Page 102: Malfunction / Improper Boiler Operation
1 - Boiler controller (control unit) box 2 - Main switch (0/1) (ON/OFF el. power supply of boiler) Detail A Detail B Safety thermostat Unscrew and take (110 - 6 °C) off the lid Press Technical instructions Controller PelTec II Lambda 69/96... - Page 103 294,3 1.462 2.309 255,6 1.481 2.328 222,7 1.501 2.348 190,7 1.520 2.367 170,8 1.539 2.386 150,5 1.558 2.405 1.578 2.425 1.597 2.444 1.161 2.463 1.635 2.482 1.655 2.502 1.674 2.521 1.693 2.540 1.712 Technical instructions Controller PelTec II Lambda 69/96...
-
Page 104: Operation Stages (Shown On The Screen)
Waits for flame to disappear, enter PF4. Final fan blowing, the boiler goes to "ON" and starts operating or is switched to "OFF" (depending on the request of the boiler). Grate cleaning stage. Technical instructions Controller PelTec II Lambda 69/96... -
Page 105: Power Modulation Principle
S7, C0, S0 (if there is a need entrant dans les phases S7, to operate the boiler)... C0, S0 (s'il est nécessaire de faire fonctionner la chaudière)... Operating phases: "R" mark is S7-1, S7-2, blinking C0, (S7-3). Technical instructions Controller PelTec II Lambda 69/96... - Page 106 "G" - shutting down the boiler due to the need to clean the grate; boiler going to phases S7-1, S7-2, C0, (S7-3), (S0) (if there is a need to operate the boiler)... Operating phases: "G" mark is S7-1, S7-2, blinking C0, (S7-3). Technical instructions Controller PelTec II Lambda 69/96...
- Page 107 Notes Technical instructions Controller PelTec II Lambda 69/96...
- Page 108 Company assumes no responsibility for possible inaccuracies in this book originated typographical errors or rewriting, all figures and diagrams are principal and it is necessary to adjust each actual situation on the field, in any case the company reserves the right to enter their own products such modifications as considered necessary. Centrometal d.o.o. Glavna 12, 40306 Macinec, Croatia www.centrometal.hr central tel: +385 40 372 600, fax: +385 40 372 611 e-mail: servis@centrometal.hr...
Need help?
Do you have a question about the PelTec II Lambda 69/96 and is the answer not in the manual?
Questions and answers