Advertisement
USA office: Fontana
AUS office: Truganina
DEU office: FDS GmbH, Neuer Höltigbaum 36, 22143 Hamburg, Deutschland
GBR office: FDS Corporation Limited,Unit 4, Blackacre Road, Great Blakenham,Ipswich, Ip6 0FL,United Kingdom
POL office: Gdańsk
ITA office: Milano
FRA office: Saint Vigor d'Ymonville
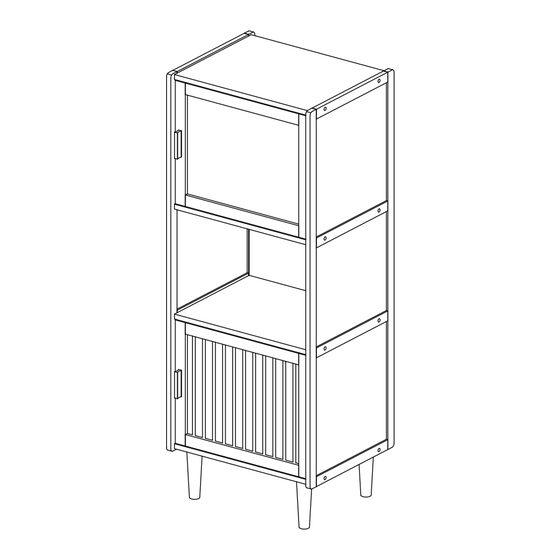
Display Cabinet
Vitrinenschrank
Armoire d'Exposition
Armario de Exposición
Armadio da Esposizione
Gablotka
Vitrinekast
JV11770NA
THIS INSTRUCTION BOOKLET CONTAINS IMPORTANT SAFETY INFORMATION.
PLEASE READ AND KEEP FOR FUTURE REFERENCE.
Advertisement
Table of Contents

Related Manuals for Costway JV11770NA


Summary of Contents for Costway JV11770NA
- Page 1 Vitrinenschrank Armoire d’Exposition Armario de Exposición Armadio da Esposizione Gablotka Vitrinekast JV11770NA THIS INSTRUCTION BOOKLET CONTAINS IMPORTANT SAFETY INFORMATION. POL office: Gdańsk USA office: Fontana AUS office: Truganina ITA office: Milano DEU office: FDS GmbH, Neuer Höltigbaum 36, 22143 Hamburg, Deutschland FRA office: Saint Vigor d'Ymonville PLEASE READ AND KEEP FOR FUTURE REFERENCE.
-
Page 2: Before You Start
Before You Start Avant de Commencer Please read all instructions carefully. Veuillez lire attentivement toutes les instructions. Retain instructions for future reference. Conservez les instructions pour vous y référer ultérieurement. Separate and count all parts and hardware. Vérifiez toutes les pièces et les accessoires. Read through each step carefully and follow the proper order. -
Page 3: Prima Di Iniziare
Prima di Iniziare Voordat U Begint Si prega di leggere attentamente tutte le istruzioni. Lees alle instructies zorgvuldig door. Conservare le istruzioni per riferimento futuro. Bewaar de instructies voor toekomstig gebruik. Separare e contare tutte le parti e gli accessori. Scheid en tel alle onderdelen en hardware. - Page 4 G X1 Remove the protective film before installation. /Entfernen Sie die Schutzfolie vor dem Einbau. /Retirez le film protecteur avant l’installation. /Retire la película protectora antes del montaje. /Rimuovere la pellicola protettiva prima dell'installazione. /Przed montażem usuń folię ochronną. /Verwijder de beschermfolie voor de installatie. Remove the protective film before installation.
- Page 5 E X1 K X4 1 X4 The groove should face up. /Die Rille sollte nach oben zeigen. /La rainure doit être tournée vers le haut. /La ranura debe quedar hacia arriba. /La scanalatura deve essere rivolta verso l'alto. /Szczelina powinna być skierowana do góry.
- Page 6 1 X2 EN:Use screws #1 to secure the side support frame (A) to the bottom panel (E). A X1 Make sure the groove on the side support frame aligns with the groove on the bottom panel. Groove on the side support frame /Nut am seitlichen Stützrahmen DE:Befestigen Sie den seitlichen Stützrahmen (A) mit den /Rainure sur le cadre de support latéral...
- Page 7 B X1 D X1 P X2 3 X4 C X1 1 X6 Door Catch /Türverriegelung /Loquet de porte /Cierre de puerta /Chiusura della Porta /Zatrzask drzwi /Deurgrendel EN:Use screws #3 to secure the door catch (P) to shelves (B) and EN:Use screws #1 to secure the shelves (B), (C), and (D) to the (D).
- Page 8 F X2 G X1 H X1 J X2 I X1 2 X4 3 X14 O X2 Q X4 M X2 N X12 EN:Install the door (J) as shown in the picture. Note: Insert the shorter end of the metal pin into the door. Install the other door (J) in the same way, just replacing part (I) with part (H).
- Page 9 A X1 1 X8 EN:Insert the two assembled doors into the holes on the shelves. Note: The round metal piece (O) on the door should be aligned with the door catch. DE:Setzen Sie die beiden zusammengebauten Türen in die Löcher der Einlegeböden ein.
- Page 10 EN:Use only the adhesive pad (T) and metal plate (U). Unscrew the nut from the washer (T), attach the washer to both the wall and the Anti-tip Kit /Anti-Kipp-Kit /Kit Anti-Basculement /Kit Antivuelco /Kit Antiribaltamento /Zestaw zapobiegający przewróceniu /Anti-tip Kit cabinet, then secure the metal plate (U) with the nut.
- Page 11 DE:Verwenden Sie Dehnschraube, Metallplatte, lange Schraube und Klebepad. Bohren Sie ein Loch in die Wand, setzen Sie die Dehnschraube in das Loch ein und befestigen Sie dann die Metallplatte mit der langen Schraube an der Dehnschraube. Bringen Sie das Klebepad auf dem Schrank an. FR:Utiliser une vis à...
- Page 12 Return / Damage Claim Instructions Instructions De Retour / Réclamation De Dommages DO NOT discard the box / original packaging. NE PAS jeter la boîte/l'emballage d'origine. Dans le cas où un retour est requis, l'article doit être retourné dans sa boîte In case a return is required, the item must be returned in original box.
- Page 13 Istruzioni Per La Restituzione / Reclamo Per Danni Instructies voor Retournering/Schadeclaim NON scartare la scatola / confezione originale. GOOI DE doos/het originele verpakkingsmateriaal NIET weg. Nel caso in cui sia richiesto un reso, l'articolo deve essere restituito nella scatola In het geval van een retournering moet het artikel in de originele doos originale.
Need help?
Do you have a question about the JV11770NA and is the answer not in the manual?
Questions and answers