
Subscribe to Our Youtube Channel
Related Manuals for GEM eSyLite


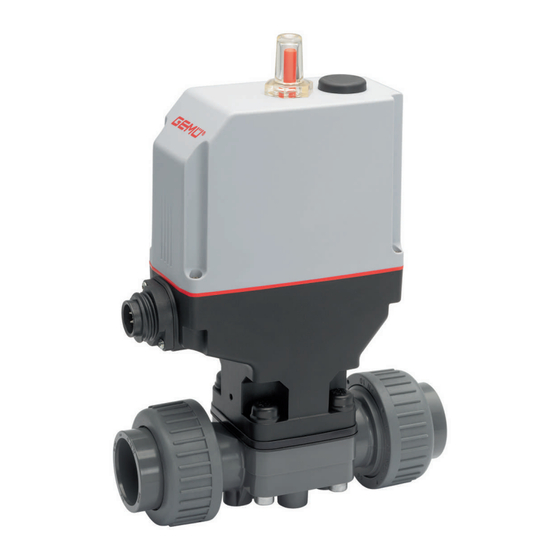
Summary of Contents for GEM eSyLite
- Page 1 GEMÜ eSyLite Montageanleitung Ersatzteile Assembly instructions Spare parts Weitere Informationen Webcode: GW-eSyLite...
- Page 2 Alle Rechte, wie Urheberrechte oder gewerbliche Schutzrechte, werden ausdrücklich vorbehalten. All rights including copyrights or industrial property rights are expressly reserved. Dokument zum künftigen Nachschlagen aufbewahren. Keep the document for future reference. © GEMÜ Gebr. Müller Apparatebau GmbH & Co. KG 07.10.2024 GEMÜ eSyLite 2 / 16...
- Page 3 Inhaltsverzeichnis 1 Allgemeines ............Allgemeine Informationen ......Hinweise ............Verwendete Symbole ........Begriffsbestimmungen ......... Warnhinweise ..........2 Sicherheitshinweise ..........3 Austausch Notstrommodul ........4 Austausch Zahnrad ..........www.gemu-group.com 3 / 16 GEMÜ eSyLite...
- Page 4 1.1 Allgemeine Informationen ▶ Bei Nichtbeachtung drohen schwerste Diese Montageanleitung ist für das Notstrommodul und das Verletzungen oder Tod. Zahnrad eines GEMÜ eSyLite Antriebs gedacht. Die Montage- anleitung wird hier beispielhaft an einem R629 gezeigt. WARNUNG 1.2 Hinweise Möglicherweise gefährliche Situation! - Beschreibungen und Instruktionen beziehen sich auf Stan- dardausführungen.
- Page 5 Bei Betrieb: 9. Dokument am Einsatzort verfügbar halten. 10. Sicherheitshinweise beachten. 11. Das Produkt gemäß diesem Dokument bedienen. 12. Das Produkt entsprechend der Leistungsdaten betreiben. 13. Das Produkt ordnungsgemäß instand halten. 14. Wartungsarbeiten bzw. Reparaturen, die nicht in dem Do- kument beschrieben sind, nicht ohne vorherige Abstim- mung mit dem Hersteller durchführen.
- Page 6 4. Stecker des Notstrommoduls ausstecken. Abb. 2: Ventil komplett mit Antrieb 1 (Oberteil 3 und Unterteil 4) 5. Neues Notstrommodul 6 in umgekehrter Reihenfolge wie- der anklemmen und montieren 1. Schrauben 2 (Torx 10) aus Gehäuseunterteil 4 lösen. GEMÜ eSyLite 6 / 16 www.gemu-group.com...
- Page 7 3. Falls ein Notstrommodul verbaut ist, muss dieses demon- tiert werden (siehe 'Austausch Notstrommodul', Seite 5). 4. Schrauben 8 (Torx Plus 20, oder Torx 20) von Befesti- gungsplatte 7 demontieren und entfernen. 5. Befestigungsplatte komplett 7 durch Wackeln aus Unter- teil 4 demontieren. www.gemu-group.com 7 / 16 GEMÜ eSyLite...
- Page 8 1 General information ..........General information ........Information ............ Symbols used ..........Definition of terms ........Warning notes ..........2 Safety information ..........3 Replacement of emergency power supply module 4 Replacement of toothed gear ....... GEMÜ eSyLite 8 / 16 www.gemu-group.com...
- Page 9 ▶ Non-observance can cause death or These assembly instructions are intended for the emergency severe injury. power supply module and the toothed gear of a GEMÜ eSyLite actuator. The assembly instructions are shown here using an R629 as an example.
- Page 10 14. Do not carry out any maintenance work and repairs not de- scribed in this document without consulting the manufac- turer first. In cases of uncertainty: 15. Consult the nearest GEMÜ sales office. 1. Detach screws 2 (Torx 10) from housing base 4. GEMÜ eSyLite 10 / 16...
- Page 11 Fig. 2: Valve assembly with actuator 1 (cover 3 and base 4) 5. Reconnect and reassemble new emergency power supply module 6 in reverse order 1. Detach screws 2 (Torx 10) from housing base 4. www.gemu-group.com 11 / 16 GEMÜ eSyLite...
- Page 12 (see “Replacement of emergency power supply module“, page 10). 4. Detach and remove screws 8 (Torx Plus 20, or Torx 20) from mounting plate 7. 5. Remove mounting plate assembly 7 from base 4 by wig- gling it. GEMÜ eSyLite 12 / 16 www.gemu-group.com...
- Page 13 4 Replacement of toothed gear www.gemu-group.com 13 / 16 GEMÜ eSyLite...
- Page 14 GEMÜ eSyLite 14 / 16 www.gemu-group.com...
- Page 15 15 / 16 GEMÜ eSyLite...
- Page 16 GEMÜ Gebr. Müller Apparatebau GmbH & Co. KG Fritz-Müller-Straße 6-8, 74653 Ingelfingen-Criesbach, Germany Änderungen vorbehalten Phone +49 (0) 7940 1230 · info@gemue.de Subject to alteration www.gemu-group.com 10.2024 | 88929397...
Need help?
Do you have a question about the eSyLite and is the answer not in the manual?
Questions and answers