
Related Manuals for Bodyworx JTX3.25


Summary of Contents for Bodyworx JTX3.25
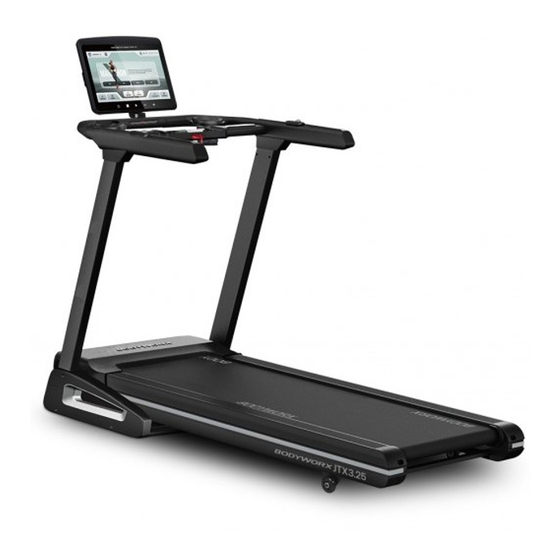
- Page 1 JTX3.25 TREADMILL Model No: JTX3.25 WAX BELT (NO LUBRICATION REQUIRED) Retain this owner’s manual for future reference. Read and follow all instructions in this owner’s manual. Specs subject to change without notice.
- Page 2 CONTENT PAGE WARRANTY REGISTRATION FORM IMPORTANT SAFETY INSTRUCTIONS SAFETY GUIDELINES PRODUCT DESCRIPTION TOOL KIT PARTS LIST 8-10 EXPLODED DIAGRAM ASSEMBLY INSTRUCTIONS 12-15 WATER BOTTLE ASSEMBLY INSTRUCTIONS FOLDING INSTRUCTIONS UNFOLDING INSTRUCTIONS CONSOLE ADJUSTMENTS INSTRUCTIONS CONSOLE INSTRUCTIONS 20-36 MAINTENANCE BELT ADJUSTMENT EXERCISE INSTRUCTIONS 39-40...
- Page 3 Warranty Registration Form Congratulations on purchasing your product, we at GPI believe that our product range is of the highest quality and represents great value for money. We back our product range up with our industry leading warranty. Please see below for the step by step instructions on how to register your product warranty online. Step 1 Visit our Website Go to the GPI Sports website:...
- Page 4 IMPORTANT SAFETY INSTRUCTIONS Before beginning any fitness program, you should obtain a complete physical examination from your physician. This exercise equipment is designed and built for optimum safety for home use. However, certain precautions always apply whenever you operate any exercise equipment. Be sure to read the entire manual before assembly and operation of this machine.
- Page 5 SAFETY GUIDELINES Successful fitness training programs have one prominent feature in common...safety. Fitness training has some inherent dangers, as do all physical activities. The chance of injury can be greatly reduced or completely removed by using correct techniques, proper breathing, maintaining equipment in good working condition, and by wearing the appropriate clothing.
- Page 6 PRODUCT DESCRIPTION DIMENSION Power Circuit: 220V~AC Use in temperature: 0-40℃ Speed: 0.8-22KM/H Incline: 15 sections of motor incline Max user weight: 145kg Distance range: 0.00-99.9km Calories: 0-9999 Kcal Time range: 00:00-99:59 (min) Heart rate range: 50-200 bpm Running face: 510*1500mm Set up size: 1820 x 780 x 1450mm Folding size: 1955 x 910 x 330mm PRODUCT DESCRIPTION...
- Page 7 TOOL KIT TOOL KITS Picture Part Description D167 Socket Head Cap Screw M10x50mm 2pcs Button Head Cap Screw M8x15mm 4pcs Flat Washer M8 4pcs Phillips Rounded Washer Head 6pcs Self-Drilling Screw ST4.2x19mm D172 Allen Wrench 8mm Allen Wrench 5mm Allen Wrench 6mm Open End Wrench...
- Page 8 PART LIST PARTS LIST A. Welding Parts Description Description Main Frame Console Support Bracket Base Frame Long Solid Side Rail Fixing Plate Left Upright Short Solid Side Rail Fixing Plate Right Upright Handlebar Connector Left Handlebar Incline Axle Screw Right Handlebar Countersunk Washer Incline Bracket Upper Washer...
- Page 9 Bottom Cover of Button B105 Arc Shaped Foot Pad B133 Platform B116 Incline Bearing (10) B138 Buttons (PROG+START) B117 Water Bottle Shelf B139 Buttons (STOP+MODE) B118 Rubber Cushion B142 Transport Wheel(45mm) C. Electric and Drive Parts Description Description Running Belt Magnetic Ring Rear Roller Inductor...
- Page 10 Button Head Cap Screw, D164 Socket Head Cap Screw, M8X40mm M4X12mm Button Head Cap Screw, Socket Head Cap Screw, D165 M8X45mm M6X35mm Socket Head Cap Screw, Nylon Nut M10 D167 M10X50mm Nylon Nut M6 D172 Allen Wrench 8mm Button Head Cap Screw, Nylon Nut M8 D175 M8X35mm...
- Page 11 EXPLODED DIAGRAM EXPLODED DRAWING...
- Page 12 ASSEMBLY INSTRUCTIONS ASSEMBLY INSTRUCTION When you open the carton, you will find below spare parts: : 1 Main Frame: 1SET B11L Left Side Cover: 1PC B11R Right Side Cover: 1PC C13 Safety Key: 1 PC C15 Power Cable: 1 PC STEP 1 Move out the treadmill unit from the packaging box, and place it on the flat ground or floor.
- Page 13 STEP 2 Lift up Left/ Right Uprights(A3L/A3R) by holding Handlebars (A4) as illustrated. Tighten the bottom of Left/ Right Uprights (A3L/A3R) by using: 2pcs of Button Head Cap Screw M10x50mm (D167). Then continue to tighten 2pcs of pre-assembled Button Head Cap Screw M10x50mm (D167) right above the previous assembled screws.
- Page 14 STEP 4 Attach the Left/ Right Side Covers (B11L/ B11R) to the Base (A2) and Left/Right Uprights (A3L/R) by using: 6pcs of Phillips Rounded Washer Head Self-Drilling Screw ST4.2X19mm (D48). B11R B11L STEP 5 Rotate Console (1) up as illustrated position. Then plug in the Power Cable (C15) and Safety Key (C13).
- Page 15 STEP 6 After installation, press start button and adjust speed to 3km/h or below. Then check the running belt to see if it runs smoothly. The tightness level of running belt is decided based on the situation of slipping and deviation (Please refer to “MAINTENANCE INSTRUCTIONS “). After checking is completed, move treadmill to appropriate location for exercising use.
- Page 16 WATER BOTTLE ASSEMBLY INSTRUCTIONS Assembly of the Water Bottle Holder: Insert the Water Bottle Holder (B117) into the Water Bottle Mounting Sleeve (B127) to install it. Note: When inserting the Water Bottle Holder (B117), make sure to insert both sides horizontally into the Water Bottle Mounting Sleeve (B127) at the same time to avoid damaging the Water Bottle Holder (B117).
- Page 17 FOLDING INSTRUCTIONS FOLDING INSTRCUTIONS Before folding the treadmill, please make sure you turn off the power and the incline level resumes to 0. Lift up the machine with force and pull up until you hear a “CLICK” sound from safety casing locking the cylinder.
- Page 18 UNFOLDING INSTRUCTIONS UNFOLDING INSTRCUTIONS Push the bottom of the running board slightly, and kick the safety spacer with your foot at the middle of the cylinder. Push down the bottom of the running board. When the treadmill starts descending, move your foot away from the cylinder.
- Page 19 CONSOLE ADJUSTMENT INSTRUCTIONS CONSOLE ADJUSTMENT INSTRCUTIONS The console can be rotated clockwise to 180° and counterclockwise to 90° by holding 2 sides of the console. The console can be rotated to proper reading angle or flat by holding 2 sides of the console.
- Page 20 CONSOLE INSTRUCTIONS JTX3.25 CONSOLE COMPUTER INSTRUCTIONS 1.1 WINDOW DISPLAY 1.2 BUTTON PLATFORM FUNCTION 1.2.1 START When you press the START button, the program will start operating. If you press START at the WARM UP mode, it will skip the WARM UP and enter the WORK OUT directly.
- Page 21 1.2.2 PROGRAM If user presses PROGRAM button in IDLE MODE, you will enter the interface of GOAL mode (GOAL/ HILL/ RANDOM INCLINE). 1.2.3 MODE - Only valid when in the workout page. - User can switch between INCLINE PROFILE and SPEED PROFILE by pressing MODE button. 1.2.4 QUICK SPEED Press the speed quick button to quickly adjust speed to 5km/h, 10km/h, or 15km/h when the treadmill is running.
- Page 22 wheel forward; decrease 0.1 km/h by rotating the wheel back. While the WHEEL QUICK BUTTON displays GREEN light, increase 1 km/h by rotating the wheel forward; decrease 1 km/h by rotating the wheel back. 1.3 CONSOLE DISPLAY BUTTON FUNCTION 1.3.1 POWER If user presses POWER button at IDLE MODE, the console display will be turned off;...
- Page 23 1.4.2 QUICK SPEED Press +/- button to increase or decrease the incline by 0.1 km/h. Press expand option list button and quickly adjust the speed to 1km/h, 3km/h, 5km/h, 7km/h, 9km/h, 11km/h, 13km/h or 15km/h when the treadmill is running. 1.4.3 MEDIA Press the button MEDIA in IDLE MODE and there are 2 options: Application and Mirror.
- Page 24 1.4.4 WEARABLE BLUETOOTH DEVICE The default status is off. Please enter PAUSE mode first, and then press the wearable Bluetooth device button. Turn on the Bluetooth function and connect to your device. If it connects successfully, the icon changes to; if not, the icon shows 1.4.5 PROFILE Press PROFILE button or press incline and speed to change the profile display.
- Page 25 Without any operation within 30 minutes Display Will enter REAL Sleep Mode WILL NOT enter Sleep Mode (Awaken the console by pressing any button) 1.5.3 WARM UP MODE Warm up mode is 3 minutes. If you don’t need the warm up, press SKIP to over it. There are 7 programs are with warm up mode: Hill, Random Incline, Speed, Interval, Gerkin and HRC.
- Page 26 summary mode. During PAUSE MODE, if user doesn’t operate over 3 minutes, the console will end the workout summary mode and go bank to IDLE mode automatically For ARMY program, it will show SUCCESS or FAILED in the workout summary mode. For MARATHON program, it will show the level result based on the marathon criterion in workout summary mode.
- Page 27 Unit: kcal Display Data Range: 0~9999 Pull-down the button and user could switch to different data display: METs (Metabolic Equivalent): no unit CALORIES CALORIES CALORIES / HR ELEVATION GAIN: unit m/ft When user sets CALORIES as GOAL, the window shows remaining calories;...
- Page 28 1.7 BASIC SETTING 1.7.1 CONNECTING SETTING 1.7.1.1 WiFi Turn on the WiFi function and search for the WiFi name. Please go back to the HOME page after the connection is made, then the console will start connecting to WiFi. 1.7.1.2 Ethernet Please turn on the Ethernet function according to user’s need.
- Page 29 1.7.2.5 Volume Adjust the volume by using the bar. 1.7.2.6 Child Lock In case kids inadvertently activate the machine, the default setting of child lock is on. If no operation at IDLE mode for 10 minutes, the console shows “CONSOLE LOCKED”. Please press HOME button longer to unlock the console.
- Page 30 1.8.2.1 GOAL User can set their own goal for time. distance and calories. The default time is 20 minutes if user doesn’t set the goal for time before starting. When user achieves any of the goal, the program ends and enter to summary mode. 1.8.2.2 HILL User can set up the ideal time, max speed and max incline.
- Page 31 1.8.3.2 HIIT User can set up the ideal select interval ratio, work speed, rest speed and repetition. The default setting: Select Interval Ratio: 10:30 (work:rest) Work Speed: 6 mph Rest Speed: 2 mph Repetition: 4 times When user achieve goal time, the program ends and enter to cool down mode. 1.8.3.3 CUSTOM User can set up the ideal work time, work speed, rest time, rest speed and repetition.
- Page 32 Choose one video, and set up the ideal time, distance and calories based on user’s need. The default setting if user doesn’t set the goal for time before starting: Time: 20 min Distance: 5 M Calories: 200 Kcal Cannot use media, mirror and HDMI function when under vision run program. When user achieves the goal time, the program ends and enters to summary mode.
- Page 33 finish the program. If no heart rate is detected over 60 seconds, the program will end and enter summary mode. 1.13 FITNESS TEST There are 8 programs in FITNESS TEST: Air force, Army, Coast Guard, PEB, Marine Corps, Navy and Gerkin. Only Gerkin has warm up and cool down mode.
- Page 34 1.13.5 PEB The total distance is 2.4 km (1.5 mile). 1.13.6 MARINE CORPS The total distance is 4.8 km (3.0 mile). 1.13.7 NAVY The total distance is 2.4 km (1.5 mile). 1.13.8 GERKIN Only Gerkin has warm up and cool down mode. The total distance is 4.8 km (3.0 mile).
- Page 35 1.13.8.3 COOL DOWN MODE The default time is 3 minutes. The speed is 4.8 km/h and incline is 0 level. If no heart rate is detected over 1 minute, the cool down will end and go to summary mode. After cool down mode finished, the program ends. 1.14 ERROR MESSAGE Error Code Problems...
- Page 36 Data Save Error Turn off the machine for over 2 minutes and then restart. If the console is still inactive, change a new controller. Overheat Please wait until the temperature is back to normal Motor Reverse Please check if UVW wire is connected well. Motor Parameter Error Please contact your dealer about this issue.
- Page 37 MAINTENANCE MAINTENANCE WARNING: Please make sure you pull out the treadmill's power plug before cleaning or maintaining the product. CLEANING General cleaning or the unit will greatly prolong the treadmill's life. Keep treadmill clean by dusting regularly. Be sure to clean the exposed part of the deck on either side of the walking belt and also the side rails.
- Page 38 BELT ADJUSTMENT BELT ADJUSTMENT Place treadmill on a level surface. Make treadmill run at approximately 6-8 km/h, observe the running belt deviate condition. If the belt has drifted to the right, unplug the safety lock and power switch, and turn the right adjusting bolt 1/4 turn clockwise, then insert the power switch and safety lock, make the treadmill running, observe the running belt deviation condition.
- Page 39 EXERCISE INSTRUCTIONS Using your exerciser will provide you with several benefits, it will improve your physical fitness, tone muscle and in conjunction with a calorie controlled diet help you lose weight. 1. THE WARM UP PHASE This stage helps get the blood flowing around the body and the muscles working properly. It will also reduce the risk of cramp and muscle injury.
- Page 40 EXERCISE INSTRUCTIONS 3. THE COOL DOWN PHASE This stage is to let your Cardio Vascular System and muscles wind down. This is a repeat of the warm up exercise e.g. reduce your tempo, continue for approximately 5 minutes. The stretching exercises should now be repeated, again remembering not to force or jerk your muscles into the stretch.
- Page 41 JTX3.25 TREADMILL Model No: JTX3.25 www.gpisports.com.au DISTRIBUTED EXCLUSIVELY BY 275 Wellington Road Mulgrave, VIC, 3170 Australia...
Need help?
Do you have a question about the JTX3.25 and is the answer not in the manual?
Questions and answers
Treadmill seems to not flow evenly, seem to stick regularly