Advertisement
Quick Links
APPLICATION
Chevrolet Silverado1500 / GMC Sierra 1500 - Double Cab
Chevrolet Silverado1500 / GMC Sierra 1500- Crew Cab
Chevrolet Silverado HD / GMC Sierra HD - Double Cab
Chevrolet Silverado HD / GMC Sierra HD- Crew Cab
* Modification required to running board assembly. See Item 1 on page 3.
REALTRUCK TECH SUPPORT 1-888-983-2204 (Press 2) Monday - Friday, 8:00 AM - 5:00 PM EST
Designed and manufactured by RealTruck AMP Research
Patent Protected. Please see our product site for applicable patents. www.realtruck.com/b/amp-research/
© RealTruck Group, Inc., 2024 • Three-year limited warranty. • Professional installation is recommended.
www.realtruck.com
I N S T A L L A T I O N G U I D E
• Made in Mexico
®
1/12
*
2014-18
2014-18
*
2015-19
(excludes diesel engine)
2015-19
(excludes diesel engine)
q Safety goggles
q Measuring tape
q Flat blade screwdriver
q Power Drill
q 9/32" drill bit
q 13 mm socket
q 10 mm socket
q 7 mm socket
q Ratchet wrench and extension
q 13mm end wrench
q Wire crimpers
q Wire stripper / cutter
q
q
q
q
q
q
5-Year Limited Warranty
AMP Part #
75154-01A-B
75154-01A-B
75154-01A-B
75154-01A-B
INSTALLATION TIME
3-5 Hours
Professional installation recommended
SKILL LEVEL
4
1 2 3
4= Experienced
TOOLS REQUIRED
3 /16" hex key wrench (allen wrench)
5 mm hex key wrench (allen wrench)
4mm hex key wrench ( allen wrench )
Electrical tape
Weather proof caulking (silicone sealer)
Silicone spray
WARRANTY
IM75154 rev 06.12.24
Advertisement

Subscribe to Our Youtube Channel
Related Manuals for REALTRUCK AMP Research PowerStep


Summary of Contents for REALTRUCK AMP Research PowerStep
- Page 1 Weather proof caulking (silicone sealer) Silicone spray WARRANTY 5-Year Limited Warranty REALTRUCK TECH SUPPORT 1-888-983-2204 (Press 2) Monday - Friday, 8:00 AM - 5:00 PM EST Designed and manufactured by RealTruck AMP Research • Made in Mexico ® Patent Protected. Please see our product site for applicable patents. www.realtruck.com/b/amp-research/ ©...
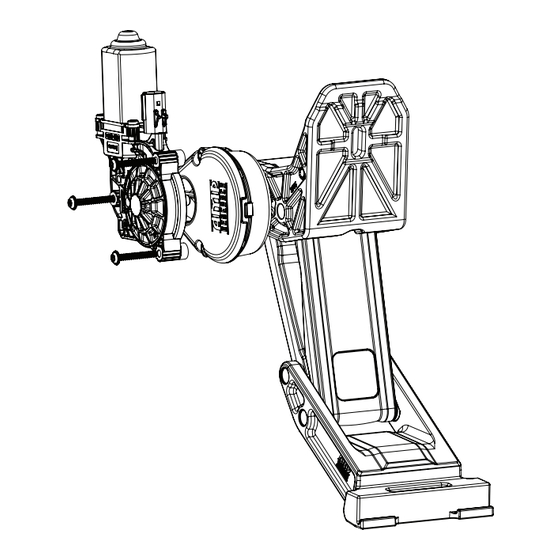
- Page 2 3. After seating into place, fasten the motor with the three motor mount screws with 4mm Hex Head. Tighten screws to 36 in-lbs (4N-m). Do not over torque. www.realtruck.com www.amp-research.com 2/12 2/12...
- Page 3 - End caps (1 left & 1 right) - T-Nut Insert (x2) - S-style clips (x2) Running Board assembly Idler Linkage assembly Motor Linkage assembly Controller STA Wire harness U-nut Brake Cable Bracket Connecting Red Wire Motor kit www.realtruck.com 3/12 IM75154 rev 06.12.24...
- Page 4 – C H E V R O L E T / G M C Hex Bolt with Conical Nut with Conical Hex Bolt with Conical U-nut Washer Washer Washer Cable tie (7”) Tubing (Installation Tool) Socket Cap Screw Posi-Tap™ Cable tie (11”) Grommet LED Lamp Butt Connector www.realtruck.com 4/12 IM75154 rev 06.12.24...
- Page 5 Remove power fuse. Attach power lead (RED wire) to positive pole on the battery. Attach ground lead to negative battery pole. CAUTION: Do not ground wrench when engaged with nut. www.realtruck.com 5/12 5/12 IM75154 rev 06.12.24...
- Page 6 FRONT DOOR WIRING: Pop cover plate off. Work Remove Front door Cover plates behind door handle your way across the bottom of cover. Once bottom is and in bottom of grab handle to access mounting popped loose pull down and out. www.realtruck.com 6/12 IM75154 rev 06.12.24...
- Page 7 Once panel pins are out lift up on panel. Lift panel up Remove door latch cable from door panel. and off of door. Remove plug from door panel. Remove accordion seal at door jamb and use supplied red wire and route wire into kickpanel. Rotate www.realtruck.com 7/12 IM75154 rev 06.12.24...
- Page 8 (Left on Driver, Right on Passenger Side) Insert Tighten Insert and Strip 3/8” Tighten Remove seal on door panel by removing metal clips Attach clips to grooves in door. that attach it to panel with a flat screwdriver. www.realtruck.com 8/12 IM75154 rev 06.12.24...
- Page 9 Slide boot over ring and reattach to vehicle. REAR DOOR WIRING : Steps 28-38 are for rear doors Pull up rear sill plate cover as shown. Pull back b pillar interior panel to gain access. Pull back accordion seal. www.realtruck.com 9/12 9/12 IM75154 rev 06.12.24...
- Page 10 Pry all panel fasteners loose. Start at door hinge side Once panel pins are out lift up on panel. Lift panel up and work your way around the bottom and towards and off of door. latch side of door. www.realtruck.com 10/12 IM75154 rev 06.12.24...
- Page 11 Close and wrap conduit step down midway across the surface. Affix lamp with electrical tape. Secure all loose wires with just outside of step down. cable ties. Pull lamp wires upward to avoid any wire snagging. www.realtruck.com 11/12 IM75154 rev 06.12.24...
- Page 12 Lamps will stay on until restowing of both Power Steps or until 5 minutes has expired with the doors open. When the lights timeout after 5 minutes, they can be reillumintated by closing and opening any door of vehicle. 30 42 www.realtruck.com 12/12 IM75154 rev 06.12.24...
- Page 13 • Faster and easier access to customer service and tech support in the unlikely event you need warranty or product support. • Registration helps us keep you up to date on product information and offers. To view other RealTruck products that may be offered for your vehicle. Please visit: www.realtruck.com Rev 05.30.24...
- Page 14 Caution! Keep hands away when the running board is in motion. 5-YEAR LIMITED WARRANTY RealTruck / AMP RESEARCH warrants this product to be free from defects in material and workmanship for FIVE (5) YEARS FROM DATE OF PURCHASE, provided there has been normal use and proper maintenance. This warranty applies to the original purchaser only.
Need help?
Do you have a question about the AMP Research PowerStep and is the answer not in the manual?
Questions and answers