
Related Manuals for Belleze 014-HG-31080


Summary of Contents for Belleze 014-HG-31080
- Page 1 Camden Bed with Drawer FOLLOW US: CONTACT INFO: ITEM NO. 014-HG-31080 The instruction booklet contains IMPORTANT support@belleze.com @bellezefurniture safety information. Please read it in full and 1-800-682-6376 keep it for future reference. www.belleze.com...
- Page 2 Scan this QR Code to view our online tutorial Estimated time for assembly: 90 mins Weight limitations are as follows: Maximum Load 30 lb Maximum Load 700 lb Maximum Load 30 lb...
- Page 3 Assemble the furniture on an empty carton, carpet, or rug to prevent scratches or damage. For safety, please keep pets and children away from the assembly area. Ensure the product is fully assembled before use. If you are missing any hardware or products, do not use it until you have restored the missing parts.
- Page 4 PACKAGE CONTENTS 21x10 24x8...
- Page 5 PACKAGE CONTENTS CODE DESCRIPTION Socket Panel Headboard Top Panel Top Back Panel Crossrail Right Headboard Frame Left Headboard Frame Center Support Frame Side Rail Support Post Center Support Beam Center Support Beam Support Post Support Rail Support Rail Footboard Slat Drawer Front Panel Drawer Tray Drawer Roller...
- Page 6 PACKAGE CONTENTS 28x+2x 16x+1x FLASH7 STROBE7 FLASH16 STROBE16 RF Remote Controller Install all hardware perpendicular to the opening.
- Page 7 Attach the power hub to the socket panel (1). v.08292023...
- Page 8 Install wire clamp , this is not a lixed position , the specifie posigion can be adjusted at will.
- Page 9 Assemble the top panel (4) to the top back panel (7). Assemble the top back panel (7) to the socket panel (1).
- Page 10 Assemble the socket panel (1) to the headboard(2). Assemble the headboard assembly and the crossbar (10) to the right headboard frame (11). Be aware of the orientatioin of the rail. v.08292023...
- Page 11 Assemble the headboard assembly and the crossbar (10) to the left headboard frame (12). Assemble the center support post (25) between two center support frames (13) and then the side rail support posts (14) on the sides.
- Page 12 Assemble center support beams (15, 16) to support posts (17). Assemble the center support beam (15, 16) on the center support post (25). v.08292023...
- Page 13 Assemble the support rails (18, 19) to the side rail support posts (14).
- Page 14 Assemble the support rails (18, 19) to the headboard assembly. Secure the center support beam (15) to the headboard assembly. v.08292023...
- Page 15 Assemble support rails (18, 19) to the footboard (20). Secure the center support beam (16) to the foorboard (20).
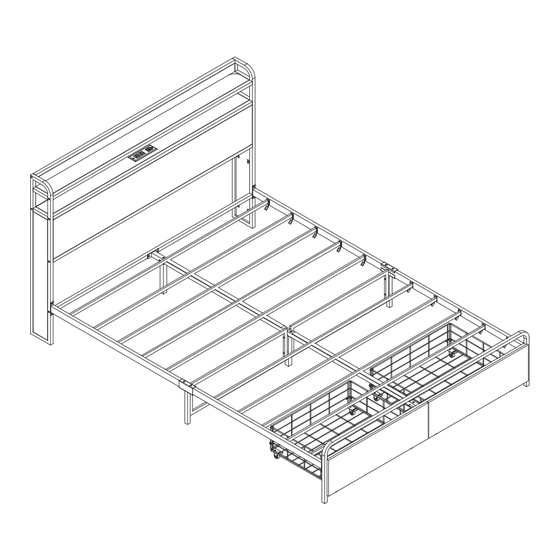
- Page 16 Assemble slats (21) across the bed frame. v.08292023...
- Page 17 Unfold the drawer tray (23). Assemble 2 drawers...
- Page 18 Assemble drawer rollers (24) underneath the drawer tray (23). Turn the drawers over to assemble the rollers. Assemble the drawer front panel (22) to the drawer tray. v.08292023...
- Page 19 Attach hanging bolts to the drawer front panel (23). Note:Please don't full tighten two N screws attop positions on the board.
- Page 20 Slide the drawers under the footboard and hang the drawer to the footboard rails.When you pull out the drawer, lift it up a bit. Connect LED lights to power outlets. FLASH7 STROBE7 FLASH16 STROBE16 RF Remote Controller YOU’RE FINISHED! v.08292023...
- Page 21 USER INSTRUCTION (REMOTE CONTROL) Decrease Increase Flash 7 Strobe 7 Static Color Shortcut Flash 16 Strobe 16 Press the ON button to turn on the light. Press the OFF button to turn off the light. Static Color Shortcut Each button is assign to a color, press the button to select your desire color. Increase Press the increase button to increase brightness in static color mode.
- Page 22 USER INSTRUCTION (LED LIGHT REMOTE CONTROL) Technical Parameters: Working temperature: −20°C - 60°C / −4°F - 140°F Power Supply Voltage: DC5 - 24v Output: 3 Loops Remote Control Distance: 8m - 15m ⚠ CAUTION / WARNING Dispose old / used battery at a suitable recycling point or according to local regulatioins. DO NOT ingest battery.
- Page 23 FURNITURE CARE AND MAINTENANCE Thank you for your purchase. We want your item to last as long as possible. To ensure the product gives you years of longevity, please follow the recommendations in this care and maintenance guide. MAINTENANCE • Tighten all bolts and screws again within the first 2 weeks of assembly.
- Page 24 v.08292023...
- Page 25 © All copyright of this document belongs to BELLEZE . This document may not be printed, translated, reproduced, or distributed in whole or in part without written permission from BELLEZE. v.08292023...
- Page 26 WARRANTY BELLEZE products come with a 1-year warranty from the date of delivery. Register your product on our website to enjoy our limited lifetime warranty! AFTER-SALE SERVICE Encounter any difficulties or missing parts? Contact us at 1-800-682-6376 or email us at support@belleze.com We will send you replacement.
Need help?
Do you have a question about the 014-HG-31080 and is the answer not in the manual?
Questions and answers