Advertisement
Quick Links
Model 3103V
Owner's Guide
This product is intended for installation by a
professional installer only! Attempts to install this
product by a person other than a trained professional
may result in severe damage to a vehicle's electrical
system and components.
DIRECTED by VOXX LLC, 2351 J. Lawson Blvd., Orlando, Florida 32824
(10/24)
Advertisement

Subscribe to Our Youtube Channel
Related Manuals for Viper 3103V


Summary of Contents for Viper 3103V
- Page 1 Model 3103V Owner’s Guide This product is intended for installation by a professional installer only! Attempts to install this product by a person other than a trained professional may result in severe damage to a vehicle’s electrical system and components.
- Page 2 Congratulations Congratulations on the purchase of your VIPER® system. Reading this Owner’s Guide prior to using your system will help maximize the use of your system and its many features. For additional information please contact your Authorized Dealer or visit www.viper.com.
- Page 3 Authorized Dealer. Replacement Remote Controls Please see your Authorized Dealer or visit us at www.viper.com to order additional remote controls. Remote control part numbers are found on the back of the remote.
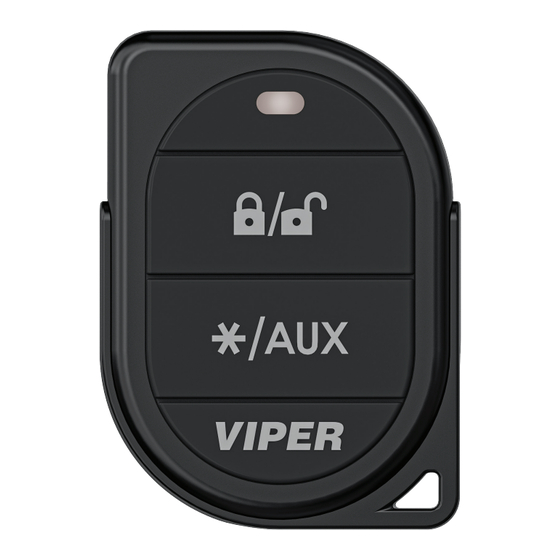
- Page 4 1-Way Remote Control Feature Description Internal Antenna Used for transmitting information Transmit LED Active when transmitting information Used to perform locking, unlocking, Command buttons arming and disarming, auxiliary channel and panic activation.
- Page 5 Remote Control Command Table Basic Remote Functions Button Press Function Hold Function ARM / DISARM PANIC (ON / OFF) (see advanced functions) TRUNK / AUX 1 Advanced Remote Functions Button Press Function Hold Function AUX 2 AUX 2 - VALIDITY (PRESS Together) (HOLD Together) SILENT ARM /...
- Page 6 Remote control functions The remote control buttons are used to send commands to the system. The descriptions below reflect the standard configuration for this system. Arm/Lock Press and release LOCK/UNLOCK. The doors lock and the system is armed. Disarm/Unlock Press and release LOCK/UNLOCK. The doors unlock and the system is disarmed.
- Page 7 AUX 2 Press LOCK/UNLOCK and STAR/AUX simultaneously. An optional auxiliary convenience or expansion function that you have added to your system can be activated by pressing these buttons simultaneously. The Aux 2 output controls Using Your System Active arming You can arm the system by pressing LOCK/UNLOCK for 1-second. When the system arms you will hear a short siren sound or chirp, and the parking lights flash once.
- Page 8 If any protected entry point (such as a door or a switch-protected trunk or hood) is open, the system will not passively arm (unless forced passive arming is programmed ON. See ‘Programming Options’ section of this guide.) Additionally, if a door, hood or trunk is triggered during the arming countdown, the 30-second countdown starts over.
- Page 9 Disarming To disarm the system, press LOCK/UNLOCK. You will hear two chirps, and the parking lights will flash twice. If the power locks are connected to the system, the doors will unlock. If the siren chirps either four or five times when disarming, refer to the Diagnostics section of this guide.
- Page 10 Dome Light Control The dome light activates for 30-seconds after the system is disarmed (if connected). Silent Mode To temporarily turn off the arm or disarm chirps, use Silent Mode. Press STAR/AUX for less than 1-second before arming or disarming, and the confirmation chirp(s) will be eliminated for that one operation only.
- Page 11 Valet Mode You can prevent your security system from automatically arming and triggering by using Valet Mode. This is very useful when washing the vehicle or having it serviced. In Valet Mode, the security system will not arm, even with the remote transmitter, but all convenience functions (door locks, trunk release, etc.) will continue to work normally.
- Page 12 NPC will interpret those triggers as false alarms. After the third trigger, NPC ignores, or bypasses that sensor or switch (along with any other sensors or switches sharing the same zone) for 60-minutes. If the bypassed sensor tries to trigger the system while it is being bypassed, the 60-minute bypass period starts over.
- Page 13 Trunk Release: When connected, pressing STAR/AUX for 1.5-seconds will remotely release the vehicle trunk lid or rear hatch. This output remains active until the button is released. AUX 2: When connected, pressing LOCK/UNLOCK and STAR/AUX together will immediately activate this output to control an additional convenience option.
- Page 14 The security system continually ignores the zone that was active until the input stops. 3-seconds after the input stops, the system monitors that input normally. For example, if your vehicle has interior light exit delay and you arm it before the interior light goes out, you may hear Bypass Notification chirps.
- Page 15 System Status Chirps The siren chirps when arming and disarming the system. The pattern of chirps audibly reports the system’s status as described below. Action Chirps Description Armed (3-second delay) 1 Armed with Bypass Notification Disarm Disarmed Disarm Disarmed with Tamper Alert Disarm Disarmed NPC active...
- Page 16 Zone/LED Description Flashes Trunk / Sensor 2 Impact Sensor: a light impact activates Warn away and a heavier impact activates full alarm Door switch trigger NOT USED Ignition trigger Interpreting Zone Diagnostics Warn Away responses are not reported by arming or disarming diagnostics.
- Page 17 Code Hopping The receiver and transmitters each use algorithms to change their codes each time the transmitter is used. This technology has been developed to increase the security of the system. The system knows what the next codes should be. This helps to keep the transmitter “in sync”...
- Page 18 Power Saver when the system is armed: After the system • has been armed for 24 hours, the in-vehicle LED will flash at half its normal rate, decreasing the system’s current draw. Power Saver in Valet Mode: When the system enters Valet •...
- Page 19 Battery Information When the remote control battery begins to weaken, the operating range will be reduced. Battery Replacement: If communication range is diminished, or the remote control ceases to function, the remote battery should be replaced. It is recommended to have your battery replaced by an Authorized Dealer.
- Page 20 Patent Information This product may be covered by one or more of the patents found on our website. For a full list of patents, please visit: www.voxxintl.com/company/patents Government Regulations FCC Compliance This device complies with Part 15 of the FCC rules and with RSS- 210 of Industry Canada.
- Page 21 Warranty Information LIMITED LIFETIME WARRANTY DIRECTED by VOXX LLC (the Company) warrants to the original purchaser of this product that should this product or any part thereof, under normal use and conditions, be proven defective in material or workmanship within the Lifetime from the date of original purchase in the original vehicle, such defect(s) will be repaired or replaced with new or reconditioned product, (at the Company’s option) without charge for parts or repair labor.
- Page 22 This Warranty is in lieu of all other express warranties or liabilities. ANY IMPLIED WARRANTIES, INCLUDING ANY IMPLIED WARRANTY OF MERCHANTABILITY, SHALL BE LIMITED TO THE DURATION OF THIS WRITTEN WARRANTY. ANY ACTION FOR BREACH OF ANY WARRANTY HEREUNDER INCLUDING ANY IMPLIED WARRANTY OF MERCHANTABILITY MUST BE BROUGHT WITHIN A PERIOD OF 24 MONTHS FROM DATE OF ORIGINAL PURCHASE.
Need help?
Do you have a question about the 3103V and is the answer not in the manual?
Questions and answers