Table of Contents
Advertisement
Available languages
Available languages
Quick Links
Advertisement
Table of Contents

Subscribe to Our Youtube Channel
Related Manuals for TECHFIT FT120


Summary of Contents for TECHFIT FT120
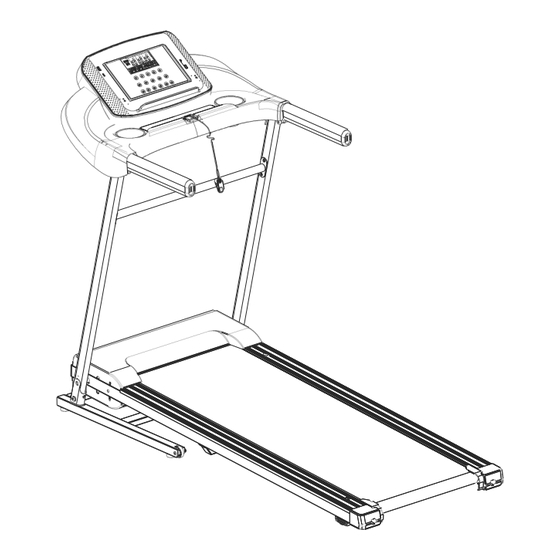
- Page 1 ELECTRIC TREADMILL FT120 TECHFIT OWNER’S MANUAL IMPORTANT: Read all instructions carefully before using this product. Retain this owner’s manual for future reference. The specifications of this product may vary from this photo and are subject to change without prior notice.
-
Page 2: Important Safety Instructions
IMPORTANT SAFETY INSTRUCTIONS Basic precautions, including the following important safety instructions should always be followed when using this treadmill. Read all instructions before using this treadmill. DANGER: To reduce the risk of electric shock, always unplug the treadmill from the electrical outlet immediately after using and before cleaning, assembling, or servicing the treadmill. - Page 3 Always hold on to the handrails while using the treadmill. Always make sure the storage latch is in place when folding and moving the treadmill. Do not leave children who are under 12 years-old unsupervised near or on the treadmill.
- Page 4 ASSEMBLY PACK LIST (C) Flat Washer (A) M8x35mm Hex Bolt ( B ) M8x16mm Hex Bolt 4 PCS 2 PCS 2 PCS (F) Allen Wrench ( E ) Safety Tether Key (D) Curved Washer 1 PC 1 PC 4 PCS...
- Page 5 ASSEMBLY INSTRUCTIONS STEP 1 It is recommended to have a second person assist with this step. 1. Remove the treadmill from its packaging, lay it flat on a level ground, and lift the entire machine. It is recommended that two people work together to complete this step. 2.
- Page 6 STEP 2 Upper Handlebar and Console Installation: 1. Align the panel and connect the cables to the main control and electronic meter console. 2. After straightening the panel, use an Allen Wrench to fix the M8X16mm Hex Bolt(B) and Curved Washers (D) to the corresponding holes on both sides of the columns, and tighten them in place.
-
Page 7: Lifting Up & Setting Down The Treadmill
LIFTING UP & SETTING DOWN THE TREADMILL LIFTING UP THE TREADMILL Firmly grasp the rear end of the main frame with both hands. Carefully lift the end of the treadmill up into the upright position until the Foot Lock Latch engages and securely locks the main frame into position. -
Page 8: Operating The Computer
OPERATING THE COMPUTER T o reduce risk of serious Remove safety key when injury,stand on side rails not in use and out of before starting this treadmill, the way of children. Keep read the user manual and take children away while in use. note of warnings before use. -
Page 9: Display Functions
DISPLAY FUNCTIONS: SPEED: Displays the current speed from the minimum 1.0 KPH to the maximum 12.0 KPH. DIS (DISTANCE): Displays the accumulative distance traveled during workout. You may also pre-set target distance in STOP mode before training. To set DIS (DISTANCE) press the MODE button on the computer console until you see the split window of DIS (DIS- TANCE) begin blinking. -
Page 10: Technical Specifications
Phase sequence SPEED 9 10 11 12 13 14 15 16 17 18 19 20 PROGRAM 7 10 TECHNICAL SPECIFICATIONS Product Name HSM-FT120 Voltage Rate 220-240V ~ Rated Frequency 50/60HZ Rated Power DC 1.5 HP Maximum User Weight 110KG Running Belt Size... -
Page 11: Troubleshooting Guide
CARE, MAINTENANCE & TROUBLESHOOTING GUIDE WARNING: To prevent electrical shock, please turn off and unplug the treadmill before cleaning or performing routine maintenance. WARNING:Always check the wear and tear components like foot lock latch tube and running belt to prevent injury. CLEANING After each exercise, ensure that the unit is wiped down and any sweat is removed from the unit. -
Page 12: Belt Adjustment
BELT ADJUSTMENT The running belt is pre-adjusted to the running deck at the factory, but after prolonged use it can stretch and require readjustment. To adjust the belt, turn on the main power switch of the treadmill and let the belt run at a speed of 8-10 KPH. Use the 6 mm Allen Wrench provided to turn the rear roller adjustment bolts in order to centre the belt. -
Page 13: Emergency Stop
LUBRICATION Lubricating your treadmill running belt will ensure superior performance and extend its life expectancy. When you receive your treadmill please apply some lubricant into each oil cap. After the first 25 hours of use ( or 2-3 months ) apply some lubricant and repeat for every following 50 hours of use ( or 5-8 months).Run on the treadmill at a slow speed for 3 to 5 minutes to evenly distribute lubricant. -
Page 14: Warm Up And Cool Down Routine
WARM UP AND COOL DOWN ROUTINE The WARM-UP is an important part of any workout. The purpose of warming up is to prepare your body for exercise and to minimize injuries. Warm up for two to five minutes before aerobic exercising. It should begin every session to prepare your body for more strenuous exercise by heating up and stretching your muscles, increasing your circulation and pulse rate, and delivering more oxygen to your muscles. - Page 15 QUADRICEPS STRETCH With one hand against a wall for balance, reach behind you and pull your right foot up. Bring your heel as close to your buttocks as possible. Hold for 15 counts and repeat with left foot. INNER THIGH STRETCH Sit with the soles of your feet together and your knees pointing outward.
- Page 16 Scan the QR code to download the KINOMAP or ZWIFT APP and check the instruction which with APP connection steps . In case the QR code is invalid , please download the KINOMAP or ZWIFT APP from APPStore or Google Playstore etc . Check if your mobile device confirms the requirements for the application.The requirements of each application are shown in the Google PlayStore or AppStore.
- Page 17 BANDA DE ALERGARE ELECTRICA FT120 TECHFIT UTILIZATOR MANUAL IMPORTANT: Citiți cu atenție toate instrucțiunile înainte de a utiliza acest produs. Păstrați acest manual de utilizare pentru referințe ulterioare. Specificațiile acestui produs pot diferi de această fotografie și pot fi modificate fara instiintare in prealabil.
- Page 18 INSTRUCȚIUNI DE SIGURANȚĂ IMPORTANTE Măsurile de precauție basic inclusiv următoarele instrucțiuni importante de siguranță, trebuie respectate întotdeauna când utilizați această bandă de alergare. Citiți toate instrucțiunile înainte de a utiliza această bandă de alergare. PERICOL: Pentru a reduce riscul de electrocutare, deconectați întotdeauna banda de alergare de la priza electrică...
- Page 19 ATENȚIE - RISC DE RĂNIRE PENTRU PERSOANE : Pentru a evita rănirea, fiți extrem de precauți când pășiți pe sau de pe covorul de alergare in mișcare al benzii de alergare. Citiți cu atenție acest manual de instrucțiuni înainte de utilizare. ...
- Page 20 KIT componente/piese: (C) Saiba Plata (A) M8x35mm Surub ( B ) M8x16mm Surub 2 PCS 4 PCS 2 PCS (F) Cheie Allen ( E ) Cheie de (D) Saiba curbata Siguranta 1 PC 4 PCS 1 PC...
- Page 21 INSTRUCTIUNI ASAMBLARE PAS 1 Se recomandă ca o a doua persoană să asiste la acest pas. 1. Scoateți banda de alergare din ambalaj, așezați-o pe un teren plat și ridicați întreaga banda. Se recomandă ca două persoane să lucreze împreună pentru a finaliza acest pas. 2.
- Page 22 PAS 2 Instalarea cadrului superior și a consolei: 1. Aliniați panoul și conectați cablurile la consola principală de control și a contorului electronic. 2. După îndreptarea panoului, utilizați o cheie hexagonală pentru a fixa șurubul hexagonal M8X16mm (B) și șaibe curbate (D) la orificiile corespunzătoare de pe ambele părți ale coloanelor și strângeți-le în poziție.
- Page 23 RIDICAREA ȘI AȘEZAREA BENZII DE ALERGARE RIDICAREA BENZII DE ALERGARE Prindeți ferm capătul din spate al cadrului principal cu ambele mâini. Ridicați cu grijă capătul benzii de alergare în poziție verticală până când dispozitivul de blocare al piciorului se cuplează și blochează în siguranță cadrul principal în poziție.
- Page 24 FUNCTII AFISAJ T o reduce risk of serious Remove safety key when injury,stand on side rails not in use and out of before starting this treadmill, the way of children. Keep read the user manual and take children away while in use. note of warnings before use.
- Page 25 FUNCTII AFISAJ DISPLAY: SPEED: Afișează viteza curentă de la minim 1,0 KPH la maxim 12,0 KPH. DIS (DISTANCE): Afișează distanța cumulativă parcursă în timpul antrenamentului. De asemenea, puteți pre-seta distanța țintă în modul STOP înainte de antrenament. Pentru a seta DIS (DISTANTA) apasati butonul MODE de pe consola computerului pana cand vedeti ca fereastra despartita a DIS (DISTANTA) incepe sa clipeasca.
-
Page 26: Specificatii Tehnice
Phase sequence SPEED 9 10 11 12 13 14 15 16 17 18 19 20 PROGRAM 7 10 SPECIFICATII TEHNICE Product Name FT120 Voltage Rate 220-240V ~ Rated Frequency 50/60HZ Rated Power DC 1.5 HP Maximum User Weight 120KG Running Belt Size... - Page 27 MAINTENANTA & GHID DE POSIBILE ERORI, SOLUTII AVERTISMENT: Pentru a preveni șocurile electrice, vă rugăm să opriți și să deconectați banda de alergare înainte de a curăța sau a efectua întreținerea de rutină. AVERTISMENT: Verificați întotdeauna componentele de uzură precum tubul de blocare al piciorului și cureaua de rulare pentru a preveni rănirea.
- Page 28 AJUSTARE COVOR DE ALERGARE Cureaua de alergare este pre-ajustată pe puntea de rulare din fabrică, dar după o utilizare prelungită se poate întinde și necesită reajustare. Pentru a regla cureaua, porniți comutatorul principal de alimentare al benzii de alergare și lăsați cureaua să funcționeze la o viteză de 8-10 KM/h. Folosiți cheia hexagonală prevăzut pentru a roti șuruburile de reglare a rolei din spate pentru a centra cureaua.
- Page 29 LUBRIFIEREA : Lubrifierea curelei de alergare a benzii de alergare va asigura performanțe superioare și va prelungi durata de viață a acesteia. Când primiți banda de alergare, vă rugăm să aplicați puțin lubrifiant în fiecare capac de ulei. După primele 25 de ore de utilizare (sau 2-3 luni) aplicați puțin lubrifiant și repetați pentru fiecare 50 de ore de utilizare următoare (sau 5-8 luni) lubrifiant.
- Page 30 INCALZIRE MUSCULARA WARM-UP este o parte importantă a oricărui antrenament. Scopul încălzirii este de a vă pregăti corpul pentru exerciții fizice și de a minimiza rănile. Încălziți-vă timp de două până la cinci minute înainte de exercițiile aerobice. Ar trebui să înceapă fiecare sesiune pentru a vă pregăti corpul pentru exerciții mai intense, prin încălzirea și întinderea mușchilor, creșterea circulației și frecvența pulsului și furnizarea de mai mult oxigen mușchilor.
- Page 31 QUADRICEPS STRETCH Cu o mână de un perete pentru echilibru, ajunge în spatele tău și trage piciorul drept în sus. Adu-ți călcâiul cât mai aproape de fese. Țineți apăsat timp de 15 numărări și repetați cu piciorul stâng. INTINDERI STRETCH Stați cu tălpile picioarelor împreună...
- Page 32 Scanați codul QR pentru a descărca aplicația KINOMAP sau ZWIFTși verificați instrucțiunile care cu pașii de conectare la APP. În cazul în care codul QR este invalid, vă rugăm să descărcați KINOMAP sau ZWIFT APP din APPStore sau Google Playstore etc. Verificați dacă dispozitivul dvs.
Need help?
Do you have a question about the FT120 and is the answer not in the manual?
Questions and answers