Advertisement
- 1 Your Device
- 2 Getting Started
-
3
Rand Navigation 2.0
- 3.1 Navigation Settings
- 3.2 Destination Search
- 3.3 Single-line Search
- 3.4 Guided Search
- 3.5 New Location Menu
- 3.6 Entering a New Location
- 3.7 My Trips
- 3.8 Multi-Stop Trips
- 3.9 Trails
- 3.10 History
- 3.11 Address Book: Menu
- 3.12 Address Book: Bookmarks
- 3.13 Address Book: Contacts
- 3.14 Address Book: Groups
- 3.15 POIs
- 3.16 Filter POIs
- 3.17 Home and Work Locations
- 3.18 History & Bookmarks
- 3.19 Route Map Window
- 3.20 Exits
- 3.21 Route Options
- 3.22 Route Overview
- 3.23 Detour/Avoid
- 3.24 Weather
- 3.25 Traffic
- 3.26 Traffic Icons
- 3.27 Fuel
- 3.28 Virtual Dashboard
- 3.29 Fuel Logs
- 3.30 Junction View
- 3.31 Local Apps
- 4 Motor Carriers' Road Atlas
- 5 Cameras
- 6 More Information
- 7 Important Safety Information
- 8 Documents / Resources
Your Device
What's included

- Navigation tablet
- Powered slice
Note: Powered slice is for 7-inch and 8-inch Rand Tablet models only. - Suction cup mount
- Removable guard
- Vehicle charger (5V/5A)
- USB-C cable
- Anti-glare screen protector
- Customer contact card
Mounting the Rand Tablet
Suction cup mount
Note: Follow all local regulations governing the placement of the mount.

- Select an area with a line of sight to the sky and GPS satellites.
- Clean and dry the mounting area.
- Remove the suction cup protective film.
- Adjust the angle of the mount.
- Pull the suction cup lever up to release suction.
- Plug the power cord into the mount and the vehicle's 12-volt power source.
- Place and hold the mount suction cup against the mounting surface.
- Press the suction cup lever down until it snaps into place.
- Snap the tablet onto the mount (using built-in magnet).
Rand Tablet Hardware

Getting Started
Powering up
Charge the device before using it on battery power.
Note: GPS navigation will work right out of the box even if you do not have internet access.

Connecting to Wi-Fi
When you first turn on your tablet, you'll be asked to select a Wi-Fi network to connect to the internet. A Wi-Fi connection is required to browse the web, download apps, and use internet-enabled features such as weather and traffic. Choose your wireless access point or hotspot from the list and type in your password. You can come back to this step later if you are in a place without internet access.

When using the magnetic mount in your vehicle, only use the mount's DC IN port for charging. Do not attempt to simultaneously charge the tablet from the magnetic mount and the tablet's USB port.
Registration
In the next step, you'll be prompted to download the Rand One app on your Android or iOS mobile device to complete registration. Your registration ensures that you have access to the latest information and updates, as well as Customer Support.

Android User Interface

- Bluetooth®
- Wi-Fi
- Battery Meter and Charging Indicator
- Current Time
- Back
- Return to Home Screen
- View Open Apps
Pictured: Rand Tablet 8-inch.
Note: Camera for image capture is supported on Rand Tablet 8 only.
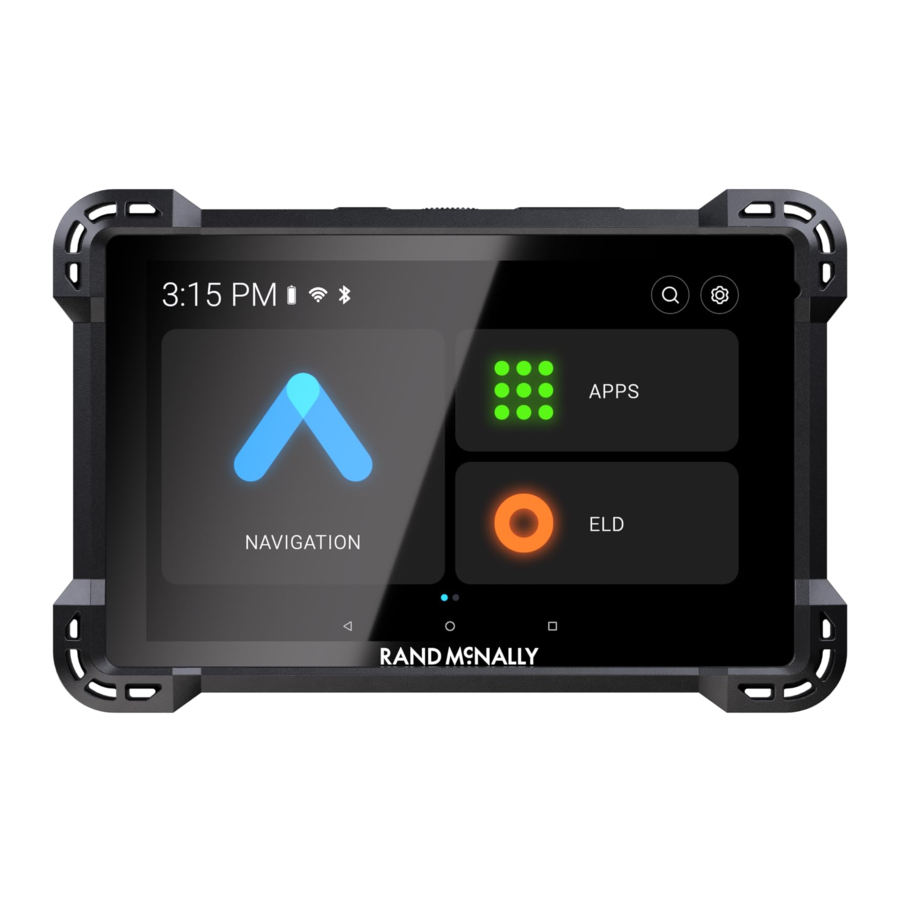
Main Menu

- Rand Navigation
- Local Apps
- ELD Chooser
- Third-party Apps Page
Accessible by swiping left on the screen - Current Time
- Battery Indicator
- Wi-Fi and Bluetooth®
- Guided Search
- Camera
Note: Camera option only available on Rand Tablet 8 - Settings
Pictured: Rand Tablet 8-inch.
Note: Camera for image capture is supported on Rand Tablet 8 only.
Rand Tablet Settings

- Wi-Fi
Connect to a wireless network. - Bluetooth
Connect to available Bluetooth devices. - Android Settings
Opens the Android device settings screen. - System Updates
Check for available updates for your Rand Tablet. - Data Repair
Fix missing or out-of-date files for your navigation system. Only perform this function when instructed by a Rand McNally technical support representative. - About
View information about your device. - Registration
Pair and register your device using the Rand One app. - Quick Start Guide
Scan the QR code to view the Quick Start Guide, User Guide, FAQ and more. - RELD Service
Choose your Rand McNally ELD service for compliance.
Android Settings


- Network & Internet – Options for Wi-Fi, data usage, tethering, VPN, and Airplane mode.
- Connected devices – Options for Bluetooth, Cast, printing, and USB.
- Apps & notifications – Options for notifications, app permissions, default apps, and access.
- Battery – Displays battery life and power options.
- Display – Options for brightness, wallpaper, sleep timers, and size.
- Sound – Options for media, alarm, and notification volume, do not disturb, and default sounds.
- Storage – Options for managing storage used by files and apps.
- Security & location – Options for setting screen lock preferences, location services, and other security settings.
- Users & accounts – Options for adding and managing user accounts and data synchronization.
- Accessibility – Options for screen readers, font sizes, magnification, and other ease-of-use settings.
- System – Options for language, time, and gesture settings, system information, and factory reset.
Rand Navigation 2.0

- Route to a location
- Battery power status and charging indicator
- Select map view mode: Heading up, North up or 3D view
- Wi-Fi connected services
- Zoom in/out
- Return to current location
- Virtual dashboard
- Current street name, upcoming intersection, or current location
- Local time and Elevation
- Navigation Settings: General, Truck Info, Route, Map and Warnings
- Hide/display screen information and controls
Navigation Settings
To access navigation settings, tap the gear icon in the bottom-right of the Rand Navigation Home Screen. After adjusting any settings, tap the ![]() Back icon in the upper-left to return to navigation.
Back icon in the upper-left to return to navigation.
| General | Options |
| Language | English Español Français For the screen and spoken instructions. |
| Units | Automatic Metric U.S. Standard |
| Clock | 12-hour format 24-hour format Note: Some tools and settings may not be available in car mode. |
| Yard Time Zone | Hawaii-Aleutian time Alaska time Pacific time Arizona Mountain time Central time Eastern time Indiana (East) Atlantic (Canada) time Newfoundland time |
| Vehicle Type | Truck Bus Car/Light truck Controls how routes are calculated. |
| Load Prompt | Enabled Always loaded When enabled, the system will ask if the truck is loaded or not every time you start a trip or a new leg. |
| Mileage Log | Truck & bus Car only Truck & car Disabled |
| Custom POIs | Tap to display the list of custom Points of Interest and control if they appear on the map. |
| Touch Sound | Display Android System sound settings. |
| System Settings | Tap to display Android System settings. |
| Data Repair | Tap to fix missing or out-of-date files for your navigation system. An internet connection is required. |
| System Update | Tap to perform system update. |
| Tutorial | View getting started tutorial. |
| Contact & About | Tap to show version information and customer support contact information. |
| Legal Notices | End user responsibilities and credits. |
| Truck Info | Options |
| Hazmat Type | None Explosives Gases Flammable Liquids Flammable Solids Oxidizers Poison Radioactive Corrosives PIH Other |
| Weight (Empty) | Click the pencil icon to enter a numeric value. |
| Weight (Loaded) | Click the pencil icon to enter a numeric value. See Load Prompt in General preferences. |
| Height | Click the pencil icon, and use the dials to select your vehicle's height. |
| Width | Click the pencil icon, and use the dials to select your vehicle's width. |
| Trailers | Straight 48' 53' Double Triple |
| Number of Axles | Use the dial to select the number of axles. |
| Route | Options |
| Traffic | On/Off slider (requires Wi-Fi connection) |
| Recalculation | Auto Manual |
| Preferred Route | Fastest route Shortest route |
| ETA Adjustment | ETA ok Increase ETA some Increase ETA more Decrease ETA some Decrease ETA more Set adjustments to your ETA due to weather or traffic conditions. You can add (increase) time to make the trip take longer or subtract (decrease) time to make the trip take less time. |
| Turn Announcements | Set three distances at which you want to be warned about an upcoming turn. The first announcement will be the farthest from the turn and the third the closest to it. |
| Chime tone | Slide On/Off to hear a chime before each turn announcement. |
| Junction Views | Set the distance before an upcoming maneuver at which the highway junction view screen appears. |
| Navigation Widget | On/Off slider Enables a pop-up window showing the next turn and distance when navigation is minimized and running in the background. |
| Route Avoids | Select/de-select from the list of options: Tollways, Freeways, Ferries, Tunnels, Small roads, U-Turns, Cross country borders, Dirt roads. |
| Permanent Avoids | Tap to manage your list of areas and roads to permanently avoid. |
| Map | Options |
| Day/Night Mode | Automatic Day Night |
| Route Color | Tap a color to select. |
| Map View Mode | Heading up North up 3D view |
| Map Auto Zoom | On/Off slider Auto scale Street scale City scale State scale Maneuver scale Set to street/city/state scale to specify the maximum scale of the zoom. |
| Lane Guidance | On/Off slider When on, the map guides you to the correct lane in preparation for upcoming turns. |
| POI Icons | On/Off slider Select categories of icons to display on map. Select restaurants, banks, and other consumer POIs to display on the map. Tap any category to fill in the square and display those icons. |
| Truck POI Icons | On/Off slider Select icons to display on map. Select travel centers, service, weigh stations and truck POIs to display on the map. Tap any category to fill in the square and display those icons. |
| Address Book Icons | On/Off slider Address book entries appear as pushpin icons unless they are assigned to a group. |
| Truck Icon | Use the arrows to set the truck icon to display when using the truck setting. Use the provided colors to set the truck icon color. |
| Bus Icon | Use the arrows to set the bus icon to display when using the bus setting. Use the provided colors to set the bus icon color. |
| Car/Light truck Icon | Use the arrows to set the car icon to display when using the car setting. Use the provided colors to set the car icon color. |
| Warnings | Options |
| Warning Type | None Audio & visual Visual only Audio only |
| Auto Dismiss Warnings | Never After 2 seconds After 10 seconds After 30 seconds Height and weight violations will not be auto dismissed. |
| Curve Warnings | On/Off slider Click the pencil to manually edit, or use the slider to set distance. |
| Hill Warnings | On/Off slider Click the pencil to manually edit, or use the slider to set distance. |
| Engine Brake Warnings | On/Off slider Click the pencil to manually edit, or use the slider to set distance. |
| Narrow Road Warnings | On/Off slider Click the pencil to manually edit, or use the slider to set distance. |
| Construction Area | On/Off slider Click the pencil to manually edit, or use the slider to set distance. |
| Speed Limit | On/Off slider Set the amount over the posted limit at which the warning appears. Set a user-defined maximum speed to be warned whenever the truck exceeds that speed, regardless of posted speed limits. |
| Speed Limit Change | On/Off slider Click the pencil to manually edit, or use the slider to set distance. |
| Red Light Speed Camera | On/Off slider Check box to show on map Click the pencil to manually edit, or use the slider to set distance. |
| Weigh Station | On/Off slider Click the pencil to manually edit, or use the slider to set distance. |
| State/Province Border | On/Off slider Click the pencil to manually edit, or use the slider to set distance. |
| Timezone Change | On/Off slider |
| Toll Booth Alert | On/Off slider Click the pencil to manually edit, or use the slider to set distance. |
| Maintenance | On/Off slider |
Destination Search
To access this window from the Rand Navigation Home Screen, tap Where to?

- Single-line Search
Tap here to bring up a keyboard and start typing to search for a destination. - Guided Search
Tap to access the guided search options. - Points of Interest
Tap to search for a point of interest (POI), such as a travel center, restaurant, etc. - History
Tap to route to a recently entered location. - Bookmarks
Tap to view a list of saved locations. - Distance
Displays the distance to each destination in the list. - Back
Tap to return to the navigation screen.
Single-line Search
To access the single-line search window from the Rand Navigation Home Screen, tap Where to?
From this screen, you can tap in the search bar to bring up a keyboard and begin typing an address, point of interest, or any other destination type. The single-line search will return matching results below.

- Address/Text Search
Search for addresses, streets, cities and points of interest.- Address searches should include either a city or postal code.
- Avoid using punctuations.
- Avoid using street prefixes and suffixes.
- Matching Results
Destinations that match your search terms display here. The address, city, and state display to the left. The distance from your current location displays on the right. Tap a destination to begin navigation. - See on Map
Tap to view the listed destinations on a map in a split-screen view. - Selected Destination
Tap a destination from the list to select it. The address, coordinates, and Motor Carriers' Road Atlas reference page are displayed. - Navigate
Tap to begin navigation to the selected destination. - Back
Tap to return to the previous screen. - Go to Map
Tap to return to the navigation screen.
Guided Search
To access Guided Search, either tap Guided Search from the top-right of the Single-line Search screen, or tap the magnifying glass icon ![]() from the Main Menu.
from the Main Menu.

- New Location
Tap to route to a destination by address, city center, intersection, or latitude and longitude coordinates. - My Trips
Tap to review your saved trips. - History
Tap to review your recent destinations. - Address Book
Tap to select a destination from your Address Book. - POIs
Tap to begin a point of interest search. - Add Home
Tap to route to your stored Home location. - Add Work
Tap to route to your stored Work location. - Back
Tap to return to the previous screen. - Go to Map
Tap to return to the navigation screen.
New Location Menu

- Address
Navigate to an address by entering the city (or postal code), street, and house number. - City Center
Navigate to a city center. - Intersection
Navigate to the intersection of two roads within a specified city. - Coordinates
Navigate to a location by entering its numeric latitude and longitude.

- Navigate
Once you select your destination through the guided search, click the Navigate button to begin navigation.
Entering a New Location
The Guided Search Keyboard helps you quickly locate your destination.

- Auto-Complete Keyboard
As you key in characters, the keyboard only displays next possible letters or numbers. Letters and numbers that cannot be entered in sequence are disabled. Search results are displayed as you key in characters. - Destination Entry
The top bar displays the current search entry. - Guided Search: City/Postal Code
Displays the available city/postal code selections based on the information you entered. Tap a result to advance. - Guided Search: Street
Displays the available street name selections based on the city you selected, and the information you entered. If the next letter in the street name cannot be selected on the keyboard, tap Expand Search to search a larger area. Tap a result to advance. - Guided Search: House Number
Displays the available house numbers based on the city and street selected, and the information you entered.
Tap a result to advance.
My Trips

- Multi-Stop Trips
Tap to view a list of saved multi-stop trips or to create a new one. - Trails
Use Trails to record a "bread-crumb" path where your truck travels.
Multi-Stop Trips
Displays a list of recent destinations.

- Tap to review and edit a saved trip.
- Tap + NEW TRIP to create a new multi-stop trip.
- Trip details:
Displays the stops along your trip.
Tap the X to remove a stop.
Tap + Add a Location to add a new stop. - Tap to view Route avoids, Route details, and Overview.
- Also tap to Save to My trips.
- Tap to Reverse or Reorder your stops (manually or automatically).
- Displays the travel time, traffic delays (if any), and estimated toll costs for the first leg of your trip.
- Tap to compare and select alternate routes.
- Tap to begin navigation.
Trails
Use Trails to record a "bread-crumb" path where your truck travels. The Trails feature is beneficial when traveling in areas where there is no marked road network.

- Tap to open an existing trail.
- Tap to record a new trail.
- Tap to edit or delete a trail.
- Tap to stop recording.
- View details about the trail.
- Tap to begin navigation. Routing to an existing trail will take you to the start of the trail. You can then follow the rest of the trail to your destination.
- Tap to edit or delete the trail.
History
Displays a list of recent destinations.

- Recent Destinations
Tap an entry in the list to navigate to the destination. - Distance
Displays the distance to each destination from your current location. - Options
Tap to access additional options
- Edit: Allows you to select and delete an entry from the history list.
- Clear History: Deletes all entries.
Address Book: Menu
Displays your saved bookmarks, contacts, and groups.

- Bookmarks
Navigate to a saved address. - Contacts
Navigate to a stored address from a saved contact.
Note: Contacts are stored in the Contacts app. You can add contacts manually or import them. - Groups
Organize your bookmarks and contacts in groups.
Address Book: Bookmarks

- Destinations
Tap a bookmark to navigate to the destination. - Alphabetic Organization
Tap a letter group to view bookmarks alphabetically. This is useful if you have a lot of bookmarks and they are difficult to find. - Options
Tap to search, sort, edit, add or delete bookmarks. - New bookmark
Tap to add a new bookmark.
Address Book: Contacts
In order to use contacts for navigation, you first need to set them up in the Rand Navigation 2.0 app. You can add contacts manually or import them.

- Add a New Contact
Tap to manually create a new contact. - Search
Tap to search for an existing contact. - Contacts
Tap a contact's name to view and edit information about that contact. - Create New Contact screen
Enter information about the contact.
Tap Save to save and return to the previous screen.
Address Book: Groups
Use Groups to organize your contacts and destinations into categories for easier searching.

- Groups
Displays groups you have created. - New Group
Tap to create a new group. - Group Destinations
Displays the destinations stored in the selected group. Tap a destination to begin navigation. - Group Options
Tap in the corner to edit or delete destinations in a group. - Add Location
Tap to add a new location to the group. You can add a new address or select from your history, bookmarks, or POIs.
POIs
Displays Points of Interest (POIs) near your current location, near a specific location, along your intended travel route, or near your destination.

- My Truck
Tap to display POIs near your current location. - A city
Tap to display POIs near a specific city. - My route
Tap to display POIs along your route if you have one set. - My destination
Tap to display POIs near your destination if you have one set. - POI Categories
Tap to select the POI category.
Note: Some categories may have multiple subcategories. - Custom POI
Tap to display custom POIs from an import. - Quick Stops
Displays a list of commonly-searched POI categories.
Filter POIs
Truck-related points of interest such as Travel Centers and Truck Services can include several amenities. To review only the locations with particular amenities you can filter your search results.

- Nearby Places
Lists destinations near your location that match the selected category. - Map
Displays destinations near your location. - Filter
Search for points of interest by available services. - Search
Search for points of interest by name.
- Tap a check box for a subcategory to include it in your search.
- Tap to clear the filters.
- Tap to go back and view the filtered POI list.
Note: Filter selections will remain active until you clear them.
POIs
When you select a POI category, the system will display POIs for that category nearby.

- Tap the arrow to change between Along Route, Nearby, or My Destination.
- Displays matching POIs near the location specified along with the distance to each destination. Tap a destination to view additional information and begin navigation.
- Filter
Based on available amenities. - Map
Displays POIs near your truck, a city, your route, or your destination. - More information
Displays additional information about the POI including address, phone number, and any available amenities. - POI Destination
Displays the selected POI on the map, along with the locations of other nearby places. - Navigate
Tap to begin navigation to the selected POI.
Home and Work Locations
You can set bookmarks for a Home and a Work location. This is useful so you can quickly navigate to these destinations. Tap Add Work or Add Home to set these locations.


- Select Location
Tap New Location, History, or POIs to set a Home or Work destination from among these options. - Choose on Map
Tap to set your Home or Work location by selecting a point on the map. - Use Current Location
Tap to set your Home or Work location to your current location. - Create/Remove Bookmark
Use this button to create or remove a bookmark. - Home/Work Information
Displays information about your Home or Work location. - Navigate
Tap to navigate to Home or Work.
History & Bookmarks
History

- Displays previous destinations.
Tap a destination to begin navigation.
Bookmarks

- Displays your saved locations.
Tap a location to begin navigation.
Route Map Window

- Next Maneuver
Instructions for your next maneuver. - Road Name
Next maneuver street name or highway sign. - Exits
Check upcoming exits for food, gas, hotels and other places. - Route Options
Tap to display additional options, including adding a stop, detours, and ending navigation. - Current time and time zone
- Map View Mode
Tap to switch the map view: 3D map, North up, or Heading up. - Battery power status and charging indicator
- Wi-Fi Connected Services
Tap to enable fuel prices, weather and traffic on the map.
Note: These options require a Wi-Fi connection. - Zoom In/Zoom Out
- Announcements
- Distance remaining to your destination
Displays a progress bar indicating the distance remaining to your destination. - Expanded Map Display
Tap to remove additional options from the map screen. - Settings
Tap to open the Navigation Settings screens. - ETA/Time/Distance
Tap to toggle between displaying ETA, Yard ETA, Remaining Time, Yard Time, and Elevation. - Location View
Tap to toggle between displaying the current location by city, street name, or next cross street. - Virtual Dashboard
Tap to view information about your current location, route, trips, and more. - Current Speed
Displays your current speed and turns red for speed warnings. - Speed Limit
Posted speed limit for your vehicle setting.
Tap to open a screen to submit a speed limit correction. - Map
Displays the map, your current route, and your vehicle's current location.
Exits
Slide out to show points of interest at upcoming exits. The list displays the distance to the next exit, exit name and number, and a count of available amenities.

- Tap on an exit to display a list of POIs at the exit.
- Tap the icon to display locations by category.
- Tap on any item in the list to view additional information or to route to the POI.
- Add a stop along your route to this exit.
Route Options

- Route Overview
Displays the directions, highways, and summary of your trip. - Save or Edit a Trip
Tap to save a new trip or edit your existing trip. - Add Stop
Tap to add additional destinations to your route. - Detour/Avoid
Tap to manage locations to avoid on the route and automatically calculate detours around them. - Route Settings
Tap to open the Route tab of the Settings screen. - Skip to Next Stop
Tap to skip the next destination in your route and continue. - Stop Navigation
Tap to cancel the current route and return to the home screen. - Exit
Tap to close Route Options and resume navigation.
Route Overview

- Directions Tab
Displays the turn-by-turn directions for the current route. - Highways Tab
Displays only the highways along your route, with the number of miles to travel on each. - Summary Tab
Displays the total travel time and distance for your route, as well as summaries for each leg of the trip for multi-stop trips.
Detour/Avoid
From Route Options, tap Detour/Avoid. There are four options available to set up detours and permanent avoids:


- Next miles allows you to detour a certain number of miles. Use the slider to set the number of miles to detour/avoid.
- A road allows you to avoid a specific road.
- An area allows you to draw a polygon on the map to avoid.
- Along the route allows you to select a step in your navigation to avoid.
When selecting next miles, use the slider to set the number of miles that are next along your route to avoid. Tap Detour to being using the new route.
When selecting A road, zoom in and out on the map to center the target over the road to avoid. The road is highlighted in red. Tap Permanent Avoid to always avoid it. Tap Detour to avoid it on this trip only.

When selecting An area, tap on the map to set points for an area to avoid. Tap Permanent Avoid to always avoid it. Tap Detour to avoid it on this trip only.

When selecting Along the route, select the step on the route you wish to avoid. Tap Detour to navigate around it.

Weather
When enabled, Weather displays current weather condition overlays on the map.


Notes:
- Requires a Wi-Fi connection.
- The refresh speed of the weather display is dependent on your connection speed. Weather information is updated every few minutes when a Wi-Fi connection is active.
- Weather display depends on active weather patterns and map zoom level.
To view current weather information and the three-day forecast for your location, tap the gear icon on the map screen and tap the Weather slider.
- Tap to enable weather.
- Tap to view details and enter settings.
- Select to view weather at your current location or at your destination.
- Current weather conditions at the selected location.
- Three-day forecast for the selected location.
- Tap to view and change weather overlay preferences such as layer opacity and weather type.
Traffic
To view traffic information, tap the gear icon on the map screen and then the Traffic slider. Traffic conditions will overlay on the map when traffic is enabled.
Note: Requires a Wi-Fi connection.


- Tap to enable traffic.
- Tap to view details and enter settings.
- Select to view traffic flow, incidents, or all.
- Current traffic conditions/incidents along your route.
- Your distance to the traffic conditions/incidents.
Traffic Icons
![]()
Fuel
To view fuel price information, tap gear icon on the map screen and then the Fuel slider. Current fuel prices will overlay on the map at various stations when enabled and available.
Note: Requires a Wi-Fi connection.

- Tap to enable fuel prices.
- Tap to view details and enter settings.
- Select to view fuel prices either nearby or along your route.
- Displays the fuel stations based on the criteria you selected.
- Displays the distance to each station.
- Sort by distance or price.
- View and change fuel preferences such as fuel types and stations to display on the map.
Virtual Dashboard

- Current location.
- Current times at the yard, current location and destination, as well as estimated time of arrival.
- Sunrise and sunset times based on vehicle location (latitude/longitude) and time of day.
- Current speed (above) and posted speed limit (below).
Note: Turns red when speed limit warning exceeded. - Elevation at current location.
- Current leg progress.
- Information for up to three trips. Includes odometer, time and speed information.
- Nearest cross street.
- Current day and date at your location.
- Battery power status and charging indicator
- Return to the route map.
- Add fuel purchase information.
- Distance to next maneuver.
Fuel Logs

- From the Virtual Dashboard, tapAdd Fuel.
- Tap a field to enter information. You can edit the following fields: Date, Taxable, Fuel quantity, Fuel price, Total cost, Location, Station, Last odometer, and Current odometer. Distance, Current economy, and Average economy are calculated automatically based on your entries.
- TapSave to record a fuel purchase.
Junction View
When on a route, Junction View displays when you have an upcoming maneuver. Set distance in Settings > Route. Once past the maneuver, Junction View closes and the previous window displays.

- Signs to follow for the next maneuver. Includes exit number and highway name/number if applicable.
- Distance to the upcoming maneuver. Distance decreases as you approach.
- Lane assist arrow.
- Return to previous window.
Turn View
Displays for upcoming turns. Set distance in Settings > Route.

Local Apps
To accees, tap Apps from the Main Menu.

- Back Up – Back up your navigation data.
- Calculator
- Calendar
- Camera – Available on Rand Tablet 8 only
- Clock
- Contacts
- DriverConnect
- Export Data – Export your navigation and user data.
- File Manager Pro – View downloads for third-party app installs and on device screen shots.
- Firefox – Browse the web when connected to the internet.
- Gallery – View image and video captures.
- Get Apps – View and download third party app marketplaces
- Import Data – Import your navigation and user data from another Rand McNally navigation tablet.
- Mileage & Fuel – View driving information, state mileage logs and fuel purchase information.
- Motor Carriers Road Atlas and Info – View Rand McNally's index of helpful roadside emergency contact information and truck regulations.
- Music – System music player
- Navigation – Open Rand Navigation fuel, and more.
- Notes – Notepad
- Quick Planner – Quick Calculatre the distance, driving time, and cost to travel between any two cities or towns.
- Rand ELD
- Search – Internet Search
- Settings – Android Settings Menu
- Sound Recorder
- Tell Rand – Compose a message to Rand McNally.
- Unit Converter – Quickly convert distance, temperature, currency, fuel, and more.
Motor Carriers' Road Atlas
A digital version of Rand McNally's Motor Carriers' Road Atlas.
Tap Maps at the top right to select pages by state.
Tap Legend at the left to view the map legend.
Swipe with one finger to move the center of the map.
Use two fingers to zoom in and out.

Cameras
Use the camera app to take pictures and videos, such as for inspection reports. Rand Tablet 8 Inch only.

- Take a photo.
- Start or stop recording a video.
- Adjust camera settings.
- Adjust image settings.
- Panoramic photo mode.
- Gallery.
- Turn on/off HDR capture for photos.
More Information
For more information
- Rand McNally Website randmcnally.com/rand-tablet
- Support randmcnally.com/support
- GPS accessories store.randmcnally.com
- Facebook facebook.com/randtrucking
Important Safety Information

Navigation
- Use this device at your own risk.
- Use this device only when it is safe to do so.
- Look at the display only when it is safe to do so.
- Traffic regulations always have priority over any instructions from the navigation system.
- Follow navigation system instructions only when local regulations and road traffic allow you do so.
- Make sure that the mount is securely mounted and properly adjusted before each trip.
- Note: If you do not understand the spoken instructions or are unsure of what to do next, refer to the navigation map on your navigation device.
Device
- Do not use sharp-edged objects on the device touch screen.
- The device is not waterproof and is not protected against water damage.
- Protect the device from extreme temperatures. Operating temperature for the device is between 32 degrees F and 120 degrees F.
- Do not open the navigation device casing.
- Do not attempt to replace the battery. Contact Rand McNally Customer Support with questions about the battery.
- Always follow local regulations when disposing of this device.
Note: Make sure that there are no kinks in the cable and that it will not be damaged by any sharp objects.
Installation
- Make sure that the mount does not impair the driver's visibility.
- Do not attach the mount within the airbag deployment zone.
- When installing the mount, make sure that it does not pose a risk in the event of an accident.
- Do not run cables directly next to safety-relevant devices and power supplies.
- After installation, check all safety-relevant equipment.
- Connect the wall charger to a 120V or 240V outlet only.
- Connect the vehicle charger to a 12V outlet only.
Note: Use only a moist cloth to clean the navigation device.
Note: Do not pull the cable to unplug the unit.
Customer Support
Call toll-free:
877-446-4863
Service hours:
Monday through Friday, 7 a.m. to 6 p.m. CT (Except official holidays)
Email:
Support@randmcnally.com
Note: Some screens may appear slightly different depending on device model and software version.
Documents / Resources
References
Download manual
Here you can download full pdf version of manual, it may contain additional safety instructions, warranty information, FCC rules, etc.
Advertisement


Need help?
Do you have a question about the RAND and is the answer not in the manual?
Questions and answers