bora PM-1100 Manual
- Assembly instructions manual (20 pages) ,
- Assembly instructions manual (20 pages) ,
- Assembly instructions manual (20 pages)
Advertisement
Parts

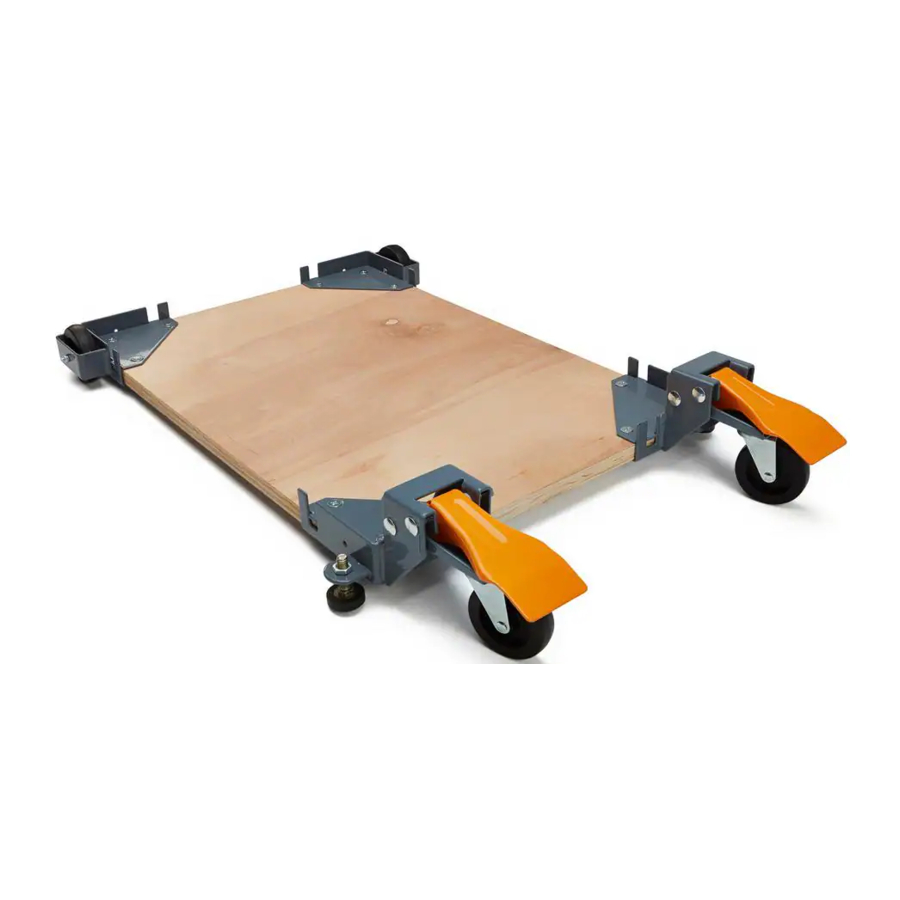
Figure 1
| Description | Part No. | Qty. |
| A CORNER, L.H. W/CASTER BRACKET | M3766 | 1 |
| B CORNER, R.H. W/CASTER BRACKET | M3765 | 1 |
| C CORNER, L.H. W/WHEEL HOUSING | M3764 | 1 |
| D CORNER, R.H. W/WHEEL HOUSING | M3763 | 1 |
| E BOLT PLATE | M2042 | 4 |
| F 3" SWIVEL CASTER WHEEL | M3711 | 2 |
| G M10 SERRATED SHOULDER NUT | G1056 | 2 |
| H RUBBER GLIDE FOOT | G2402 | 2 |
| I M10 JAM NUT | G1024 | 2 |
| K 3" WHEEL | G2403 | 2 |
| L M8-30 MACHINE SCREW (FOR PLYWOOD = < 3/4" THICK) | G1060 | 12 |
| L M8-40 MACHINE SCREW (FOR PLYWOOD > 3/4" THICK) | G1062 | 12 |
| M SWIVEL PLATE | M2045 | 2 |
| N M8-85 CARRIAGE BOLT | G1059 | 4 |
| O NYLON FOOT LEVER BUSHING | G1052 | 4 |
| Q M-8 NUT | G1020 | 4 |
| R FOOT LEVER | M2037 | 2 |
| S PLYWOOD (NOT INCLUDED) | ||
| T M6 NYLON WHEEL BUSHING | G1058 | 2 |
| U M6 NUT, SELF LOCKING | G1017 | 2 |
| V M6-45 MACHINE SCREW, AXLE | G1061 | 2 |

Any power tool must be bolted securely to stand before use.
Read Owners Manual carefully and be completely familiar with the correct and safe operation of each power tool before use.
Failure to follow these rules may result in serious personal injury.
Assembly Instructions
Tools required: Adjustable wrench, tape measure, drill, ½" (13 mm) drill bit, and a Philips screwdriver
- Unpack and identify all components and hardware. Make sure there are no missing parts and that there is no shipping damage.
![warning]() Note: Read instructions thoroughly before proceeding.
Note: Read instructions thoroughly before proceeding. - Assemble the front corners:
- Thread the rubber glide foot H into the bracket, then thread the jam nut onto the top
![]()
- Attach the wheel F to the swivel plate M.
- Install the swivel plate using the M8-85 carriage bolt N, and nut G. Tighten.
![]()
- Install the foot lever R using the M8-85 carriage bolt N, nylon washers O, and nut Q.
![]()
- Install the foot lever R using the M8-85 carriage bolt N, nylon washers O, and nut Q.
![]()
- Thread the rubber glide foot H into the bracket, then thread the jam nut onto the top
- Assemble the back corners, to the right are the components you will need:
- Install the back wheel K using the M6-45 axle bolt V, nylon wheel bushing T, and M6 lock nut U.
![]()
- Install the back wheel K using the M6-45 axle bolt V, nylon wheel bushing T, and M6 lock nut U.
- Carefully measure the footprint of your machine (or whatever you are mobilizing) and add about 1" to the dimension. (1" allows clearance for the fasteners).
- Review the assembly examples shown below to help you determine the fixed wheel, caster and leveler placement. As these are examples only, you must determine what best suits your particular machine's requirements for stability.
Tighten all hardware securely
 Note: Read instructions thoroughly before proceeding.


- Cut the plywood you are using down to size.

- You will now need to attach the corners to the plywood, begin by marking the holes using the corner plates as your template.

- Drill the holes using a ½" (13 mm) drill bit, it is a good idea to check that the holes are lined up to the plate before drilling each hole.

- Each corner should now look like this.

- Attach the corners in the correct positions using the Philips screwdriver, do not tighten the bolts until all three machine screws are partially threaded into the bottom plate.
![]()
- Congratulations! You have successfully completed assembly of the PM-1100 mobile base.


Assembly Examples
Be sure to follow Safety and Assembly Instructions. Keep in mind the actual operation of your machine and the effect it has on overall stability.
A long, narrow base, such as on a jointer, would benefit from this arrangement. Most machines may be arranged to the convenience of the user.

A short, narrow base, such as found on a drill press or bandsaw, may benefit from this arrangement. Due to swivel rotation, base may sit out of level. Rotate swivel wheel away from base to correct.

General Safety Instructions for Power Tools
Using power tools of any kind can be dangerous if safe operating procedures are not followed. Recognizing the hazards of each tool and using them with respect and caution will considerably limit the possibility of personal injury. However, if safety precautions are ignored, personal injury will likely result. Always use common sense – your personal safety is your responsibility.
- Know your power tool. Read and understand the Operator's Manual and observe the warnings and instruction labels affixed to the tool.
- Properly ground all tools.
- Keep guards in place.
- Remove adjusting keys and wrenches.
- Keep work area clean and dry.
- Keep children away.
- Never leave running machines/tools unattended.
- Disconnect tools from service.
- Use correct tools for the job.
- Never force a tool.
- Wear safety apparel.
- Wear safety glasses/goggles.
- Never stand or sit on tools.
- Replace damaged components immediately.
- Make sure your work platform is sufficiently sturdy to do the specific job at hand.
- Properly anchor power tools to work stands.
- Use correct blade for job being done.
- Think Safety. Safety is a combination of operator awareness, common sense and alertness at all times.
Safety Instructions for Mobile Bases
- Be careful when moving to limit any finger pinch points.
- Place base on a level surface and adjust levelers before placing the machine in position. This should keep the machine from rocking, while testing it for stability.
- Test the stability in both the up (on the casters) and the down positions. Exercise caution when testing the stability of top heavy machines (drill presses, band saws, etc.).
- Unplug any power tool before moving or repositioning your tool.
- Always test your set-up for stability and safety after repositioning.
- Care should be taken when planning the orientation of the machine onto the Universal Mobile Base. Transfer the weight off of the levelers to the casters will result in the machine tilting 1/2" (13 mm) toward the fixed wheels. When positioning top heavy tools such as a drill press or band saw, take advantage of the center of gravity, and position so that it will remain stable while on casters.
- Never use your machine without engaging the floor locks and foot locks. Always lower the machine onto the non-skid levelers before operating.
- When moving, always push the base, not the machine.
Documents / ResourcesDownload manual
Here you can download full pdf version of manual, it may contain additional safety instructions, warranty information, FCC rules, etc.
Advertisement


Need help?
Do you have a question about the PM-1100 and is the answer not in the manual?
Questions and answers