Mackie M-Caster Studio - Live Streaming Mixer Manual
- Quick start manual (13 pages)
Advertisement
Features
Pristine sound quality and unmatched flexibility in a sleek, compact design
Use your favorite mic plus a headset, media player and more
Pick the perfect vocal sound with selectable ContourFX Presets
StreamFX makes it easy to add the finishing touch with tons of fun voice-changing effects to choose from
USB connectivity allows for use as an audio interface on a Mac/PC
Bluetooth® connectivity allows for remote call-in support or music playback
Connect directly to your smartphone's headphone jack to both send and receive audio
View levels, settings, and more via the built-in MixViewer color display
The built-in Sampler allows you to transfer and store audio files directly on M-Caster Studio and trigger them via 4 dedicated buttons
RGB LED strip with a whole rainbow of user-selectable colors. You can even have it cycle through all the colors automatically.
Included accessories
- USB Cable
- Power Supply
Introduction
M-Caster Studio is a powerful, compact Live Streaming Production Studio for streaming on mobile devices, laptops, and in the studio.
Plug in your mic, sweeten your sound with ContourFX and StreamFX, then stream in minutes. With ContourFX, your voice will reach new heights with studio-quality sound-shaping and enhancements. And with StreamFX, you can add fun voice-changing effects.
M-Caster Studio is also packed with features like dedicated headset and media player inputs, a built-in 4-pad sampler with 3GB of internal storage, USB connectivity, and user-selectable RGB lighting that looks amazing in any streaming setup.
The built-in MixViewer color display makes adjustments and configuration a snap. And with Bluetooth®, M-Caster Studio may be utilized for call-in support or music playback via phone, tablet, or computer. Automatic mix minus ensures that remote guests only hear you on their end.
From streaming to podcasting, get pristine audio just about anywhere with M•Caster Studio. Your followers will thank you.
How to Use This Manual:
After this introduction, a getting started guide will help you get things set up fast. The hookup diagrams show some typical setups, while the remaining sections provide details of the M-Caster Studio.
The bracketed numbers throughout the manual references the number of each of the features; go there if you seek additional information about said feature.

This icon marks information that is critically important or unique to the M•Caster Studio. For your own good (and our peace of mind), please read and remember them. You will be quizzed later.

There's an illustration of a microscope, so, of course, you're going to get more detailed information when you see this little guy. There are explanations of features and practical tips listed here.

It's a good idea to pay attention to text displayed next to a note icon, as this icon draws attention to certain features and functions relating to the usage of the M•Caster Studio.
Getting Started
We realize that you can't wait to hook up your M•Caster Studio and try it out. Nevertheless, please take the time to read this page NOW, and the rest can wait until you're good and ready.
- Turn down all knobs.
- Push the included line cord securely into the M•Caster Studio's power connector and plug the other end into an AC outlet.
- Connect to headphones and/or to speakers.
- Plug signal sources into the M•Caster Studio, such as:
- Microphone plugged into the mic input. (Engage phantom power if needed.)
- Line-level sources such as a keyboard, headset and/or smartphone plugged into the line-level inputs.
- Computer plugged into the USB-C jack.
- Smartphone paired and connected via Bluetooth.
- Confirm that the input selector switches have the correct inputs selected.
- Slowly raise the input and output volume knobs to a comfortable listening level.
- Add EQ, FX, samples, contour shaping, downlit accent color (and more) to taste.
If you desire a more thorough walk-through of the M•Caster Studio, there is a wealth of information in the following pages!
Things to Remember:
- Never listen to loud music for prolonged periods. Please see the Safety Instructions for information on hearing protection.
- Save the shipping boxes and packing materials! You may need them someday.
- Save the sales receipt and original packaging in case you ever need warranty service.
- Beep boop.
Hookup Diagrams

There are a number of use case scenarios for M•Caster Studio. Live streamers use their favorite device (phone or tablet) as the connection to the streaming service, game streamers often stream-share live video and their game screens over Twitch and other social platforms and M•Caster Studio works well for podcasters due to its portability (not to mention quality audio and fun effects).
In this example, a Mackie EM-89D microphone is connected to the channel 1 XLR mic input [#3]. The left side of channel 1's input selector switch should be illuminated (blue). A computer is added to the channel 2 USB connector [#5]. The right side of channel 2's input selector switch should be illuminated (green). Lastly, a phone is connected over Bluetooth for guests calling into the podcast/livestream. The right side of channel 3's input selector switch should be illuminated (blue) since connected via Bluetooth.
As shown above, a pair of Mackie's MC-60BT headphones are connected to the M•Caster Studio's 1/8" headphone jack [#8].
Adjust the input [#10] and output [#14] volume of all three inputs until you are pleased with the results, then start streaming, podcasting or whatever your heart desires!

It was mentioned on the previous page that there are a number of use case scenarios for M•Caster Studio. With this example, we'll take a look at some of the other inputs and outputs.
Here, a gaming headset is connected to the channel 1 1/8" input [#4]. The right side of channel 1's input selector switch should be illuminated [orange]. Then a phone is connected via the 1/8" TRRS connector [#7]. The left side of channel 3's input selector switch should be illuminated (white) since using the 1/8" TRRS connector.
Adjust the input [#10] and output [#14] volume of the two inputs until you are pleased with the results, then start streaming, podcasting or whatever your heart desires!
M•Caster STUDIO: Rear Panel Features

Force Update Switch
The force update switch is conveniently located right next to the power connector. In a perfect world, this indented switch would just sit there without a care in the world, umbrella drink in hand, beach, surf and sun on a daily basis. In all likelihood, this switch will live his / her dream out, while the rest of us can only dream of such a life.
Here's how to force an update: first, unplug the M•Caster Studio. Now, with a bent paperclip, poke the force update switch, then power up the M•Caster Studio with the button depressed.
Now that you know how to force an update, here's a friendly reminder that you should let the switch remain peaceful, calm and tranquil, only forcing an update if instructed to do so by Tech Support. Thank you for listening!
- Power Connector
M•Caster Studio has a universal power supply that accepts any AC voltage ranging from 100 VAC to 240 VAC. No need for voltage select switches. It will work virtually anywhere in the world. That's why we call it a "Planet Earth" power supply! It is less susceptible to voltage sags or spikes compared to conventional power supplies, and provides greater electromagnetic isolation and better protection against AC line noise.
Connect the power adapter connector of the power supply to the M•Caster Studio and plug the other end into an outlet.
![]()
Only use the factory-authorized power supply that came with the M•Caster Studio.
![]()
M•Caster Studio does NOT power up via the computer's USB-C connection (#5). That is a separate feature! - 48V Phantom Power Switch [Ch. 1 XLR]
Press this switch in if the Ch. 1 XLR microphone requires phantom power. (Always check the position of this switch before connecting microphones.).
![]()
When engaged, the mic icon located in the upper-left corner of the display [#20] will illuminate yellow. Otherwise, it remains gray when disengaged.
![]()
You may notice a "pop" and some white noise when engaging / disengaging phantom power, especially when the volume knobs [#10, #14] are cranked. This disappears after a few seconds. - XLR and 1/4" Combo Input Jack [Ch. 1]
This is a female XLR connector that accepts a balanced mic or line level input from almost any type of source. The volume is controlled with the volume knobs [#10, #14].
Professional ribbon, dynamic, and condenser mics all sound excellent through this input. The mic / line input will handle any kind of level you can toss at them, without overloading.
They are wired as follows, according to standards specified by the AES (Audio Engineering Society).
XLR Balanced Wiring:
Pin 1 = Shield (ground)
Pin 2 = Positive (+ or hot)
Pin 3 = Negative (– or cold)
![]()
In addition to accepting a balanced mic signal using an XLR connector, this input channel may also accept a 1/4" line-level signal driven by balanced or unbalanced sources.
To connect balanced lines to this input, use a 1/4" Tip-Ring-Sleeve (TRS) plug. "TRS" stands for Tip-Ring-Sleeve, the three connection points available on a stereo 1/4" or balanced phone jack or plug. TRS jacks and plugs are used for balanced signals and are wired as follows:
1/4" TRS Balanced Mono Wiring:
Sleeve = Shield
Tip = Hot (+)
Ring = Cold (–)
![]()
To connect unbalanced lines to this input, use a 1/4" mono (TS) phone plug, wired as follows:
1/4" TS Unbalanced Mono Wiring:
Sleeve = Shield
Tip = Hot (+)
![]()
- 1/8" Headset Output [Ch. 1]
This is a female 1/8" TRRS connector that accepts the mic level signal of the TRRS and has a line-level output for the headphones. A gaming headset should be connected here. The volume is controlled with the volume knobs [#10, #14].
![]()
The headset amp is loud and could cause permanent hearing damage. Even intermediate levels may be painfully loud with some headsets. BE CAREFUL! Always turn the volume knob all the way down before connecting headsets. Then turn it up slowly as you listen carefully.
![]()
While channel 1's XLR mic output supports 48V phantom power, this 1/8" mic output does not. However, this output does add an extra +5V of "plug-in power".

- USB I/O [Ch. 2]
This is an interface that allows audio to stream to and from the M•Caster Studio via computer. This is the connection to use when live-streaming over computer via USB instead of live-streaming by phone.
This is the connection that may be used for gaming, playing uploaded and/or downloaded streaming content, playing music or just about any other sound that is emitted to/from the computer. The volume is controlled with the volume knobs [#10, #14].
Connect the USB-C side of a USB cable (included in the packaging)to the M•Caster Studio and the USB-A side to the computer's USB port.
Don't forget to change the input and output to 'M•Caster Studio' via Settings on your computer.
![]()
M•Caster Studio's USB connection is audio only. It is not a source of power. - 1/8" Line Input Jack [Ch. 2]
Connect a line-level signal to this input jack using an unbalanced 1/8" TRS connector. This may be an instrument connection, such as a sampler or keyboard (or other), or perhaps a secondary portable source, such as another smartphone, MP3 player or just about any other line-level signal. The volume is controlled with the volume knobs [#10, #14].
It is wired as follows, according to standards specified by the AES (Audio Engineering Society):
Stereo 1/8" TRS
Sleeve = Shield (Ground)
Tip = Left Channel
Ring = Right Channel
![]()
If connecting a device, keep in mind that while the volume may be raised and lowered via the M•Caster Studio volume knobs, the volume of the device also needs to be up. - 1/8" Smartphone Stereo Jack [Ch. 3]
This is the connection to use when live-streaming via phone instead of computer via USB. Connect a line-level signal from a smartphone (most likely), MP3 player or other signal source to this jack using an unbalanced 1/8" TRRS connector. The volume is controlled with the volume knobs [#10, #14].
![]()
While the volume may be raised and lowered via the M•Caster Studio volume knobs, the volume of the device also needs to be up.
![]()
- 1/8" Headphones Output Jack
This 1/8" TRS connector supplies the output to stereo earbuds, headphones or IEMs. The volume is controlled with the main mix volume knob [#14].
The phones output is wired as follows, according to standards specified by the AES (Audio Engineering Society):
Stereo 1/8" TRS
Sleeve = Shield (Ground)
Tip = Left Channel
Ring = Right Channel
![]()
The headphone amp is loud and could cause permanent hearing damage. Even intermediate levels may be painfully loud with some headphones. BE CAREFUL! Always turn the volume knob all the way down before connecting headphones. Then turn it up slowly as you listen carefully. - 1/8" Speaker Output Jack
This 1/8" stereo output jack connects to the input of powered monitors. The signal at this output is a stereo mix of all the inputs.
It shouldn't come as any surprise that we would highly recommend any sized CR-X / CR-XBT monitors. Check the Mackie website for more information!


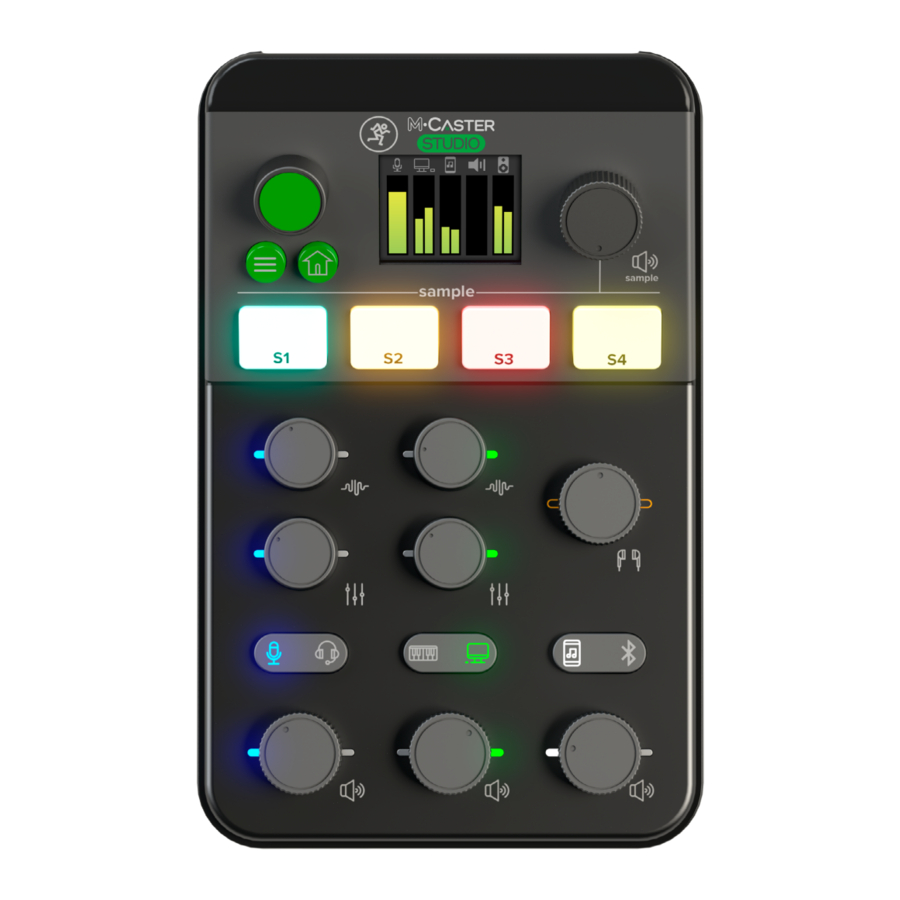
M•Caster STUDIO: Top Panel Features

- Volume Knobs
These knobs adjust the level of each channel's relative volume and gain – of the selected source(s) [#11] – to the main mix [#14]. This allows signals from the outside world to be adjusted to run through each channel at optimal internal operating levels. The volume levels range from –∞ dB (off) to +10.0 dB (max).
Left knob = Ch. 1 (Combo input or headset)
Middle knob = Ch. 2 (Line input or computer/USB)
Right knob = Ch. 3 (Phone or Bluetooth) - Input Selector Switches
These source switches determine which channel inputs are active.
The activated channel 1 input may either be mic 1 (combo input, left side of Ch. 1 input selector switch down) [#3] or mic 2 (1/8" gaming headset, right side of Ch. 1 input selector switch down) [#4].
The activated channel 2 input may either be aux 1 (1/8" instrument / line input jack, left side of Ch. 2 input selector switch down) [#6] or aux 2 (USB / computer connection, right side of Ch. 2 input selector switch down) [#5].
The activated channel 3 input may either be aux 3 (1/8" phone input jack, left side of Ch. 3 input selector switch down) [#7] or aux 4 (Bluetooth connection, right side of Ch. 3 input selector switch down).
It's a new school year, so these icons are color coordinated with the input and output jacks on the rear panel of the M•Caster Studio. The currently selected inputs (and their respective controls) will illuminate the same color as these rear panel jacks. For example, as seen to the right, Ch. 1 mic input (blue) [#3], Ch. 2 USB I/O (green) [#5] and 1/8" smartphone jack (white) [#7]. Note that the icons are also presented at the top of the MixViewer [#20]. - ContourFX Control Knobs
These knobs control how much the selected preset affects the channel's signal, thereby "shaping" it. The FX level ranges from off (knob fully counter-clockwise) to max (knob fully clockwise). These control knobs are post-volume [#10], but pre-StreamFX control knobs [#13].
![]()
While these knobs determine the "shape" level, the actual presets are selected via the navigation knob [#17], menu button [#19] and MixViewer [#20]. - StreamFX Control Knobs
These knobs increase and decrease the channel's FX intensity of the selected preset. The FX level ranges from off (knob fully counter-clockwise) to max (knob fully clockwise). These control knobs are post-volume [#10] and post-ContourFX control knobs [#12].
![]()
While these knobs determine the FX "intensity" level, the actual presets are selected via the navigation knob [#17], menu button [#19] and MixViewer [#20]. - Main Mix Volume Knob
This knob allows you to adjust the level of the signal sent to the outputs, including the headphones [#8] and gaming headset outputs [#4]. The volume levels range from off (silent) to max (full volume).
Please note that when this knob is rotated, the output level will be displayed horizontally across the top of the MixViewer [#20]. - Sample Buttons 1-4
Pressing one (or more) of these buttons results in playback of the saved sample. When pressed the sample will play. Additionally, the button will illuminate and flash at the speed and duration of the playback.
The samples, playback mode, colors and more may be changed and updated via the menu button [#19], navigation knob [#17] and MixViewer [#20]. More on this later.

- Sample Volume Knob
Rotate this knob to adjust the volume of the samples. It is a global control, affecting the level of all four sample pads. The volume levels range from off (silent) to max (full volume). - Navigation Knob
This is the main method of navigation through the M•Caster Studio's GUI. Rotate it to view and adjust the EQ, FX, samples, select a downlit accent color, connect via Bluetooth, update the firmware and more, then push to make a selection. This also becomes the main (speaker) output level adjustment when the main and headphone levels are unlinked. Much more on all of this later.
![]()
Pushing the navigation knob down when on the home view also opens up the menu view. - Home Button
Pressing this button simply returns you to the main mixer view... home! Additionally, when navigating through the GUI, it will automatically return home after approximately 30 seconds. - Menu Button
Pressing this button with the "hamburger" icon opens the settings menu. Once open, use the navigation knob [#17] to scroll through (and select) the options you desire.
![]()
Pushing the navigation knob down when on the home view also opens up the menu view. - TFT Display (aka MixViewer)
The MixViewer presents information about the M•Caster Studio in full color. There is nothing to push, touch, turn, twist and shout here... info display only. TFT is considered one of the best displays and is easy on the eyes.
The MixViewer should be covered with a protective film to protect the M•Caster Studio from scratches and other possible damage during production and distribution. It also helps keeps fingerprints off! It won't affect performance, but we still recommend removing the protective film.
That is the hardware in a nutshell, but we're only getting started! Flip the page and let's take a look at all of the incredible features packed in your M•Caster Studio.


M•Caster STUDIO: Settings
Introduction
Friends! We have a lot to get through, but we'll start at the top and work our way through...
When the M•Caster Studio is first plugged in, you will be immediately greeted with the infamous Running Man logo. After a few seconds of boot-up, you are greeted with the home view, which is the main mixer view. It displays which inputs are selected, the sample and output channels and all of their respective I/O meters.

Main Menu
Hey, we're off to a great start! Now press the menu button [#19] to open the settings menu as seen below.

As mentioned previously, the navigation knob [#17] is used to scroll through (and select) the options you desire. The current option will illuminate green, while the remaining options remain grayed out. Go ahead and rotate the knob to see!
Contour
As seen above, the Contour presets feature is illuminated green, so we'll start there and work our way right. Push the navigation knob down to select it.

Rotate the navigation knob [#17] to choose between 11 different digital signal processors (DSPs), such as EQ, compression, filtering and more. The "audio quality enhancement" is selected here, but the amount of processing is determined by the level of the channel's ContourFX Control Knob [#12].
Only one ContourFX preset may be selected at a time. We implore you to use trial-and-error to find the best ContourFX preset for your application. The currently selected ContourFX preset will have an asterisk (*) next to it. Broadcaster* in the example located on the bottom-left.
The available ContourFX Presets are:
- None (Off)
- Broadcaster
- Deepcaster
- Brightcaster
- Auto-Leveler
- Hard Compress
- Bright
- Crisp
- AM Radio
- Vintage Vinyl
- De-Esser
FX
Once you've had some fun playing around with the various ContourFX, it's time to add some other flavor to the mix. After returning to the settings screen, rotate and select 'FX' using the navigation knob [#17].

Rotate the navigation knob [#17] to choose between 21 different, crazy signal-altering effects! The effect is chosen with this knob, but the intensity of the effect is determined by the level of the channel's StreamFX Control Knob [#13].
Only one StreamFX preset may be selected at a time. We implore you to use trial-and-error to find the best StreamFX preset for your application. The currently selected StreamFX preset will have an asterisk (*) next to it. Ping Pong* in the example below.

The available StreamFX Presets are:
- None (Off)
- Plate Verb
- Live Room
- Bathroom Verb
- Lasershow
- Flanger
- Munchkin
- Grandma
- Mega Deep
- Diablo
- Bioshock
- Optimus
- Shockwave
- Soundwave
- Clapback
- Repeater
- Delay Verb
- Nitrous
- Ping Pong
- Space Echo
- Spatial Effect
Bluetooth
If you are running a podcast, an interviewee may be added to the show over the phone's Bluetooth connection. Due to mix-minus, the guest will hear everything except for their own voice.
Setting up and connecting a device via Bluetooth is the third and final feature on the top row of the settings... then we'll check out the bottom row features!
Upon powering up the M•Caster Studio, the Bluetooth function is either:
- In sleep mode. See 'Pairing and connecting for the first time' (below) or...
- ...Paired and connected. See 'Previously paired and connected devices' (below).
Pairing and connecting for the first time:
This is how to pair and connect a device to an M•Caster Studio.
As done previously, return to the settings screen, then rotate and select 'BT' using the navigation knob [#17].

Once the Bluetooth screen is open, rotate the navigation knob to 'Enter pairing mode' and push to begin the pairing process.

While M•Caster Studio is in pairing mode, simultaneously scan for Bluetooth devices on the device. You should see 'M-Caster Studio' appear in the list of "available devices". Select it by tapping it. From there, your Bluetooth device should indicate that it is successfully connected. If it does not, start the pairing process again, and make sure that the M•Caster Studio and device are both in pairing mode at the same time.

Previously paired and connected devices:
The Bluetooth connection will disconnect if it's out of range. Previously paired and connected devices will automatically reconnect IF 'Auto-connect' is set to ON.

To drop the device from being paired with the M•Caster Studio, press 'Disconnect this device' in Settings > Bluetooth.
The Bluetooth may disconnect when affected by Electrostatic Discharge [ESD]. Manually reconnect the Bluetooth connection.
Last, but certainly not least... please make sure that the Ch. 3 input selector switch [#11] is set to Bluetooth!
Congratulations! You went through the top line of Settings with ease! Now we'll head South and take a look at the Settings on the bottom row, again from left to right. First up is – <drum roll> – Sampler!
Sampler
The previously mentioned features are incredible enough on their own merit. However, with a wink and nod to Ron Popeil, "But wait, there's more!" Act now and we'll add five more circle features to your M•Caster Studio!
That's right, Jim! When any of the settings on the top row are opened, the selection is made right then, but when Sampler is opened, a plethora of sampler options appears. Here you have to dig deeper to make selections. Let's take a look at the Sampler Options starting at the top-left with 'Record':

Sampler – Record:
Your M•Caster Studio comes stocked with a handful of samples to get you started... but what if there are particular sounds and samples that you like and use that perhaps no one else does? This is where 'Sampler Record' makes its grand entrance!
Once 'Record' is tapped, the TFT screen will display (and request) that you push a sample button to start recording. Additionally, all four sample pads will flash between red and green until a selection is made.

Next, tap one of the four sample pads [#15] to select it. All sample pad colors will will remain the same solid color they were assigned, except for the sample pad that was tapped. It will flash between red and off. Recording will start immediately.

Any audio played through the M•Caster Studio is recorded as a sample. Press the sample pad again to stop recording. This closes the file and makes it available for immediate playback. It will replace the current selection, although that sample may be reassigned as it is still on the internal drive.
Samples are recorded in.wav format at 24-bit / 48 kHz, then stored and saved as 'Sample1.wav', 'Sample1(1).wav', etc. However, the names may be updated via USB the next time you do a firmware update. M•Caster Studio will remember these samples every time it is powered up thereafter. Don't fret, they won't disappear!
M•Caster Studio comes equipped with a solid 3GB of internal storage. That should be more than enough to hold all of your samples. If not, you will be met with an error message, as seen below.

Sampler – Assign:
As you might have guessed, this is the place to assign samples to each of the four sample pads.

Once 'Assign' is tapped, the TFT screen will display (and request) that you push a sample button to assign a sample. Additionally, all four sample pads will remain the same solid color that they were assigned.

Next, tap one of the four sample pads [#15] to select it. From here, rotate the navigation knob [#17] to highlight the preferred sample, then push to select.

The available samples are:
- AirHorn. Stereo.wav
- Applause. Stereo.wav
- ApplauseWithLaughter. Stereo.wav
- Buzzer. Stereo.wav
- CensorBleep. Stereo.wav
- Success1.Stereo.wav
- Success2.Stereo.wav
- Trombone. Stereo.wav
- WilhelmScream. Stereo.wav
- YouLose1.Stereo.wav
- YouLose2.Stereo.wav
Samples that you have recorded will also be added to this list. We don't know what they're named, so we can't add them!
Sampler – Clear:
'Clear' simply removes the currently selected sample from the chosen sample pad.

Once 'Clear' is tapped, the TFT screen will display (and request) that you push a sample button to clear its sample. Additionally, all four sample pads will flash between (our beloved Seattle sports teams') blue and green until a selection is made.

Tap one of the four sample pads [#15] to select it. A message pops to indicate success! Now there is no color or sample associated with that sample pad.
Sampler – Mode:
Moving right along into the sampler's 'Mode' section.

This is the spot where to select each sample's playback mode. Once 'Mode' is tapped, the TFT screen will display (and request) that you push a sample button to select its mode. Additionally, all four sample pads will flash between blue and yellow until a selection is made.

Next, tap one of the four sample pads [#15] to select it. All sample pad colors will turn off except for the sample pad that was tapped. It will flash between blue and yellow. From here, rotate the navigation knob [#17] to highlight the preferred mode, then push to select.

As seen below-left, there are a total of three choices:
- One Shot – One Shot plays the sample from start to finish. The sample may be stopped early by pressing the sample button again.
- Loop – Like the One Shot, Loop also plays the sample from start to finish. However, once the sample has finished playing, it will "loop back" to the beginning and play the sample again repeatedly until the sample button is pressed again.
- Retrigger – Retrigger is also similar to the One Shot as it also plays the sample from start to finish. In fact, it will do so if you allow it. However, you didn't set this up as a One Shot. It's a Retrigger!
With Retrigger, you're supposed to tap the sample button again. This ends the currently playing sample and starts the sample playback from the beginning.
Playback may be stopped by pressing and holding the sample button for one second.
As you might expect, only one mode may be selected per sample pad (although it would be quite odd to have more than one!). The currently selected mode will have an asterisk (*) next to it. Oneshot* in the example to the left.
Regardless of the sample mode(s) chosen:
The sample buttons will flash – in their selected colors – during playback.
Don't expect the sample to play back if the sample button is pushed and held for a second or longer. Just a quick tap is all it takes to play!
All four sample buttons are on their own chain. What this means is that multiple samples may be played simultaneously.
Sampler – Colors:
This is the section where you get to choose what color(s) the sample pads will be.

Once 'Colors' is tapped, the TFT screen will display (and request) that you push a sample button to select its color. Additionally, all four sample pads will flash between red and yellow until a selection is made.

Next, tap one of the four sample pads [#15] to select it. All sample pad colors will turn off except for the sample pad that was tapped. It will flash between off and the currently selected color. From here, rotate the navigation knob [#17] to highlight the preferred color, then push to select.

Only one color may be selected per sample pad. The currently selected color will have an asterisk (*) next to it. Green* in the example shown on the left. Note that the names of the colors of the sample pad are displayed on the TFT screen.
The available colors (in order) are as follows:

M•Caster Studio will remember the selection every time it is powered up thereafter.
Lighting
Now that samples have been loaded and approved, it's time to get... even more colorful!

When selected, lighting changes the downlit accent color located on the undercarriage of M•Caster Studio. Simply rotate the navigation knob [#17] until the color you desire arrives. Once found, push the knob down to select.
Only one color may be selected at a time (although the "RGB" selection slowly transitions between all colors). The currently selected color will have an asterisk (*) next to it. RGB* in the example below.

The available colors (in order) are as follows:

M•Caster Studio will remember the selection every time it is powered up thereafter.

Don't forget to set the M•Caster Studio's LED to match the carpet and drapes!
Utility
We are onto the sixth and final feature: 'Utility'. However, we would like to bring back Ron Popeil since there are additional features tucked within 'Utility'.
Let's take a deeper dive into what options are available within Utility, starting at the top-left with 'Output Gain':

Utility – Output Gain:
M•Caster Studio contains three "types" of outputs:
- Monitoring Outputs – this covers the gaming headsets [#4], headphones [#8] and speaker outputs [#9].
- Phone Outputs – this covers the Ch.3 output, regardless of whether it's hard wired (TRRS) [#8] or a Bluetooth connection.
- USB Output – this covers – you guessed it! – the USB output [#5].
The output level of the monitoring outputs is controlled via the main mix volume knob [#14], but Utility > Output Gain is where to adjust the output gain of the phone/BT and USB outputs.
Tap 'Output Gain' to reveal a screen similar to what is displayed below. From here, rotate the navigation knob [#17] between 'Bluetooth Output', 'USB Output' and 'Headphone and mainout:'. Once the selection you desire is highlighted – 'Bluetooth Output' in the example below – push the navigation knob down to select. Then rotate the knob to raise and lower the level of the selected output, Bluetooth or USB. A horizontal fader appears at the bottom of the screen, displaying the current output level.

This covers the Bluetooth and USB output gain portion, but what is up with 'Headphone and mainout' at the bottom of the screen there? Simply put, these outputs may either be linked [default] or unlinked.
When linked, the single main mix volume knob [#14] "combines and controls" the output volume of both the headphone and main output.
However, when unlinked, the main mix volume knob will control the level of the headphone output, but the navigation knob [#17] controls the level of the main output... but only when on the main home screen.
Utility – Storage Mode:

'Storage Mode' and 'Firmware Update' work together, so we'll cover what they are and how to perform a Firmware Update utilizing both.
'Storage Mode' is the place to select whether M•Caster Studio has control over the cache storage (INTERNAL) or if a computer does (EXTERNAL).

In INTERNAL mode, M•Caster Studio has read and write access over the file system, can play samples from memory and update any parameters. This is the default setting. When 'Storage Mode' is tapped, notice that EXTERNAL access is OFF.

In EXTERNAL mode, the computer has (almost) complete control over the M•Caster Studio. You can still mix audio from connected devices, but you are locked out of sample playback and editing/changing parameters. Rotate and select 'Enable PC access' to switch from M•Caster Studio (INTERNAL) to computer (EXTERNAL).
Notice below that EXTERNAL access is now ON. Now notice it on the MixViewer [#20] of your M•Caster Studio... cool!

The first thing you may notice, though, are all the flashing LEDs. Do not fret, this is ok... this is supposed to happen! Did you push a sample pad, input selector switch, home and/or settings switch with no result? That is ok, too. The one thing that does work is pushing the navigation knob down. Please do NOT do this until you have "ejected" the drive from the computer. More on this shortly.
Our goal now is to load the latest firmware on to M•Caster Studio. While the LEDs continue to flash, go to the Mackie website to check for the latest firmware. Download and save the file to the computer's desktop. Unzip the file and open the folder.
There should be a file called something similar to 'M-Caster_Firmware_Update_v1_0_66.bin' within the folder. This folder may be dragged-and-dropped into the EXTERNAL – i.e. computer's – 'M-CASTER' cache.

Once completed, we can now (1) eject the drive – right-click, eject 'M-CASTER'; the external drive should disappear from the desktop to confirm success and (2) disable PC access – press the navigation knob down.
Everything is almost back to normal... except we still need to add the updated firmware to the M•Caster Studio. After returning to the main menu, select Utility > Firmware Update.
In addition to firmware updates, 'Storage Mode' holds another important function. Any samples that are created (or purchased) may be added to M•Caster Studio via 'Storage Mode'. In essence, 'Storage Mode' behaves like an external drive: USB thumb drive, portable hard drive, etc. So copy-and-paste (or drag-and-drop) the samples from the 'external' (i.e. thumb drive) to the 'internal' (i.e. M•CASTER) drive.
Simply follow the same steps as outlined above:
- Enable PC access,
- drag-and-drop the samples into the computer's 'M-CASTER' drive,
- eject the drive, then
- disable PC access.
Follow the steps in Utility > Firmware Update to complete the process.
Samples may be named (and re-named), but please stay away from "special" characters such as...
- @ /: < >? \ |... and more!
Utility – Firmware Update:
See 'Storage Mode' (previous feature) for directions on how to start a firmware update.
'Firmware Update' is the place to view the current version of firmware, and, if available, the place to download the latest firmware on to M•Caster Studio.

As seen below, an update is available! Simply push the navigation knob down when 'Start update' is highlighted.

As you might imagine, we do not want you pushing any buttons, twiddlin' any knobs or (by no means) unplugging the M•Caster Studio! The update does not take long, so please be patient.

The next time you return to Utility > Firmware Update, it should look a little something like this:

As you can see, there is nothing to do other than return back to the main menu.
Utility – Factory Reset [aka Don Lee Vulcan Mind Meld]:
Are things just a complete mess and you want to start with a fresh slate? Well, zero everything out with a simple factory reset.

Tap 'Factory Reset' to reveal a screen similar to what is displayed below. From here, rotate the navigation knob [#17] to either 'Back to menu' or 'Factory reset (erase all)'. Once the selection you desire is highlighted – 'Back to menu' in the example below – push the navigation knob down to select.

Are you ready to do a factory reset? Before selecting 'Factory reset (erase all)' please understand that this erases all settings, including any ContourFX and StreamFX presets, levels, samples, colors, etc. that may have been set. More importantly, this will erase any samples that were recorded, dragged-anddropped, etc. from the file system. This does NOT include the default samples that ship with the product.
After tapping 'Factory reset (erase all)', you will be met with the following two screens. Please do NOT touch or push anything while M•Caster Studio is resetting back to factory settings. Once completed, though, feel free to return to the main menu and start fresh.

When a factory reset is performed, you are also wiping the M•Caster Studio's memory of previously paired devices. To remedy this, on your smartphone, tablet or other Bluetooth device, you will need to 'forget device' in the Bluetooth settings, then re-pair in order to regain communication and functionality.
Utility – Gamer's Paradise:
Mackoids around the world are loving the 'Gamer's Paradise' feature! Here you are able to play or watch! Select 'Gamer's Paradise' to enter.

Tap 'Gamer's Paradise' to reveal a screen similar to what is displayed below. From here, rotate the navigation knob [#17] to 'Play Arcade', 'Watch Arcade' or 'Watch Live Sports'. Once the selection you desire is highlighted – 'Watch Arcade' in the example below – push the navigation knob down to select.

As seen above, there are three choices:
- Play Arcade – Are you a fan of classic arcade games? How about current gaming/video consoles? Any time you feel like "tapping out" from creating your next M•Caster Studio masterpiece, drop in here for a visit. There are an insane amount of games available, so we won't post them all here.
- Watch Arcade – Watching people play games has become a huge phenomenon over the past few years and has grown exponentially. Do you want to watch your favorite gamers play? This is the spot!
- Watch Live Sports – Last, but certainly not least, your M•Caster Studio can stream live sports on the MixViewer. This encompasses nearly every sport – Yukigassen, anyone?! – and at every level from top-performing professionals on down to Pee-Wee football, Ladybugs soccer and the T-ball leagues! It surprised us, but if you want to watch shin-kicking, it, too, is a competitive sport, and is available to watch.
Troubleshooting
If you think your M•Caster Studio has a problem, please check out the following troubleshooting tips and do your best to confirm the problem. Visit the Support section of our website (www.mackie.com/support) where you will find lots of useful information such as FAQs and other documentation. You may find the answer to the problem without having to part with your M•Caster Studio.
No power
- Please note that M•Caster Studio's USB (computer) connection [#5] is audio only. It is not a source of power.
- Our favorite question: Is it plugged in?
Make sure the outlet is live. - Our next favorite question: Is the power switch on?
Gotcha. There is no power switch, but... - Make sure the power cord is plugged all the way into the AC outlet (if utilizing the wall wart).
- Are any of the input selector switch LEDs illuminated?
If not, make sure the AC (or USB) outlet is live.
If so, refer to "No sound" below. - The internal AC line fuse may be blown. This is not a user serviceable part. If you suspect the AC line fuse is blown, please see the "Repair" section next.
No sound
- Do the input selector switches have the correct source(s) selected?
- Is the level knob for the input source turned all the way down? Verify that all the volume controls in the system are properly adjusted.
- Is the signal source turned up? Make sure the signal level from the computer, mixer, MP3 player, phone (or whatever device immediately precedes the M•Caster Studio) is high enough to produce sound.
- Speaking of computers, if one is connected to the M•Caster Studio, make sure
- that the cable is plugged in to the correct jacks and
- that the input and output is changed to 'M•Caster Studio' via Settings on the computer.
Poor sound
- Is it loud and distorted? Make sure that you're not overdriving a stage in the signal chain. Verify that all level controls are set properly.
- Are the input connectors plugged completely into the jacks? Be sure all connections are secure.
- If possible, listen to the signal source with headphones plugged into the preamp stage. If it sounds bad there, it's not the M•Caster Studio.
Noise / Hum / Buzz
- Check the signal cable between the computer/mixer/ MP3 player/phone and the M•Caster Studio. Make sure all connections are secure. These problems usually produce crackling noises, hum, or buzz.
- Make sure the signal cable is not routed near AC cables, power transformers, or other EMI sources (including wall warts and line lumps!). These sources usually produce hum.
- Is there a light dimmer or other triac-based device on the same AC circuit as the M•Caster Studio? Dimmers cause buzzing noises. Use an AC line filter or plug the M•Caster Studio into a different AC circuit.
- If possible, listen to the signal source with headphones plugged in. If it sounds noisy there, it's not the M•Caster Studio.
Other Issues
- Please email or call Technical Support if you are having any other issue(s) not listed here:
- mackie.com/support-contact
- 1-800-898-3211
Repair
Non-warranty service is available at a factory-authorized service center. To locate the nearest service center, visit www.mackie.com/support/service-locator. Service for an M•Caster Studio living outside the United States may be obtained through local dealers or distributors.
If you do not have access to our website, please call our Tech Support department at 1-800-898-3211 (normal business hours, Pacific Time), to explain the problem. They will tell you where the nearest factory-authorized service center is located in your area.
Technical Information
M•Caster STUDIO Specifications
| Noise Characteristics | |
| A-D Dynamic Range (all inputs): | 116 dB |
| D-A Dynamic Range (all outputs): | 120 dB |
| Distortion (THD+N) | |
| (1 kHz, –1dBFS, 20 kHz BW) | |
| Ch 1 XLR Input | <0.02% THD+N |
| Ch 1 1/4" Line Input | <0.05% THD+N |
| Ch 1 1/8" Gaming Headset Input | <0.02% THD+N |
| Ch 2 1/8" Line Input | <0.02% THD+N |
| Ch 2 USB | <0.01% THD+N |
| Ch 3 1/8" Phone Input | <0.01% THD+N |
| Input / Output | |
| Maximum Input Level | +10 dBu |
| Maximum Output Level | +10 dBu |
| Bit Depth / Sample Rate | |
| Supported Bit Depth & Sample Rate | 24-bit / 48 kHz |
| System Requirements | |
| PC | Windows 10 or higher (32 or 64 MB RAM) |
| Android | Android 9 or higher |
| Mac | Mac OS X 10.13 or higher (32 or 64 MB RAM) |
| iOS | iOS 13 or higher |
| Power Requirements | |
| USB-C | 100–240V, 50/60 Hz, 12V 2A |
| Phantom Power | 48VDC to Channel 1 input |
| Physical Dimensions and Weight | |
| Height: | 2.8 in / 72 mm |
| Width: | 5.1 in / 129 mm |
| Depth: | 8.0 in / 203 mm |
| Weight: | 1.5 lb / 0.7 kg |
M•Caster STUDIO Dimensions

Important Safety Instructions
- Read these instructions.
- Keep these instructions.
- Heed all warnings.
- Follow all instructions.
- Do not use this apparatus near water.
- Clean only with a dry cloth.
- Do not block any ventilation openings. Install in accordance with the manufacturer's instructions.
- Minimum distance (5 cm) around the apparatus for sufficient ventilation. The ventilation should not be impeded by covering the ventilation openings with items, such as newspapers, table-cloths, curtains, etc.
- Do not install near any heat sources such as radiators, heat registers, stoves, or other apparatus (including amplifiers) that produce heat.
- No naked flame sources, such as lighted candles, should be placed on the apparatus.
- Protect the power cord from being walked on or pinched particularly at plugs, convenience receptacles, and the point where they exit from the apparatus.
- Only use attachments/accessories specified by the manufacturer.
- Unplug this apparatus during lightning storms or when unused for long periods of time.
- Refer all servicing to qualified service personnel. Servicing is required when the apparatus has been damaged in any way, such as power-supply cord or plug is damaged, liquid has been spilled or objects have fallen into the apparatus, the apparatus has been exposed to rain or moisture, does not operate normally, or has been dropped.
- This apparatus shall not be exposed to dripping or splashing, and no object filled with liquids, such as vases or beer glasses, shall be placed on the apparatus.
- Operating Temperature: 0˚–45˚ C // 32–113˚ F
- RF Power: ≤20dBm (EIRP)
Bluetooth frequency range: 2400–2483.5 MHz
Bluetooth transmitter modulation: GFSK, ω/4-DQPSK, 8-DPSK

To reduce the risk of fire or electric shock, do not expose this apparatus to rain or moisture.
If the product is subjected to static electrical interference, it is necessary to manually restart the product which is within the design scope of the product.
Need help with the M•Caster STUDIO?
- Visit www.mackie.com/support to find: FAQs, manuals, addendums, and other documents.
- Email us at: www.mackie.com/support-contact
- Telephone 1-800-898-3211 to speak with one of our splendid technical support chaps (Monday through Friday, normal business hours, Pacific Time).
19820 North Creek Parkway #201
Bothell, WA 98011 • USA
Phone: 425.487.4333
Toll-free: 800.898.3211
Fax: 425.487.4337
www.mackie.com
Documents / Resources
References
Download manual
Here you can download full pdf version of manual, it may contain additional safety instructions, warranty information, FCC rules, etc.
Download Mackie M-Caster Studio - Live Streaming Mixer Manual
Advertisement


Need help?
Do you have a question about the M-Caster Studio and is the answer not in the manual?
Questions and answers