Advertisement
Advertisement
Table of Contents

Related Manuals for Kogan KACDRYVT50A


Summary of Contents for Kogan KACDRYVT50A
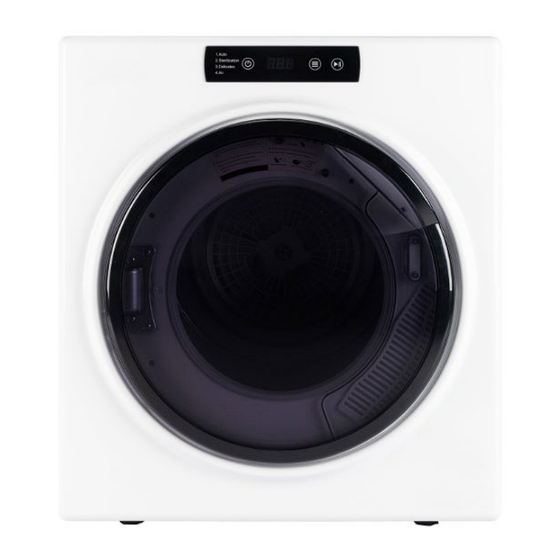
- Page 1 5KG VENTED DRYER KACDRYVT50A...
-
Page 2: Table Of Contents
Safety & Warnings Overview Installation Operation Cleaning & Care Troubleshooting... -
Page 3: Safety & Warnings
SAFETY & WARNINGS • Read this user guide thoroughly before first use, even if you are familiar with this type of dryer. • The safety precautions enclosed reduce the risk of fire, electric shock and injury when correctly adhered to. •... - Page 4 Do not attempt to repair, disassemble or modify the dryer. • Improper installation may result in the risk of fire, electric shock or injury. • The use of attachments not sold or recommended Kogan.com may cause fire, electric shock or injury.
- Page 5 Plastic substances such as shower caps or waterproof baby bibs. Fabric softeners or similar products, unless they are specifically recommended by Kogan.com for use in a dryer. • Before the dryer is discarded, remove the door. • Do not reach into the dryer if the drum is moving.
- Page 6 Grounding WARNING: • Improper connection of the equipment-grounding conductor can result in a risk of electric shock. Consult a qualified electrician if you are in doubt as to whether the dryer is properly grounded. • Do not modify the plug provided with the dryer. If it will not fit the outlet, have a compatible outlet installed by a qualified electrician.
-
Page 7: Overview
OVERVIEW Control Panel Door Door Latch Door Gasket Window Drum Casing Exhaust Vent Back Cover... - Page 8 Control Panel Power Auto Dry Program Sterilisation Start/Pause Delicate Dry Air Dry Note: The buzzer sounds once per touch.
-
Page 9: Installation
INSTALLATION WARNING: This dryer cannot be mounted upside down. Caution • Two people are required lift this dryer. • To avoid the risk of injury, do not lift the dryer by grasping any of the protruding parts such as the door, as this may damage the dryer. •... - Page 10 Wall Mounting One of the best ways to save space in your laundry room is to mount your dryer on a wall using the mounting kit. The purpose of the mounting kit is to evenly distribute the weight of the dryer to reduce the risk of damage to the dryer. Wall Mounting Kit: Wall Brackets (x2) Spacers (x2)
- Page 11 Mounting the Dryer WARNING: • Never mount the dryer directly onto a plasterboard wall. The wall brackets must always be attached to the wall studs or an additional timber stud that is then attached to the wall studs. If you are unsure, consult a trade professional. •...
- Page 12 Unscrew the x4 screws at the bottom of the back cover. Screws Screws Secure the spacers to the x4 screw holes. Spacers...
- Page 13 To install the exhaust connector, push the exhaust connector into the exhaust vent at the back of the dryer with the exhaust outlet in the direction required. With assistance, carefully mount the dryer on to the bracket. Once the dryer is installed, plug the power cord into an electrical outlet.
-
Page 14: Operation
OPERATION Before Drying • Before using the dryer, carry out the following checks to ensure the dryer is correctly installed and ready for use: Use a spirit level to ensure the dryer is well balanced. Check there is no packaging inside the drum or on the surroundings of the dryer Ensure you also check the back of the dryer for any packaging. - Page 15 Programs • Auto Dry (0-210mins): The dryer will use full heat to gently dry items. The weight of the clothes will determine the time it needs to run for. • Sterilisation (35mins): The dryer will use full heat to gently dry items. •...
-
Page 16: Cleaning & Care
CLEANING & CARE Note: • Disconnect the power plug before performing cleaning or maintenance. • To prolong the service life of your dryer, clean the filters regularly. Cleaning the Interior and Exterior of the Dryer • Wipe the exterior of the dryer with a dry or slightly damp cloth. •... - Page 17 Cleaning the Lint Filter The lint filter must be in place whenever the dryer is in operation. It is recommended to clean the lint filter before each use. To remove the lint filter, insert your fingers into the four holes that surround the exhaust vent shroud and pull out the filter assembly.
- Page 18 After cleaning the lint filter, you must re-assemble the parts in the correct sequence (lint filter - exhaust filter - exhaust vent shroud), aligning the recesses in the centre with the projection in the centre of the drum. Ensure that the filter assembly is firmly inserted.
-
Page 19: Troubleshooting
TROUBLESHOOTING Problem Possible Cause Solution The dryer does not The power cord is not Insert the power cord firmly. turn on. inserted firmly. The door is open. Close the door. If the power is switched on The power cord is not at the electrical outlet, The drum does not inserted. - Page 20 Need more information? We hope that this user guide has given you the assistance needed for a simple set-up. For the most up-to-date guide for your dryer, as well as any additional assistance you may require, head online to help.kogan.com...
Need help?
Do you have a question about the KACDRYVT50A and is the answer not in the manual?
Questions and answers