Table of Contents
Advertisement
Available languages
Available languages
Quick Links
Advertisement
Table of Contents

Related Manuals for Jennov UBox S Series


Summary of Contents for Jennov UBox S Series
- Page 1 Support : support@jennov.com The lastest manual Online Chat If you find that the interface in the manual is different from your app, please scan the QR code above for the latest and more detailed manual. S.2023.068.H5 www.jennov.com support@jennov.com U.S Hotline: +1 3239021978...
- Page 2 Support : support@jennov.com 4G LTE Cellular Solar Security Camera English ----------------------------------- PS 01-16 4G LTE Caméra Surveillance sans Fil Solaire Francais --------------------------------- PS 17-32 4G LTE Solar Überwachungskamera Deutsch ---------------------------------- PS 33-48 4G LTE Telecamera Solare Italiano ----------------------------------- PS 49-64 4G LTE Cámara Vigilancia Solar...
- Page 3 Support : support@jennov.com CATALOGUE English QR Code for More Information What’s Include Product Overview Download the application Registration and Login Add Device White Light Setting Motion Detection Setting - 01 -...
- Page 4 Support : support@jennov.com QR Code for More Information Latest Detailed Manual Operation Guidance Video Scan the QR code above to access more detailed manual and instructional videos. 1. QR code for detailed manual 2. QR code for connection guide Notes: •...
- Page 5 Support : support@jennov.com What’s Include 4G Camera Type-C Cable Solar Panel Solar Panel Bracket Camera Bracket Screw Package x2 Hole Sticker Tweezer Manual - 03 -...
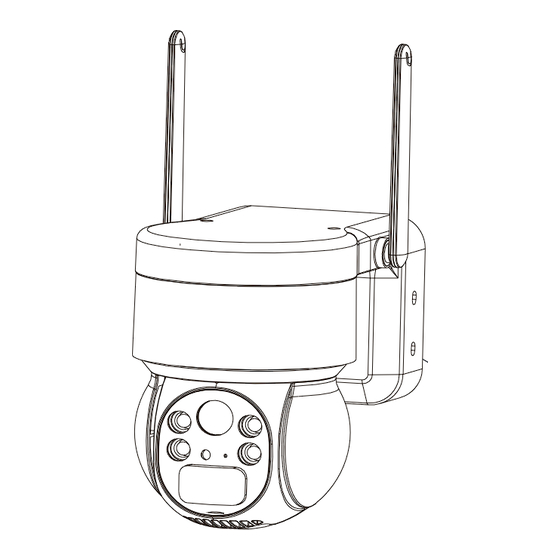
- Page 6 Support : support@jennov.com Product Overview Antenna On/Off Switch(Please switch on the camera power before use.) Charging Port (compatible with external solar panels) Microphone Lens Lights sensor Indicator Light PIR Sensor Note: The Micro-USB port cannot be used for charging, it is only for product test.
-
Page 7: Installation Of The Camera
Support : support@jennov.com Installation of the camera 1. Drill holes according to the hole placement sticker. The recommended drill bit length is 15/64 inches (6 millimeters). 2. Insert the rubber plug into the hole. 3. Tighten the screws to secure the camera in place. -
Page 8: Precautions Before Installation
Support : support@jennov.com Precautions before installation: Please test the 4G signal strength before installing the device. Note: 1. Please fully charge the battery before use, which takes about 5-10 hours for charging. 2. During installation, try to install the solar panel in a place with sufficient sunlight, which can increase the battery usage time. - Page 9 Support : support@jennov.com Schematic Diagram of Camera Connection Installation Recommendation: It is recommended to face the solar panel towards the due south direction and the installation angle is generally equal to the latitude value of the local area or fluctuates up and down by a few degrees.
-
Page 10: Download The Application
Support : support@jennov.com Download the application Search for "UBox" on the App Store or Google Play Store to download the application. ● GooglePlay ● APP Store ● Or scan the QR code below - 08 -... -
Page 11: Registration And Login
Support : support@jennov.com Registration and Login 1. To register an account on the APP, click "Register" and enter your phone number or email address. Check the box to agree to the user agreement, and then click "Register" to receive a verification code. (To ensure a better user experience, please allow all notification permissions to avoid not receiving the verification code.) -
Page 12: Add Device
Support : support@jennov.com Add Device 01 1. Click on "Add a device". 2. Follow the prompt and select "Setup 4G Device". 3. Once the blue indicator light on the device is blinking, click "Next". Note: Please insert the SIM card, raise the antenna, power on the device and reset it before connecting. - Page 13 Support : support@jennov.com Add Device 02 4. Scan the QR code on the device. This process may take 10-30 seconds. 5. Name and categorize the camera and click "Done". 6. Once the connection is complete, you can start watching the video feed.
- Page 14 Support : support@jennov.com White Light Setting 1. Click on the camera list to enter the viewing interface. 2. Click on the bulb icon in the lower right corner of the screen. 3. Click on the button to switch between White Light Mode and Infrared Light Mode.
-
Page 15: Motion Detection Setting
Support : support@jennov.com Motion Detection Setting 1. Click on the gear icon to enter the settings. 2. Click on "Motion Detection" to adjust the sensitivity. PIR human detection is turned on by default, but if turned off, any moving object will trigger an alarm. - Page 16 Support : support@jennov.com Tips for PIR Human Detection Function 1. You can adjust the sensitivity of human detection in the device settings. If used in an environment with high pedestrian traffic, it is recommended to turn off or set the PIR sensitivity of the device to low in order to avoid unnecessary wake-up of the device and prolong battery life.
- Page 17 Support : support@jennov.com F A Q Q1: Why is the device always offline? A: Check if the 4G SIM card has run out of data usage, and refer to the SIM card manual to check the data usage. Q2: Why does the solar panel suddenly stopped charging the device? A: 1) Check if there is sufficient sunlight in the location where the solar panel is installed.
- Page 18 12-month warranty from the order date on. After finish filling or scanning, please take a picture and send it to the email(support@jennov.com). Then your free warranty will take effect ! During the warranty period, if any parts of product are damaged, please contact us immediately and we will provide satisfactory resolution.
- Page 19 Support : support@jennov.com CATALOGUE Francais QR Code pour plus d'informations Ce qui est inclus Aperçu du produit Téléchargez l'application Registration and Login Ajouter un appareil Réglage de la lumière blanche Réglage de la détection de mouvement - 17 -...
- Page 20 Support : support@jennov.com QR Code pour plus d'informations Manuel Vidéo Scannez le code QR ci-dessus pour accéder à un manuel plus détaillé et des vidéos d'instructions. 1. QR code pour le manuel détaillé 2. QR code pour le guide de connexion Remarques : •...
- Page 21 Support : support@jennov.com Ce qui est inclus Caméra 4G Câble Type-C Panneau solaire Support de panneau solaire Support de caméra Ensemble de vis x2 Autocollant pour trou Pince à épiler Manuel - 19 -...
- Page 22 Support : support@jennov.com Aperçu du produit Interrupteur marche/arrêt (Veuillez allumer l'alimentation de la caméra avant utilisation.) Antenne Port de charge (compatible avec les panneaux solaires externes) Microphone Lentille Lumières Capteur Témoin lumineux Capteur PIR Note : Le port Micro-USB ne peut pas être utilisé pour la charge, il est uniquement destiné...
-
Page 23: Installation De La Caméra
Support : support@jennov.com Installation de la caméra : 1. Percez des trous selon l'autocollant de placement des trous. La longueur recommandée de la mèche est de 15/64 pouces (6 millimètres). 2. Insérez le bouchon en caoutchouc dans le trou. 3. Serrez les vis pour fixer la caméra en place. - Page 24 Support : support@jennov.com Précautions avant l'installation : Veuillez tester la force du signal 4G avant d'installer le dispositif. Note : 1. Veuillez charger complètement la batterie avant utilisation, cela prend environ 5 à 10 heures pour la charge. 2. Lors de l'installation, essayez de placer le panneau solaire dans un endroit avec suffisamment de soleil, ce qui peut augmenter le temps d'utilisation de la batterie.
- Page 25 Support : support@jennov.com Diagramme schématique de la connexion de la caméra Recommandation d'installation : Il est recommandé de faire face au panneau solaire vers le sud et l'angle d'installation est généralement égal à la valeur de la latitude de la région locale ou fluctue légèrement vers le haut ou vers le bas de quelques degrés.
- Page 26 Support : support@jennov.com Téléchargez l'application Recherchez "UBox" sur l'App Store ou le Google Play Store pour télécharger l'application. ● Google Play ● App Store ● Ou scannez le code QR ci-dessous. - 24 -...
- Page 27 Support : support@jennov.com Registration and Login 1.Pour créer un compte sur l'application, cliquez sur "S'inscrire" et saisissez votre numéro de téléphone ou votre adresse e-mail. Cochez la case pour accepter les conditions d'utilisation, puis cliquez sur "S'inscrire" pour recevoir un code de vérification. (Pour une meilleure expérience utilisateur, veuillez autoriser toutes les permissions de notification afin de ne pas manquer la réception du code de vérification.)
-
Page 28: Ajouter Un Appareil
Support : support@jennov.com Ajouter un appareil 1. Cliquez sur "Ajouter un appareil". 2. Suivez les instructions et sélectionnez "Configurer un appareil 4G". 3. Une fois que le voyant bleu sur l'appareil clignote, cliquez sur "Suivant". Note : Veuillez insérer la carte SIM, déployer l'antenne, allumer l'appareil et le réinitialiser avant de le connecter. - Page 29 Support : support@jennov.com Ajouter un appareil 4. Scannez le code QR sur l'appareil. Ce processus peut prendre de 10 à 30 secondes. 5. Nommez et catégorisez la caméra, puis cliquez sur "Terminé". 6. Une fois la connexion terminée, vous pouvez commencer à regarder la vidéo en direct.
- Page 30 Support : support@jennov.com Réglage de la lumière blanche 1. Cliquez sur la liste des caméras pour accéder à l'interface de visualisation. 2. Cliquez sur l'icône d'ampoule dans le coin inférieur droit de l'écran. 3. Cliquez sur le bouton pour basculer entre le mode lumière blanche et le mode lumière infrarouge.
- Page 31 Support : support@jennov.com Réglage de la détection de mouvement 1.Cliquez sur l'icône d'engrenage pour accéder aux paramètres. 2.Cliquez sur "Détection d' activité" pour ajuster la sensibilité. La détection humaine PIR est activée par défaut, mais si elle est désactivée, tout objet en mouvement déclenchera une alarme.
- Page 32 Support : support@jennov.com Conseils pour la fonction de détection humaine PIR 1. Vous pouvez ajuster la sensibilité de la détection humaine dans les paramètres de l'appareil. Si vous l'utilisez dans un environnement avec beaucoup de passages piétons, il est recommandé de désactiver ou de régler la sensibilité PIR de l'appareil sur bas pour éviter les réveils inutiles de l'appareil et...
- Page 33 Support : support@jennov.com F A Q 1: Pourquoi l'appareil est-il toujours hors ligne ? R : Vérifiez si la carte SIM 4G a épuisé son quota de données, et consultez le manuel de la carte SIM pour vérifier l'utilisation des données.
- Page 34 12 mois. Une fois que vous avez terminé de remplir ou de scanner, veuillez prendre une photo et l'envoyer par courriel à l'adresse (support@jennov.com). Ensuite, votre garantie gratuite entrera en vigueur ! Pendant la période de garantie, si des pièces du produit sont endommagées, veuillez nous contacter immédiatement et nous vous fournirons une solution...
- Page 35 Support : support@jennov.com Katalog Deutsch QR-Code für weitere Informationen Was ist enthalten Produktübersicht Die Anwendung herunterladen Registrierung und Anmeldung Gerät hinzufügen Einstellung des weißen Lichts Einstellung der Bewegungserkennung - 33 -...
- Page 36 Support : support@jennov.com QR-Code für weitere Informationen Handbuch Video Scannen Sie den oben angezeigten QR-Code für das aktuell- ste und detaillierteste Handbuch. 1. QR-Code für das neueste und detailliertere Handbuch. 2. QR-Code für das Video der Einrichtungsanleitung. Hinweise • Das Handbuch ist eine Kurzanleitung. Scannen Sie bitte den...
- Page 37 Support : support@jennov.com Was ist enthalten 4G kamera Type-C-Kabel Solarpanel Solarmodulhalterung Kamerahalterung Schraubenpaket x2 Lochaufkleber Pinzette Handbuch - 35 -...
- Page 38 Support : support@jennov.com Produktübersicht Antenne Ein-/Aus-Schalter (Bitte schalten Sie die Kamerapower vor Gebrauch ein.) Ladeanschluss (kompatibel mit externen solarpanels) Mikrofon Objektiv Lichter Sensor Statusanzeige PIR Sensor Hinweis: Der Micro-USB-Anschluss kann nicht zum Aufladen verwendet werden, er dient nur zum Produkttest.
-
Page 39: Installation Der Kamera
Support : support@jennov.com Installation der Kamera 1. Bohren Sie Löcher entsprechend der Lochplatzierungsaufkleber. Die empfohlene Bohrerlänge beträgt 15/64 Zoll (6 Millimeter). 2. Setzen Sie den Gummistopfen in das Loch ein. 3. Ziehen Sie die Schrauben fest, um die Kamera zu befestigen. -
Page 40: Vorsichtsmaßnahmen Vor Der Installation
Support : support@jennov.com Vorsichtsmaßnahmen vor der Installation: Bitte überprüfen Sie vor der Installation die Stärke des 4G-Signals. Hinweis: 1. Bitte laden Sie den Akku vor der Verwendung vollständig auf, was etwa 5-10 Stunden dauert. 2. Bei der Installation versuchen Sie, das Solarmodul an einem Ort mit ausreichendem Sonnenlicht zu installieren, um die Batterielaufzeit zu verlängern. - Page 41 Support : support@jennov.com Schaltbild der Überwachungskamera-Verbindung Installationsempfehlung: Es wird empfohlen, das Solarmodul in Richtung Süden auszurichten und den Installationswinkel in der Regel dem Breitengrad des Standorts gleichzusetzen oder um einige Grad nach oben und unten zu variieren. Das folgende Schaltbild dient nur zur Referenz. Das Aussehen und das Modell der Kamera können von dem bestellten Produkt abweichen, aber die Verbindung...
- Page 42 Support : support@jennov.com Die Anwendung herunterladen Suchen Sie im App Store oder Google Play Store nach "UBox", um die Anwendung herunterzuladen. ● Google Play ● App Store ● Oder scannen Sie den untenstehenden QR-Code - 40 -...
- Page 43 Support : support@jennov.com Registrierung und Anmeldung 1. Um ein Konto in der App zu registrieren, klicken Sie auf und geben Sie Ihre Telefonnummer oder E-Mail-Adresse ein. Aktivieren Sie das Kontrollkästchen, um den Nutzungsbedingungen zuzustimmen, und klicken Sie dann auf "Registri- eren", um einen Bestätigungscode zu erhalten.
-
Page 44: Gerät Hinzufügen
Support : support@jennov.com Gerät hinzufügen 1. Klicken Sie auf "smart gerat hinzufügen". 2. Folgen Sie der Anleitung und wählen Sie "4g-Geräte installieren". 3. Sobald die blaue Statusanzeige am Gerät blinkt, klicken Sie auf "Nächster Schritt". Hinweis: Bitte legen Sie die SIM-Karte ein, stellen Sie die Antenne auf, schalten Sie das Gerät ein und setzen Sie es zurück, bevor Sie eine Verbindung herstellen. - Page 45 Support : support@jennov.com Gerät hinzufügen 4. Scannen Sie den QR-Code auf dem Gerät. Dieser Vorgang kann 10-30 Sekunden dauern. 5. Benennen und kategorisieren Sie die Kamera und klicken Sie auf "Fertig". 6. Sobald die Verbindung abgeschlossen ist, können Sie mit der Anzeige des Videostreams beginnen.
- Page 46 Support : support@jennov.com Einstellung des weißen Lichts: 1. Klicken Sie auf die Kamera-Liste, um zur Ansichtsoberfläche zu gelangen. 2. Klicken Sie auf das Glühbirnensymbol in der unteren rechten Ecke des Bildschirms. 3. Klicken Sie auf die Schaltfläche, um zwischen dem Modus mit weißem Licht und dem Modus mit Infrarotlicht zu wechseln.
- Page 47 Support : support@jennov.com Einstellung der Bewegungserkennung: 1. Klicken Sie auf das Zahnrad-Symbol, um die Einstellungen zu öffnen. 2. Klicken Sie auf "Erkennung der Aktivitat", um die Empfindlichkeit anzupas- sen.Die PIR-Personenerkennung ist standardmäßig aktiviert, aber wenn sie deaktiviert ist, löst jede bewegte Objekt eine Alarm aus.
- Page 48 Support : support@jennov.com Tipps zur PIR-Personenerkennungsfunktion 1. Sie können die Empfindlichkeit der Personenerkennung in den Geräteeinstellungen anpassen. Wenn Sie das Gerät in einer Umge- bung mit viel Fußgängerverkehr verwenden, wird empfohlen, die PIR-Empfindlichkeit des Geräts auszuschalten oder auf niedrig einzustellen, um unnötiges Aufwecken des Geräts zu vermeiden und die Batterielebensdauer zu verlängern.
- Page 49 Support : support@jennov.com F A Q 1: Warum ist das Gerät immer offline? A: Überprüfen Sie, ob das 4G-SIM-Karte das Datenvolumen aufgebraucht hat, und prüfen Sie das SIM-Karten-Handbuch, um den Datenverbrauch zu überprüfen. 2: Warum hat das Solarmodul plötzlich aufgehört, das Gerät aufzulad- en? Warum ist das Gerät immer offline?
- Page 50 Sie den QR-Code, um die kostenlose 12-monatige Garantie zu aktivieren. Nachdem Sie das Ausfüllen oder Scannen abges- chlossen haben, machen Sie bitte ein Foto und senden Sie es an die E-Mail-Adresse (support@jennov.com) . Dann tritt Ihre kostenlose Garantie in Kraft! Während des Garantiezeitraums, wenn Teile des Produkts beschädigt sind, kontaktieren Sie uns bitte umgehend und wir...
- Page 51 Support : support@jennov.com Catalogo Italiano Codice QR per ulteriori informazioni Cosa è incluso Panoramica del prodotto Scarica l'applicazione Registrazione e accesso Aggiungi dispositivo Impostazione della luce bianca Impostazione Rilevazione Movimento - 49 -...
- Page 52 Support : support@jennov.com Codice QR per ulteriori informazioni Manuale Video Scansiona il codice QR sopra per accedere a un manuale più dettagliato e a video istruttivi. 1. Codice QR per il manuale dettagliato. 2. Codice QR per la guida alla connessione.
- Page 53 Support : support@jennov.com Cosa è incluso 4G Telecamera Cavo Type-C Pannello solare Supporti per pannelli solari Supporti per telecamera Pacchetto di viti Adesivi di Foro Pinzetta Manuale - 51 -...
- Page 54 Support : support@jennov.com Panoramica del prodotto Interruttore On/Off (Si prega di accendere Antenna l'alimentazione della fotocamera prima dell'uso.) Porta di ricarica (compatibile con pannelli solari esterni) Microfono Lente luce Sensore Luce indicatrice Sensore PIR Nota: La porta Micro-USB non può essere utilizzata per la ricarica, è...
-
Page 55: Installazione Della Telecamera
Support : support@jennov.com Installazione della telecamera 1. Praticare i fori in base all'adesivo per il posizionamento dei fori. La lunghezza del trapano consigliata è di 15/64 di pollice (6 millimetri). 2. Inserire il tappo di gomma nel foro. 3. Stringere le viti per fissare la telecamera nella posizione desiderata. -
Page 56: Precauzioni Prima Dell'installazione
Support : support@jennov.com Precauzioni prima dell'installazione Si consiglia di verificare la potenza del segnale 4G prima di installare il dispositivo. Nota: 1. Si prega di caricare completamente la batteria prima dell'uso, ciò richiede circa 5-10 ore di ricarica. 2. Durante l'installazione, cerca di posizionare il pannello solare in un luogo con sufficiente luce solare, il che può... - Page 57 Support : support@jennov.com Diagramma schematico della connessione della telecamera Raccomandazione di installazione: Si consiglia di orientare il pannello solare verso la direzione sud e l'angolo di installazione è generalmente uguale al valore della latitudine dell'area locale o varia leggermente al rialzo o al ribasso di alcuni gradi.
- Page 58 Support : support@jennov.com Scarica l'applicazione Cerca "UBox" su App Store o Google Play Store per scaricare l'applicazione. ● Google Play Store ● App Store ● Oppure scannerizza il codice QR qui sotto. - 56 -...
- Page 59 Support : support@jennov.com Registrazione e accesso 1. Per registrare un account nell'app, fai clic su "Registrati" e inserisci il tuo numero di telefono o indirizzo email. Seleziona la casella per accettare l'accordo dell'utente, quindi fai clic su "Registrati" per ricevere un codice di verifica.
- Page 60 Support : support@jennov.com Aggiungi dispositivo 1. Fai clic su "Aggiungi dispositivo intelligente". 2. Segui la guida e seleziona "Installa dispositivo 4G". 3. Una volta che la luce indicatrice blu sul dispositivo sta lampeggiando, fai clic su "In seguito". Nota: Prima di effettuare la connessione, inserisci la scheda SIM, alza l'antenna, accendi il dispositivo e ripristinalo.
- Page 61 Support : support@jennov.com Aggiungi dispositivo 4. Scansiona il codice QR sul dispositivo. Questo processo potrebbe richiedere da 10 a 30 secondi. 5. Assegna un nome e una categoria alla telecamera, quindi fai clic su "Fine". 6. Una volta completata la connessione, potrai iniziare a visualizzare il flusso video.
- Page 62 Support : support@jennov.com Impostazione della luce bianca 1. Fai clic sull'elenco delle telecamere per accedere all'interfaccia di visualizzazione. 2. Fai clic sull'icona a forma di lampadina nell'angolo in basso a destra dello schermo. 3. Fai clic sul pulsante per passare tra la modalità Luce Bianca e la modalità...
- Page 63 Support : support@jennov.com Impostazione Rilevazione Movimento 1. Fai clic sull'icona dell'ingranaggio per accedere alle impostazioni. 2. Fai clic su "Rilevamento dell'attività" per regolare la sensibilità. La rilevazione umana tramite PIR è attivata per impostazione predefinita, ma se viene disattivata, qualsiasi oggetto in movimento attiverà l'allarme.
- Page 64 Support : support@jennov.com Suggerimenti per la funzione di rilevazione umana tramite PIR 1. Puoi regolare la sensibilità del rilevamento umano nelle impostazioni del dispositivo. Se usi il dispositivo in un ambiente con elevato flusso di persone, si consiglia di disattivare o impo- stare la sensibilità...
- Page 65 Support : support@jennov.com F A Q Domanda 1: Perché il dispositivo è sempre offline? Risposta:Verifica se la scheda SIM 4G è esaurita per quanto riguarda l'utilizzo dei dati, e consulta il manuale della scheda SIM per controllare l'utilizzo dei dati.
- Page 66 Support : support@jennov.com Suggerimenti per la garanzia Per attivare la garanzia gratuita di 12 mesi, si prega di compilare le seguenti informazioni o scannerizzare il codice QR. Una volta completato il modulo o scannerizzato, si prega di scattare una foto e inviarla all'indirizzo email (support@jenn- ov.com).
- Page 67 Support : support@jennov.com Catálogo Español Código QR para obtener más información Qué incluye Resumen del producto Descargue la aplicación Registro y inicio de sesión Agregar dispositivo Configuración de la luz blanca Configuración de detección de movimiento - 65 -...
- Page 68 Support : support@jennov.com Código QR para obtener más información Manual Video Escanee el código QR de arriba para obtener el manual más reciente y detallado. 1. Código QR para el manual más reciente y detallado. 2. Código QR para video de guía de Ajustes.
- Page 69 Support : support@jennov.com Qué incluye 4G Cámara Cable Type-C Pannello solare Soporte de panel solar Soporte de cámara Pacchetto di viti Pegatina de agujeros Pinzas Manual - 67 -...
- Page 70 Support : support@jennov.com Resumen del producto Interruptor de encendido/apagado (Por favor, encienda la alimentación Antena de la cámara antes de usarla.) Puerto de carga (compatible con paneles solares externos) Micrófono Lente Sensor Indicador luminoso Sensor PIR Nota: El puerto Micro-USB no puede utilizarse p ara la carga, es solo para pruebas del producto.
-
Page 71: Instalación De La Cámara
Support : support@jennov.com Instalación de la cámara 1. Perfore agujeros de acuerdo con la ubicaciónindicada en la etiqueta de colocación de agujeros. Se recomienda una longitud de broca de 15/64 pulgadas (6 milímetros). 2. Inserte el tapón de goma en el agujero. -
Page 72: Precauciones Antes De La Instalación
Support : support@jennov.com Precauciones antes de la instalación Por favor, realice una prueba de la intensidad de la señal 4G antes de instalar el dispositivo. Nota: 1. Por favor, cargue completamente la batería antes de usarla, lo cual toma aproximadamente de 5 a 10 horas para la carga completa. - Page 73 Support : support@jennov.com Diagrama esquemático de conexión de la cámara Recomendación de instalación: Se recomienda orientar el panel solar hacia el sur y el ángulo de instalación generalmente es igual al valor de latitud del área local o fluctúa algunos grados hacia arriba o hacia abajo.
- Page 74 Support : support@jennov.com Descargue la aplicación: Busque "UBox" en la App Store o en Google Play Store para descargar la aplicación. ● Google Play ● App Store ● O escanee el código QR a continuación - 72 -...
- Page 75 Support : support@jennov.com Registro y inicio de sesión 1. Para registrar una cuenta en la aplicación, haz clic en "Registrarse" e introduce tu número de teléfono o dirección de correo electrónico. Marca la casilla para aceptar el acuerdo de usuario y luego haz clic en "Registrarse"...
- Page 76 Support : support@jennov.com Agregar dispositivo 1. Haz clic en "Añadir un dispositivo". 2. Sigue las indicaciones y selecciona "Configurar dispositivo 4G". 3. Una vez que la luz indicadora azul del dispositivo esté parpadeando, haz clic en "Siguiente". Nota: Por favor, inserte la tarjeta SIM, levante la antena, encienda el dispositivo y restablézcalo antes de realizar la conexión.
- Page 77 Support : support@jennov.com Agregar dispositivo 4. Escanea el código QR en el dispositivo. Este proceso puede tardar entre 10 y 30 segundos. 5. Nombra y categoriza la cámara y haz clic en "Finalizar". 6. Una vez que la conexión esté completa, podrás comenzar a ver la transmis- ión de video.
- Page 78 Support : support@jennov.com Configuración de la luz blanca 1. Haz clic en la lista de cámaras para ingresar a la interfaz de visualización. 2. Haz clic en el icono de bombilla en la esquina inferior derecha de la pantalla. 3. Haz clic en el botón para alternar entre el modo de luz blanca y el modo de luz infrarroja.
- Page 79 Support : support@jennov.com Configuración de detección de movimiento Haz clic en el icono de engranaje para ingresar a la configuración. Haz clic en "Detecta actividad" para ajustar la sensibilidad. La detección de movimiento PIR está activada de forma predeterminada, pero si se desactiva, cualquier objeto en movimiento activará...
- Page 80 Support : support@jennov.com Consejos para la función de detección humana PIR Puedes ajustar la sensibilidad de la detección humana en la configuración del dispositivo. Si se utiliza en un entorno con un alto tráfico de personas, se recomienda desactivar o configurar la sensibilidad PIR del dispositivo en bajo para evitar el despertar innecesario del dispositivo y prolongar la vida útil de la batería.
- Page 81 Support : support@jennov.com F A Q 1: ¿Por qué el dispositivo siempre está desconectado? R: Verifica si la tarjeta SIM 4G se ha quedado sin uso de datos y consulta el manual de la tarjeta SIM para verificar el uso de datos.
- Page 82 QR para activar la garantía gratuita de 12 meses. Después de completar o escanear, tome una foto y envíela por correo electrónico (support@jennov.com). ¡Entonces su garantía gratuita entrará en vigor! Durante el período de garantía, si alguna parte del producto está...
Need help?
Do you have a question about the UBox S Series and is the answer not in the manual?
Questions and answers