
Related Manuals for ECOWITT WH0295


Summary of Contents for ECOWITT WH0295
- Page 1 Wireless Indoor Air Quality Monitor with PM2.5 / PM10 / CO / Temperature/ Humidity 5-In-1 Detection Sensor Model: WH0295...
- Page 2 QR perleggi il manuale italiano e conservalo perReferenza futura Instruction manuals https://www.ecowitt.com/api/quickstart/product?id=248 Help Our product is continuously changing and improving, particularly online services and associated applications. To download the latest manual and additional help, please contact our technical support team: support@ecowitt.com support.eu@ecowitt.net (EU/UK)
-
Page 3: Table Of Contents
Contents 1. Introduction ..............3 2. Get Started ..............3 2.1 Parts List ............4 2.2 Air Quality Sensor Set Up ......4 2.3 Display Console Set Up ........ 6 2.3.1 Display Console Layout ..... 8 3. Wireless Sensor Installation ........8 4. -
Page 4: Introduction
1. Introduction Thanks for your purchasing of the WH0295 Wireless Indoor Air Quality Monitor which measures PM2.5, PM10, CO2 (NDIR based sensor) , Indoor Temperature and Humidity. To ensure the best product performance, please read this manual and retain it for future reference. -
Page 5: Parts List
2.1 Parts List 1 × 5-in-1 Air Quality Sensor (PM2.5 / PM10 / CO2 / Temperature / Humidity 5-In-1) (PM2.5/PM10/CO2/Temperature/Humidity) 1 × WH0295 Display Console (Receiver) 1 × USB Cable 1 × User Manual 2.2 Air Quality Sensor Set Up... - Page 6 Description Description Red LED Indicator Battery Compartment (RF transmission) Cover AC Adapter USB Battery Compartment Power Port Insert two AA batteries (not included) and close the battery door. Connect the USB cable between the sensor and an AC adapter (not included). Note: After inserting the batteries or connecting AC power, the sensor LED indicator will light for 3 seconds –...
-
Page 7: Display Console Set Up
2.3 Display Console Set Up Move the remote about 2 to 3m away from the display console (if the sensor is too close, it may not be received by the display console). Remove the battery door on the back of the display, as shown in Figure 2. - Page 8 All of the LCD segments will light up for a few seconds to verify all segments are operating properly. Full Display Replace the battery door, and fold out the desk stand and place the console in the upright position. The console will instantly display indoor temperature and humidity.
-
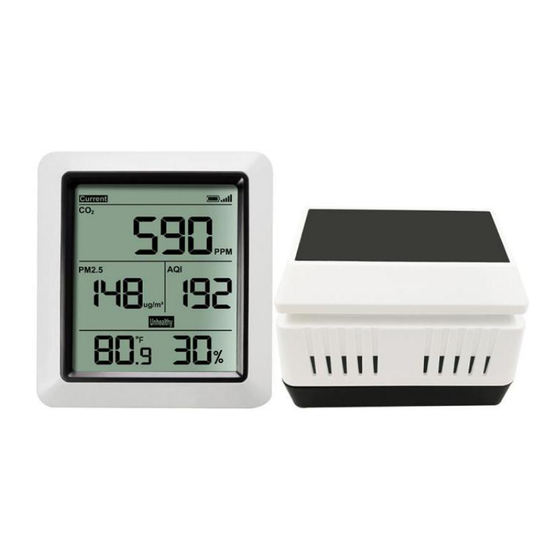
Page 9: Display Console Layout
2.3.1 Display Console Layout Figure 3 1. Data Indicator and Sensor status 2. CO2 3. PM2.5/PM10 4. AQI index 5. Indoor Temperature and Humidity 3. Wireless Sensor Installation Place the sensor on a horizontally surface. Note that the vents must be clear of any obstructions, and recommend placement away from... - Page 10 place on a metal table to prevent RF signal loss. Note: This sensor is designed for indoor use only. Wireless communication susceptible interference, distance, walls and metal barriers. We recommend the following best practices for trouble free wireless communication. 1. Electro-Magnetic Interference (EMI). Keep the console several feet away from computer monitors and TVs.
-
Page 11: Console Operation
4. Console Operation Note: The console has two buttons for easy operation:【°C/°F】 button (on the left), and【MAX】 button (on the right). 4.1 °C/°F Short press 【 ° C/ ° F 】 button: switch between display of temperature unit: °C/°F Press and hold the【°C/°F】button for 2 seconds: switch between display of the PM2.5 and PM10 data display. -
Page 12: Sensor Calibration
sensor for maximum 12minutes until the sensor signal is received. If both button pressed and hold for 2s or longer, it will tell the display to erase the previously learned sensor ID and search for new sensor ID. This can be used when you have a new sensor to be paired with the display, or for the first time use, to erase any previously learned sensor and start as new. - Page 13 wait for some more time, and test it during night to confirm. Once it is confirmed, you can open the back housing, and use a clipper pin to press the Calibrate button as below figure shows, leave it for 4minutes at least, because the calibration must be completed in a ventilated environment with Co2 fluctuations <±15ppm for 4 minutes, and the calibration will always be in the state if the...
- Page 14 However if PM2.5 data is persistently low, it can be that there is a spider net going inside the sensor. So please clean the sensor from time to time to see if there is any sign of spider penetration.
-
Page 15: Best Practices For Wireless
6. Best Practices for Wireless Communication Note: To insure proper communication, place the remote sensor on a flat surface. Do not lean or upside down it to avoid any damage. Keep the console several feet away from computer monitors and TVs. The wireless signal strength displays reception quality. - Page 16 PM2.5 Air Pollution Cautionary Statement Concentration Health Implications Level (for PM2.5) ug/m3 Air quality is considered satisfactory, and air 0 - 50 Good 0.0-12.0 None pollution poses little or no risk Air quality is acceptable; however, Active children and for some pollutants adults, and people with there may be a respiratory disease,...
- Page 17 PM2.5 Air Pollution Concentration Level ug/m3 0 - 50 Good 0-54 51 -100 Moderate 55-154 101-150 Poor 155-254 151-200 Unhealthy 255-354 201-300 Severe 355-424 300+ Hazardous 425+ Carbon Dioxide Levels potential health problems are indicated below: 250-350 ppm: background (normal) outdoor air ...
-
Page 18: Specifications
headaches, sleepiness, and stagnant, stale, stuffy air; poor concentration, loss of attention, increased heart rate and slight nausea may also be present. >5,000 ppm: This indicates unusual air conditions where high levels of other gases also could be present. Toxicity or oxygen deprivation could occur. -
Page 19: Measurement Specifications (Sensor)
Frequency: 433/915/868 MHz (optional) Update Rate: 1 minutes 8.2 Measurement Specifications (Sensor) The following table provides specifications for the measured parameters. Measurement Range Accuracy Resolution >100ug/m3, ±15% PM 2.5 0~999ug/m3 1ug/m3 <100ug/m3, ±15ug/m3 >100ug/m3, ±25% PM 10 0~999ug/m3 1ug/m3 <100ug/m3, ±25ug/m3... -
Page 20: Power Consumption
8.3 Power Consumption Display Console : 1 x AA Alkaline or Lithium batteries (not included) 5-in-1 Air Quality sensor : 2 x AA Alkaline or Lithium batteries (not included) USB mini-B type cable to be connected from a ... - Page 21 receive warranty service, the purchaser must contact us for problem determination and service procedures. This warranty covers only actual defects within the product itself, and does not cover the cost of installation or removal from a fixed installation, normal set-up or adjustments, claims based on misrepresentation by the seller or performance variations resulting...
Need help?
Do you have a question about the WH0295 and is the answer not in the manual?
Questions and answers