Advertisement
Advertisement
Table of Contents

Subscribe to Our Youtube Channel
Related Manuals for Horizon Fitness HSR30


Summary of Contents for Horizon Fitness HSR30
- Page 1 HSR30 / HHR50 OWNER’S MANUAL HPR70 / HPS30...
- Page 2 ENGLISH...
- Page 3 ENGLISH IMPORTANT SAFETY INSTRUCTIONS • It is essential that your equipment is used only WARNING indoors, in a climate controlled room. SAVE THESE INSTRUCTIONS READ ALL INSTRUCTIONS BEFORE DEATH OR SERIOUS INJURY CAN OCCUR ON THIS • Do not Drop dumbbells and kettlebell to the floor. EQUIPMENT.
- Page 4 ENGLISH LOCATION OF THE RACK Place the rack on a level and stable base. There should be 2 feet (60 cm) TRAINING of free space each side surrounding AREA the rack. Do not place the rack in any area that will block any vent or air openings.
- Page 5 ENGLISH ENGLISH ASSEMBLY WARNING During the assembly process there are several areas that special attention must be paid. It is very important to follow the assembly instructions correctly and to make sure all parts are firmly tightened. If the assembly instructions are not followed correctly, the weight bench could have frame parts that are not tightened and will seem loose and may cause irritating noises.
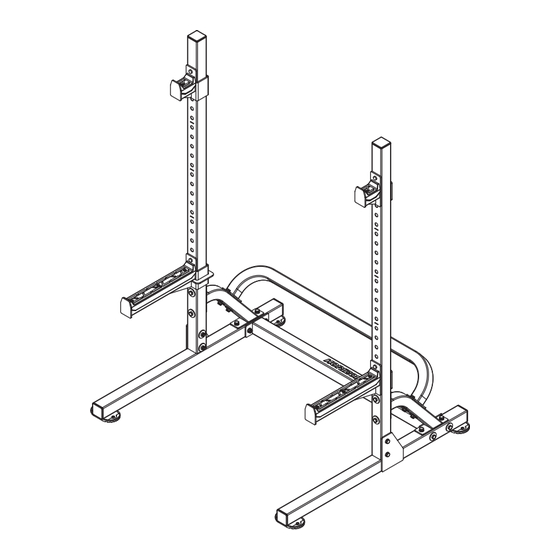
- Page 6 ENGLISH HSR30 SQUAT RACK J-HOOK SAFETY ARMS(M)
-
Page 7: Need Help
ENGLISH UNPACKING HSR30 HARDWARE KIT INCLUDED: 4 Bolt (M10x25 mm) 12 Bolt (M10x80 mm) UNPACKING 4 Bolt (M10x70 mm) Unpack the product where you will be using it. Place the bench 20 Flat Washer (M10) on a level flat surface. It is recommended that you place a 16 Big Washer (Φ38xΦ11) -
Page 8: Assembly Step
ENGLISH ASSEMBLY STEP 1 Hardware For Step 1 Description BOLT (M10x25) BOLT (M10x80) FLAT WASHER (M10) BIG WASHER (Φ38xΦ11) SPRING WASHER (M10) LOCK NUT (M10) AC10 AC10 1. Attach R/L VERTICAL FRAME (AC10) with 2 FLAT WASHER (Z20), 2 BIG WASHER (Z21), 2 LOCK NUT (Z40), 2 BOLT (Z02) to the R/L BASE FRAME (AB10/AB20). - Page 9 ENGLISH ASSEMBLY STEP 2 Hardware For Step 2 Description BOLT (M10x80) BOLT (M10x70) FLAT WASHER (M10) BIG WASHER (Φ38xΦ11) LOCK NUT (M10) 1. Attach R/L base frame with CROSS BRACE (AF11) by 2 WASHER (Z20), 2 WASHER (Z21), 2 LOCK NUT (Z40), 2 BOLT (Z02).
- Page 10 ENGLISH ASSEMBLY STEP 3 1. Attach R/L J-HOOK (AP30/AP10) and SAFETY ARM (AP20/ AP40) to the main frame. AP30 AP10 AP40 AP20...
- Page 11 ENGLISH ASSEMBLY STEP 4 ASSEMBLY COMPLETE! HSR30 TECH SPECS Assembled Dimensions 111 x 127 x 153 cm / (L x W x H) 44” x 50” x 68” Product Weight 44 kg / 97 lbs. Max Training Load 160 kg / 352 lbs.
- Page 12 ENGLISH HHR50 HALF RACK BACKREST CUSHION J-HOOK SAFETY ARMS(M) WEIGHT PLATE STORAGE BAND PEGS...
- Page 13 ENGLISH UNPACKING HHR50 HARDWARE KIT INCLUDED: 14 Bolt (M10x25 mm) 18 Bolt (M10x80 mm) UNPACKING 20 Flat Washer (M10) Unpack the product where you will be using it. Place the bench 28 Big Washer (Φ38xΦ11) on a level flat surface. It is recommended that you place a 2 Big Washer (Φ35xΦ13) protective covering on your floor.
- Page 14 ENGLISH ASSEMBLY STEP 1 Hardware For Step 1 Description BOLT (M10x25) BOLT (M10x80) FLAT WASHER (M10) BIG WASHER (Φ38xΦ11) AC10 SPRING WASHER (M10) LOCK NUT (M10) AC10 1. Attach R/L VERTICAL FRAME (AC10) with 2 FLAT WASHER (Z20), 2 BIG WASHER (Z21), 2 LOCK NUT (Z40), 2 BOLT (Z02) to the R/L BASE FRAME (AB10/AB20).
- Page 15 ENGLISH ASSEMBLY STEP 2 Hardware For Step 2 Description BOLT (M10x25) AD10 BOLT (M10x80) FLAT WASHER (M10) BIG WASHER (Φ38xΦ11) SPRING WASHER (M10) LOCK NUT (M10) AF21 1. Attach R/L BASE FRAME with CROSS BRACE (AF1) by 2 FLAT WASHER (Z20), 2 BIG WASHER (Z21), 2 LOCK NUT (Z40), 2 BOLT (Z02).
- Page 16 ENGLISH ASSEMBLY STEP 3 Hardware For Step 3 Description BOLT (M10x25) BOLT (M10x80) FLAT WASHER (M10) BIG WASHER (Φ38xΦ11) BIG WASHER (Φ35xΦ13) SPRING WASHER (M10) LOCK NUT (M10) LOCK NUT (M12) 1. Attach BARBELL HOLDER (AM2) with 2 FLAT WASHER (Z20), 2 BOLT (Z02), 2 LOCK NUT (Z40), 2 BIG WASHER (Z21) to the CROSS BRACE (AF5).
- Page 17 ENGLISH ASSEMBLY STEP 4 1. Attach R/L J-HOOK (AP30/AP10) and SAFETY ARM (AP20/ AP40) to the main frame. AP30 AP10 AP40 AP20...
- Page 18 ENGLISH ASSEMBLY STEP 5 ASSEMBLY COMPLETE! HHR50 TECH SPECS Assembled Dimensions 110 x 149 x 213 cm / (L x W x H) 44” x 59” x 84” Product Weight 56 kg / 122 lbs. Pull-up: 120 kg / 264 lbs. Max Training Load Overall: 160 kg / 352 lbs.
- Page 19 ENGLISH HPR70 POWER RACK PULL UP HANDLE J-HOOK SAFETY ARMS(L) WEIGHT PLATE STORAGE DIPPING BAR...
- Page 20 ENGLISH UNPACKING HPR70 HARDWARE KIT INCLUDED: 20 Bolt (M10x25 mm) 30 Bolt (M10x80 mm) UNPACKING 32 Flat Washer (M10) Unpack the product where you will be using it. Place the bench 46 Big Washer (Φ38xΦ11) on a level flat surface. It is recommended that you place a 2 Big Washer (Φ35xΦ13) protective covering on your floor.
- Page 21 ENGLISH ASSEMBLY STEP 1 Hardware For Step 1 Description BOLT (M10x25) BOLT (M10x80) FLAT WASHER (M10) BIG WASHER (Φ38xΦ11) SPRING WASHER (M10) LOCK NUT (M10) AB20 1. Attach CROSS BRACE (AF5) with 2 FLAT WASHER (Z20), 2 BIG WASHER (Z21), 2 LOCK NUT (Z40), 2 BOLT (Z02) to the R/L BASE FRAME (AB10/AB20).
- Page 22 ENGLISH ASSEMBLY STEP 2 Hardware For Step 2 Description BOLT (M10x25) BOLT (M10x80) FLAT WASHER (M10) BIG WASHER (Φ38xΦ11) BIG WASHER (Φ35xΦ13) SPRING WASHER (M10) LOCK NUT (M10) LOCK NUT (M12) 1. Attach 4 VERTICAL FRAME (C01) with 4 FLAT WASHER AM10 (Z20), 4 BIG WASHER (Z21), 4 LOCK NUT (Z40), 4 BOLT (Z02) to the base frame.
- Page 23 ENGLISH ASSEMBLY STEP 3 Hardware For Step 3 Description BOLT (M10x25) BOLT (M10x80) FLAT WASHER (M10) AF40 BIG WASHER (Φ38xΦ11) SPRING WASHER (M10) LOCK NUT (M10) 1. Attach R/L TOP BEAM (AF1) and REAR TOP BRACE (AF40) with 4 BOLT (02), 4 FLAT WASHER (Z20), 4 BIG WASHER (Z21), 4 LOCK NUT (Z40), and 3 BOLT (Z01), 3 BIG WASHER (Z21), 3 SPRING WASHER (Z30) to the main frame.
- Page 24 ENGLISH ASSEMBLY STEP 4 Hardware For Step 4 Description BOLT (M10x25) BOLT (M10x80) FLAT WASHER (M10) AF21 BIG WASHER (Φ38xΦ11) SPRING WASHER (M10) LOCK NUT (M10) 1. Attach 2 PULL UP HANDLE (AD10) with 4 BOLT (Z01), 4 BIG AD10 WASHER (Z21), 4 SPRING WASHER (Z30) on to the FRONT TOP BRACE (AF21).
- Page 25 ENGLISH ASSEMBLY STEP 5 Hardware For Step 5 Description BOLT (M10x80) FLAT WASHER (M10) BIG WASHER (Φ38xΦ11) LOCK NUT (M10) 1. Attach BARBELL HOLDER (AM2) with 2 FLAT WASHER (Z20), 2 BOLT (Z02), 2 LOCK NUT (Z40), 2 BIG WASHER (Z21) to the CROSS BRACE (AF5).
- Page 26 ENGLISH ASSEMBLY STEP 6 ASSEMBLY COMPLETE! NOTICE: Attach DIPPING HANDLE (BE10) to the HPR70. BE10 HPR70 TECH SPECS Assembled Dimensions 156 x 149 x 215 cm / (L x W x H) 62” x 59” x 85“ Product Weight 93 kg / 205 lbs. Pull-up &...
- Page 27 ENGLISH HPS30 PULLEY SET PULL DOWN HANDLE LEG HOLDER FOOT REST ROWER HANDLE...
- Page 28 ENGLISH UNPACKING HPS30 HARDWARE KIT INCLUDED: 4 Bolt (M10x25 mm) 4 Bolt (M10x80 mm) UNPACKING 4 Bolt (M10x85 mm) Unpack the product where you will be using it. Place the bench 2 Bolt (M10x75 mm) on a level flat surface. It is recommended that you place a 21 Flat Washer (M10) protective covering on your floor.
- Page 29 ENGLISH ASSEMBLY STEP 1 Hardware For Step 1 Description BOLT (M10X25) BOLT (M10X85) FLAT WASHER (M10) SPRING WASHER (M10) LOCK NUT (M10) 1. Attach FOOTREST (AR30), with 1 BOLT (Z01), 1 SPRING HPR70 WASHER (Z30), 1 LOCK NUT (Z40) to the top of cross brace from HPR70.
- Page 30 ENGLISH ASSEMBLY STEP 2 1. Attach 2 END COVER (D64), 1 BAR (J01), 2 THIGH PAD (J02) to the LEG HOLDER BASE (BH10).
- Page 31 ENGLISH ASSEMBLY STEP 3 Hardware For Step 3 Description BOLT (M10X75) 1. Attach 2 GUIDE ROD (K01), 1 SLIDING WEIGHT POST (BM10), 2 SLIDING SLEEVE (K07) with 2 BOLT (Z05) to the base frame. BM10...
- Page 32 ENGLISH ASSEMBLY STEP 4 Hardware For Step 4 Description BOLT (M10x80) FLAT WASHER (M10) LOCK NUT (M10) 1. Attach UPPER POST (BB20) with 2 FLAT WASHER (Z20), 2 BOLT (Z02) to the GUIDE ROD (K01), and 4 FLAT WASHER BB20 (Z20), 2 LOCK NUT (Z40), 4 BOLT (Z02) to the HPR70.
- Page 33 ENGLISH ASSEMBLY STEP 5 1. Before assemble CABLE (BG20/BG30), please loosen the pre- assemble ROLLER (Z40/G35), SCREW (W40/Z20), ROLLER COVER (G01) one by one, than re-assemble them during the process. 2. Pass the CABLE (BG30) through a-b-c-d-e, and attach the screw at the end of the cable to the WEIGHT POST (BM10).
- Page 34 ENGLISH ASSEMBLY STEP 6 ASSEMBLY COMPLETE! NOTICE: Please use weight plate with ø50mm inner diameter. (Weight plate be sale separately) HPS30 TECH SPECS Assembled Dimensions 97 x 64 x 219 cm / (L x W x H) 38” x 25” x 86” Product Weight 32 kg / 69 lbs.
- Page 35 ENGLISH ANCHORING INSTRUCTIONS REQUIRED TOOLS AND HARDWARE FOR ANCHORING TO CONCRETE FLOORS 1. Hammer drill 2. Soclet wrench and socket 3. Masonary drill bit (reference anchors for correct size) 4. Expandsion anchors ∅12mm 5. Level-meter 1. Using a concrete ø12mm drill bit (reference your hardware for the correct size), drill a 80mm depth hole through the ANCHORING LOCATIONS anchoring hole in the base plate.
-
Page 36: Get Start
ENGLISH GET START atZone Exercise with atZone via Bluetooth, scan QR code on the cover to download and for more information. -
Page 37: Conditioning Guidelines
ENGLISH CONDITIONING GUIDELINES STRETCH FIRST Before using your product, it is best to take a few minutes doing a few gentle stretching exercises. Stretching prior to exercise will improve flexibility and reduce chances of exercise related injury. Ease into each of these stretches with a slow gentle motion. Do not stretch to the point of pain. -
Page 38: Troubleshooting
ENGLISH TROUBLESHOOTING MAINTENANCE The safety considerations designed into the rack Problem Solution can only be maintained when the equipment is regularly examined for damage and wear. Inoperable components Verify the following: should be replaced or the equipment should be put out of use until it is repaired. - Page 40 | HALF RACK | POWER RACK | PULLEY SET Horizon SQUAT RACK | HSR30 | HHR50 | HPR70 | HPS30 Rev. 1.0 E | 1000522996 ©2024 Horizon Fitness...
Need help?
Do you have a question about the HSR30 and is the answer not in the manual?
Questions and answers