Advertisement
Quick Links
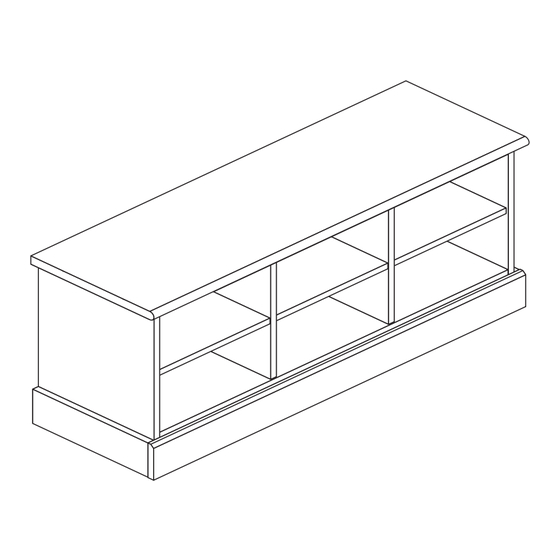
Winchester - Low Hall Cubby Unit
Assembly Instructions -
Dimensions
Width - 100cm
Depth - 33cm
Height - 45cm
Important -
Please read these instructions fully before starting assembly
If you need help or have damaged or missing parts, call the Customer Helpline: 03456 400800
Please keep for future reference
414/9431
MADE IN
BRITAIN
Issue 1 - 15/05/15
Advertisement

Subscribe to Our Youtube Channel
Related Manuals for Argos Winchester 414/9431


Summary of Contents for Argos Winchester 414/9431
- Page 1 Winchester - Low Hall Cubby Unit Assembly Instructions - 414/9431 Please keep for future reference Dimensions Width - 100cm Depth - 33cm MADE IN Height - 45cm BRITAIN Important - Please read these instructions fully before starting assembly If you need help or have damaged or missing parts, call the Customer Helpline: 03456 400800 Issue 1 - 15/05/15...
-
Page 2: Care And Maintenance
Safety and Care Advice Important - Please read these instructions fully before starting assembly • Warning: This unit weighs • Make sure you have enough • We do not approximately 19kgs. space to layout the parts before recommend the Please lift with care. starting. - Page 3 If you have damaged or missing components, call the Components - Panels Customer Helpline: 03456 400800 quoting the reference numbers below Please check you have all the panels listed below Left End Right End (DF2971) (DF2972) (DF3377) (425 x 307mm) (425 x 307mm) (996 x 327mm) Base...
- Page 4 If you have damaged or missing components, call the Components - Fittings Customer Helpline: 03456 400800 quoting the reference numbers below Please check you have all the fittings listed below Note: The quantities below are the correct amount to complete the assembly. In some cases more fittings may be supplied than are required.
- Page 5 If you have damaged or missing components, call the Assembly Instructions Customer Helpline: 03456 400800 quoting the reference numbers below Step 1 10mm Prepare the left end Screw 4 metal dowels into the left end Note: Tighten the metal dowels up fully against Finished the panels.
- Page 6 Assembly Instructions Step 3 Prepare the 2 rails Insert 2 large locking nuts into each of the rails Tap 2 wooden dowels into each of the rails Finished front edge Step 4 Prepare the 2 dividers Tap a wooden dowel into each of the 2 dividers Finished...
- Page 7 Assembly Instructions Step 6 Fit the right end Push the right end onto the rail Use a screwdriver to tighten the large locking fitted to the rail Note: Turn the large locking nut as far as it will go - more than 1/2 a turn.
- Page 8 Assembly Instructions Step 9 Fit the 2 dividers Attach the 2 dividers to the base using screws Step 10 Fit the other rail Push the rail onto the right end Use a screwdriver to tighten the large locking fitted to the rail Step 11 Fit the left end Push the left end...
- Page 9 Assembly Instructions Step 12 Prepare the top Screw 4 metal dowels into the top Step 13 Fit the top Push the top onto the assembly. Use a screwdriver to tighten the 4 large locking nuts fitted to the left end and right Note: To make it easier to fit the top and the plinths, place 4 polystyrene blocks from the packaging...
- Page 10 Assembly Instructions Step 14 Finished Prepare a side plinth top edge Insert a large locking into 1 of the side plinths Tap a wooden dowel into the side plinth Step 15 Prepare the other side plinth Finished top edge Insert a large locking into the side plinth Tap a wooden dowel into the side plinth...
- Page 11 Assembly Instructions Step 18 Fit the plinths Position the 3 plinths onto the assembly, as shown. Secure the 2 side plinths through the left end . . and right end using screws Use the 2 mark holes on the side plinths to line them up with the holes in the ends.
- Page 12 Assembly Instructions Step 20 The measurement from top corner X to bottom corner X must be equal to the measurement from top corner Y to bottom corner Y Fit the back Square up the unit by making sure that measurement x to x equals y to y.
- Page 13 Assembly Instructions Step 22 Fit the shelf studs For each of the 3 shelves , insert 4 shelf studs Step 23 Fit the shelves Lower the 3 shelves down onto the shelf studs...
- Page 14 Step 24 Assembly is complete If you need help or have damaged or missing parts, call the Customer Helpline: 03456 400800 and quote the reference numbers on the component pages. Argos Ltd, 489-499 Avebury Boulevard, Central Milton Keynes, MK9 2NW...
- Page 16 ALR3167...
Need help?
Do you have a question about the Winchester 414/9431 and is the answer not in the manual?
Questions and answers