
Subscribe to Our Youtube Channel
Related Manuals for PDi A Series


Summary of Contents for PDi A Series
- Page 1 USER MANUAL Document Number: PD196-457R1 PDi A-Series Televisions For model numbers ending with “C” or “C2” A24C, A32C, A43C, A55C, A65C A24C2, A32C2, A43C2, A55C2, A65C2 mymedTV.com...
-
Page 2: Table Of Contents
Delete Channels from the Channel Map ............................. 13 Default Program/Power On Channel ............................13 Speaker Enable/Disable................................14 Enable/Disable Sources ................................14 PDi Communication Systems, Inc. ▪ 40 Greenwood Ln ▪ Springboro, Ohio 45066 USA ▪ ▪ Phone www.pdiarm.com www.mymedTV.com 800.628.9870... - Page 3 Internal Speaker Enable ................................. 20 SECURITY MENU ............................... 21 Change Password ..................................21 System Lock/Parental Controls ............................. 21 HOSPITAL MODE MENU ............................22 PDi Communication Systems, Inc. ▪ 40 Greenwood Ln ▪ Springboro, Ohio 45066 USA ▪ ▪ Phone www.pdiarm.com www.mymedTV.com 800.628.9870...
- Page 4 Firewall ...................................... 30 IPTV (Live TV over IP).................................. 30 Wifi Captive Portal ..................................30 TROUBLESHOOTING TIPS ............................. 31 LIMITED WARRANTY .............................. 31 PDi Communication Systems, Inc. ▪ 40 Greenwood Ln ▪ Springboro, Ohio 45066 USA ▪ ▪ Phone www.pdiarm.com www.mymedTV.com 800.628.9870...
- Page 5 United States and Canada PDi Communication Systems, Inc. ▪ 40 Greenwood Ln ▪ Springboro, Ohio 45066 USA ▪ ▪ Phone www.pdiarm.com www.mymedTV.com...
-
Page 6: Important Safety Instructions
When a cart is used, use caution when moving the cart/apparatus combination to avoid injury from tip-over. PDi Communication Systems, Inc. ▪ 40 Greenwood Ln ▪ Springboro, Ohio 45066 USA ▪ ▪ Phone www.pdiarm.com www.mymedTV.com 800.628.9870... -
Page 7: Safety Instructions (French)
12. Utiliser uniquement avec un chariot, stand, trépied, support ou table recommandé par le fabricant ou vendu avec l'appareil. PDi Communication Systems, Inc. ▪ 40 Greenwood Ln ▪ Springboro, Ohio 45066 USA ▪ ▪ www.pdiarm.com www.mymedTV.com... -
Page 8: Mounting
User Manual Page 8 of 31 Mounting PDi offers a wide range of wall, floor and ceiling mounting options. Contact PDi for more information. Connections Pillow Speaker Connection A ¼” stereo-style pillow speaker (pendant control) jack is located on the TV’s connector panel on the left side of the TV. This TV is designed for 5V pillow speaker voltage and works with either a digital pillow speaker that generates digital-style control codes or a single-button analog (switch-style) pillow speaker. -
Page 9: Pillow Speakers
Pillow Speakers To get full use out of all of the features available to patients on PDi A-Series TVs, PDi recommends selecting a pillow speaker with the following buttons: HOME, BACK, NAVIGATION ARROWS, and OK/SELECT. Ideally, the patient will also have a button that gives them the functionality of a mouse. -
Page 10: Side Panel Buttons
These remotes will operate any PDI TV regardless of the TV’s Bed A/B/C/D setting. Because these remotes have the TV SETUP button to gain full access to the TV’s menus, they should not be given to patients. PDi offers other remotes designed for patient use. -
Page 11: Set-Up Wizard
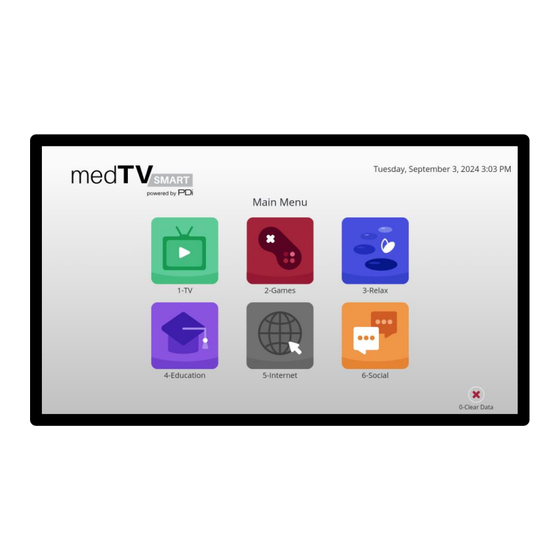
• Internet: TV, Games, Relaxation, Education (link to cdc.gov), Internet browser (google.com homepage), Social (links to Facebook, Instagram, LinkedIn, Pinterest, X(Twitter) PDi Communication Systems, Inc. ▪ 40 Greenwood Ln ▪ Springboro, Ohio 45066 USA ▪ ▪ www.pdiarm.com www.mymedTV.com Phone 800.628.9870... -
Page 12: Initial Power On - With Genio
Connect Device to the Internet Note: a hardwired connection is PDi’s recommended method of providing internet connectivity. Guest networks with captive portal (that require the acceptance of terms and conditions before use) should NOT be used. See Network Requirements section for additional information. -
Page 13: Set Up Channels (Rf)
USB Cloning Once you have a PDi TV configured the way you want, you can copy these settings to other PDi TVs of the same model and size. USB Cloning copies most of the TV settings, including: channel scan/map, power on channel, power on volume, channel aliases, min/max volume, source settings, WiFi settings. -
Page 14: Speaker Enable/Disable
The firmware is field upgradeable, but normally does not require this process and should be performed by the hospital technician. Once complete, the TV settings must be reprogrammed. A special data file is required from the PDi factory to complete this process by USB. -
Page 15: Reset Configuration/Connect To Genio
The Device Management Menu below will appear. With the TV in keyboard mode, press 2 on the remote to reconfigure the device per the set up wizard instructions above. PDi Communication Systems, Inc. ▪ 40 Greenwood Ln ▪ Springboro, Ohio 45066 USA ▪ ▪... -
Page 16: Rf Television Settings
RF TELEVISION SETTINGS TV setup can be done using a PDi programming remote or a keyboard and mouse. The PDi programming remote (Part Number PD108- 520) must be ordered separately. The following instructions assume you have correctly mounted the TV and connected a coax cable that provides RF signal. -
Page 17: Picture Menu
: 16:9 (default), 4:3, Zoom1, Zoom2 Color Temp : Normal (default), Warm, Cool More Settings : brings up Dynamic Light Control (DLC) setting on or off. PDi Communication Systems, Inc. ▪ 40 Greenwood Ln ▪ Springboro, Ohio 45066 USA ▪ ▪ www.pdiarm.com www.mymedTV.com Phone 800.628.9870... -
Page 18: Channel Menu
To run a channel scan: Set the applicable service level as Active Service Level. Navigate to Scan and press OK on the remote. PDi Communication Systems, Inc. ▪ 40 Greenwood Ln ▪ Springboro, Ohio 45066 USA ▪ ▪ www.pdiarm.com www.mymedTV.com... -
Page 19: Configure Channels
: This setting automatically assigns a sequential channel number to the channels in the list. Choose the desired setting and confirm your selection. PDi Communication Systems, Inc. ▪ 40 Greenwood Ln ▪ Springboro, Ohio 45066 USA ▪ ▪ www.pdiarm.com www.mymedTV.com... -
Page 20: Sound Menu
Check or uncheck the boxes next to the sources/inputs for which you want the internal speakers disabled. To ensure the speakers are always disabled, uncheck all boxes. PDi Communication Systems, Inc. ▪ 40 Greenwood Ln ▪ Springboro, Ohio 45066 USA ▪ ▪ www.pdiarm.com www.mymedTV.com... -
Page 21: Security Menu
The default password is 1234. The password can be changed to a 4 digit password of your choice through the Change Password menu. PDi Communication Systems, Inc. ▪ 40 Greenwood Ln ▪ Springboro, Ohio 45066 USA ▪ ▪ www.pdiarm.com www.mymedTV.com... -
Page 22: Hospital Mode Menu
WiFi settings, and, optionally, the splash screen. The splash screen is the “medTV powered by PDi” image seen on the display as the TV boots up. This splash screen can be customized [insert file require] NOTE: USB cloning does NOT copy GENiO project IDs. - Page 23 Insert USB drive containing MCU file provided by PDi i into USB-A port on bottom of TV Press MCU Upgrade. A message will be displayed if no MCU file is found. PDi Communication Systems, Inc. ▪ 40 Greenwood Ln ▪ Springboro, Ohio 45066 USA ▪ ▪ www.pdiarm.com www.mymedTV.com...
-
Page 24: System Recovery
Navigate to Hospital Mode -> System Recovery Confirm that you want to factory reset the TV and select OK to continue PDi Communication Systems, Inc. ▪ 40 Greenwood Ln ▪ Springboro, Ohio 45066 USA ▪ ▪ www.pdiarm.com www.mymedTV.com Phone 800.628.9870... -
Page 25: Common Menu
Open the TV application. Press TV SETUP on the program remote Navigate to Common -> Standby Power Set to Low, Normal, or High PDi Communication Systems, Inc. ▪ 40 Greenwood Ln ▪ Springboro, Ohio 45066 USA ▪ ▪ www.pdiarm.com www.mymedTV.com... -
Page 26: Closed Caption Settings
Text Opacity: Solid (default), Flashing, Translucent, Transparent Background Color: Black (default), White, Red, Green, Blue, Cyan, Magenta, Yellow Background Opacity: Solid (default), Flashing, Translucent, Transparent PDi Communication Systems, Inc. ▪ 40 Greenwood Ln ▪ Springboro, Ohio 45066 USA ▪ ▪ www.pdiarm.com www.mymedTV.com... -
Page 27: Hdmi Cec Setup
Pro:Idiom Status – used to troubleshoot suspected Pro:Idiom problems CCI Status – used to troubleshoot suspected CCI problems MTI Status – used to troubleshoot suspected MTI problems PDi Communication Systems, Inc. ▪ 40 Greenwood Ln ▪ Springboro, Ohio 45066 USA ▪ ▪ www.pdiarm.com www.mymedTV.com... -
Page 28: Advance/System Setting
For full functionality of GENiO, the TV must be able to find the time from the network. Time can be adjusted through this menu. PDi Communication Systems, Inc. ▪ 40 Greenwood Ln ▪ Springboro, Ohio 45066 USA ▪ ▪ www.pdiarm.com www.mymedTV.com... -
Page 29: App Permissions
: Firmware updates are available from PDi over the air. Ensure your device is connected to the internet and select Check For System Update to see if a newer version of firmware is available from PDi. System Recovery : Use this menu to factory reset your television. -
Page 30: Network Requirements
Firewall While the PDi A-Series SmarTV may be used without an internet connection, it can be connected to the internet to provide more patient infotainment options. For connecting to most web sites, including the PDi Genio and OTA servers, the following must be allowed in your firewall. -
Page 31: User Manual
PDi Communication Systems Inc., (“PDi”) standard warranty information is found at pdiarm.com. For information regarding authorized servicing and all other information pertaining to this warranty, please contact PDi COMMUNICATION SYSTEMS, INC. at 40 Greenwood Ln, Springboro, Ohio 45066 or phone 800-628-9870 and ask for the PDi ProServices team.
Need help?
Do you have a question about the A Series and is the answer not in the manual?
Questions and answers