
Subscribe to Our Youtube Channel
Related Manuals for Munters REVENTA ZEW basic 1600


Summary of Contents for Munters REVENTA ZEW basic 1600
- Page 1 »ZEW« Mounting instructions Fresh air systems Example of set-up »ZEW« basic 1600 Fresh air systems 9702079E - 4920...
-
Page 2: Information Page
Chapter 1 General Safety Instructions for Mounting Systems and System Components Fresh air systems »ZEW« basic 1600 Information page Description Fresh air systems »ZEW« basic 1600 Versions automatic opening (a.o.): automatic closing (a.c.) M variant Year of construction 2020 Manufacturer REVENTA GmbH Im Gewerbegebiet 3 48612 Horstmar... - Page 3 Chapter 1 General Safety Instructions for Mounting Systems and System Components Fresh air systems »ZEW« basic 1600 General Safety Instructions for Mounting Systems and System Components IMPORTANT READ CAREFULLY BEFORE USE KEEP FOR REFERENCE PURPOSES General The system and system component parts correspond to the state of the art and - if required - to the applicable harmonized standards.
- Page 4 Chapter 1 General Safety Instructions for Mounting Systems and System Components Fresh air systems »ZEW« basic 1600 Requirements for the qualification of the mounting personnel This applies to all personnel irrespective of the employment relationship or company affiliation. Qualification of the groups of persons must comply with the national workplace safety legislation. Definition of technical qualifications Term Definition...
- Page 5 Chapter 1 General Safety Instructions for Mounting Systems and System Components Fresh air systems »ZEW« basic 1600 Notes for reading the mounting instructions Graphic symbols used Warning symbol Type of danger General warning Warning of electrical voltage Warning of being pulled in and caught Warning of automatic start-up Warning of hand injury Signs used and meaning of the signal words in safety warnings...
-
Page 6: Specific Dangers
Chapter 1 General Safety Instructions for Mounting Systems and System Components Fresh air systems »ZEW« basic 1600 Rules of conduct during mounting work Safe mounting and fail-safe operations depend, for instance, on the tools, auxiliary equipment, media and energies being used carefully and as intended. Any changes or modifications to system components are only permitted after consulting the manufacturer and receiving his written approval. - Page 7 Chapter 1 General Safety Instructions for Mounting Systems and System Components Fresh air systems »ZEW« basic 1600 Electrical voltage Working on electrical components/sub-assemblies must only be carried out by qualified electricians or authorized specialists under the direction and supervision of a qualified electrician in accordance with the electrical engineering regulations.
-
Page 8: Warranty And Liability
Chapter 1 General Safety Instructions for Mounting Systems and System Components Fresh air systems »ZEW« basic 1600 Essential requirements for reliable commissioning The installation can be put into operation safely: ▪ When all the relevant components and safety devices (fixed, moving and electrical safety components) are mounted and in working order. -
Page 9: Basic Instructions
Chapter 2 Instructions for fresh air inlets Fresh air systems »ZEW« basic 1600 Instructions for fresh air inlets Basic instructions Tension-free installation Eliminate any deformation in fresh air inlets during installation. Deformed fresh air inlets are not air-tight, meaning daylight and air can penetrate. Carrying out installation as described prevents deformation in the fresh air inlets. - Page 10 Chapter 2 Instructions for fresh air inlets Fresh air systems »ZEW« basic 1600 Installation Insert fresh air inlet into wall recess. Use installation aids to centre it. Support with added prop in centre (made of wood, for example). Fasten wall air inlet onto wall. Foam in distance with light expanding spray foam.
- Page 11 Chapter 2 Instructions for fresh air inlets Fresh air systems »ZEW« basic 1600 Position of the cord guide with wall guide Page 11/29...
- Page 12 Chapter 2 Instructions for fresh air inlets Fresh air systems »ZEW« basic 1600 Distances between wall guide / ceiling guide and fresh air inlets Type Distance A (minimum) a.o. with wall guide a.c. with wall guide a.o. with ceiling guide –...
-
Page 13: Technical Data
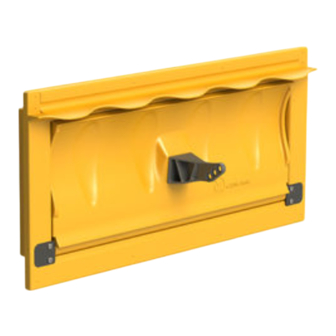
Chapter 3 »ZEW« basic 1600 wall air inlet Fresh air systems »ZEW« basic 1600 »ZEW« basic 1600 wall air inlet Introduction The wall air inlet regulates the fresh air stream into livestock sheds. It is opened in the following ways in this model: ▪... - Page 14 Chapter 3 »ZEW« basic 1600 wall air inlet Fresh air systems »ZEW« basic 1600 Frame depth 100mm Type Item code Air flow rate* Tensile Stroke Weight force path (kg) (mm) »ZEW« basic 1600 202161010 2300 automatic closing (a.c.) »ZEW« basic 1600 202161110 2300 automatic closing (a.c.)
- Page 15 Chapter 3 »ZEW« basic 1600 wall air inlet Fresh air systems »ZEW« basic 1600 3.2.1 Dimensions Wall air inlet a.o. Wall air inlet a.c. Wall air inlet M version Des. Value Des. Value Des. Value Note Frame depth 60 mm The wall air inlet is available in two frame 100 mm...
-
Page 16: Mounting Overview
Chapter 3 »ZEW« basic 1600 wall air inlet Fresh air systems »ZEW« basic 1600 Mounting overview 3.3.1 Work steps for wall air inlet »ZEW« basic 1600 a.c. Use a torque of < 2 Nm to tighten screws which are fastened into PU PLEASE NOTE! foam parts or screwed into place with PU foam parts. - Page 17 Chapter 3 »ZEW« basic 1600 wall air inlet Fresh air systems »ZEW« basic 1600 Work step Tools and material Description 1x flap Push flap mount sideways into the flap. 1x flap mount Place flap mount into the frame stop 2x chipboard screws, 5 x 30 fillister and screw into position.
- Page 18 Chapter 3 »ZEW« basic 1600 wall air inlet Fresh air systems »ZEW« basic 1600 Warning Risk of injury due to springs flying out Springs can fly out and cause injury when you insert them. Wear safety glasses. Work step Tools and material Description 2x springs Fit springs into frame eyelet.
- Page 19 Chapter 3 »ZEW« basic 1600 wall air inlet Fresh air systems »ZEW« basic 1600 3.3.2 Work steps for wall air inlet »ZEW« basic 1600 a.o. Use a torque of < 2 Nm to tighten screws which are fastened into PU PLEASE NOTE! foam parts or screwed into place with PU foam parts.
- Page 20 Chapter 3 »ZEW« basic 1600 wall air inlet Fresh air systems »ZEW« basic 1600 Work step Tools and material Description 1x flap Push flap mount sideways into the flap. 1x flap mount Place flap mount into the frame stop 2x chipboard screws, 5 x 30, fillister and screw into position.
- Page 21 Chapter 3 »ZEW« basic 1600 wall air inlet Fresh air systems »ZEW« basic 1600 3.3.3 Work step »ZEW« basic 1600 M version Use a torque of < 2 Nm to tighten screws which are fastened into PU PLEASE NOTE! foam parts or screwed into place with PU foam parts. Page 21/29...
- Page 22 Chapter 3 »ZEW« basic 1600 wall air inlet Fresh air systems »ZEW« basic 1600 Work step Tools and material Description 1x frame Press seal into the groove. 1x seal Warning: Ensure that the seal is fully pressed into the groove. 1x »ZEW«...
- Page 23 Chapter 3 »ZEW« basic 1600 wall air inlet Fresh air systems »ZEW« basic 1600 Work step Tools and material Description 1x nut M6 Place flap in frame. 1x ULF screw 6 x 14 Push screw through mount on the flap and mount on the frame and fasten with nut.
- Page 24 Chapter 3 »ZEW« basic 1600 wall air inlet Fresh air systems »ZEW« basic 1600 3.3.4 Work steps for optional accessories Use a torque of < 2 Nm to tighten screws which are fastened into PU PLEASE NOTE! foam parts or screwed into place with PU foam parts. Bird protective grid optional Work step Tools and material...
- Page 25 Chapter 3 »ZEW« basic 1600 wall air inlet Fresh air systems »ZEW« basic 1600 Work step Tools and material Description 1x [2.2] chipboard screw Place air guide plate in desired 5 x 30 fillister head position in the catch. Push screw [2.2] through bracket and fasten to air guide plate.
- Page 26 Chapter 3 »ZEW« basic 1600 wall air inlet Fresh air systems »ZEW« basic 1600 Work step Tools and material Description 1x »ZEW« wall guide Knot one end of cord. 1x cord Thread cord through wall guide. Thread cord through flap lever. Warning: The different holes on the flap lever can be used to set a delayed...
- Page 27 Chapter 3 »ZEW« basic 1600 wall air inlet Fresh air systems »ZEW« basic 1600 Wall guide for wall air inlet »ZEW« basic 1600 a.o. and M Fit wall guide at a distance of 100 mm above the wall air inlet. PLEASE NOTE! Work step Tools and material...
-
Page 28: Finishing Work
Chapter 3 »ZEW« basic 1600 wall air inlet Fresh air systems »ZEW« basic 1600 Work step Tools and material Description 1x cord fastener, including mounting Place cord fastener over connecting components* rod. Push screw through cord fastener and fasten with nut. Thread cord through cord fastener and knot the end. -
Page 29: Accessories (Optional)
Chapter 3 »ZEW« basic 1600 wall air inlet Fresh air systems »ZEW« basic 1600 Accessories (optional) Article »ZEW« basic 1600 Wall guide Item no. 9-201990800 Bird protective grid Article no. 202160790 Air guide plate 180 mm Article no. 202160008 Wind deflection hood Article no.
Need help?
Do you have a question about the REVENTA ZEW basic 1600 and is the answer not in the manual?
Questions and answers