Table of Contents
Advertisement
Quick Links
Advertisement
Table of Contents

Subscribe to Our Youtube Channel
Related Manuals for TRENDnet TS-U200


Summary of Contents for TRENDnet TS-U200
-
Page 2: Table Of Contents
ABLE OF ONTENTS ABOUT THIS GUIDE...................4 1. INTRODUCTION ..................5 ..................6 ENERAL EATURES ..................7 ACKAGE ONTENTS .....................8 RODUCT LEDs......................10 Buttons.....................11 2. INSTALLATION..................12 ................12 ETWORKING PPLICATION .............13 NSTALLING THE STORAGE ERVER Connecting to the Network ..............13 Connecting to a Client Workstation ............13 Expanding the USB Devices..............13 ..............14 SING THE... - Page 3 Basic LAN................... 24 Basic Samba ..................24 Basic Time Zone ................. 25 ..............26 ONFIGURATION DVANCED Advanced Account ................26 Advanced Samba ................28 Advanced LAN..................29 Advanced CR backup ................. 30 Advanced Time Zone ................31 Advanced FTP Server................. 32 Advanced Status .................
-
Page 4: About This Guide
BOUT THIS UIDE This manual provides instructions and illustrations on how to use your TSU-200 Network Storage Server with All-in 1 Card Reader/Writer, including: Chapter 1, Introduction, provides the general information on the product. Chapter 2, Installation, describes the hardware installation procedure for the product, and how to access to the storage server. -
Page 5: Introduction
NTRODUCTION Congratulations on purchasing your TS-U200 Network Storage Server with All-in-1 Card Reader/Writer, the easiest and fastest way to share data, file, and resource in your network. This entry-level storage server is the value-added equipment in your network that allows you to control file-sharing needs within a small office/home office (SOHO) environment. -
Page 6: General Features
General Features ♦ Compact-sized design. ♦ Compliant with USB1.1 and USB2.0. ♦ Provides one 10/100Mbps AutoMDIX Fast Ethernet LAN port. ♦ Embedded All-in-1 Card Reader/Writer. ♦ Supports USB “Hot-plug” function. ♦ Two operating modes support: Open mode and Account mode. ♦... -
Page 7: Package Contents
Package Contents Unpack the package and check all the items carefully, and be certain that you have: ♦ One TS-U200 Network Storage Server with Card Reader/Writer ♦ One AC Power Adapter suitable for your country’s electric power service. ♦ One Multi-Language Quick Installation Guide. -
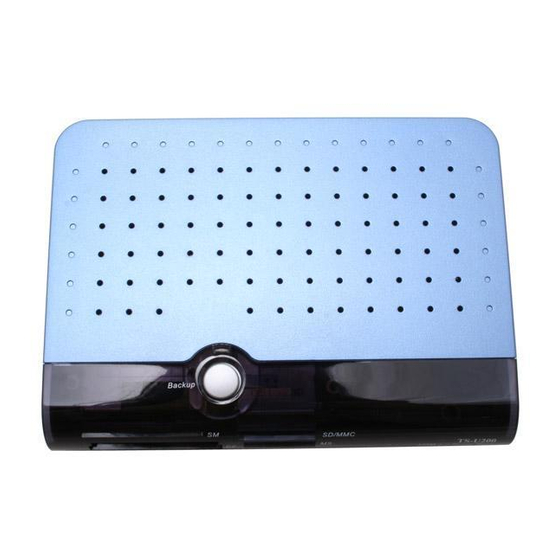
Page 8: Product View
Product View This section describes the externally visible features of the file server. Front View Backup Button LEDs see instructions in page 10. - 8 -... -
Page 9: Reset Button
Rear View DC Power Input Reset Button plug the AC power adapter to this jack. USB Port LAN Connector Unmount connect the USB p l u g L A N c a b l e devices. to this connector. - 9 -... -
Page 10: Leds
LEDs There are four/five LEDs on the front panel: LEDs Description A steady Green light confirms that the storage server is Power powered on. A steady Green light confirms that the storage server has a good connection to your network. When it blinks, the storage server is receiving/ transmitting data from/to the network. -
Page 11: Buttons
Buttons There are three buttons on the unit: Buttons Description Press and hold the Reset Button for 4 seconds to reset the storage server. Please NOTE that the system will Reset restore to factory default settings after pressing this button. Press the button to switch between Sync/Unmount Mode and Mount Mode. -
Page 12: Installation
NSTALLATION Networking Application The following diagram explains the application of your storage server. Network Storage Server Solution - 12 -... -
Page 13: Installing The Storage Server
Installing the Storage Server Follow these steps for a trouble-free operation with your storage server. Connecting to the Network 1. Confirm proper operation of the Gateway/Hub to be connected in the network. 2. Connect the storage server to the Gateway/Hub through the RJ-45 cable. -
Page 14: Using The Storage Server
Using the Storage Server Configuring a Fixed IP Address When you connect your computer to the storage server directly to configure the storage server, you need to check the computer’s IP address, and set up the IP address within the storage server’s IP address range. - Page 15 3. Right-click the Local Area Connection icon and click Properties from the shortcut menu. 4. When the Local Area Connection Properties window appears, choose General tab and select Internet Protocol [TCP/IP], and then click Properties to bring up the Internet Protocol [TCP/IP] Properties window.
- Page 16 5. To configure a fixed IP address, check the “Use the following IP address” option. Then, enter an IP address into the empty field. Suggested IP Address is 192.168.1.x (x is 3~254), and suggested Subnet Mask is 255.255.255.0. 6. Click OK to complete the configuration. - 16 -...
-
Page 17: Accessing The Storage Server
IP address, you can access the storage server through the following steps. 1. Click Start and choose My Network Places. 2. The storage server is named as Samba_Server(TS-U200). If you connect the USB device, it also appears in the window. Connected USB device;... - Page 18 3. Double-click the web_page shared folder, and then double-click the goweb.htm item to launch your web browser and enter the web configuration utility. The login window will show as below. Double-click Enter the User name and password, and select one option to proceed.
-
Page 19: Un Utility Rasy Earch
Run Utility - Easy Search To access and manage the Storage Server easily, the conveniently utility called Easy Search is provided in the Installation CD-ROM under Run Utility. Easy Search is a tool that allows you to set up the storage server’s connection. To Run Utility 1. - Page 20 2. Click the easy_search.exe on your desktop to launch the utility. The control panel will appear as below. Control Panel of Easy Search • Search Device – when launching the utility, it will search the connected storage server(s) automatically, and display the results in the list.
-
Page 21: Web Configuration
ONFIGURATION You can access and manage the Storage Server through a web browser. This chapter provides you with instructions of the Web Configuration Utility, and explains how to set up your Storage Server with the web browser. Web Configuration Utility First, login the web configuration utility as described in the previous section. - Page 22 There is a menu bar in the top of the configuration page, containing five items to set up storage server. The Menu Bar Home – main screen of the utility, providing the brief instructions of the buttons on menu bar. Basic –...
-
Page 23: Configuration - Basic
Configuration - Basic The Basic menu contains three steps that will guide you through the basic configuration for the storage server. Click Basic in the top menu bar to start the step-by-step configuration. Basic Menu – LAN - 23 -... -
Page 24: Basic Lan
Basic The first step is to configure the LAN settings. These options in this step display the current IP address and DHCP service of the file server, and can be modified manually. When completed, click Next. Basic Samba This screen allows you to set up the Workgroup name for the storage server. -
Page 25: Basic Time Zone
Basic Time Zone This screen displays the current time setting of the storage server. Basic Menu – Time Zone The Method pull-down menu allows you to set up the correct time by getting time from the computer or time server (need an Internet connection). -
Page 26: Configuration - Advanced
Configuration - Advanced The Advanced menu contains six submenus: Account, Samba, LAN, Wireless, CR backup, Time zone, FTP server, and Status. Advanced Account The Account submenu contains the options that allow you to add/delete users. Also, you can manage the users of the storage server. - Page 27 Add user: You can add user of the storage server by entering a name in the User name box, and the corresponding password in the Password box. When completed, click Apply to activate the user’s account. Remove user: You can delete an existing user’s account in this option.
-
Page 28: Advanced Samba
Advanced Samba The Samba submenu allows you to set up the Workgroup name for the storage server, and change the name and description of the storage server. You can also manage the session in this submenu. Advanced Menu – Samba Global: Enter the Workgroup name for the storage server;... -
Page 29: Advanced Lan
Security: You can configure the security function by selecting NO, Allow IP, and Deny IP through the Filter Action pull-down menu. Advanced The LAN submenu displays the current IP address and DHCP service of the file server, and can be modified manually. Advanced Menu –... -
Page 30: Advanced Cr Backup
Advanced CR backup The CR backup submenu allows you to backup your files through the Web interface. Click Open to find the file you want to backup, and then click Apply. Advanced Menu – CR backup - 30 -... -
Page 31: Advanced Time Zone
Advanced Time Zone The Time zone submenu displays the current time setting of the file server. For system management purpose, a correct time setting is critical to have accurate time stamps on the system logs. Advanced Menu – Time Zone The Method pull-down menu allows you to set up the correct time by getting time from the computer or time server (need an Internet connection). -
Page 32: Advanced Ftp Server
Advanced FTP Server The FTP server submenu contains the options that allow you to enable/disable the FTP service of the storage server, as well as the relative FTP settings. Advanced Menu – FTP Server (Setting) Start/Stop: This field displays the general information of the FTP Server settings on your storage server. -
Page 33: Advanced Status
- Max user: The users allowed to connect to the FTP server (1~10). - Anonymous: Choose Yes will allow the user connect to the FTP server anonymously. - Idle time: Set up the idle time for the FTP server (1~10 minutes). -
Page 34: Configuration - Maintenance
Configuration - Maintenance The Maintenance menu contains two submenus: Firmware upload and Configuration. Maintenance Firmware Upload The Firmware upload submenu allows you to update the firmware of your storage server once you obtained a latest version of firmware. Click Browse to point to the firmware file, and then click Upload. Maintenance Menu –... -
Page 35: Maintenance Configuration
Maintenance Configuration The Configuration submenu allows you to reload the factory default settings of the storage server. Also, you can set up the Idle time in this submenu. Maintenance Menu – Configuration Default: Clicking Reset allows you to resume the factory default settings of the storage server. -
Page 36: Configuration - Logout
Configuration - Logout Click the Logout button to exit the web configuration utility, and it will return to the login screen of the utility. You can re-login using the admin User name. Alternately, if you set up a new user for the storage server, you can login the utility using the given user account. -
Page 37: Download Files Through Storage Server
OWNLOAD ILES HROUGH TORAGE ERVER Entering Download Page 1. If you are in the configuration mode, click Logout to exit the web configuration utility, and re-login the utility’s download page by clicking the Download Schedule button on the login dialog box. NOTE: If the administrator has added users of the file server, the users can login the Download page with their user name and password. - Page 38 2. The Main menu of Download page will display as below. Home – main screen of the download page, providing the brief instructions of the buttons on menu bar. Download Scheduling – clicks to set up your download schedule. Schedule List – contains the information of scheduled download tasks.
-
Page 39: Scheduling Download Task
Scheduling Download Task Click the Download Scheduling menu to set up your download tasks. Enter the required information in the relative fields. Setup Screen of Download Scheduling Login Method: According to the settings of target server, choose Anonymous or Account from pull-down menu. When you choose Account, you have to enter the correct User name and Password. - Page 40 Save to: Click open to bring up the following window that allows you to assign the destination folder to save the downloaded files. When completed, click OK. When: You have to set up the start-up time to download files from the pull-down menu of the Date and Time options. Option: When the downloaded files have the same filename as the files in the destination folder, checking the Overwrite option will overwrite the old file in the folder.
-
Page 41: Schedule List
Schedule List Click the Schedule List menu to display the scheduled download tasks as below. Scheduled Download Tasks You can edit, delete and view these download tasks from the list. When you change the settings of selected task, click Apply to save the configuration. -
Page 42: Logout
Logout Click the Logout button to exit the download page, and it will return to the login screen of the utility. NOTE: If you are denied to enter the Configuration Utility or Download page, the following warning message will appear on the screen. -
Page 43: Product Specification
RODUCT PECIFICATION Standards Network Standards: IEEE 802.3, IEEE 802.3u Wireless LAN Standard (for wireless model): IEEE 802.11g USB Interface: USB 2.0, USB 1.1 Connecting Ports One 10/100M RJ-45 connector (with AutoMDIX) Two USB 2.0 ports One Power jack Card Reader Compact Flash Card Type I/Type II (CF card) IBM Micro-Drive Smart Media Card (SM card) -
Page 44: Operating System Support
Buttons Reset button Unmount button Backup button LEDs Power (Green) LAN (Green) WLAN (Green, for wireless model only) Mode (Green/Red) Backup (Green/Orange) Management Web-based administrative program Operating System Support Windows 98/ME, Windows NT, Windows 2000/XP Linux SMB Environmental and Physical Power Supply: 5VDC, 2.5/3 Amp Operating Temperature: 5°C to 50°C Storage Temperature: -20°C to 50°C... -
Page 45: Emi Compliance
EMI Compliance FCC Part 15 Class B CE (EN55022/EN55024) VCCI - 45 -... -
Page 46: Limited Warranty
TRENDware warrants its products against defects in material and workmanship, under normal use and service, for the following lengths of time from the date of purchase. TS-U200 – 2 Years Warranty If a product does not operate as warranted above during the applicable warranty period,... - Page 47 RANGE OF THE INTENDED USE, OR BY ACCIDENT, FIRE, LIGHTNING, OR OTHER HAZARD. LIMITATION OF LIABILITY: TO THE FULL EXTENT ALLOWED BY LAW TRENDWARE ALSO EXCLUDES FOR ITSELF AND ITS SUPPLIERS ANY LIABILITY, WHETHER BASED IN CONTRACT OR TORT (INCLUDING NEGLIGENCE), FOR INCIDENTAL, CONSEQUENTIAL, INDIRECT, SPECIAL, OR PUNITIVE DAMAGES OF ANY KIND, OR FOR LOSS OF REVENUE OR PROFITS, LOSS OF BUSINESS, LOSS OF INFORMATION OR DATE, OR OTHER FINANCIAL LOSS ARISING OUT OF OR IN...
-
Page 48: Technical Support
TRENDware website. TRENDware provides FREE technical support for all customers for the duration of the warranty period on this product. TRENDware Technical Support Tel: +1-310-626-6252 Fax: +1-310-626-6267 E-mail: support@trendware.com www.TRENDnet.com Monday ~ Friday, 7:30AM ~ 6:00PM Pacific Standard Time (Except holidays)
Need help?
Do you have a question about the TS-U200 and is the answer not in the manual?
Questions and answers