Table of Contents
Advertisement
Available languages
Available languages
Quick Links
........................................................................................... Seite
Abwicklung im Garantiefall .................................................................. Seite 12
Service ................................................................................................... Seite 12
.................................................................. Seite
................................................................ Seite
............................................................. Seite
........................................................ Seite
.............................................. Seite
.................................................. Seite
6
6
8
8
9
9
9
DE/AT/CH
5
Advertisement
Chapters
Table of Contents

Related Manuals for Parkside 100303547


Summary of Contents for Parkside 100303547
-
Page 1: Table Of Contents
Einleitung ................... Seite Sicherheitshinweise ..............Seite Sägeblatt montieren ..............Seite Astschere verwenden ............. Seite Schnittwinkel einstellen ............Seite Teleskopstange verlängern ..........Seite Äste schneiden und sägen ..........Seite Pflegehinweise ................Seite 10 Entsorgung ..................Seite 10 Garantie ..................... Seite 11 Abwicklung im Garantiefall .............. -
Page 2: Einleitung
Teleskop-Baumschere mit Säge Einleitung Wir beglückwünschen Sie zum Kauf Ihres neuen Produkts. Sie haben sich damit für ein hochwertiges Produkt entschieden. Machen Sie sich vor der ersten Inbetriebnahme mit dem Produkt vertraut. Lesen Sie hierzu aufmerksam die nachfolgende Bedienungsanleitung und die Sicherheitshinweise. Benutzen Sie das Produkt nur wie beschrieben und für die angegebenen Einsatzbereiche. - Page 3 J S tellen Sie vor jedem Gebrauch sicher, dass sich das Produkt in einem einwandfreien Zustand befindet. Beschädigte oder lockere Teile können Verletzungen zur Folge haben. J V ERLETZUNGSGEFAHR! Berühren Sie die Schneide nicht mit bloßen Händen. J A chten Sie auf den festen Sitz der Teleskopstiel-Fixierung. Andernfalls kann sich die Schere lösen und Verletzungen und / oder Sachschäden verursachen.
-
Page 4: Sägeblatt Montieren
J V ORSICHT! VERLETZUNGSGEFAHR! Die Astschere ist sehr scharf und gefährlich. Bitte während der Arbeit immer die nötige Vorsicht walten lassen. Sägeblatt montieren (s. Abb. B) Q Hinweis: Lassen Sie die Schutzhülle auf dem Sägeblatt, während Sie dieses einsetzen oder abmontieren. Lösen und entfernen Sie die Fügelschraube und Unterlegscheibe. -
Page 5: Schnittwinkel Einstellen
Schnittwinkel einstellen (s. Abb. E) j D rehen Sie die Drehscheibe im Uhrzeigersinn und wählen Sie eine der sieben verfügbaren Winkeleinstellungen. j D rehen Sie die Drehscheibe gegen den Uhrzeigersinn, um diese nach der Auswahl der Winkeleinstellung zu fixieren. Hinweis: Achten Sie darauf, dass die Drehscheibe fixiert ist, wenn Sie mit der Arbeit beginnen. -
Page 6: Pflegehinweise
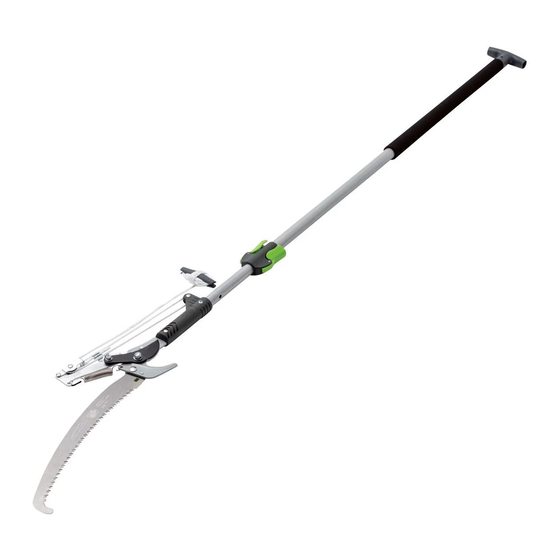
j F ür stärkere Äste können Sie die Astsäge verwenden. Die maximale Sägelänge beträgt 300 mm (siehe Abb. C). Pflegehinweise Q j S äubern Sie die Klingen sorgfältig nach jedem Gebrauch. Schmutz und Saft auf der Klinge führen zu Rostbildung, behindern den Schneidevorgang und können Pflanzenkrankheiten verbreiten. -
Page 7: Garantie
Garantie Das Produkt wurde nach strengen Qualitätsrichtlinien sorgfältig produziert und vor Anlieferung gewissenhaft geprüft. Im Falle von Mängeln dieses Produkts stehen Ihnen gegen den Verkäufer des Produkts gesetzliche Rechte zu. Diese gesetzlichen Rechte werden durch unsere im Folgenden dargestellte Garantie nicht eingeschränkt. -
Page 8: Abwicklung Im Garantiefall
Abwicklung im Garantiefall Um eine schnelle Bearbeitung Ihres Anliegens zu gewährleisten, folgen Sie bitte den folgenden Hinweisen: Bitte halten Sie für alle Anfragen den Kassenbon und die Artikelnummer (z. B. IAN 123456_7890) als Nachweis für den Kauf bereit. Die Artikelnummer entnehmen Sie bitte dem Typenschild, einer Gravur, auf dem Titelblatt Ihrer Anleitung (unten links) oder als Aufkleber auf der Rück- oder Unterseite. - Page 9 Service Österreich Tel.: 0820 201 222 (0,15 EUR / Min.) E-Mail: owim@lidl.at Service Schweiz Tel.: 0842 665566 (0,08 CHF / Min., Mobilfunk max. 0,40 CHF / Min.) E-Mail: owim@lidl.ch DE/AT/CH...
- Page 10 Introduction ..................Page 15 Safety advice ................. Page 15 Attaching a saw blade ............Page 17 Using the loppers ............... Page 17 Setting the cutting angle ............Page 17 Extending the telescopic pole .......... Page 18 Cutting and sawing branches ..........
-
Page 11: Introduction
Extendable Tree Pruner with Saw Introduction We congratulate you on the purchase of your new product. You have chosen a high quality product. Familiarise yourself with the product before using it for the first time. In addition, please carefully refer to the operating instructions and the safety advice below. - Page 12 J D ANGER OF INJURY! Never touch the cutting edges with your bare hands. J C heck that the telescopic handles are fixed in place properly. If not the shears could become loose and cause injury to you or damage to property. J Use the following personal protective equipment when using the product: Wear protective glasses, safety boots, protective gloves...
-
Page 13: Attaching A Saw Blade
Attaching a saw blade (see Fig. B) Q Note: Keep the protective sleeve on the saw during installing or removing it from the cutter. Unscrew and remove the thumbscrew and washer. Insert the saw blade. Guide the bolts through the holes in the saw blade. Re-insert the washer and secure the connection with the thumbscrew. -
Page 14: Extending The Telescopic Pole
Extending the telescopic pole (see Fig. F) Q j L oosen the retaining pin to be able to extend the telescopic pole. j E xtend the telescopic pole to the desired length. Note: The maximum length of the combination loppers is 2.77 m, the minimum length is 2 m. -
Page 15: Disposal
Disposal The packaging is made entirely of recyclable materials, which you may dispose of at local recycling facilities. Contact your local refuse disposal authority for more details of how to dispose of your worn-out product. Warranty The product has been manufactured to strict quality guidelines and meticulously examined before delivery. -
Page 16: Warranty Claim Procedure
The warranty applies to defects in material or manufacture. This warranty does not cover product parts subject to normal wear, thus possibly considered con- sumables (e.g. batteries) or for damage to fragile parts, e.g. switches, rechar- geable batteries or glass parts. Warranty claim procedure To ensure quick processing of your case, please observe the following instructions: Please have the till receipt and the item number (e.g. -
Page 17: Service
Service Service Great Britain Tel.: 0800 404 7657 E-Mail: owim@lidl.co.uk Service Ireland Tel.: 1890 930 034 (0,08 EUR / Min., (peak)) (0,06 EUR / Min., (off peak)) E-Mail: owim@lidl.ie GB/IE... - Page 18 Introduction ..................Page 23 Consignes de sécurité ............. Page 23 Montage de la lame à scie ..........Page 25 Utilisation du sécateur ............Page 25 Réglage de l‘angle de coupe ........... Page 26 Rallonger la perche télescopique ......... Page 26 Couper et scier les branches ..........
-
Page 19: Introduction
Coupe-branches télescopique Introduction Nous vous félicitons pour l‘achat de votre nouveau produit. Vous avez opté pour un produit de grande qualité. Avant la première mise en service, vous devez vous familiariser avec toutes les fonctions du produit. Veuillez lire attentivement le mode d’emploi ci-dessous et les consignes de sécurité. - Page 20 J A vant chaque utilisation, contrôlez systématiquement le parfait état du pro- duit. Des pièces endommagées ou desserrées sont un risque de blessures. J R ISQUE DE BLESSURES ! Ne touchez jamais la lame à main nue. J A ssurez-vous que la perche télescopique soit correctement fixée. Dans le cas contraire, le sécateur risque de se desserrer, entraînant ainsi des risques de blessures et / ou de dommages matériels.
-
Page 21: Montage De La Lame À Scie
J P RUDENCE ! RISQUE DE BLESSURE ! Le sécateur est très tranchant et donc dangereux. Lors des travaux, veillez à toujours agir avec la prudence requise. Montage de la lame à scie (cf. Fig. B) Q Remarque : Laissez la gaine protectrice sur la lame pendant que vous la montez ou démontez. -
Page 22: Réglage De L'angle De Coupe
Réglage de l‘angle de coupe (cf. Fig. E) j T ournez le disque rotatif dans le sens horaire et choisissez parmi les sept options d´angle disponibles. j T ournez le disque rotatif dans le sens anti-horaire pour le fixer selon la sélection de l´angle retenu. -
Page 23: Conseils D´entretien
j V ous utiliserez la scie à branche pour le gros bois. La longueur maximale de la scie est de 300 mm (cf. Fig. C) Conseils d´entretien Q j N ettoyez minutieusement les lames après chaque utilisation. Des salissures ou des résidus de sève sur la lame peuvent entraîner la formation de rouille, et par conséquent, altérer la coupe et propager les maladies des plantes. -
Page 24: Garantie
Garantie Article L217-16 du Code de la consommation Lorsque l‘acheteur demande au vendeur, pendant le cours de la garantie com- merciale qui lui a été consentie lors de l‘acquisition ou de la réparation d‘un bien meuble, une remise en état couverte par la garantie, toute période d‘immobili- sation d‘au moins sept jours vient s‘ajouter à... - Page 25 Article L217-5 du Code de la consommation Le bien est conforme au contrat : 1° S´il est propre à l‘usage habituellement attendu d‘un bien semblable et, le cas échéant : - s‘il correspond à la description donnée par le vendeur et posséder les qualités que celui-ci a présentées à...
- Page 26 Article 1648 1er alinéa du Code civil L‘action résultant des vices rédhibitoires doit être intentée par l‘acquéreur dans un délai de deux ans à compter de la découverte du vice. Les pièces détachées indispensables à l’utilisation du produit sont disponibles pendant la durée de la garantie du produit.
-
Page 27: Faire Valoir Sa Garantie
d’usure, ni aux dommages sur des composants fragiles, comme des interrup- teurs, des batteries ou des éléments fabriqués en verre. Faire valoir sa garantie Pour garantir la rapidité d’exécution de la procédure de garantie, veuillez res- pecter les indications suivantes : Veuillez conserver le ticket de caisse et la référence du produit (par ex. -
Page 28: Service Après-Vente
Service après-vente Service après-vente France Tél. : 0800 919270 E-Mail : owim@lidl.fr Service après-vente Belgique Tél. : 070 270 171 (0,15 EUR / Min.) E-Mail : owim@lidl.be 32 FR/BE... - Page 29 Inleiding ..................Pagina 34 Veiligheidsinstructies ............Pagina 34 Snijblad monteren ..............Pagina 36 Takkenschaar gebruiken ..........Pagina 36 Snijhoek instellen ..............Pagina 37 Telescoopstang verlengen ..........Pagina 37 Takken snijden en zagen ..........Pagina 37 Onderhoudsinstructies ............Pagina 38 Verwijdering ................Pagina 38 Garantie ..................Pagina 39 Afwikkeling in geval van garantie ............Pagina 40 Service ....................Pagina 40 NL/BE...
-
Page 30: Inleiding
Telescopische boomschaar met zaag Inleiding Hartelijk gefeliciteerd met de aankoop van uw nieuwe product. U hebt voor een hoogwaardig product gekozen. Maak u voor de eerste ingebruikname vertrouwd met het product. Lees hiervoor aandachtig de volgende gebruiks- aanwijzing en de veiligheidsvoorschriften. Gebruik het product alleen zoals beschreven en voor de aangegeven toepassingsgebieden. - Page 31 J W ees er voor ieder gebruik zeker van, dat het product zich in een feilloze toestand bevindt. Beschadigde of losse delen kunnen letsel als gevolg hebben. J V ERWONDINGSGEVAAR! Raak het mes alstublieft niet met blote handen aan. J L et op een stevige montage van de telescoopsteel-fixatie.
-
Page 32: Snijblad Monteren
J V ERWONDINGSGEVAAR! Trek een beschermhoes over de messen indien het niet wordt gebruikt. J V OORZICHTIG! GEVAAR VOOR LETSEL! De takkenschaar is zeer scherp en gevaarlijk. Gedurende het werk altijd de nodige opmerkzaam- heid in acht nemen. Snijblad monteren (zie afb. B) Q Opmerking: Laat de beschermhoes op de schaar, terwijl u deze monteert of demonteert. -
Page 33: Snijhoek Instellen
Snijhoek instellen (zie afb. E) j D raai de draaischijf met de klok mee en kies één van de zeven beschikbare hoekinstellingen. j D raai de draaischijf tegen de klok in, om deze na de keuze van de hoekin- stelling te fixeren. Attentie: Let erop, dat de draaischijf gefixeerd is, voordat u begint met de werkzaamheden. -
Page 34: Onderhoudsinstructies
j V oor dikkere takken kunt u de takkenzaag gebruiken. De maximale zaa- glengte bedraagt 300 mm (zie afb. C). Onderhoudsinstructies Q j R einig de messen zorgvuldig na ieder gebruik. Vuil en vocht op de messen leiden tot roestvorming, verminderen het snijproces en kunnen plantenziektes verspreiden. -
Page 35: Garantie
Garantie Het product wordt volgens strenge kwaliteitsrichtlijnen zorgvuldig geproduceerd en voor levering grondig getest. In geval van schade aan het product kunt u rechtmatig beroep doen op de verkoper van het product. Deze wettelijke rech- ten worden door onze hierna vermelde garantie niet beperkt. Op dit product verlenen wij 3 jaar garantie vanaf aankoopdatum. -
Page 36: Afwikkeling In Geval Van Garantie
Afwikkeling in geval van garantie Om een snelle afhandeling van uw reclamatie te waarborgen dient u de vol- gende instructies in acht te nemen: Houd bij alle vragen alstublieft de kassabon en het artikelnummer (bijv. IAN 123456_7890) als bewijs van aankoop bij de hand. Het artikelnummer vindt u op de typeplaat, ingegraveerd, op het titelblad van uw handleiding (linksonder) of als sticker op de achter- of onderzijde. - Page 37 Service Belgiё Tel.: 070 270 171 (0,15 EUR / Min.) E-Mail: owim@lidl.be NL/BE...
- Page 38 Wstęp ....................Strona 43 Wskazówki bezpieczeństwa ........Strona 43 Montaż brzeszczotu .............. Strona 45 Stasowanie nożyc do gałęzi ......... Strona 45 Ustawianie kąta cięcia ............Strona 46 Wydłużanie drążka teleskopowego ..... Strona 46 Cięcie oraz piłowanie gałęzi ......... Strona 46 Wskazówki pielęgnacji .............
-
Page 39: Wstęp
Teleskopowe nożyce z piłą do pielęgnacji drzew Wstęp Gratulujemy Państwu zakupu nowego produktu. Zdecydowali się Państwo na zakup produktu najwyższej jakości. Przed uruchomieniem urządzenia po raz pierwszy zapoznaj się z nim. W tym celu przeczytaj uważnie poniższą instruk- cję obsługi oraz wskazówki dotyczące bezpieczeństwa. Produkt należy użyt- kować... - Page 40 J P rzed każdym użyciem sprawdzić, czy produkt znajduje się w należytym stanie. Uszkodzone lub poluzowane części mogą być przyczyną powsta- nia obrażeń. J N IEBEZPIECZEŃSTWO POWSTANIA OBRAŻEŃ! Nie dotykać ostrza gołymi rękami. J Z wracać uwagę na właściwe zamocowanie drążka teleskopowego. W przeciwnym razie nożyce mogą...
-
Page 41: Montaż Brzeszczotu
J O STROŻNIE! NIEBEZPIECZEŃSTWO OBRAŻEŃ CIAŁA! Sekator i zarazem nożyce do pielęgnacji żywopłotów są bardzo ostre i dlatego niebezpieczne. Podczas pracy należy zawsze zachowywać konieczną ostrożność. Montaż brzeszczotu (patrz rys. B) Q Wskazówka: Podczas zaglądania lub zdejmowania brzeszczotu pozostawić na nim osłonę. Poluzować... -
Page 42: Ustawianie Kąta Cięcia
Ustawianie kąta cięcia (patrz rys. E) Tarczę obrotową przekręcić zgodnie z ruchem wskazówek zegara i wybrać jedno z siedmiu dostępnych ustawień kąta. Tarczę obrotową przekręcić w przeciwnym kierunku do ruchu wskazówek zegara, aby zablokować ją po ustawieniu kąta. Wskazówka: Przed rozpoczęciem pracy należy zwrócić uwagę, aby tarcza obrotowa była zablokowana. -
Page 43: Wskazówki Pielęgnacji
j D o grubszych gałęzi mogą państwo zastosować piłę do gałęzi. Maksy- malna długość piły wynosi 300 mm (zobacz rysunek C). Wskazówki pielęgnacji Q j P o każdym użyciu starannie oczyścić ostrza. Brud i soki powodują tworze- nie się rdzy, utrudniają przesuwania się ostrzy i mogą rozprzestrzeniać choroby roślin. -
Page 44: Gwarancja
Gwarancja Produkt wyprodukowano według wysokich standardów jakości i poddano skrupulatnej kontroli przed wysyłką. W przypadku wad produktu nabywcy przysługują ustawowe prawa. Gwarancja nie ogranicza ustawowych praw nabywcy produktu. Produkt objęte jest 3 gwarancją, licząc od daty zakupu. Gwarancja wygasa w razie zawinionego przez użytkownika uszkodzenia produktu, niewłaściwego użycia lub konserwacji. -
Page 45: Sposób Postępowania W Przypadku Naprawy Gwarancyjnej
Sposób postępowania w przypadku naprawy gwarancyjnej Aby zapewnić szybkie rozpatrzenie Państwa wniosku, prosimy stosować się do następujących wskazówek: Przed skontaktowaniem się z działem serwisowym należy przygotować paragon i numer artykułu (np. IAN 123456_7890) jako dowód zakupu. Numery artykułów można znaleźć na tabliczce znamionowe, na grawerunku, na stronie tytułowej jego instrukcji (na dole po lewej stronie) lub jako naklejkę... - Page 46 Úvod ....................Strana 51 Bezpečnostní pokyny ............Strana 51 Montáž pilového listu ............Strana 53 Používání nůžek na větve ..........Strana 53 Nastavení úhlu řezu .............. Strana 53 Prodloužení teleskopické tyče ........Strana 54 Stříhání a řezání větví ............Strana 54 Pokyny k ošetřování...
-
Page 47: Úvod
Teleskopické nůžky na větve s pilkou Úvod Blahopřejeme Vám ke koupi nového výrobku. Rozhodli jste se pro kvalitní výro- bek. Před prvním uvedením do provozu se seznamte s výrobkem. K tomu si po- zorně přečtěte následující návod k obsluze a bezpečnostní pokyny. Používejte výrobek jen popsaným způsobem a pouze pro uvedené... - Page 48 J D bejte na pevné držení aretace teleskopické násady. V opačném případě se nůžky mohou uvolnit a způsobit zranění a/nebo věcné škody. J P ři používání výrobku noste následující ochranné pomůcky: ochranné brýle, pracovní ochrannou obuv, ochranné rukavice a ochranu hlavy. Tak se ochráníte před padajícími zbytky větví a zabráníte zranění...
-
Page 49: Montáž Pilového Listu
Montáž pilového listu (viz obr. B) Q Upozornění: Při nasazování nebo demontáži pilového listu nechte nasazené ochranné pouzdro. Odšroubujte křídlový šroub a podložku. Nasaďte pilový list. Nastrčte šrouby do příslušných otvorů pilového listu. Nasaďte zase podložku a zajistěte spojení křídlovým šroubem. Používání... -
Page 50: Prodloužení Teleskopické Tyče
Prodloužení teleskopické tyče (viz obr. F) Q j P řed prodloužením teleskopické tyče vytáhněte nejdříve jistící kolík. Prodlužte teleskopickou tyč na požadovanou délku. Poznámka: Maximální možná délka kombi nůžek na větve je 2,77 m, minimální 2 m. Zastrčte zase dobře jistící kolík. Upozornění: Dbejte na to, aby byl jistící... -
Page 51: Zlikvidování
Zlikvidování Obal se skládá z ekologických materiálů, které můžete zlikvidovat prostřednic- tvím místních sběren recyklovatelných materiálů. O možnostech likvidace vysloužilých zařízení se informujte u správy vaší obce nebo města. Záruka Výrobek byl vyroben s nejvyšší pečlivostí podle přísných kvalitativních směrnic a před odesláním prošel výstupní kontrolou. V případě závad máte možnost uplatnění... -
Page 52: Postup V Případě Uplatňování Záruky
Záruka platí na vady materiálu a výrobní vady. Tato záruka se nevztahuje na díly výrobku podléhající opotřebení (např. na baterie), dále na poškození křeh- kých, choulostivých dílů, např. vypínačů, akumulátorů nebo dílů zhotovených ze skla. Postup v případě uplatňování záruky Pro zajištění... -
Page 53: Servis
Servis Servis Česká republika Tel.: 800 143 873 E-Mail: owim@lidl.cz... - Page 54 Úvod ....................Strana 59 Bezpečnostné upozornenia ..........Strana 59 Montáž pílového listu ............Strana 61 Používanie záhradných nožníc ........Strana 61 Nastavenie uhla rezu ............Strana 61 Predĺženie teleskopickej tyče ........Strana 62 Strihanie a pílenie konárov ..........Strana 62 Pokyny týkajúce sa údržby ...........
-
Page 55: Úvod
Teleskopické nožnice na konáre s pílkou Úvod Blahoželáme Vám ku kúpe Vášho nového výrobku. Kúpou ste sa rozhodli pre vysoko kvalitný produkt. Pred prvým uvedením do prevádzky sa oboznámte s výrobkom. Za týmto účelom si pozorne prečítajte nasledujúci návod na obsluhu a bezpečnostné... - Page 56 J N EBEZPEČENSTVO PORANENIA! Nedotýkajte sa ostria nožníc holými rukami. J D bajte na pevné zasadenie upevnenia teleskopickej tyče. V opačnom prípade sa môžu nožnice uvoľniť a spôsobiť poranenia a / alebo vecné škody. J Pri používaní výrobku používajte nasledovnú ochrannú výstroj: Noste ochranné...
-
Page 57: Montáž Pílového Listu
Montáž pílového listu (p. obr. B) Poznámka: Ponechajte ochranný obal na pílovom liste, keď ho nasadzujete alebo demontujete. Uvoľnite a odstráňte krídlovú skrutku a podložku pod maticu. Nasaďte pílový list. Preveďte skrutky cez otvory pílového listu. Opäť nasaďte podložku pod maticu a zaistite spojenie pomocou krídlovej skrutky. -
Page 58: Predĺženie Teleskopickej Tyče
Poznámka: Dbajte na to, aby bol otočný kotúč zafixovaný, keď začnete s prácou. Predĺženie teleskopickej tyče (p. obr. F) Uvoľnite aretačný kolík, aby ste mohli predĺžiť teleskopickú tyč. Predĺžte teleskopickú tyč na želanú dĺžku. Poznámka: Maximálna dĺžka kombi-záhradných nožníc je 2,77 m, minimálna dĺžka 2 m. -
Page 59: Pokyny Týkajúce Sa Údržby
Pokyny týkajúce sa údržby Po každom použití starostlivo očistite čepele. Nečistota a miazga na čepeli vedú k tvorbe korózie, znemožňujú proces strihania a môžu rozširovať choroby rastlín. Všetky kovové diely pretrite naolejovanou handričkou. Tak ich chránite pred usadeninami hrdze. Pravidelná a odborná údržba umožňuje dlhoročné používanie. Likvidácia Obal pozostáva z ekologických materiálov, ktoré... -
Page 60: Postup V Prípade Poškodenia V Záruke
Na tento produkt poskytujeme 3-ročnú záruku od dátumu nákupu. Záručná doba začína plynúť dátumom kúpy. Starostlivo si prosím uschovajte originálny pokladničný lístok. Tento doklad je potrebný ako dôkaz o kúpe. Ak sa v rámci 3 rokov od dátumu nákupu tohto výrobku vyskytne chyba materi- álu alebo výrobná... -
Page 61: Servis
Ak sa vyskytnú funkčné poruchy alebo iné nedostatky, najskôr telefonicky alebo e-mailom kontaktujte následne uvedené servisné oddelenie. Produkt označený ako defektný potom môžete s priloženým dokladom o kúpe (pokladničný lístok) a uvedením, v čom spočíva nedostatok a kedy sa vyskytol, bezplatne odoslať...
Need help?
Do you have a question about the 100303547 and is the answer not in the manual?
Questions and answers