Table of Contents
Advertisement
Quick Links
Advertisement
Table of Contents

Related Manuals for HAMPTON BAY HBX050


Summary of Contents for HAMPTON BAY HBX050
- Page 1 This Owner's Manual is provided and hosted by Appliance Factory Parts. HAMPTON BAY HBX050 Owner's Manual Shop genuine replacement parts for HAMPTON BAY HBX050 Find Your HAMPTON BAY Air Conditioner Parts - Select From 332 Models -------- Manual continues below --------...
-
Page 2: For Future Reference
FOR FUTURE REFERENCE Write down the model Model and serial number Números de serie y modelo and serial numbers Numéros de modèle et de série The model and serial numbers can be found on the left hand side of the decorative front grille. Use these numbers in any correspondence or service calls concerning your air conditioner. - Page 3 INSTALLATION & OPERATIONS MANUAL Including Service and Warranty Incluye mantenimiento y garantía Avec service et garantie Room Air Conditioners for Double-Hung Windows Acondicionadores de aire ambientales para ventanas de guillotina 5,000 – 6,000 BTU’S Climatiseur d’air individuel pour fenêtres à guillotine...
- Page 4 CONTENTS ENGLISH ESPAÑOL FRANÇAIS Installation......1 Instalación......14 Montage......28 Warning (Electrical) Aviso (Eléctrica) Avertissement (Électrique) Warning (Product Damage & Safety) Aviso (Daño al producto y seguridad) Avertissement (Endommagement du produit et sécurité) Tools Needed Herramientas necesarias Outils nécessaires Important Grounding Requirements Requistos importantes para la conexión Importantes exigences de mise à...
-
Page 5: Installation
INSTALLATION WARNING WARNING 1. ELECTRICAL REQUIREMENTS Expanded Polystyrene (white foam) Grounded Electrical Shock Hazard three-prong wall receptacle 1. Plug unit only into grounded electrical outlet. 2. Do not use an extension cord or plug adaptor with this unit. 3. Do not operate unit with front removed. Failure to follow the above precautions could result in electrical shock, fire or personal injury. -
Page 6: Window Installation
INSTALLATION 2. WINDOW INSTALLATION Parts List Tabbed Edge Lock Edge Master Control Cabinet Filler Panel Tabbed Edge Lock Edge Filler Panel Frame Curtain Thermostat Control Curtain Track Decorative Front Filter Filler Panel Frame Window Requirements Install the air conditioner in a window where Filler Panel Installation there will be enough clearance around the cabinet Air conditioner is factory prepared for installation... -
Page 7: Side View
1” Long Wood Screws Air Conditioner Base Storm Window Frame 2” Center 8 3/4” 8 3/4” Bracket Wood Strips SIDE VIEW 8 3/4” Mark Window Sash that the curtain locks into place. Gently pull center line and 8 3/4” to the left of the center window stool and sill, with either nails or the frame out until it is the correct length for line (Fig. - Page 8 INSTALLATION 2. WINDOW INSTALLATION 4. Keeping a firm grip on air conditioner, care- Top Bar Level fully center air conditioner in window open- ing with the bottom bar between the window stool and the angle bracket. Be sure cabinet maintains an outward pitch. Air conditioner should slant slightly downward on the out- side as shown by half a bubble off on a car- penters level.
-
Page 9: Inside View
24 5 Foam Seal Installation in window Upper Window Sash 19” to 22” wide (Do not attach filler panels for this application) 1. Refer to steps 1 and 2 of preceding instructions. 2. Close window until it touches behind top bar (Fig. -
Page 10: Operation
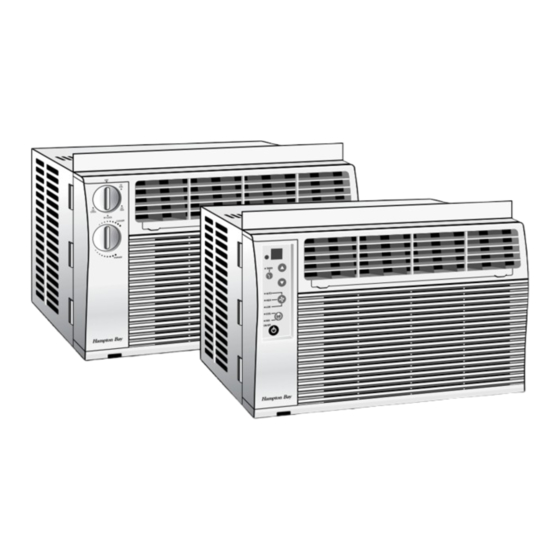
OPERATION 3. MECHANICAL CONTROL PANEL 4. ELECTRONIC CONTROL PANEL Pictured control panel is Control Functions The pictured control panel similar to your panel. is similar to your panel. 1. Master Control: Turns unit on and off. Selects desired function of unit, cooling with continuous air circulation or air circulation Temperature without cooling. - Page 11 Power Control Fan Speed Control To turn the unit OFF using the Timer: Depress the timer key when the power is on, The Power Control turns the unit on and off. The Fan Speed Control has three the display will read 01. Adjust to the desired settings: High, Low and Auto.
-
Page 12: Front Panel
OPERATION 5. FRONT PANEL Remove screw from both sides of cabinet Air Filter Adjustable Louvers Note: Failure to keep air filter clean will result in poor air circulation. DO NOT operate without filter. This can render the unit inoperable. Proper use and care of your air conditioner will help ensure longer life of the unit. -
Page 13: Avoid Service Checklist
SERVICE & ROOM AIR CONDITIONER WARRANTY Avoid Service Checklist Before calling for service, review this list. It may save you time and expense. This list includes common occurrences that are not the result of defective workmanship or materials in this appliance. Occurrence Possible Cause Solutions... - Page 14 SERVICE & ROOM AIR CONDITIONER WARRANTY Occurrence Possible Cause Solutions Air conditioner cooling, • Dirty air filter — air restricted. Clean air filter. Refer to “Cleaning Air Filter” section. but room too warm — NO ice forming on cooling coil behind decorative front •...
- Page 15 Occurrence Possible Cause Solutions Noise when unit is cooling • Air movement sound. The sound of rushing air is normal. If too loud, turn selector to lower fan setting. • Sound of fan hitting water-moisture This is normal when humidity is high. removal system.
- Page 16 Note: In the event of any required parts replacement within the First, make the recommended checks. If it appears period of this warranty, Hampton Bay replacement parts shall that service or parts are still required, see your Full (One Year) Parts and Labor Warranty be used and will be warranted only for the period remaining on room air conditioner warranty “How to Obtain...
- Page 17 RANTIES, EXPRESS OR IMPLIED, ARE MADE TO ANY 1-800-345-4494 BUYER UPON RESALE. or you may write: Some states do not allow limitations on how long CareCo, Service Department an implied warranty lasts or do not allow the exclusion or limitation of incidental or consequen- 415 W.
Need help?
Do you have a question about the HBX050 and is the answer not in the manual?
Questions and answers