
Related Manuals for Bluetti AC180P


Summary of Contents for Bluetti AC180P
- Page 1 AC180P Portable Power Station User Manual Please read this manual carefully before use and keep it for future reference.
- Page 2 Warning 1. Charge the unit before first use. 2. Do not use solar panels with open circuit voltage higher than 60V. Solar input voltage range for the unit is DC 12V~60V. 3. Charge the unit when the SoC drops below 5%. If the SoC drops to 0, power off the unit and charge it for at least 30mins before restarting.
- Page 3 Thank You! Thank you for making BLUETTI a part of your family. From the very beginning, BLUETTI has tried to stay true to a sustainable future through green energy storage solutions for both indoor and outdoor use while delivering an exceptional eco-friendly experience for our homes and our world.
-
Page 4: Table Of Contents
Contents Safety Instructions General Safety Handling Storage and Usage What’s In The Box Product Overview Diagram Specifications Operating Instructions Buttons LCD Screen Charging Discharging BLUETTI App Appendix FAQs Troubleshooting Abbreviations FCC Warning... -
Page 5: Safety Instructions
The Safety Requirements provided herein are for illustrative purposes that include but are not limited to those listed in this manual. Actual operation shall comply with all applicable safety standards. If you have any questions, feel free to contact BLUETTI support or your local BLUETTI dealers. 1.1. General Safety •... - Page 6 It's recommended to grounded this product (via the grounding terminal) before operation. Connect a grounding cable (recommended 14AWG(1.5mm )/105℃/yellow-green color) to the grounding terminal of AC180P. Fasten the grounding screw (M5*10) to fix the cable. Legal and Regulatory Requirements •...
-
Page 7: Handling
It is recommended to charge the unit via an AC source. If charging via solar energy, ensure that your solar system provides an output of more than 100W. BLUETTI shall not be liable for any equipment damage caused by the violation of above instructions. -
Page 8: What's In The Box
2. What’s In The Box Standard Packaging Item Picture Qty. Portable Power Station AC Charging Cable Car Charging Cable Solar Charging Cable Grounding screw (M5*10) User Manual Warranty Card JUST POWER ON... - Page 9 Optional (Available on official BLUETTI website) Item Picture TYPE-C Cable (5A/100W, 2m) Cigarette Lighter to 5521 Cable (For 12V devices with 5521 port, such as routers, cameras, etc.) Cigarette Lighter to Clamp Cable (Charging lead-acid battery via the cigarette lighter port)
-
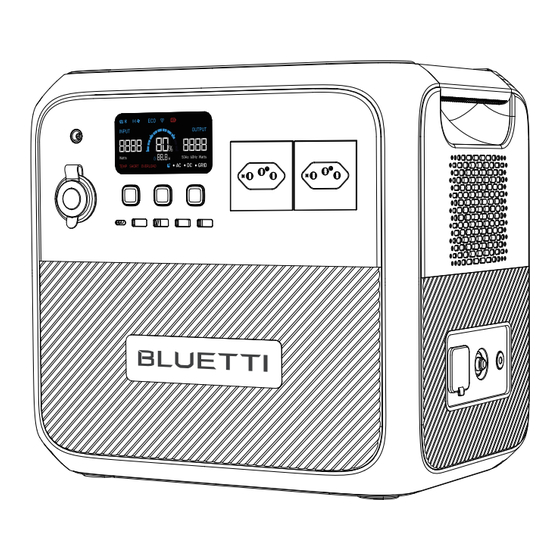
Page 10: Product Overview
Bluetooth speaker, just to name a few. As for recharging, AC180P takes up to 1440W AC input and 500W DC input, so you’re able to fully charge it in a few hours. It also supports BLUETTI app control - with the Bluetooth connectivity, you can monitor everything that's happening inside and optimize your power usage to your preference. -
Page 11: Specifications
3.2 Specifications Model AC180P Area US/BR EU/UK/AU Battery Capacity 1440Wh Cell Type LiFePO Net Weight About 16.4kg/36.16lbs Dimensions (L*W*H) 340mmx247mmx317mm/13.39in×9.72in×12.48in Charging Temperature C~40 C/32°F~104°F -20°C~40°C (35°C~40°C: @1500W Max.) -4°F~104°F (95°F~104°F: @1500W Max.) Discharging Temperature (When SOC is 100%, the discharge power at 35°C~40°C can be... -
Page 12: Operating Instructions
BLUETTI AC180P has PWR button, AC power button and DC power button. 4.1.1. Power ON/OFF • Press the PWR button to start the AC180P. When AC180P is on, press this button to turn on/off the LCD screen. Press and hold the button for more than 2 seconds to turn off the AC180P. - Page 13 Grid Enhancement mode: By default, the Grid Enhancement mode is disabled. Please turn it on directly in the BLUETTI app. This mode ensures that the AC180P has a stable and continuous AC input, as it allows AC180P to adapt to voltage fluctuations and waveform distortion of an AC source.
-
Page 14: Lcd Screen
4.2. LCD Screen ① ⑧ ⑮ Remaining time indicator DC Input Input power ② ⑨ ⑯ Power Lifting mode Bluetooth Battery capacity ③ ⑩ ⑰ AC indicator Wireless charging Output power ④ ⑪ ⑱ DC indicator AC frequency ⑤ ⑫ ⑲... -
Page 15: Charging
Turbo and silent modes can be enabled in BLUETTI app. BLUETTI’s AC charging mode guide is as follows: 1) Turbo charging comes in handy when you need AC180P to be replenished in short time. 2) Standard charging is more friendly to AC180P’s battery. - Page 16 4.3.2.Solar Charging Connect the solar panels (in series or parallel) to AC180P via the solar charging cable. Note: Please make sure your solar panels comply with: Voc: 12V-60V Input Current: 10A Max. Input Power: 500W Max. Warning: The open circuit voltage of solar panels cannot exceed 60V, otherwise it will damage the device(Note:It’s not covered in the warranty)
-
Page 17: Discharging
4.4.1.AC Output AC180P has 4 AC output ports (2 ports for EU version), providing a total of up to 1800W AC power. It also can handle a surge of 2700W. 4.4.2.DC Output •... -
Page 18: Bluetti App
4.5 BLUETTI App Scan the QR code below or search "BLUETTI" in the App Store or Google Play to download the BLUETTI app. AC180P supports Bluetooth connection. Once connected, the AC180P can be accessed and controlled on a mobile phone or other smart devices. For more details, please refer to BLUETTI APP INSTRUCTIONS. -
Page 19: Appendix
Please evaluate the total constant load of your devices. If it doesn't exceed the Max. output power of AC180P (1800W), you can use this power station to run your devices. Note: Some devices with built-in motor/compressor may start at 2-4 times the rated power, which can easily overload the AC180P. -
Page 20: Troubleshooting
Discharging temperature too high E087 before discharging. Recommended discharging Discharging temperature too low E088 temperature: -20 C~40 Ensure the PV input voltage is in PV Input overvoltage E033 the range of 12V~60VDC. Others Contact BLUETTI technical support. JUST POWER ON... -
Page 21: Abbreviations
5.3 Abbreviations • MPPT: Maximum Power Point Tracking • SoC: State of Charge • UPS: Uninterruptible Power Supply • AC: Alternating Current • DC: Direct Current • PV: Photovoltaic (Solar Panels) • DoD: Depth of Discharge 5.4 FCC Warning This equipment has been tested and found to comply with the limits for a Class B digital device, pursuant to part 15 of the FCC Rules. - Page 22 This device contains licence-exempt transmitter(s)/receiver(s) that comply with Innova- tion, Science and Economic Development Canada’s licence-exempt RSS(s). Operation is subject to the following two conditions: (1) This device may not cause interference. (2) This device must accept any interference, including interference that may cause undesired operation of the device.
-
Page 23: Manual Do Usuário
AC180P Estação elétrica portátil Manual do usuário Leia este manual com atenção antes de usar e guarde-o para referência futura. - Page 24 Aviso 1. Carregue a unidade antes da primeira utilização. 2. Não use painéis solares com tensão de circuito aberto superior a 60 V. A faixa de tensão de entrada solar para a unidade é 12~60 Vcc. 3. Carregue a unidade quando o SoC ficar abaixo de 5%. Se o SoC cair para 0, desligue a unidade e carregue-a por pelo menos 30 minutos antes de reiniciar.
- Page 25 É por isso que a BLUETTI está presente em mais de 70 países e tem a confiança de milhões de clientes em todo o mundo.
- Page 26 Conteúdo Instruções de segurança Segurança geral Manuseio Armazenamento e uso Conteúdo da caixa Resumo do produto Diagrama Especificações Operação Botões Tela LCD Carregamento Descarregamento Aplicativo BLUETTI Anexo Perguntas frequentes Solução de problemas Abreviaturas...
-
Page 27: Instruções De Segurança
A operação real deve seguir todos os padrões de segurança aplicáveis. Se tiver alguma dúvida, entre em contato com o suporte da BLUETTI ou com os revendedores locais da BLUETTI. 1.1. Segurança geral •... - Page 28 • Em caso de mau funcionamento, desligue a unidade imediatamente e entre em contato com o suporte da BLUETTI ou com os revendedores da BLUETTI locais se este manual não explicar adequadamente o mau funcionamento para você. •...
-
Page 29: Manuseio
É recomendável carregar a unidade com uma fonte de CA. Se for carregar via energia solar, confirme se o seu sistema solar forneça uma saída de mais de 100 W. A BLUETTI não se responsabiliza por danos ao equipamento causados por deixar de seguir as instruções acima. -
Page 30: Conteúdo Da Caixa
2. Conteúdo da caixa Embalagem padrão Item Imagem Qtd. Estação elétrica portátil Cabo de carregamento CA Cabo de carregamento para carro Cabo de carregamento solar Parafuso de aterramento (M5*10) Manual do usuário Carta de Garantia JUST POWER ON... - Page 31 Opcional (Disponíveis no site oficial da BLUETTI) Item Imagem Cabo tipo-C (5 A / 100 W, 2 m) Cabo de saída de isqueiro para 5521 (para dispositivos de 12 V com porta 5521, como roteadores, câmeras etc.) Cabo de saída de isqueiro para fixação (carregamento da bateria de chumbo-ácido pela saída de isqueiro)
-
Page 32: Resumo Do Produto
Bluetooth, só para citar alguns. Quanto à recarga, o AC180P recebe até 1.440 W de entrada CA e 500 W de entrada CC, para a carga total em poucas horas. Ele também permite o controle pelo aplicativo BLUETTI. Com a conexão Bluetooth, você... -
Page 33: Especificações
3.2. Especificações Modelo AC180P Área UE/RU/AU Capacidade da bateria 1.440 Wh Tipo de célula LiFePO Peso líquido Cerca de 16.4 kg Dimensões (C x L x A) 340x247x317 mm Temperatura de carregamento 0 °C~40 °C -20 °C~40 °C (35~40 °C: @ 1.500 W máx.) Temperatura de (Quando SoC é... -
Page 34: Operação
4. Operação 4.1. Botões O BLUETTI AC180P tem botão PWR, botão de energia CA e botão de energia CC. 4.1.1. LIGAR/DESLIGAR • Pressione o botão liga/desliga para ligar o AC180P. Quando o AC180P estiver ligado, pressione este botão para ligar/desligar a tela LCD. Mantenha pressionado por mais de dois segundos para desligar o AC180P. - Page 35 Ligue-o diretamente pelo aplicativo BLUETTI. Esse modo garante que o AC180P tenha uma entrada CA estável e contínua, pois permite que o AC180P se adapte às flutuações de tensão e à distorção da forma de onda de uma fonte CA.
-
Page 36: Tela Lcd
4.2. Tela LCD ① ⑧ ⑮ Indicador de tempo restante Entrada CC Potência de entrada ② ⑨ ⑯ Modo Power Lifting Bluetooth Capacidade da bateria ③ ⑩ ⑰ Indicador CA Carregamento sem fio Potência de saída ④ ⑪ ⑱ Indicador CC Ventoinha Frequência CA ⑤... -
Page 37: Carregamento
4.3. Carregamento O AC180P aceita quatro métodos de carregamento: AC, solar, carro (saída de isqueiro) e gerador. 4.3.1. Carregamento CA (tomada de parede) Basta conectar o AC180P na tomada padrão e começar a carregar. O AC180P aceita os modos de carregamento Turbo/Padrão/Silencioso. Ele vem configurado para carregamento padrão, enquanto os modos Turbo e silencioso podem ser ativados no... -
Page 38: Descarregamento
4.3.3. Carregamento de carro Conecte a AC180P à saída de isqueiro de 12/24 V do veículo com o cabo de carregamento do carro. Aviso: o conector de isqueiro deve estar totalmente encaixado; caso contrário, poderão ocorrer riscos à segurança. 4.3.4. Carregamento pelo gerador Conecte o AC180P ao gerador com o cabo de carregamento CA. -
Page 39: Aplicativo Bluetti
3) DoD refere-se à taxa de descarga. O AC180P opera com 90% DoD para maior duração da bateria. η é a eficiência de conversão do inversor, que é de 85% para o AC180P. Por exemplo, se você tiver um produto de 40 W, poderá operá-lo por cerca de 20 horas. -
Page 40: Anexo
4.3.1. Carregamento CA para ver mais informações. Quando devo usar o modo Grid Enhancement? Esse modo é útil ao carregar o AC180P por meio de uma fonte CA instável, como uma rede elétrica ou gerador não confiável. Por exemplo, se você alterar a saída do gerador enquanto carrega o AC180P, a queda de tensão também causará... -
Page 41: Solução De Problemas
Verifique se a tensão de entrada Sobretensão de entrada fotovoltaica E033 fotovoltaica está na faixa de 12 a 60 Vcc. Entre em contato com o suporte Outros técnico da BLUETTI. 5.3. Abreviaturas • MPPT: rastreamento do ponto de potência máxima • SoC: estado de carga •... - Page 43 For more information, please visit: Web: https://br.bluettipower.com/ @ BLUETTI Support @ BLUETTI Official @ bluetti_inc @bluetti.inc @bluetti_official support-br@bluettipower.com SHENZHEN POWEROAK NEWENER CO., LTD. Address: F19, BLD No.1, Kaidaer, Tongsha Rd No.168, Xili Street, Nanshan, Shenzhen, China Customer Service Mail: support-br@bluettipower.com,...
- Page 44 Cer t ifi ca te Inspector: Q C :...
Need help?
Do you have a question about the AC180P and is the answer not in the manual?
Questions and answers