Table of Contents
Advertisement
Quick Links
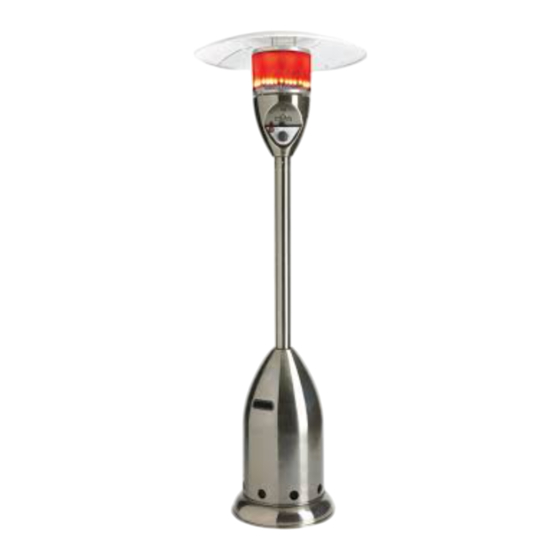
PROPANE PATIO HEATER
Manual, Instructions & Parts List
OFF
WARNING: For Outdoor Use Only.
FOR YOUR SAFETY
If you smell gas:
1. Shut off gas to the appliance.
2. Extinguish any open flame.
3. if odor continues ,immediately
call gas supplier.
FOR YOUR SAFETY
Do not store or use gasoline or
other flammable vapors or liquids
in the vicinity of this or any other
appliance.
CAUTION: Retain these instructions
for future use.
C E R T I F I E D
Model No.:SRPH02S
Master Contract No.:217109
Customer Item No.: PTH38PSS
PTH3 8 PGM
PTH3 8 PCP
Advertisement
Table of Contents

Subscribe to Our Youtube Channel
Related Manuals for Napoleon PTH38PGM


Summary of Contents for Napoleon PTH38PGM
- Page 1 PROPANE PATIO HEATER WARNING: For Outdoor Use Only. FOR YOUR SAFETY If you smell gas: 1. Shut off gas to the appliance. 2. Extinguish any open flame. 3. if odor continues ,immediately call gas supplier. FOR YOUR SAFETY Do not store or use gasoline or other flammable vapors or liquids in the vicinity of this or any other appliance.
-
Page 2: Tools And Parts Needed For Assembly
TOOLS AND PARTS NEEDED FOR ASSEMBLY CARBON MONOXIDE HAZARD DANGER This appliance can produce carbon monoxide which has no odor. Using it in an enclosed space can kill you. Never use this appliance in an enclosed space such as a camper, tent, car or home. TOOLS NEEDED: WARNING: Improper installation, adjustment,... - Page 3 PARTS Center Reflector Cap Reflector Cap Head Assembly Gas Hose Post Cylinder Cover Post Mounts Cylinder Base 15 M6 Nuts 18 6mm Washers 5mm Washers 4mm Washers M4 8 Bolts M5 8 Bolts 12 M6 10 Bolts M6 x70 double pointed bolts Regulator Cylinder (Not Supplied)
- Page 4 PRECAUTIONS NOTE: PLEASE READ THE FOLLOWING SAFETY RULES WARNING At least once a year, the unit should be inspected for the This appliance must only be used outdoors. presence of spiders, spider webs or other insects. Check the Using this product in an enclosed area may cause heater immediately if any of the following exist: injury, death or property damage.
- Page 5 IGNITER BATTERY INSTALLATION Instruction For Battery Installing Remove igniter button by turning counter clockwise. Install “AAA” battery with positive terminal up as indicated in diagram. Replace igniter button. Ignition button Control knob Replace Battery Ignition button AA battery...
- Page 6 ASSEMBLY NOTE: Assembly of this heater requires Step 1 basic mechanical skills. Proper assembly is the responsibility of the installer. Step 1 ---- Attach Post to Base Assembly Attach the post to the post mounts using M5 X 8 bolts (6 pcs) and 5mm washers (6 pcs) Step 2 Step 2 ---- Attach Cylinder Cover to Post Mounts...
- Page 7 ASSEMBLY NOTE: Assembly of this heater requires basic mechanical skills. Proper assembly Step 3 is the responsibility of the installer. Step 3 ---- Attach Head Assembly to Post Load head assembly by inserting gas hose into post. Insert head assembly into post. Tighten securely using M4 X 8 Bolts (5 pcs) and 4mm washers (5 pcs).
- Page 8 ASSEMBLY NOTE: Assembly of this heater requires basic mechanical skills. Proper assembly Step 5 is the responsibility of the installer. Step 5 ---- Attach Center Reflector to Reflector Attach center reflector to the top of reflector (4 pcs) with M6 X 10 mm screws (12 pcs), 6mm washers (12 pcs) and nuts (12 pcs).
- Page 9 ASSEMBLY NOTE: Assembly of this heater requires basic mechanical skills. Proper assembly Step 7 is the responsibility of the installer. Step 7 ---- Connect Gas Line to Cylinder Attach Gas hose to regulator with 3/8 inch open end wrench and adjustable wrench. Attach regulator to cylinder.
- Page 10 ASSEMBLY Step 9---- Lower Cylinder Cover onto Step 9 Cylinder Base Lower the cylinder cover onto the cylinder base . Step 10---- Disconnect Cylinder Step 10 When Storing or Transporting 1) Turn off the heater. 2) Raise the cylinder cover onto the post mounts. 3) Turn off the valve on the cylinder.
-
Page 11: Operation
OPERATION WARNING: DO NOT attempt to operate heater until you have WARNING read and understand all precautions. Failure to do so can result in serious personal injury, death or property damage. FOR YOUR SAFETY: If at any time you are unable to light Before Turning Gas Supply ON burner and smell gas, wait 5 minutes to Your heater was designed and approved for OUTDOOR USE ONLY. -
Page 12: Shut Down Instructions
OPERATION OPERATION Note: The flame pattern at the emitter grid should be visually checked whenever the heater is operated. Normally the burner flame is blue, but little yellow flame is acceptable. If flames extend beyond the surface of the emitter grid, flame is lifting off the or there is a black soot (carbon) accumulating on the emitter grid or reflector, the heater should be turned off immediately. -
Page 13: Locating Heater For Use
LOCATING HEATER FOR USE BE CAREFUL WHEN CERTAIN MATERIALS OR ITEMS ARE Stored, ABOVE, BESIDE OR UNDER THIS HEATER WHILE IN USE, THEY WILL BE SUBJECT TO RADIANT HEAT AND COULD BE SERIOUSLY DAMAGED. 36" This heater is primarily used for the heating of outdoor patios, decks, pool and spa areas. -
Page 14: Maintenance/Cleaning/Storage
MAINTENANCE/CLEANING/STORAGE MAINTENANCE : Visually check To enjoy years of outstanding performance from your heater make sure you perform the following maintenance activities on a regular basis: Keep exterior surfaces clean. Emitter Screen Use warm soapy water for cleaning. Never use flammable or corrosive cleaning agents. -
Page 15: Troubleshooting
TROUBLESHOOTING PROBLEM PROBABLE CAUSE SOLUTION Pilot will not light Gas valve may be OFF Turn the gas valve ON Fuel T empty Refill LP gas tank Orifice blocked Clean or replace orifice Purge air from lines, with knob Air in supply system in pilot position, depress and hold in, to release air.
Need help?
Do you have a question about the PTH38PGM and is the answer not in the manual?
Questions and answers