
Related Manuals for CommScope Ruckus SmartZone 100


Summary of Contents for CommScope Ruckus SmartZone 100
- Page 1 HARDWARE INSTALLATION GUIDE Ruckus SmartZone 100 Getting Started Guide Part Number: 800-70611-001 Rev D Publication Date: January 2020...
- Page 2 As a condition of your use of the Materials, you warrant to CommScope that you will not make use thereof for any purpose that is unlawful or prohibited by their associated terms of use.
- Page 3 BeamFlex, ChannelFly, EdgeIron, FastIron, HyperEdge, ICX, IronPoint, OPENG, SmartCell, Unleashed, Xclaim, and ZoneFlex are trademarks of CommScope, Inc. and/or its affiliates. Wi-Fi Alliance, Wi-Fi, the Wi-Fi logo, Wi-Fi Certified, the Wi-Fi CERTIFIED logo, Wi-Fi Protected Access, the Wi-Fi Protected Setup logo, Wi-Fi Protected Setup, Wi-Fi Multimedia and WPA2 and WMM are trademarks or registered trademarks of Wi-Fi Alliance.
- Page 4 Ruckus SmartZone 100 Getting Started Guide 800-70611-001 Rev D...
-
Page 5: Table Of Contents
Preparing the Controller’s Interface Settings to Use............................. 29 Preparing the Administrative Computer............................... 29 Running the Setup Wizard and Logging On to the Web Interface......................... 33 Overview of the Setup Wizard..................................33 Step 1: Start the Setup Wizard..................................33 Ruckus SmartZone 100 Getting Started Guide 800-70611-001 Rev D... - Page 6 Method 3: Register the Controller with the DNS Server..........................49 Method 4: Configure DHCP Option 43 on the DHCP Server......................... 51 Method 5: Manually Configure the Controller Address on the AP’s Web Interface..................55 What to Do Next......................................57 Ruckus SmartZone 100 Getting Started Guide 800-70611-001 Rev D...
-
Page 7: Preface
A DANGER statement indicates conditions or situations that can be potentially lethal or extremely hazardous to you. Safety labels are also attached directly to products to warn of these conditions or situations. Ruckus SmartZone 100 Getting Started Guide 800-70611-001 Rev D... -
Page 8: Command Syntax Conventions
Document Feedback Ruckus is interested in improving its documentation and welcomes your comments and suggestions. You can email your comments to Ruckus at #Ruckus-Docs@commscope.com. When contacting us, include the following information: •... -
Page 9: Online Training Resources
Ruckus products, including: • Technical Documentation—https://support.ruckuswireless.com/documents • Community Forums—https://forums.ruckuswireless.com/ruckuswireless/categories • Knowledge Base Articles—https://support.ruckuswireless.com/answers • Software Downloads and Release Notes—https://support.ruckuswireless.com/#products_grid Ruckus SmartZone 100 Getting Started Guide 800-70611-001 Rev D... - Page 10 Using these resources will help you to resolve some issues, and will provide TAC with additional data from your troubleshooting analysis if you still require assistance through a support case or RMA. If you still require help, open and manage your case at https:// support.ruckuswireless.com/case_management. Ruckus SmartZone 100 Getting Started Guide 800-70611-001 Rev D...
-
Page 11: About This Guide
If release notes are shipped with your product and the information there differs from the information in this guide, follow the instructions in the release notes. Most user guides and release notes are available in Adobe Acrobat Reader Portable Document Format (PDF) or HTML on the Ruckus support website at https://support.ruckuswireless.com/documents. Ruckus SmartZone 100 Getting Started Guide 800-70611-001 Rev D... - Page 12 Ruckus SmartZone 100 Getting Started Guide 800-70611-001 Rev D...
-
Page 13: Preparing To Set Up The Controller
SmartZone 100 appliance and may be ordered separately. Rack Mount Kit Contents The rack mount kit contains the following items: • Mounting brackets x 2 • Rack cabinet mounting screws x 4 • Small screws x 10 Ruckus SmartZone 100 Getting Started Guide 800-70611-001 Rev D... -
Page 14: Before You Begin
An administrative computer (desktop or laptop) running Windows 8/7/Vista/XP or Mac OS X, containing a minimum RAM of 15G, with a web browser installed (Google Chrome recommended). Supported web browsers include: – Google Chrome 15 (and later) Ruckus SmartZone 100 Getting Started Guide 800-70611-001 Rev D... -
Page 15: Determine Which Controller Sku You Have
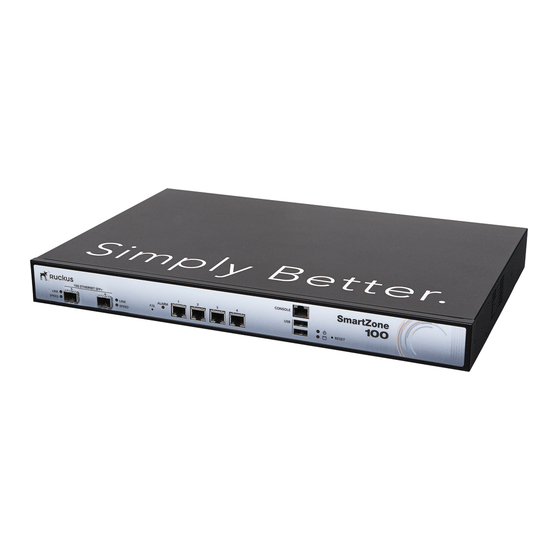
FIGURE 2 SKU P01-S124-WW10 has two 10GBASE-X (SFP+) ports, which SKU P01-S104-WW10 does not TABLE 2 SZ100 Port Configuration Model Optio GE(0) GE(1) GE(2) GE(3) 10GE(4) 10GE(5) Chassis Type SZ104 MGMT/CL/CP/ MGMT/CL/CP/ MGMT/CL/CP/ MGMT/CL/CP/ (4xGE) SZ104 MGMT/CL/CP MGMT/CL/CP (4xGE) Ruckus SmartZone 100 Getting Started Guide 800-70611-001 Rev D... -
Page 16: Get To Know The Physical Features Of The Controller
Before you begin the installation process, Ruckus Networks strongly recommends that you become familiar with these physical features. Front Panel The following figure shows the controller’s front panel with the bezel installed. For descriptions of the numbered parts, refer to the table below. Ruckus SmartZone 100 Getting Started Guide 800-70611-001 Rev D... - Page 17 Power LED (see LEDs on the Front Panel on page 18) HDD LED (see LEDs on the Front Panel on page 18) Reset button. Press for 5 seconds to restart the SZ 100. Ruckus SmartZone 100 Getting Started Guide 800-70611-001 Rev D...
- Page 18 On: Disk I/O (usually blinking) Off: No disk I/O Rear Panel The figure below shows the rear panel of the SmartZone 100. For descriptions of the numbered parts, refer to the table below. Ruckus SmartZone 100 Getting Started Guide 800-70611-001 Rev D...
- Page 19 Preparing to Set Up the Controller Before You Begin FIGURE 4 Rear panel of the SmartZone 100 TABLE 5 SmartZone rear panel parts Number Description Power switch High efficiency (80+) power supply (110-220 VAC) Ruckus SmartZone 100 Getting Started Guide 800-70611-001 Rev D...
- Page 20 Ruckus SmartZone 100 Getting Started Guide 800-70611-001 Rev D...
-
Page 21: Mounting And Powering The Controller
What You Will Need • 3/8-inch hex driver or wrench • Phillips (crosshead) screwdriver, #1 and #2 bits • Anti-static wrist strap and conductive foam pad (recommended) Ruckus SmartZone 100 Getting Started Guide 800-70611-001 Rev D... -
Page 22: Mounting The Controller
Unpack the rack mount kit that is included in the SZ100 package that you received. Refer to Rack Mount Kit Contents on page 13 and verify that the rack mount kit contents are complete. FIGURE 5 Rack mount kit contents Ruckus SmartZone 100 Getting Started Guide 800-70611-001 Rev D... - Page 23 Take one mounting ear, and then use a Phillips to secure it to the right side of the chassis with the supplied mounting ear screws. FIGURE 7 Secure the mounting ear to the right side of the chassis Ruckus SmartZone 100 Getting Started Guide 800-70611-001 Rev D...
- Page 24 Therefore, you can only use up to four mounting ear screws on each side. Ten mounting ear screws are supplied. So you may have two or more mounting ear screws left (depending on how many you use) when you finish. Ruckus SmartZone 100 Getting Started Guide 800-70611-001 Rev D...
- Page 25 Using the supplied four rack mounting screws, secure the SZ 100 chassis to the rack. Use two screws on each side of the chassis. FIGURE 9 Use the supplied screws to secure the mounting ears to the rack Ruckus SmartZone 100 Getting Started Guide 800-70611-001 Rev D...
- Page 26 Mounting and Powering the Controller Mounting the Controller FIGURE 10 Use two mounting screws on each mounting ear You have completed mounting the controller to a rack. Ruckus SmartZone 100 Getting Started Guide 800-70611-001 Rev D...
-
Page 27: Powering On The Controller
Connect the AC power cable to the power socket on the rear panel. FIGURE 11 Connect the AC cable to the power socket Connect the other end of the power cable to an electrical outlet. Ruckus SmartZone 100 Getting Started Guide 800-70611-001 Rev D... - Page 28 Press the power switch on the rear panel to power on the SZ 100. The power LED on the front panel turns amber while the SZ 100 boots up, and turns off when the startup is complete. FIGURE 12 Press the power switch to power on the SmartZone 100 You have completed powering on the controller. Ruckus SmartZone 100 Getting Started Guide 800-70611-001 Rev D...
-
Page 29: Preparing The Interface Settings And Administrative Computer
• Start > Control Panel > Network and Sharing Center > Change Adapter Settings When the Network Connections windows appears, right click the icon for “Local Area Connection” and click Properties. Ruckus SmartZone 100 Getting Started Guide 800-70611-001 Rev D... - Page 30 Properties. The TCP/IP Properties dialog box appears. NOTE Write down all of the currently active settings so you can restore your computer to its current configuration later (when this process is complete). Ruckus SmartZone 100 Getting Started Guide 800-70611-001 Rev D...
- Page 31 Preparing the Interface Settings and Administrative Computer Preparing the Administrative Computer FIGURE 13 The Internet Protocol Version 4 (TCP/IP) properties dialog box Ruckus SmartZone 100 Getting Started Guide 800-70611-001 Rev D...
- Page 32 Click OK to save your changes and exit first the TCP/IP Properties dialog box, then the Local Area Connection Properties dialog box. Your changes are put into effect immediately. You have completed preparing the administrative computer. Ruckus SmartZone 100 Getting Started Guide 800-70611-001 Rev D...
-
Page 33: Running The Setup Wizard And Logging On To The Web Interface
Connect one end of an Ethernet cable to Port 1 on the front panel of the controller, and then connect the other end to an Ethernet port on the administrative computer. FIGURE 14 Location of Port 1 on the front panel Ruckus SmartZone 100 Getting Started Guide 800-70611-001 Rev D... -
Page 34: Step 2: Configure The Port Grouping
Two Port Group: The management and AP control traffic and the AP tunnel data traffic are separated. If you select Two Port Group, you will need to enter two sets of IP address settings. NOTE On the SZ104, the two 10GB ports are bound to Port Group 2. Ruckus SmartZone 100 Getting Started Guide 800-70611-001 Rev D... -
Page 35: Step 3: Configure The Ip Settings
IPv4 Only: Click this option if you want the controller in IPv4 only mode. • IPv4 and IPv6: Click this option if you want the controller in both IPv4 and IPv6 mode. Ruckus SmartZone 100 Getting Started Guide 800-70611-001 Rev D... - Page 36 NAT IP: Enter a NAT IP address. SmartZone pushes both the private IP and the NAT IP to the AP. In Primary DNS Server and Secondary DNS Server, enter the DNS server address for the enabled interfaces. Ruckus SmartZone 100 Getting Started Guide 800-70611-001 Rev D...
-
Page 37: If You Selected Two Port Groups
After you click Next on the previous setup wizard page, a warning message appears and informs you that the administrative computer must be connected to LAN 1 (Port 1) and LAN 2 (Port 2) to complete the setup process. Ruckus SmartZone 100 Getting Started Guide 800-70611-001 Rev D... - Page 38 IPv4 Only: Click this option if you want the controller in IPv4 only mode. • IPv4 and IPv6: Click this option if you want the controller in both IPv4 and IPv6 mode. Ruckus SmartZone 100 Getting Started Guide 800-70611-001 Rev D...
- Page 39 NAT IP: Enter a NAT IP address. SmartZone pushes both the private IP and the NAT IP to the AP. In Primary DNS Server and Secondary DNS Server, enter the DNS server address for the enabled interfaces. Ruckus SmartZone 100 Getting Started Guide 800-70611-001 Rev D...
-
Page 40: Step 4: Configure The Cluster Settings
• If This Controller Is Forming a New Cluster on page 41 • If This Controller Is Joining an Existing Cluster on page 43 Ruckus SmartZone 100 Getting Started Guide 800-70611-001 Rev D... -
Page 41: If This Controller Is Forming A New Cluster
Controller Description: Type a description for this controller. In NTP Server, type the address of the NTP server from which members of the cluster will obtain and synchronize time. The default NTP server is pool.ntp.org. Ruckus SmartZone 100 Getting Started Guide 800-70611-001 Rev D... - Page 42 Confirm Password: Retype the password above to confirm. • Enable Password: Type a password that you want to use to enable CLI access to the controller. • Confirmation Password: Retype the password above to confirm. Ruckus SmartZone 100 Getting Started Guide 800-70611-001 Rev D...
-
Page 43: If This Controller Is Joining An Existing Cluster
If any member node is out of service, the join request will fail. You will need to remove any out-of-service node from the cluster before you can add a new node successfully. Ruckus SmartZone 100 Getting Started Guide 800-70611-001 Rev D... -
Page 44: Step 5: Verify The Settings
Step 5: Verify the Settings Verify that all the settings displayed on the Confirmation page are correct. If they are all correct, click Finish to apply the settings and activate the controller on the network. Ruckus SmartZone 100 Getting Started Guide 800-70611-001 Rev D... -
Page 45: Connecting The Controller To The Network
35. Follow these steps to log on to the controller’s web interface. On a computer that is on the same subnet as the Management (Web) interface, start a web browser. Ruckus SmartZone 100 Getting Started Guide 800-70611-001 Rev D... - Page 46 The web interface refreshes, and then displays the Dashboard page, which indicates that you have logged on successfully. You are now ready to configure the controller. Refer to the SmartZone 100 Administrator Guide for information on how to configure the controller and manage APs and wireless clients. Ruckus SmartZone 100 Getting Started Guide 800-70611-001 Rev D...
-
Page 47: Ensuring That Aps Can Discover The Controller On The Network
If the LWAPP2SCG application is pre-installed but disabled in your controller release, do the following to enable it: Log on to the controller’s console. Enter en to enable privileged mode. Enter config. Enter lwapp2scg. Enter policy accept-all. You have completed enabling the LWAPP2SCG application on the controller. Ruckus SmartZone 100 Getting Started Guide 800-70611-001 Rev D... -
Page 48: Method 1: Perform Auto Discovery Of The Controller Using The Smartlicense Server
The DNS IP address of the FQDN must match the Internet routable IP address of the computer from which the API request is generated. • If any of the above three conditions are not met, the API request will fail with a 401 error. Ruckus SmartZone 100 Getting Started Guide 800-70611-001 Rev D... -
Page 49: Method 2: Perform Auto Discovery On Same Subnet, Then Transfer The Ap To Intended Subnet
Using the DNS information they obtained during the DHCP request, APs will attempt to resolve the controller IP address using RuckusController.{DNS domain name} and zonedirector.{DNS domain name}. Ruckus SmartZone 100 Getting Started Guide 800-70611-001 Rev D... - Page 50 Record Key#2: zonedirector Type: A (IPv4 Domain Name Translation) Value: (IP address of the controller) FIGURE 26 Add records for “RuckusController” and “zonedirector” to the DNS zone file Save the zone file. Ruckus SmartZone 100 Getting Started Guide 800-70611-001 Rev D...
-
Page 51: Method 4: Configure Dhcp Option 43 On The Dhcp Server
DHCP Option 43 enables the DHCP server on your network to provide the controller’s server address – either IP address or FQDN– (specifically, the IP address assigned to the controller’s control plane or cluster plane interface) to DHCP clients, including APs that are connected to the network. Ruckus SmartZone 100 Getting Started Guide 800-70611-001 Rev D... - Page 52 Follow these steps to configure DHCP option 43 on a Linux server. Log on to your DHCP server via a console terminal (for example, PuTTY). Go to /etc directory. Run vi dhcpd.conf. This command opens the DHCP configuration file for editing. Ruckus SmartZone 100 Getting Started Guide 800-70611-001 Rev D...
- Page 53 120.0.0.3 is the control interface IP address of the first controller and 120.0.0.4 is the control interface IP address of the second controller. Save the DHCP configuration file. Restart the DHCP server to apply the new settings. Ruckus SmartZone 100 Getting Started Guide 800-70611-001 Rev D...
- Page 54 Figure • accept-all: Enter this command if you want all APs that discover the controller to be managed by it. FIGURE 30 Options that appear after you enter the “policy” command Ruckus SmartZone 100 Getting Started Guide 800-70611-001 Rev D...
-
Page 55: Method 5: Manually Configure The Controller Address On The Ap's Web Interface
In Primary Controller Address, type the IP address of the controller that you want to manage the AP. In Secondary Controller Address, type the IP address of a backup controller that you want to manage the AP if the primary controller is unavailable. Ruckus SmartZone 100 Getting Started Guide 800-70611-001 Rev D... - Page 56 You have completed manually configuring the controller’s IP address on the AP’s web interface. FIGURE 32 Set the IP addresses of the primary and secondary controllers that you want to manage the AP Ruckus SmartZone 100 Getting Started Guide 800-70611-001 Rev D...
-
Page 57: What To Do Next
For more information on configuring and managing the controller, refer to the SmartZone 100 Administrator Guide for Release 3.4, which is available for download on the Ruckus support website at http://support.ruckuswireless.com. NOTE For a complete list of documentation that is available for this SZ release, refer to the Release Notes. Ruckus SmartZone 100 Getting Started Guide 800-70611-001 Rev D... - Page 58 © 2020 CommScope, Inc. All rights reserved. Ruckus Wireless, Inc., a wholly owned subsidiary of CommScope, Inc. 350 West Java Dr., Sunnyvale, CA 94089 USA www.ruckuswireless.com...
Need help?
Do you have a question about the Ruckus SmartZone 100 and is the answer not in the manual?
Questions and answers