Advertisement
For more information
Please visit our website (https://newline-interactive.com) and
choose Support > Downloads > Q Pro series to download
User Manual for detailed instruction manual.
Newline Assistant
Please visit our website (https://newline-interactive.com) and choose Support > Downloads > Q Pro series to download
the Newline Assistant installation package.
The company is committed to product updates and technical improvements. The technical parameters and
specifications are subject to change without prior notice. The pictures in this manual are for reference only.
Contact Us for Support
Please email us at support@newline-interactive.com.
National Service Hotline: +1 888 233 0868
Advertisement
Table of Contents

Subscribe to Our Youtube Channel
Related Manuals for NewLine TT-5524QP-AI1


Summary of Contents for NewLine TT-5524QP-AI1
- Page 1 User Manual for detailed instruction manual. Newline Assistant Please visit our website (https://newline-interactive.com) and choose Support > Downloads > Q Pro series to download the Newline Assistant installation package. The company is committed to product updates and technical improvements. The technical parameters and...
-
Page 2: Symbol Conventions
Welcome to the world of NEWLINE. Safety Instruction Thank you for choosing the NEWLINE Q Pro series For your safety, please read the following instruction before Interactive Flat Panel Display. Please use this document to you use the product. Serious injury or property damage may get the most out of your screen. - Page 3 Keep the product away from the radio. Do not put items on the top of the product. The product complies with the international EMI Do not put items, such as a container for liquid standard to prevent radio interference. However, (a vase, flowerpot, cosmetics or liquid medicine) interference may still exists and causes noise on the top of the product.
-
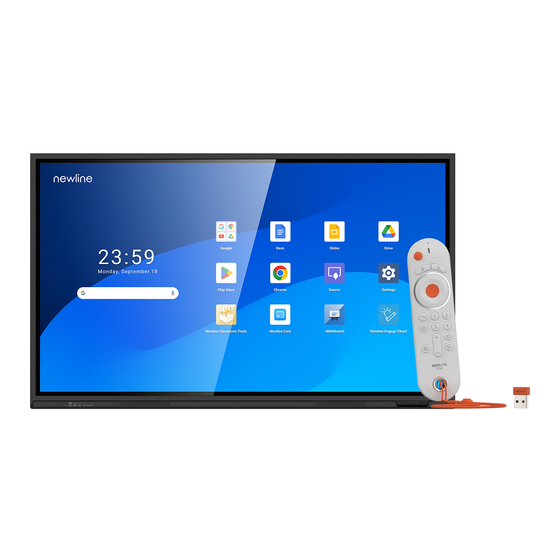
Page 4: Parts And Functions
While HDMI and Display Port offer support for cables of varying lengths, the maximum cable length that Newline recommends for optimal performance is 3 meters (10 feet) for HDMI and 1.8 meters (around 6 feet) for Display Port. - Page 5 WARNING The rear power output port supplies 180W (maximum) 1.Installation Environment power. Please contact Newline to purchase the power AC adapter for powering external devices. Please do not connect any products which require power than listed. Doing so may cause injury or damage to the panel.
- Page 6 Installation Precautions Installation 1.Weight Loading The dimensions of the four bracket mounting holes on the back panel are VESA MIS-F compliant: Weight of the panel: 98 INCH: 800 x 600 mm/31.50 x 23.62 in; 55 inch: 31.5 kg/69.4 lb. 65 inch: 39 kg/85.9 lb. 86INCH or 75INCH: 800 x 400 mm/31.50 x 15.75 in;...
- Page 7 Installing the Wi-Fi Module 98": CAUTION 800 mm (31.5 in) Wi-Fi Module does not support hot plugging. Therefore, you must insert or remove the Wi-Fi Module when the display is powered off. Otherwise, the display or Wi-Fi Module may be damaged. Perform the following steps to install the Wi-Fi Module.
-
Page 8: Power Off
Power Off Remote Control Step 1: Press the power button on the front panel or CAUTION the power button on the remote control to enter sleep mode. Carefully read the following instructions before using the Step 2: Long press the power button on the front remote control to avoid possible faults: panel or the power button... -
Page 9: Serial Port Control
Serial Port Control RS232 communication cable (please use cross data cables) This Device Computer RXD0 TXD0 TXD0 RXD0 Cover RS232 port of panel Connect RS-232 port to the PC or controlling product. Enable RS-232 serial port connection and complete the following configuration. Port: COM1 (Set according to PC or controlling product’s port number) Baud rate 19200... - Page 10 Function Controlling codes Return codes Power on 7F 08 99 A2 B3 C4 02 FF 01 7F 09 99 A2 B3 C4 02 FF 01 00 01 00 CF Power off 7F 08 99 A2 B3 C4 02 FF 01 7F 09 99 A2 B3 C4 02 FF 01 01 01 01 CF Mute/Unmute...
- Page 11 Return (exit) 7F 08 99 A2 B3 C4 02 FF 01 7F 09 99 A2 B3 C4 02 FF 01 1D 01 1D CF 7F 08 99 A2 B3 C4 02 FF 01 7F 09 99 A2 B3 C4 02 FF 01 2B 01 2B CF ←...
- Page 12 Settings 7F 08 99 A2 B3 C4 02 FF 01 7F 09 99 A2 B3 C4 02 FF 01 20 01 20 CF Freeze ON/OFF 7F 08 99 A2 B3 C4 02 FF 01 7F 09 99 A2 B3 C4 02 FF 01 3B 01 toggle 3B CF 7F 09 99 A2 B3 C4 02 FF 0B...
- Page 13 Function Querying codes Return codes 7F 09 99 A2 B3 C4 02 FF 01 37 XX Notes: 7F 08 99 A2 B3 C4 02 FF 01 Power supply 37 CF XX indicates the power on/off state. XX = 01: power on state; XX = 00: power off state.
- Page 14 7F 09 99 A2 B3 C4 02 FF 01 35 XX Notes: XX indicates the mode. 7F 08 99 A2 B3 C4 02 FF 01 D.Mode 35 CF XX = 00-standard; XX = 01-ECO mode; XX = 02-custom; XX = 03-auto. 7F 09 99 A2 B3 C4 02 FF 01 49 XX Notes: Backlight...
- Page 15 GH: Speaker volume; IJ: D.Mode; OP: Backlight brightness; QR: Backlight state; ST: Whiteboard state; UV: Screen lock state.
Need help?
Do you have a question about the TT-5524QP-AI1 and is the answer not in the manual?
Questions and answers