
Subscribe to Our Youtube Channel
Related Manuals for ROWAN ELECTRIC APPLIANCE A4216B


Summary of Contents for ROWAN ELECTRIC APPLIANCE A4216B
- Page 1 Portable Air Conditioner Owner’s Manual Item No.: A4216B Model No.: OL-A016AB06N3 (With R32 refrigerant) READ AND SAVE THESE INSTRUCTIONS...
-
Page 2: Table Of Contents
CONTENTS 1. BEFORE YOU BEGIN 2. FOR YOUR SAFETY 3. PRODUCT OVERVIEW 4. INSTALLATION 5. OPERATION 6. CLEANING AND CARE 7. TROUBLESHOOTING 8. DECOMMISSIONING... -
Page 3: Before You Begin
1. BEFORE YOU BEGIN 1.1 PRODUCT DESCRIPTION Our powerful portable air conditioners are great cooling solutions for single rooms, creating a comfortable atmosphere in your space. It also has ventilation and dehumidifying function for circulating air and removal of moisture. They're self-contained systems that do not require any permanent installation allowing you to move to the space in which it is most needed. - Page 4 Further information is available in the USER MANUAL, SERVICE MANUAL, and the like. Service personnel are required to carefully read the USER MANUAL and SERVICE MANUAL before operation.
- Page 5 THE FOLLOWING SHOULD ALWAYS BE OBSERVED FOR SAFETY This appliance is intended to be used by an expert or trained users in shops, in light industry and on farms, or for commercial use by lay persons. This appliance can be used by children over the age of 8 and ...
- Page 6 non-sparking. Component parts shall only be replaced with identical repair parts. FAILURE TO ABIDE BY THIS WARNING COULD RESULT IN AN EXPLOSION, DEATH, INJURY AND PROPERTY DAMAGE.
-
Page 7: For Your Safety
2. FOR YOUR SAFETY Your safety is the most important thing we we are concerned about ! Please read this manual carefully and fully understand it before operating your appliance. WARNING OPERATIONAL PRECAUTIONS WARNING- to reduce the risk of fire, electric shock or injury to persons or property: ... - Page 8 Do not unplug while the unit is operating. Do not unplug by pulling on the power cord. Do not use an extension cord or an adapter plug. Do not put objects on the unit. Do not climb or sit on the unit. ...
- Page 9 Compliance with national gas regulations shall be observed. Keep any required ventilation openings clear of obstruction. The appliance shall be stored in a well-ventilated area where the room size corresponds to the room area as specified for operation. Any person who is involved with working on or breaking into a refrigerant circuit should hold a currently valid certificate from an industry-accredited assessment...
- Page 10 SAFETY PRECAUTIONS ON SERVICING Please follow these warnings when to undertake the following when servicing an appliance with R32. 2.2.1 Checks to the area Prior to beginning work on systems containing flammable refrigerants, safety checks are necessary to ensure that the risk of ignition is minimized. For repair to the refrigerating system, the following precautions shall be complied with prior to conducting work on the system.
- Page 11 No person carrying out work in relation to a refrigeration system that involves exposing any pipe work that contains or has contained flammable refrigerant shall use any sources of ignition in such a manner that it may lead to the risk of fire or explosion. All possible ignition sources, including cigarette smoking, should be kept sufficiently far away from the site of installation, repairing, removal and disposal, during which flammable refrigerant can possibly be released into the surrounding space.
- Page 12 – refrigeration pipe or components are installed in a position where they are unlikely to be exposed to any substance which may corrode refrigerant-containing components, unless the components are constructed of materials which are inherently resistant to being corroded or are suitably protected against being so corroded. 2.2.9 Checks to electrical devices Repair and maintenance of electrical components shall include initial safety checks and component inspection procedures.
-
Page 13: Product Overview
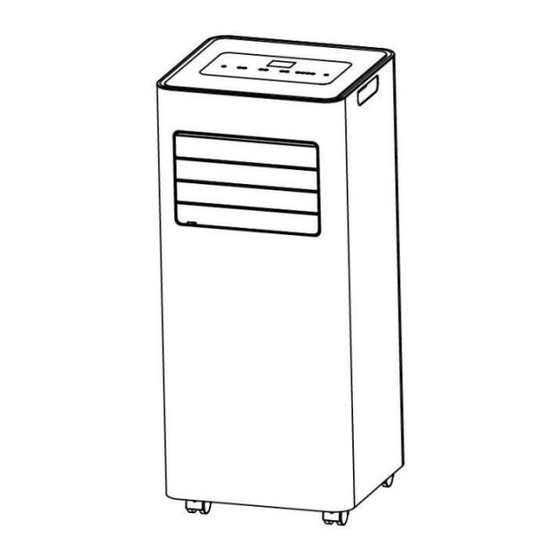
3. PRODUCT OVERVIEW 3.1 PRODUCT DIAGRAM Air inlet with Control panel Drainage Hole air filter Air outlet with adjustable Caster Air Exhaust louver Handle Note: The appearance is only for reference. Please check the real product for detailed information. - Page 14 FEATURES High Capacity in a compact size with cooling, dehumidifying and fan functions. Temperature setting and display LED Digital display Electronic control with a built-in timer, sleep mode Self-evaporating system for better efficient Auto shut off when tank full ...
-
Page 15: Installation
4. INSTALLATION UNPACKING Unpack the carton and take the appliance and accessories out. Check the device after unpacking for any damage or scratches on Accessories: 1. Exhaust hose 2. Hose connector 3. Window kit adapter ... - Page 16 Choose your location If tipped more than 45°, allow the unit to set upright for at least 24 hours before starting up. Place the unit on a firm, level surface in an area with at least 50cm of free space around it to allow for proper air circulation.
- Page 17 ATTACH THE EXHAUST HOSE The air conditioner requires being vented outside so that the exhaust air can escape the room which comes from the appliance contains waste heat and moisture. Do not replace or extend the exhaust hose which will result in decreased efficiency, even worse shut down the unit due to low back pressure.
- Page 18 the windows kit firmly in place, and secure the window kit with duct tape if required. It is recommended that the gap between the adapter and the sides of the window should be sealed off for maximum efficiency. Step 5: Attach the hose connector to the exhaust air outlet of unit. Step 6: Adjusting the length of the flexible exhaust hose, to make sure the distance between the unit and the window will be more than 70cm, the height from exhaust hose to the floor will be more than 90cm.
- Page 19 Step 7: Adjust the louver at the air outlet, and then switch on the unit.
-
Page 20: Operation
OPERATION CONTROL PANEL AND DISPLAY POWER Press to switch the machine on or off. Press to switch the operation mode among cooling, fan MODE and dehumidifier. SPEED Press to switch the fan speed between HIGH and LOW TIMER Sets a time for the unit to automatically start or stop. LOCK Long press to turn on or turn off the child lock function. - Page 21 5.2REMOTE CONTROL...
- Page 22 5.3 SETTINGS 5.3.1 Start-up and Shutdown Press POWER to turn on the unit. Press MODE button to select the desired operation mode. Press POWER again to turn off the power. 5.3.2 Operation mode The unit has four operation modes: Cool, dehumidifier, fan, sleep. The unit working temperature under cooling mode is 61℉-95℉.
- Page 23 C. Drying your room Press the MODE button on the control panel or remote control, and the dry indicator lights up. The fan speed is unable to be selected. The user should connect the hose to the drain outlet at the bottom of the unit. Note: In this mode, the fan speed switches over to low speed and cannot be selected.
- Page 24 5.3.3 TIMER SETTING (1hour-24hours): The timer has two ways of operation: Press Timer key to Press Up /Down To turn off turn on the timer repeatedly to set the (When power on) function. delay OFF time. Press Up /Down Press Timer key to To turn on repeatedly to set the turn on the timer...
- Page 25 5.4 DRAINAGE Manual drainage: 1)When the machine stops after the water is full, please unplug the power plug. Notes: Please move the machine carefully, so as not to spill the water in the water pan at the bottom of the body. 2)Place the water container below the side water outlet behind the body.
- Page 26 Continuous drainage The self-evaporating system uses the collected water to cool the condenser coils for better efficient performance. It is no need to empty the drainage tank in cooling operation except in drying operation and high humidity conditions. The condensate water evaporates at the condenser and is evacuated through the exhaust hose.
-
Page 27: Cleaning And Care
6. CLEANING AND CARE 6.1. CLEANING THE AIR FILTER (every two weeks) Dust collects on the filter and restricts the airflow. The restricted airflow reduces the efficiency of the system and if it becomes blocked it can cause damage to the unit. The air filter requires regular cleaning. - Page 28 6.2. CLEANING UP OF REFRIGERANT General Measures: 1. Gas/vapor heavier than air. May accumulate in confined spaces, particularly at or below ground level. 2. Eliminate every possible source of ignition. 3. Use appropriate personal protection equipment (PPE). 4. Evacuate unnecessary personnel, isolate, and ventilate area. 5.
-
Page 29: Troubleshooting
7. TROUBLESHOOTING Symptom Inspection Solution Check the power Insert the power cord connection in securely. securely into the wallOutlet. The unit is Check if the water level Empty the drain pan by indicator lights up? removing the rubber plug. operating. -
Page 30: Decommissioning
8. DECOMMISSIONING 8.1. STORAGE Long-Term Storage - If you will not be using the unit for an extended period of time (more than a few weeks) it is best to clean the unit and dry it out completely. Please store the unit per the following steps: Unplug the unit and emove the exhaust hose and window kit stored... - Page 31 213-4467172 661-4358826 (8:30am - 5:30pm P.S.T.) SE REQUIERE PRUEBA DE COMPRA CON FECHA PARA SERVICIO BAJO GARANTÍA. Address: ROWAN ELECTRIC APPLIANCE LLC 28407 Ascent Way, Santa Clarita, CA 91350 Phone: 213-4467172 or 661-4358826...
Need help?
Do you have a question about the A4216B and is the answer not in the manual?
Questions and answers