Advertisement
Quick Links
Instrucciones de
instalación
Installation Instructions
Antes de empezar a ensamblar el mueble, lea detenidamente las instrucciones. Pre-ensamble el mueble sobre su caja,
para no rayarlos. Si falta una parte o piensa que esta defectuosa no devuelva el mueble al almacén; le agradecemos
llamar al Firplak tel: 4441771 (opción: 2) o comuniquese con su asesor principal, tambien nos pueden escribir a
servicioalcliente@firplak.com o al Wathsapp
¡Importante!
Before starting to assemble the furniture, carefully read the instructions. Pre-assemble the furniture on its box to avoid scratching it. If a part is missing or
you think it's defective, please do not return the furniture to the store. We appreciate you calling Firplak at tel: 4441771 (option: 2) or contacting your
Important!
main advisor. You can also reach us by email at servicioalcliente@firplak.com or via WhatsApp at
Recomendaciones previas
Previous recommendations
Si las paredes donde va a ubicar el mueble son en drywall,
debe adquirir chazos y tornillos especiales para su
instalación.
If the walls where you are locating the cabinet are in drywall, you must
purchase special ramplug and screws for installation.
No golpee ni martille todo el mueble, sólo donde se le indica.
Do not strike or hammer all the cabinet, only where directed.
No pinte ni barnice el mueble.
Do not paint or varnish the cabinet.
No arrastre ni se suba al mueble, si necesita moverlo por
favor levántelo.
Do not drag or stand on the cabinet, if you need to move it please lift up.
Lea detenidamente y siga en orden consecutivo las
instrucciones de armado.
Read carefully and follow in sequence the assembly instructions.
No expongas el mueble a la intemperie, ni al calor.
Do not expose the cabinet to the outdoors or the heat.
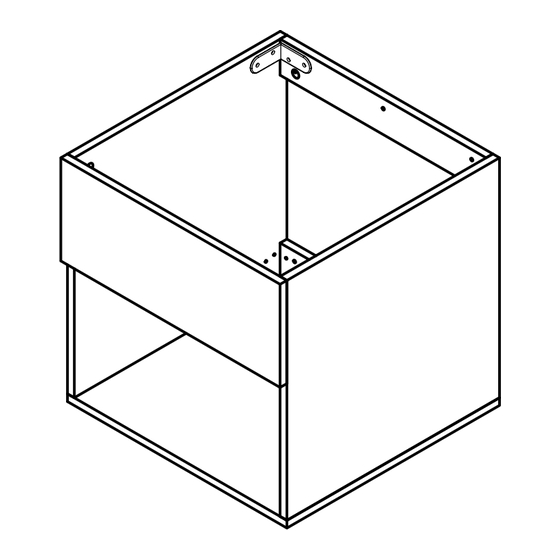
Mueble LVR KUB 50x50 cm / Mueble para lavarropas
LVR Kub cabinet 19.6" x 19.6" / Laundry sink cabinet
+57 316-481-2857
Todos los derechos reservados /COPYRIGHT © 2024
+57 316-481-2857.
49 cm
Sello de calidad /
Por favor no deseche el instructivo del mueble, este le servirá para cualquier
reclamo con respecto a la garantía del mismo.
Please do not discard the cabinet's instructions, it will serve you for any claim
regarding its warranty.
49 cm
48 cm
Quality seal
Advertisement

Related Manuals for firplak LVR Kub Cabinet


Summary of Contents for firplak LVR Kub Cabinet
- Page 1 Before starting to assemble the furniture, carefully read the instructions. Pre-assemble the furniture on its box to avoid scratching it. If a part is missing or you think it's defective, please do not return the furniture to the store. We appreciate you calling Firplak at tel: 4441771 (option: 2) or contacting your Important! main advisor.
-
Page 2: Identificación De Las Partes
Herramientas requeridas / Tools required Identificación de las partes Parts identification No incluido. Not included. Mueble para almacenamiento. Identificación de herrajes Hardware identification Starage cabinet. Ángulo metálico Chazos Tornillos chazo 2” Ramplug Ramplug screws 2” Steel angle bracket Tornillos 5/8 5/8 screws Tenga precaución al abrir la bolsa de herrajes de no perder ningún elemento. - Page 3 Ajustes de partes Tarugos Parts adjustments Wooden pins ¿Cuánto debe girar una tuerca? Inserte los tarugos solamente Introduzca los tarugos solo How much should a screw turn? en las perforaciones que más hasta su tope máximo adelante se indicarán Insert the wooden pins only Insert the wooden pins only up to their maximum peak into the perforations below...
- Page 4 Ensamble de las partes Se recomienda armar el mueble sobre la caja o una superficie lisa para no rayarlo. Is recommended to assemble the product top of the box or on a flat surface to not scratcha it. Assembly of the parts Herramientas Herrajes Tools...
- Page 5 Para fijar el mueble To secure the cabinet Perfore la pared a la altura indicada de las perforaciones con ayuda de una broca para pared (tungsteno) 3/8”, después introduzca el chazo plástico y asegure el mueble con tornillos chazos. Drill the wall at the indicated height of the perforations with the help of a 3/8" wall bit (tungsten), then insert the plastic slab and secure the furniture with screws.
- Page 6 Cuidados y manteniemiento Care and maintenance Cuidados y mantenimiento para los Care and maintenance for cabinet muebles • Para limpiar el mueble use un trapo seco o humedézcalo en agua y • To clean the cabinet, use a dry cloth or moisten it in water and mild detergent. detergente suave, elimine el exceso de agua.
Need help?
Do you have a question about the LVR Kub Cabinet and is the answer not in the manual?
Questions and answers