Advertisement
SERVICE MANUAL
COOKING
FOR INTERNAL AND PARTNERS USE ONLY
© ELECTROLUX HOME PRODUCTS
Consumer Service - EMEA
Quality & Continuous Improvement - Technical Support
Q&CI - Technical Support
Classified as Internal
Low User Experience
Publication number
For internal and partners use only.
Edition: 07/2021 - Rev. 00
0
OVEN
LUX
EN
599 844 - 908
XXX XX XX – XX Rev. XX
Advertisement
Table of Contents

Subscribe to Our Youtube Channel
Related Manuals for Electrolux LUX


Summary of Contents for Electrolux LUX
- Page 1 Low User Experience SERVICE MANUAL COOKING FOR INTERNAL AND PARTNERS USE ONLY Publication number © ELECTROLUX HOME PRODUCTS For internal and partners use only. 599 844 - 908 Consumer Service - EMEA Edition: 07/2021 - Rev. 00 Quality & Continuous Improvement - Technical Support Q&CI - Technical Support...
-
Page 2: Table Of Contents
CONTENTS CONTENTS PURPOSE OF THIS MANUAL SAFETY DEMO MODE LUX (2021) SERVICE MODE LUX (2021) WIRING DIAGRAM CONNECTED ERROR CODES 599 844 - 908 Q&CI - Technical Support Rev. 01... -
Page 3: Purpose Of This Manual
PURPOSE OF THIS MANUAL The purpose of this Service Manual is to provide Service Engineers who are already familiar with the repair procedures with information regarding: Smart Ovens with the Connected User Interface Low User Experience (LUX) Document Revisions Rev. -
Page 4: Safety
2 SAFETY All the work to be performed inside the appliance requires specific skills and knowledge and may only be carried out by qualified and authorised Service Engineers Before you access internal components, take the plug out of the socket to disconnect the power supply. ... -
Page 5: Lux
LUX Evolution User Interface Hexagon User Interface LUX Only time or only temperature Time and temperature at same time Limited feedback oven LED bar showing progress (heating up) 3 touch buttons for quick access 5 touch buttons for quick access... - Page 6 3.2 LUX Variants Double Oven Direct Steamer Cooker 599 844 - 908 Q&CI - Technical Support Rev. 01...
- Page 7 3.3 Structure Sputnik platform “LUX” Selector oven function Selector Global door lock (Pyro) Water drawer Main electronic Cooling ventilator OVC-R5000 Hot air oven function After switching off Safety thermostat 150°C 110°C ~14min 200°C 110°C ~24min Junction box...
- Page 8 3.4 Panel & Selector Direct access to timer Oven function Temperature Time Menu 599 844 - 908 Q&CI - Technical Support Rev. 01...
- Page 9 3.5 Block diagram “LUX” MACS Tachometer Door lock switch Door switch Oven Temperature sensor Food sensor Switched AC to elements 599 844 - 908 Q&CI - Technical Support Rev. 01...
- Page 10 3.6 User interface “LUX” USB programming NIU5 External HMI MACS MACS NIU5 board with & without Selector temperature for single oven Selector for double oven Programming Memory programming Optional factory Optional DAAS Selector Processor temperature for double oven 599 844 - 908 Q&CI - Technical Support...
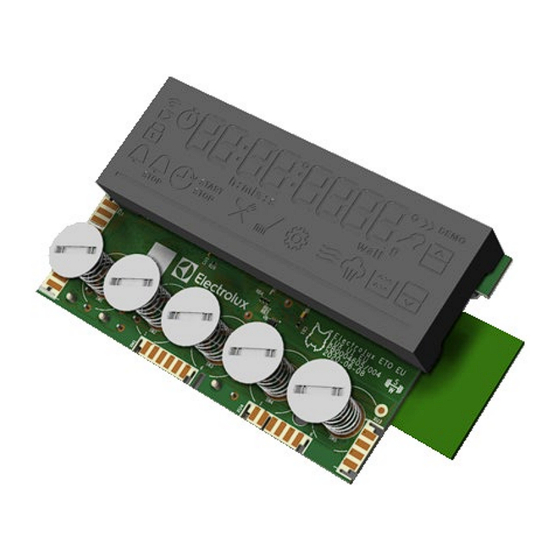
- Page 11 LED Display 5 Touch buttons External NIU5 599 844 - 908 Q&CI - Technical Support Rev. 01...
- Page 12 3.6.1 SidekickPC “LUX (2021)” DAAS Sidekick adapter from dishwasher Reprogramming at consumer home by SidekickPC: e.g. to delete a bug in the software ! i.e. - Descaling counter is set to zero ! - Cleaning counter is set to zero ! - Setups ...
- Page 13 3.6.2 SidekickPC “LUX (2021)” Spare part situation LUX with Wi-Fi The warehouse delivers ! Complete ready configured user interface Service-kit ref. 982… … ! Includes: - Oven configuration files. - NIU5-board configured with secrets. - MAC address registered on the Sidekick database.
- Page 14 3.7 Touch-keys of the different oven types Timer - To access the different timers; sound alarm; alarm, stop and delayed start. Fast Heat Up - To speed up the heating up process. Microwave Key Models Lamp - To turn the oven cavity light on or off. Key Models without FS or MW - To confirm settings and actions and to navigate in menu.
- Page 15 3.7.1 Touch-keys about key combination Key Models without FS or MW SW version Factory test mode, available only 20sec. from voltage supply. Food Sensor Key Models Child lock / Oven lock SW version Factory test mode, available only 20sec. from voltage supply.
- Page 16 3.8 Display “LUX (2021)” Microwave Demo mode Microwave power Degree sign Steam WiFi and Remote Delayed start Fast heat up Operation Steam tank water level Uptimer Time indication Food sensor Assisted cocking Lock Weight indication (gram) Cleaning Sound alarm Cavity indication...
- Page 17 3.8.1 Display “Progress LED bar” The progress LED bar consists of ten segments. Each segment consists of a red LED and a white LED which can be illuminated and dimmed separately. The progress LED bar has various functions: Temperature state (cavity, set temperature) Running time (Microwave, cleaning) Highlighting error messages etc.
- Page 18 3.8.2 Display examples Set Food sensor Food sensor Time of Day Runtime temperature temperature Standby Time of Day Microwave power Cavity temperature temperature temperature Wight APP indication 599 844 - 908 Q&CI - Technical Support Rev. 01...
- Page 19 Microwave: WiFi is activated, Remote control is not activated. Runtime is 0:44 Minutes. Power is 800 Watt. LED bar is at the beginning of the program. Oven: WiFi is activated, Remote control is activated. Set temperature is 200°C (toggling cavity temperature).
- Page 20 3.8.3 Settings Switch the appliance on. Turn the program selector to “Menu”. Turn the selector to “Settings” “OK”. 3. “Settings 01” appears 599 844 - 908 Q&CI - Technical Support Rev. 01...
-
Page 21: Demo Mode Lux
4 DEMO MODE LUX (2021) 1. Switch the appliance on. Turn the program selector to “Menu” 7. Turn the selector to “Code 4” “OK”. 2. Turn the selector to “Settings” “OK”. 8. Turn the selector to “Code 6” “OK”. -
Page 22: Service Mode Lux
5 SERVICE MODE LUX (2021) Activate service mode: The appliance is in off-state. Attention: 1. The water tank must be empty! 2. The Service Mode can be cancelled in any steps (unplug and re-plug the appliance), except after exchanging of the user interface! 1. - Page 23 7. Key test + Serialization control Door is locked ! Touch the key to continue ! Skip the serialization control Required when exchanging the user interface LUX with Wi-Fi ! Door is locked ! Turn the selector ! Key test + Skip serialization ...
- Page 24 8. Key test + Cooking Ventilator + Buzzer Door is locked ! Touch the key to continue ! 9. Key test + Cooling Ventilator low speed Door is locked ! Touch the key to continue ! 10. Key test + Cooling Ventilator high speed Door is locked ! Touch the key to continue ! 11.
- Page 25 12. LOAD test: Turn the program selector to position 1. 13. Position 1: Bottom Heater + Cooling Ventilator low speed. Turn the program selector to position 2. 14. Position 2: Ring Heater + Bottom Heater + Lamp + Cooking Ventilator + Cooling Ventilator high speed (Pyro) ...
- Page 26 16. Position 4: Turn the program selector forwards to “OFF”. 17. Food sensor test Place the food sensor 18. Food Sensor test Remove the food sensor 19. Food Sensor test Close the door 599 844 - 908 Q&CI - Technical Support Rev.
- Page 27 20. Steam Tank test Fill water into the water tank (approx. 1ltr.) Timeout max. 10sec. Impossible to fill the water tank! We are in discussion with ETO to extend the time in new Software, till then we have two methods to pass the test * Check the Service Bulletin Restart the Service Mode ! 21.
- Page 28 Service Mode LUX (2021) association and serialization After user interface exchange, carry out an association and serialization process! After connecting to the main power supply, the user interface starts with the service mode! 2.step 3.step 1.step SidekickPC Service mode Setup settings...
-
Page 29: Wiring Diagram
6 WIRING DIAGRAM Oven: Direct Steamer Platform: Apollo User interface: Power board: OVC-R5000 599 844 - 908 Q&CI - Technical Support Rev. 01... - Page 30 Oven: Direct Steamer Platform: Apollo User interface: Power board: MEC1 105°C 599 844 - 908 Q&CI - Technical Support Rev. 01...
- Page 31 Oven: Pyro Platform: Sputnik User interface: Power board: OVC5000 599 844 - 908 Q&CI - Technical Support Rev. 01...
- Page 32 Oven: Pyro Platform: Sputnik User interface: Power board: OVC5000 599 844 - 908 Q&CI - Technical Support Rev. 01...
-
Page 33: Connected Error Codes
7 CONNECTED ERROR CODES This document covers only connected error codes, for other errors refer to 599 793 313 Error Code Reason for Error Trouble Shooting F601 Wi-Fi Signal miss Alarm Procedure failures, for which the process should be retried Plug appliance out and in again.
Need help?
Do you have a question about the LUX and is the answer not in the manual?
Questions and answers