Table of Contents
Advertisement
Quick Links
High-Precision Tuning Fork Electronic Balance
AJ-CEN/AJH-CEN Series
(220〜1200)
Operation
•
To ensure safe and proper use of the balance, please read this
manual carefully.
•
After reading this manual, store it in a safe place near the balance, so
you can review it as needed.
SHINKO DENSHI CO., LTD.
Manual
IMPORTANT
310002M51
Advertisement
Table of Contents

Subscribe to Our Youtube Channel
Related Manuals for Vibra AJ-CEN Series


Summary of Contents for Vibra AJ-CEN Series
- Page 1 High-Precision Tuning Fork Electronic Balance AJ-CEN/AJH-CEN Series (220〜1200) Manual Operation IMPORTANT • To ensure safe and proper use of the balance, please read this manual carefully. • After reading this manual, store it in a safe place near the balance, so you can review it as needed.
-
Page 3: Preface
PREFACE Thank you for purchasing an AJ-CEN/AJH-CEN Series electronic balance. This is a precision instrument equipped with exacting mechanisms in a compact body. The AJ-CEN/AJH-CEN series provides enhanced functions, including a counting mode for stock control of parts, a percentage mode for comparative measurements given in percentages, and a comparator function for measuring constant quantities by consecutive weighings. -
Page 4: Important Notice
Important Notice ・It should be known that this product contains potential danger. And so please be sure to observe this document when installing, operating or servicing this product. ・SHINKO DENSHI CO., LTD. will not take any responsibility for any injury or damage caused by the non-observance of this document or misuse or unauthorized modification of this product. -
Page 5: Bundled Items
Bundled Items Before using the balance, please check that the following items have been included in the package. Should you find any missing parts, please contact your local dealer. (1) Main unit of balance (2) Measurement pan (one round or square pan) (3) Pan base (4) Windshield (5) AC adapter and plug... -
Page 6: Table Of Contents
2. Names of Component Parts ..... 6 9. Calibrating the Balance ...... 29 2.1 Main Unit ........6 9.1 Calibration of AJ-CEN Series ..29 2.2 LCD Indicators and Operating 9.2 Calibration of AJH-CEN Series ..31 Keys ..........7 9.3 GLP-compliant print ...... -
Page 7: Precautions On The Use
1. Precautions on the Use 1.1 Warnings regarding Use • This Section "Precautions Relating to Use" sets forth precautionary notes that the user should observe in order to prevent physical injury to the user and/or damage to property. • The nature of problems that may result in the event of improper operation, and consequential effects on the quality and performance of the balance, are indicated under the two categories of "Caution"... - Page 8 Do not lay the AC adapter cable on the surface of the passage. • Somebody may trip on the cable, causing the balance to fall off, thereby causing injury 定格外禁止 Do Not Drop and/or damage to the balance. Do not touch the AC adapter or balance with wet hands.
- Page 9 Do not use the balance when [o-Err] (Overloaded) is displayed. • Take down the loaded sample immediately to prevent breakage or malfunction. 定格外禁止 Do Not Overload Do not use the balance in a location where it is subject to direct sunlight. •...
-
Page 10: For More Precise Measurements
1.2 For More Precise Measurements To be able to conduct more precise measurements, it is necessary to minimize the factors that contribute to measurement errors. There are a great variety of such error-inducting factors, which can be linked to machine error and performance of the balance itself, as well as the properties and condition of samples being measured, and the measuring environment (e.g., vibration, temperature/humidity). - Page 11 1-2-3 Precautions on the Samples • Generally speaking, objects made of synthetic resin and glass have high electric insulating 3.1 Static Electricity properties and, therefore, are apt to be electrically charged. Measuring a charged sample as is may cause unstable indications, with resultant poor reproducibility of the results. With this in mind, be sure to discharge charged samples before measurement.
-
Page 12: Names Of Component Parts
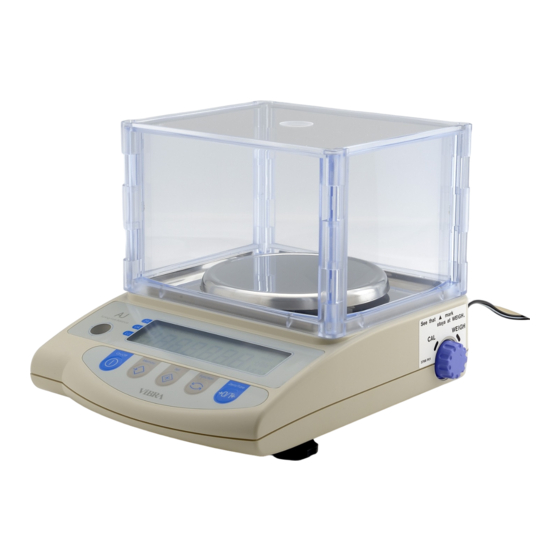
2. Names of Component Parts 2.1 Main Unit Round-pan types (AJ-220CEN, AJ-320CEN, AJ-420CEN, AJ-620CEN, AJH-220CEN, AJH-320CEN, AJH-420CEN, AJH-620CEN) Square-pan types (AJ-820CEN, AJ-1200CEN) Windshield Supplied only with the round-pan types The top lid is detachable. Level For checking the level of the Liquid-crystal balance display (LCD) -
Page 13: Keys
2.2 LCD Indicators and Operating Keys 2.2.1 Symbols Displayed Display Description Grams 0 Zero point Tare being subtracted(effective when the lock switch is off) ○ Indication of stable balance (If the light is off, the balance is unstable.) * Balance powered up (Lights up when the power is turned off) or data transmitted Counting mode Percentage mode Indication of judgement result (HI/OK/LO) when the comparator function is... - Page 14 2.2.2 Names and Functions of Operating Keys Operating Key Function Key to turn on/off the unit power On/off key [Brief press] initiates print or output. [Brief press] saves the settings of the number of pieces Memory key or percentages (%), or the limit value when using the comparator function.
-
Page 15: Basic Operations
3. Basic Operations 3.1 Installation First, mount the pan base on the Positioning the measurement pan main unit of the balance and place the measurement pan on top of it. Be sure to mount the pan base in the correct direction, as illustrated below. -
Page 16: Operation Check
3.2 Operation Check Turning on the power When the balance has the AC adapter connected, it displays [ ]. Pressing the On/Off The display section lights up, and the balance is ready for operation. -
Page 17: Checksum Check
3.3 Checksum check The CRC16 Checksum (Software identification) can be checked by following steps to verify the software of the scale. Press the Function key while 1 Set to the function2 mode. pressing the Zero/Tare key. Release the fingers when “Func2” is displayed. -
Page 18: Operation For Tare Subtraction
3.4 Operation for Tare Subtraction Place the tare (container) on the balance. As you place the tare, the balance indicates its weight. Reset read-out indication to zero. Press the Zero/Tare key. The tare is subtracted and the balance indicates zero. Load the sample to be weighed. - Page 19 ☆ Key Points of the Procedure ☆ The following applies equally to all the measurement modes for weight measurement, counting, and percentages. After the balance is switched off, there is still enough current to display [ ]. This indicates that the AC adapter is connected to an electrical outlet, but that the balance is turned off.
-
Page 20: Functions
4. Functions 4.1 Setup and Checking of Functions Press and hold down the Invoking the function Function key until the indicator changes to “Func,” then release the key. The function setup mode is activated, and the first item, b.G. 1 (Bar graph) ] appears. Key released (See “4.2 Description of Continuous pressing... -
Page 21: Description Of Functions
4.2 Description of Functions Item Set Value Description 0 Disable 1. b.G. Bar graph display ☆1 Enable ☆0 Disable 2.SEL Comparator function 1 Enable Always judge (judges even when the balance is ☆1 unstable) Judgement 21.Co. condition Judge only when the balance is stable (does not judge if the balance is unstable) Ranges beyond +5 graduation is judged (ranges +5 graduation or below, including negative ranges, are... -
Page 22: Interface Section
★ 3 20 [Pcs] (pieces) 81.S.u. Setup of units of ★ 4 1F [%] measurement to ★ 5 00 Unit not set be displayed 85.S.u. 0 Disable Display of the Enable ( is the auxiliary scale interval.) auxiliary scale 9.Ai Note: The auxiliary-scale-interval place does not ☆1 interval... -
Page 23: Switching Function For Unit Of Measurement
5. Switching Function for Units of Measurement Pressing the Function key allows the user to switch the unit of measurement to [g], [ct], [%], and so Up to five different units can be registered for use only when the function key is properly set on a balance for which the lock switch is off. - Page 24 Pressing the [Set] key to restore measurement mode. Pressing the key will reset the measurement mode Pressing the [Function] key to change the units of Press the Function key. measurement Each press of the key changes the units of measurement to be displayed, as [g] ...
-
Page 25: Counting Pieces
6. Counting Pieces To implement piece-counting, the specified samples are loaded on the balance, and their average unit weight (hereinafter, simply the “unit weight”) is entered and saved. The procedure for saving unit weights is called sampling. The counting procedure consists of loading articles that have already been sampled on to the balance. The number of pieces is then calculated by dividing the total weight of the loaded articles by the unit weight saved in memory. - Page 26 Changing the sampling number, if necessary. If samples to be counted widely deviate in weight, or a higher measure of accuracy is desired, it is recommended that users change the sampling number to a larger value. Press the Zero/Tare key. Each press of the key changes the value on the right end.
-
Page 27: Increasing The Counting Accuracy
6.2 Increasing the Counting Accuracy (Memory Update Method) ※This procedure is the same as the sampling procedure described on the previous page up, to the point at which the sampling number is changed. Loading samples Load the number of samples displayed. Count the samples precisely and load them on to the center of the measurement pan. -
Page 28: Measuring Percentage
7. Measuring Percentage The percentage measurement function operates by weighing an actual sample, selected as the reference, and saving its weight as the reference value and indexing it as 100%. When a measurement sample loaded on the balance is lighter or heavier than the reference, its weight is indicated as a percentage (%) value relative to the reference weight. - Page 29 ☆ Key Points of the Procedure ☆ While samples are being saved, the value indication disappears temporarily, and only the [M] mark flashes. If the balance is affected by wind or other vibrations during this process, the saving time may be prolonged. If [L-Err] appears briefly, it indicates one of the following states: The weight of the reference sample is insufficient.
-
Page 30: Comparator Function
8. Comparator Function The comparator function judges measurements according to a limit value saved in the balance. The function shows the judgement result by displaying the [ ] mark as either HI (excessive), OK (appropriate), or LO (insufficient). This function is very useful when discriminating between conforming and nonconforming articles. - Page 31 Selecting a function item Press the Function key. The display changes to the next item [Comparator Function]. Setting the comparator function Press the Zero/Tare key to set the value on the rightmost side to [1]. Comparator Function operations Setting the judgement condition Press the Function key.
-
Page 32: Quantity Loads
8.2 Setup of Limit Values by Actual Quantity Loads Starting the comparator function Press and hold down the key. Release the key when [L. SEt] is displayed. The currently set lower-limit value flashes. Key released Continuous pressing Loading the sample for the lower-limit value Load the sample of the lower-limit value on the measurement pan. -
Page 33: Inputting Values
8.3 Setting up Limit Values by Inputting Values Starting the comparator function Press and hold down the key. SEt ] is Release the key when [L. displayed. The currently set lower-limit value flashes. Key released Continuous pressing Opening the value input screen Press the Zero/Tare key. - Page 34 Opening the value input screen Press the Zero/Tare key. Follow the same procedure as in “Step 2.” Setting the upper-limit value Follow the same procedure as described for the lower-limit value and enter the upper-limit value. 10 Saving the upper-limit value Press the Memory key.
-
Page 35: Calibrating The Balance
Calibration is also required after long periods without use, or if a balance begins to produce inaccurate values. Calibration of a balance, or “span adjustment,” is required to produce accurate measurements. 9.1 Calibration of AJ-CEN Series When the lock switch is off: AJ-220CEN, AJ-320CEN, AJ-420CEN, AJ-620CEN, AJ-820CEN and AJ-1200CEN... - Page 36 Calibrating the capacity point Load the calibration weight in the center of the balance. The display flashes, indicating that capacity point calibration is in progress. When the calibration of the capacity Terminating the span adjustment point is finished, the original measurement mode is restored.
-
Page 37: Calibration Of Ajh-Cen Series
9.2 Calibration of AJH-CEN Series Applicable models: AJH-220CEN, AJH-320CEN, AJH-420CEN and AJH-620CEN ※ Span adjustment should be performed with the balance installed perfectly level and without any load on the measurement pan. Invoke the span-adjustment function. Hold down the Function key, then release your finger when the display switches from [Func] to [S.A. - Page 38 End of calibration of weighing capacity point Display switches to [CAL.oFF] to indicate that adjustment of the weighing capacity point is complete. End of span adjustment Return the calibration knob back to the [For Use] position. To do so, slowly turn the knob until the internal For Use mechanism engages with a click.
-
Page 39: Glp-Compliant Print
9.3 GLP-compliant print At calibration, the AJH-CEN Series enables printing in a format compliant with GLP. Set the function to the GLP print support ([0.GLP 1]) side, then connect the balance to a printer or other equipment. When calibration is complete, the balance prints out the format illustrated below. Since only items are printed, the data should be entered manually by the person who conducted calibration. -
Page 40: Terminal Numbers And Functions
10. Input/output functions 10.1 Terminal Numbers and Functions Terminal Number Signal Input/output Function & remarks ※ EXT.TARE Input External tare subtraction Output HIGH (when balance is powered-up) Input Receiving data Output Transmitting data — Signal ground RS232C connector (DIN 5-pin female): Rear panel ※Tare subtraction (zero adjustment) is possible by connecting an external tare subtraction input and a signal ground, through contacts or a transistor switch. -
Page 41: Connection Between Balances And
10.2 Connection between Balances and Personal Computers Sample connection with D-SUB9P Balance D-SUB9P DIN5P Sample connection with D-SUB25P Balance D-SUB25P DIN5P... -
Page 42: Interface Specifications
10.3 Interface Specifications Transmission system Serial transmission with start-stop synchronization Transmission rates 1200/2400/4800/9600 bps. Transmission codes ASCII codes (8-bit) Signal levels Compliant with EIA RS-232C +5 to +15 V HIGH level (Data logic 0) -5 to -15 V LOW level (Data logic 1) One-character bit configuration Start bit: 1 bit Data bit:... - Page 43 10.4.2 Polarities (P1: one character) Code Description When data is zero or positive When data is negative (SP) When data is zero or positive 10.4.3 Numeric data Six-digit numeric format/Six-digit numeric format(ASCII) : (D1–D7: seven characters) Seven-digit numeric format/Seven-digit numeric format(ASCII)t: (D1–D8: eight characters) Six-digit numeric format/Six-digit numeric format(ASCII) when A.PrF.
- Page 44 For six/seven-digit numeric format(ASCII): Code Meaning Balance indicators (SP) gram carat ounce pound troy ounce pennyweight grain (lower right) tael (Hong Kong) tael (Singapore, Malaysia) (upper right) tael (Taiwan) (lower right) momme tola (SP) percentage pieces 10.4.5 Result of judgment when operating the balance with the comparator function (S1: one character) For six/seven-digit numeric format(available only when the lock switch is off): Code...
-
Page 45: Input Commands
10.5 Input Commands Users can control the balance remotely by transmitting commands from an external device. Two types of control commands are available: Instruction for tare subtraction Setup of output control 10.5.1 Command Transmission Method A command is transmitted to the balance from an external device. Since the data flow (transmission and reception) is stored by a full-duplex system, commands can be transmitted regardless of their data-transmission timing. - Page 46 Setup of output control Code Description O Stop output O Output continuous at all times O Output continuous if stable (stop output if unstable) O Outputs once by pressing Memory key (irrespective of whether stable). O Outputs once if stable. Outputs if the balance is stable when a sample is loaded after the preceding sample has been removed and the balance indicated zero, or less.
-
Page 47: Battery
11. Operating the Balance with the Battery This function operates only when the balance is equipped with optional rechargeable battery pack. 11.1 Specifications • Built-in Nickel-Metal Hydride(NiMH) battery • Charging time: Approximately 12 hours • Drive time: Approximately 24 continuous hours •... -
Page 48: Windshield Setting
12. Windshield Setting Components Panel( 2 large & 2 small ) Cover step (1) Set a small panel in a large panel. step An edge with step should face the same side. (2) Set the other large panel in the assembly above. (3) Set the other small panel in the assembly above. -
Page 49: Troubleshooting
13. Troubleshooting ※ The numbers in ( ) indicate reference pages Symptom Cause Possible remediation Check that the AC • The AC adapter is not connected. There is no indication on the display. adapter is connected (9). • The balance is subject to air currents or ... -
Page 50: Specifications
14. Specifications 14.1 Basic Specifications AJH- AJH- AJH- AJH- Model 220CEN 320CEN 420CEN 620CEN 820CEN 1200CEN 220CEN 320CEN 420CEN 620CEN Max [g] 1200 Min [g] 0.02 0.02 0.02 0.02 0.02 0.02 e [g] 0.01 0.01 0.01 0.01 0.01 0.01 0.01 0.01 0.01 d [g]... -
Page 51: Capacities And Minimum Indications
14.3 Capacities and Minimum Indications for Different Indication Units Model AJ-320CEN/ AJ-820 AJ-1200 AJ-220CEN/ AJ-420CEN/ AJ-620CEN/ Unit of AJH-220CEN AJH-420CEN AJH-620CEN AJH-320CEN measurement displayed 1200 0.02 0.02 0.02 0.01 0.01 0.01 0.01 0.01 (gram) 0.001 0.001 0.001 0.001 0.01 Class 1100 1600 2100... -
Page 52: Conversion Table Of Units
15. Conversion Table of Units penny unit gram carat ounce pound troy ounce weight 1 gram 0.03527 0.00220 0.03215 0.64301 1 carat 0.00705 0.00044 0.00643 0.12860 1 ounce 28.34952 141.74762 0.06250 0.91146 18.22917 1 pound 453.59237 2267.96185 14.58333 291.66667 1 troy ounce 31.10348 155.51738 1.09714...
Need help?
Do you have a question about the AJ-CEN Series and is the answer not in the manual?
Questions and answers