Advertisement
Available languages
Available languages
Quick Links
Originalbetriebsanleitung........................................3 - 9
D
Original instructions.............................................10 - 16
GB
Notice originale.....................................................17 - 23
F
Oorspronkelijke gebruiksaanwijzing..................24 - 30
NL
Istruzioni originali..........................................31 -39
IT
Diamantbohrständer / Diamond Drill Rig / Support de perceuse
EIBENSTOCK
Vakuum Technik
Diamant Boorinstallatie
USD 182
Advertisement

Subscribe to Our Youtube Channel
Related Manuals for EIBENSTOCK USD 182


Summary of Contents for EIBENSTOCK USD 182
- Page 1 EIBENSTOCK Vakuum Technik Originalbetriebsanleitung........3 - 9 Original instructions……........10 - 16 Notice originale.............17 - 23 Oorspronkelijke gebruiksaanwijzing…………..….24 - 30 Istruzioni originali………………………………..….31 -39 Diamantbohrständer / Diamond Drill Rig / Support de perceuse Diamant Boorinstallatie USD 182...
- Page 2 1,16 m...
-
Page 4: Wichtige Sicherheitshinweise
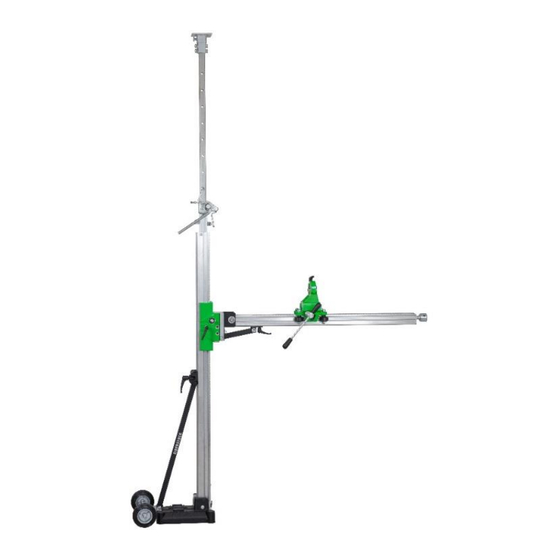
DEUTSCH Wichtige Sicherheitshinweise Warnzeichen Warnung vor allgemeiner Gefahr Warnung vor gefährlicher elektrischer Spannung Warnung vor heißer Oberfläche Maschine, Bohrkrone und Bohrständer sind schwer – Vorsicht Quetschgefahr Reiß- bzw. Schneidgefahr Zu Ihrem Schutz sollten Sie folgende Schutzmaßnahmen treffen: Gehörschutz benutzen Augenschutz benutzen Schutzhelm benutzen Schutzhandschuhe benutzen Schutzschuhe benutzen... - Page 5 Befestigung mittels Halsspannung Ø 60mm konzipiert. Der Bohrständer kann mittels Teleskop-Stativsystem zwischen Boden und Decke verspannt werden. Mithilfe des USD 182 können Bohrungen in Boden, Wand und Decke erstellt werden. Der maximale Bohrdurchmesser darf 182 mm nicht überschreiten! Bei falschem oder zweckentfremdetem Gebrauch übernimmt der Hersteller keinerlei Haftung.
- Page 6 Befestigung des Bohrständers Der Bohrständer wird zwischen Boden und Decke verspannt. Achtung! Hierfür ist eine stabile, massive Decke zwingend erforderlich. Vor der Montage des Teleskop-Stativsystems empfehlen wir, den Maschinen- Schwenkarm (4) zu entfernen. Öffnen Sie hierfür die Spannschraube am Schlitten (5) und ziehen Sie den Schwenkarm nach oben heraus.
- Page 7 Vorbereitung für Bohrungen in Boden und Decke: Für Bohrungen in Boden und Decke sollte der Bohrmotor mittels Halsspannungsadapter (13) direkt am Schlitten (5) montiert werden. Fixieren Sie für Montagarbeiten den Schlitten (5) durch Anziehen des Klemmhebels (8). Demontieren Sie den Maschinen-Schwenkarm (4) und montieren Sie stattdessen an gleicher Position den Halsspannungsadapter (13).
- Page 8 Inbetriebnahme Um die Bohreinheit sicher zu betreiben, beachten Sie bitte folgende Hinweise: Angaben zum Einsatzort ▪ Befreien Sie den Einsatzort von allem, was den Arbeitsvorgang behindern könnte. ▪ Achten Sie auf ausreichende Beleuchtung des Einsatzortes. ▪ Halten Sie die angegebenen Bedingungen für den Anschluss an die Stromversorgung ein.
- Page 9 Halten Sie dabei den Bohrständer fest! ▪ Sichern Sie den Bohrständer um Verletzungen oder Beschädigungen durch unbeabsichtigtes Umfallen zu vermeiden. Pflege und Wartung ▪ Halten Sie den Ständer immer sauber, insbesondere die Bohrsäulen mit der Verzahnung und den 4 Laufrollen / Gleitstücken an den Schlitten. Um die Leichtgängigkeit der Ritzelwelle zu gewährleisten ist diese etwas zu ölen.
- Page 10 Schäden, die durch Material- oder Herstellfehler entstanden sind, werden unentgeltlich durch Reparatur oder Ersatzlieferung beseitigt. Beanstandungen können nur anerkannt werden, wenn das Gerät unzerlegt an den Lieferer oder eine Eibenstock- Vertragswerkstatt gesandt wird. EU - Konformitätserklärung Es ist erforderlich, dass die in diesem Bohrständer betriebene Maschine...
-
Page 11: Important Instructions
ENGLISH Important Instructions Warning symbols: Warning: general precaution Warning: dangerous voltage Warning: hot surface Tool, drill bit and rig are heavy – Caution: risk of squashing Danger of tearing or cutting During work you should wear goggles, ear protectors, protective gloves, and sturdy work clothes! Wear ear protection Wear safety goggles... - Page 12 Diamond drill rig with turnstile and operating instructions Application for indented purpose The USD 182 diamond drill rig is designed for diamond drilling machines mounted using Ø 60mm collar clamping. The drill rig can be braced between the floor and the cover with the aid of the telescopic tripod system.
- Page 13 Fastening of the drill rig The drill rig is braced between the floor and the cover. Caution! A solid, sturdy cover is absolutely necessary for this purpose. We recommended removing the pivoting arm (4) of the machine before assembling the telescopic tripod system. To do this, loosen the tensioning screw on the slide (5) and pull the pivoting arm upwards out of the machine.
- Page 14 Preparations for drilling in the floor and cover To perform drilling in the floor and cover, the drilling motor should be installed directly on the slide (5) with the aid of collar clamping adapters (13). To perform installation tasks, attach the slide (5) by tightening the clamping lever (8). Remove the pivoting arm of the machine (4) and install the collar clamping adapter (13) at the same position, in place of the pivoting arm.
- Page 15 Operations In order to operate the tool safely, please observe the following notes: Details of the work area ▪ Keep the work area free of everything which could obstruct operations. ▪ Provide for adequate illumination of the work area. ▪ Adhere to the regulations concerning the power connection. ▪...
- Page 16 Care and maintenance ▪ Always keep the drill rig clean, especially the column with the toothing and the 4 sliding rolls in the machine holder. In order to allow the free movement of the pinion shaft, it should be slightly lubricated. ▪...
- Page 17 Complaints will be accepted only if the tool is returned in non-dismantled condition to the manufacturer or an authorized Eibenstock service centre. EU - Declaration of conformity It is necessary that the machine (e.g.: ETN 162/3) used in this drill rig comply with the requirements which are described in the specifications of the drill rig (f.
-
Page 18: Instruction D'utilisation
FRANÇAIS Instruction d’utilisation Symboles d’avertissement Attention : Règles de sécurité Attention : Tension dangereuse Attention : Surface chaude L’outil, la couronne et le support sont lourds Attention : Risque d’écrasement Danger de déchirure ou de coupure Pour votre protection quelques mesures de sécurité doivent être prises : Utilisez un protecteur anti-bruit Utilisez des lunettes de protection Utilisez un casque... - Page 19 Chariot pour trépan carottier et instructions d’utilisation Utilisation prescrite Le chariot pour trépan carottier USD 182 est conçu pour être utilisé avec les trépans carottier équipés d’un collier de serrage de Ø 60 mm. Le chariot peut être supporté entre le sol et la couverture à l’aide d’un système de trépied télescopique.
- Page 20 Montage du support Le chariot pour trépans carottier peut être supporté entre le sol et la couverture. Attention ! Une couverture solide est absolument nécessaire pour cette utilisation. Nous recommandons de retirer le bras pivotant (4) de la machine avant d’assembler le système de trépied télescopique.
- Page 21 Préparations pour le perçage dans le sol et la couverture Pour effectuer des perçages dans le sol et la couverture, le moteur de perçage doit être installé directement sur le coulisseau (5) à l'aide d'adaptateurs de serrage à collier (13). Pour l'installation, fixez la glissière (5) en serrant le levier de serrage (8).
- Page 22 Préparation Pour utiliser cette unité de perçage en toute sécurité vous devez observer les règles suivantes : Environnement du lieu de travail : ▪ Gardez votre lieu de travail propre. ▪ Le lieu de travail doit être suffisamment éclairé. ▪ Se conformer aux réglementations en ce qui concerne le câble électrique.
- Page 23 Soin et entretien ▪ Gardez toujours l'appareil de forage propre, en particulier la colonne dentée et les 4 billes coulissantes dans le support de la machine. Afin de permettre le mouvement libre de l'arbre-pinion, il doit être légèrement graissé. ▪ Afin d'obtenir une bonne performance de l'appareil de forage, les 4 billes coulissantes dans le support de la machine doivent se déplacer le long de la colonne sans jeu.
- Page 24 éliminés gratuitement par la réparation ou une livraison de remplacement. Les réclamations ne peuvent être acceptées que lorsque l’appareil est envoyé non démontée au fournisseur ou au service de Eibenstock. Certificat de Conformité UE Il est nécessaire que la machine (par ex. : ETN 162/3 or EBM 182/3) utilisée dans cet appareil de forage respecte les exigences décrites dans les...
- Page 25 NEDERLANDS Belangrijke richtlijnen Waarschuwingssymbolen Opgelet: Veiligheidsregels Opgelet: Gevaarlijk voltage Opgelet: Heet oppervlak Het gereedschap, de kernboor en de steun zijn zwaar Opgelet: Risico op verpletterd worden Gevaar op scheurwonden en snijwonden Draag tijdens uw werk een veiligheidsbril, oorbescherming, beschermende handschoenen en stevige werkkleding! Draag een geluidwerende helm Draag een veiligheidsbril Draag een veiligheidshelm...
- Page 26 Diamantboorinstallatie met draaikruis en gebruiksaanwijzingen Toepassing voor Bestemd Doeleinde De USD 182 diamantboorinstallatie is ontworpen voor diamantboormachines die met een spankraag van Ø 60mm worden gemonteerd. Door het uitschuifbare statiefsysteem te gebruiken, kan de boorinstallatie tussen de vloer en de afdekking worden geklemd.
- Page 27 De Boorinstallatie Verankeren De boorinstallatie wordt tussen de vloer en de afdekking geklemd. Voorzichtig! Hiertoe is een solide, stevige afdekking absoluut essentieel. Wij raden aan om de zwenkarm (4) van de machine te verwijderen alvorens het uitschuifbare statiefsysteem te monteren. Draai hiertoe de spanschroef op de schuif (5) los en trek de zwenkarm omhoog uit de machine.
- Page 28 Voorbereidingen voor het boren in de vloer en afdekking Voor het boren in vloer en afdekking, dient de boormotor direct op de schuif (5) te worden gemonteerd met behulp van klemkraagadapters (13). Voor het uitvoeren van installatietaken, bevestigt u de schuif (5) door de klemhendel (8) vast te zetten.
- Page 29 Gebruiksaanwijzingen Neem a.u.b. de volgende opmerkingen in acht voor veilig gebruik van het apparaat: Details van de werkomgeving ▪ Houd de werkomgeving vrij van alles waardoor bedieningen belemmerd kunnen worden. ▪ Zorg voor voldoende verlichting in de werkomgeving. ▪ Volg de regelgevingen m.b.t. de stroomaansluiting. ▪...
- Page 30 Zorg en Onderhoud ▪ Houd de boorinstallatie altijd schoon, voornamelijk de getande kolom en de 4 schuiflagers in de machinehouder.U dient de pignonas ietwat te smeren zodat het vrij kan bewegen. ▪ De 4 schuiflagers in de machinehouder moeten zonder speling langs de kolom schuiven om een goede prestatie van de boorinstallatie te garanderen.
- Page 31 Defecten, die door materiaal- of fabricagefouten zijn ontstaan, worden gratis door levering van een nieuw onderdeel of reparatie verholpen. Klachten kunnen alleen ingewilligd worden, als het apparaat, zonder gedemonteerd te zijn geweest, naar de leverancier of naar een Eibenstock-werkplaats gezonden wordt. EU - Verklaring van Conformiteit De machine (d.w.z.
- Page 32 ITALIANO Istruzioni important Simboli di avvertimento Warning: general precaution Warning: dangerous voltage Warning: hot surface Tool, drill bit and rig are heavy – Caution: risk of squashing Danger of tearing or cutting During work you should wear goggles, ear protectors, protective gloves, and sturdy work clothes! Wear ear protection Wear safety goggles...
- Page 33 Oder no. Set di fissaggio (calcestruzzo) 35720000 Tassello drive-in per calcestruzzo 35722000 Montaggio a parete USD 182 3572A000 Fornitura Supporto con collare per carotatori a foretto diamantato e istruzioni per l'uso Scopo di utilizzo Il supporto alla perforazione diamantataUSD 182 è progettato per carotatori diamantati da fissare con serraggio a collare Ø...
- Page 34 Fissaggio del supporto di perforazione Il supporto alla perforazione è rinforzato tra il pavimento e il soffitto. Attenzione! A questo scopo è assolutamente necessario un soffitto solido e robusto. Si consiglia di rimuovere il braccio girevole (4) della macchina prima di montare il sistema di treppiedi telescopici.
- Page 35 Per eseguire la foratura nel pavimento e nel soffitto, il carotatore diamantato deve essere installato direttamente sulla slitta (5) con l'ausilio di adattatori collari a molla (13). Per eseguire le operazioni di installazione, fissare la slitta (5) serrando la leva di bloccaggio (8). Rimuovere il braccio girevole della macchina (4) e installare l’adattatore collare a molla (13) nella stessa posizione, al posto del braccio girevole.
- Page 36 Fissaggio della slitta: Per eseguire operazioni di installazione sulla colonna, entrambe le slitte (5+10) possono essere fissate bloccando la leva di bloccaggio Operazioni Per utilizzare l'utensile in sicurezza, osservare le seguenti note: Dettagli dell'area di lavoro ▪ Mantenere l'area di lavoro libera da tutto ciò che potrebbe ostacolare le operazioni.
- Page 37 ▪ Allentare la leva di bloccaggio sul supporto della macchina e rimuovere la carotatrice dal supporto alla perforazione . ▪ Rimuovere il braccio girevole (4) della macchina. ▪ Allentare la tensione tra il pavimento e il soffitto azionando la manovella (7) e ritraendo completamente il treppiede telescopico.
- Page 38 I reclami saranno accettati solo se l'utensile viene restituito in condizioni non smontate al produttore o a un centro di assistenza autorizzato Eibenstock UE - Dichiarazione di conformità È necessario che la macchina (ad es.: ETN 162/3) utilizzata in questo supporto alla perforazione sia conforme ai requisiti descritti nelle specifiche del supporto alla perforazione (ad es.
- Page 39 Vakuum Technik GmbH Eibenstock Lothar Lässig General Manager 05.03.2024 Soggetto a modifiche senza preavviso.
- Page 40 Fachhändler Your Distributor Votre marchand spécialisé Uw distributeur Il Vostro distributore Vakuum Technik GmbH Am Steinbächel 3 08309 Eibenstock...
Need help?
Do you have a question about the USD 182 and is the answer not in the manual?
Questions and answers