Table of Contents
Advertisement
Quick Links
Advertisement
Table of Contents

Subscribe to Our Youtube Channel
Related Manuals for Karma Ergo Recline Series


Summary of Contents for Karma Ergo Recline Series
- Page 1 User manual Ergo Recline Series (KM-5001)
-
Page 3: Table Of Contents
Contents 1. Preface ............................1 1.1 General warnings .......................... 1 1.2 You and your KARMA service provider .................... 3 1.3 CE marking ........................... 4 2. Safety ............................5 2.1 Doorways ............................. 5 2.2 Leaning ............................5 2.3 Negotiating inclines ........................5 2.4 Kerbs (curbs) .......................... - Page 4 5.2 Regular maintenance record ......................32 6. Options and accessories ......................34 7. Troubleshooting ........................35 7.1 Common issues and troubleshooting tips ..................35 8. Specifications ........................... 36 9. Cleaning and recycling ......................38 9.1 Cleaning ............................. 38 9.2 Post-consumer recycling ......................38 10.
-
Page 5: Preface
This manual includes operation instructions for many aspects of the wheelchair, unfolding/folding instructions and instructions on how to deal with possible accidents. This manual is written for KARMA wheelchair: Ergo Recline series. The symbols used in this manual are explained below. Pay special attention to the parts marked with these symbols. - Page 6 the wheelchair, if you are the attendant. DO pay attention to keep the wheelchair balanced. DO check the frame and components regularly and refer to this manual during and after the warranty period. DO tie up the upholstery or replace it with a new one when it becomes loose. ...
-
Page 7: You And Your Karma Service Provider
KARMA guarantees and what maintenance service and parts that are not covered by the warranty. KARMA does not have an official list of service providers at this time. Please contact your dealer for service. If you cannot contact your dealer, please contact another authorized KARMA dealer for service. -
Page 8: Ce Marking
1.3 CE marking This wheelchair complies with the requirements of the Medical Devices Regulation (EU) 2017/745. CAUTION When prescribing wheelchairs for use by full or partial amputees (above or below knees, single or double) or other conditions that affect the user’s natural center of gravity and might cause the wheelchair to tip or the person on the wheelchair to fall off, we suggest contacting your therapist or dealer as well as attaching anti-tippers, a pelvic belt, or other additional safety accessories. -
Page 9: Safety
2. Safety 2.1 Doorways The safest way to operate the wheelchair is on level floors that are free of obstacles. Whenever possible, use a ramp to enter or exit a facility. Keeping your hands on the handrims will allow you to maintain maximum balance. Do not try to force yourself over an obstruction by propulsion and never use the sides of a doorway to pull yourself through a passageway. -
Page 10: Kerbs (Curbs)
To avoid danger, do not drive over 7 degrees of incline. When negotiating inclines, don’t propel over 3 degrees of incline diagonally. Avoid stopping on an incline, it can potentially cause you to lose control of the wheelchair. ... -
Page 11: Streets
Never stand on the footplates when getting into or out of the wheelchair. Never carry more than one passenger. KARMA wheelchairs are limited to one user. Use caution to assure your clothing doesn’t get tangled with the wheels. -
Page 12: Anti-Tippers
Anti-tippers that are incorrectly set or damaged can lead to tipping over. Please turn to a KARMA authorized dealer when anti-tippers need to be installed or re-adjusted. The activated anti-tippers may bump into the ground when negotiating steps or ... -
Page 13: Maximum User Weight Limit
To turn the anti-tippers into the inactive position, rotate the anti-tippers by pressing the release buttons (A) and turning them up. Ensure the release buttons pop out again into place (B). Active position Inactive position 2.10 Maximum user weight limit Refer to “Maximum User Weight”... -
Page 14: Labeling
2.12 Labeling Please carefully read all the labeling on the wheelchair before driving it. Do not remove them. Protect them for future reference. -
Page 15: Intended Use And Parts
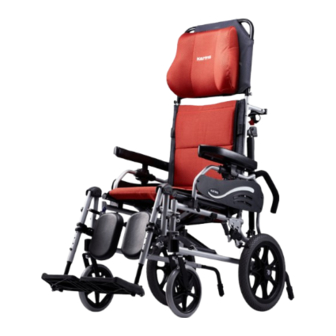
The Ergo Recline series with 14″ rear wheels is a transit wheelchair, which can be pushed by an attendant only. The Ergo Recline series is suitable for users up to 115 kg in weight. Please refer to the labeling on the wheelchair or “8. -
Page 16: Parts Description
3.2 Parts description 1. 3D headrest pillow 11. Armrest flip back lever 2. Backrest upholstery 12. Wheel lock lever 3. Pelvic belt 13. Rear wheel 4. Ship-shape armpad 14. Anti-tipper 5. Patented multi-functional armrest 15. Front caster fork 6. Elevating legrest 16. -
Page 17: Operation
4. Operation 4.1 Preparing for use 4.1.1 Unfolding To unfold your wheelchair, follow the steps below: Hold the armrests and pull outwards. (See Figure 4.1.) Point your fingers inwards with the palm of your hand on the frame, and push it down until the seat is fully lowered. - Page 18 4.1.2 Folding To fold your wheelchair, follow the steps below: Remove the headrest frame. (See Figure 4.7 and refer to “4.1.3 Installing or removing the headrest” for details.) Swivel the footplates outward up. (See Figure 4.8.) Swing away the elevating legrest and pull up the legrest to remove. (See Figure 4.9.) Pull up the knob ①...
- Page 19 4.1.3 Installing or removing the headrest 1. To install the headrest, insert both tubes of the headrest frame into the backrest tubes (see Figure 4.13), until the release buttons on both sides pop out, so the headrest clicks into place. 2.
-
Page 20: Making Adjustments
4.1.5 Removing the elevating legrests To detach the elevating legrest, press the legrest lever. (See Figure 4.18.) Swing the legrest to the side, and lift it up to release. (See Figure 4.19.) Figure 4.18 Figure 4.19 WARNING DO NOT attempt to lift the wheelchair by any removable (detachable) parts, such as the legrests. - Page 21 4.2.2 Adjusting the recline angle CAUTION Before using the recline function, make sure of the following: The rigidifying push bar (lateral support bar) is mounted properly and its knob at the center is fully tightened. You have installed the anti-tippers properly to avoid tipping over. ...
- Page 22 4.2.3 Using the patented multi-functional armrests 4.2.3.1 Flipping back the armrests Flipping back the armrests can help transfer the wheelchair user in an easier way. First, park the wheelchair and push the wheel lock levers forwards as far as possible on both sides of the wheelchair to engage the wheel locks. Pull up the armrest lever (see Figure 4.23), and then flip back the armrest (see Figure 4.24).
- Page 23 4.2.3.3 Mounting the armrests Once the wheelchair user is transferred into or out of the wheelchair, you should put the armrest back into position. First, park the wheelchair and push the wheel lock levers forwards as far as possible on both sides of the wheelchair to engage the wheel locks. Align the hexagonal base at the end of the armrest with the armrest rotation bracket and insert it into the bracket (see Figure 4.29).
- Page 24 Press the release lever to lower the legrest with one hand (see Figure 4.33), and maintain the stability of the legrest with the other hand. To adjust footplate height, use the KARMA tool provided to loosen the bolt at the side of the legrest arm. Adjust to required height and re-tighten. (See Figure 4.34.)
-
Page 25: Transferring In And Out
4.2.5 Adjusting the footplate height To adjust the footplate height, use the KARMA tool provided to loosen the bolt at the side of the legrest arm. Adjust it to the desired height, re-insert the bolt and make sure the footplate is firm. - Page 26 4.3.2 Transferring out Make sure that the wheelchair is near your final destination. Move the wheelchair back sufficiently to ensure that the front casters are pointing forward, i.e. in line with the rear wheels and usually with the front caster forks pointing forward.
-
Page 27: General Use
4.4 General use 4.4.1 Attendant pushing and self-propelled Do ensure that the wheel locks are always locked when the wheelchair is not being pushed. (See Figure 4.25.) Always make sure that both feet are safely on the footplates and that clothing is ... - Page 28 PLEASE keep in contact with the person in the wheelchair. If you stop to look in shop windows or talk to people, remember to turn the wheelchair so that the person in the wheelchair does not have to turn. WARNING NEVER engage the wheel locks too quickly as this may tip the user out of the wheelchair.
- Page 29 4.4.4 Going down kerbs (curbs) NOTE It is always better to avoid kerbs (curbs) where possible by using ramped kerbs (curbs) or slopes and this operation is best attempted with the aid of an attendant. 4.4.4.1 Going down kerbs (curbs) forwards with an attendant CAUTION ...
- Page 30 4.4.5 Going up kerbs (curbs) NOTE This operation is best attempted with the aid of an attendant and the best method is to go up kerbs (curbs) forwards as this maintains the direction of travel and is physically less demanding for the attendant. 4.4.5.1 Going up kerbs (curbs) forwards with an attendant 1.
-
Page 31: Storing
4.6 Transportation The Ergo Recline series fulfills the performance requirements for a “Crash Test” of ISO 7176-19 (Report No. TSSM2302000051W0) and is suitable to use as a seat in vehicles that have been adapted for this purpose. The wheelchair must be securely restrained as described in this manual. - Page 32 Carefully carry it up or down steps; be aware of how you place your feet, do not cross them and trip yourself up. 4.6.2 Method of restraint The Ergo Recline series was tested with four-point webbing systems. Please refer to the restraint manufacturer’s user guide for further details of its operation.
- Page 33 4.6.3 Fitting the front restraints Connect the straps around the wheelchair frame and front caster bracket as pictured below. The anchor point is marked with a yellow sticker Take the brakes off and reverse the wheelchair to tension the front straps. Apply wheelchair brakes (the brakes should be left on during transport).
-
Page 34: Pelvic Belt
4.6.5 Fitting seat belt Fasten the three-point safety belt around the user. The occupied wheelchair should be located in a forward-facing configuration, with the wheel locks applied. Pelvic restraints should make full contact across the front of the body near the junction of the thigh and pelvis as pictured below (correct seat belt position). - Page 35 4.7.2 Adjusting the length of a pelvic belt Identify the required length of the pelvic belt. (See Figure 4.31.) Push the two part of belt through buckle to make the belt longer or shorter. (See Figure 4.32.) Pull the two part of belt tight. (See Figure 4.33.) Push buckle up to the plastic clip so that the belt cannot slip out of position.
-
Page 36: Inspection And Maintenance
5.2 Regular maintenance record In order to ensure that your wheelchair is in good condition, please contact KARMA authorized dealers regularly and make further wheelchair inspection and maintenance records. We recommend that you inspect and maintain your wheelchair every 6 months. - Page 37 Item Weekly Monthly GENERAL Wheelchair rolls straight (no excessive drag or pull to one Ⅴ side) FRAME AND CROSSBARS Inspect frame structure for small cracks/fissures Ⅴ Inspect for bent frame or crossbars Ⅴ WHEEL LOCKS/ATTENDANT BRAKES Do not interfere with tyres (tires) when rolling Ⅴ...
-
Page 38: Options And Accessories
CAUTION If you find anything abnormal, stop using the wheelchair immediately and visit a KARMA wheelchair dealer for inspection and maintenance. As with any wheelchair, the wheels and tyres (tires) should be checked periodically for cracks and wear, and should be replaced. Failure to keep tyres (tires) at the correct pressure will reduce the braking efficiency. -
Page 39: Troubleshooting
Check the front caster bracket angle 4. Squeaks and Rattles Check for loose nuts and bolts 5. Looseness in Wheelchair Check for loose nuts and bolts If you cannot solve the problem by yourself, contact your KARMA wheelchair dealer for help. -
Page 40: Specifications
8. Specifications Product Model Ergo Recline (KM-5001) Nominal seat width (mm/in) Nominal seat depth (mm/in) Front caster/Rear wheel size (in) 8 x 14 8 x 20 Backrest height (mm) 725–865 725–865 725–865 725–865 Headrest height above seat (mm) 220–300 220–300 220–300 220–300 Armrest to seat distance (mm) - Page 41 - The actual product specifications differ from the data in the table by ±10 mm ±0.5 - The actual product specifications may vary according to different configurations. - KARMA reserves the right to modify information herein without further notice. - Please scan the QR code to watch more instructions of the measurement methods...
-
Page 42: Cleaning And Recycling
9. Cleaning and recycling 9.1 Cleaning In order to lengthen the life of your wheelchair, it is suggested that you clean the wheelchair periodically (if not daily), especially after it is used in the rain or snow. We suggest that you don’t use your wheelchair in the rain or snow. If you are traveling and get caught in the rain, we suggest you try to find shelter while waiting it out. -
Page 43: Warranty
Reasons The product or part has been damaged by accident, improper use, incorrect assembly or poor maintenance. The evaluation of it is the privilege of KARMA. Damage resulting from normal wear and tear. Any overloading of the product, please check the label for maximum user weight. - Page 44 Product inspection, adjustment, lubrication, cleaning, etc. The costs of regular inspection and maintenance of product. The product is not repaired by the authorized dealer designated by KARMA. 10.2.4 Responsibilities The Responsibilities of the User Fully adhere to operation guidelines set forth in this manual.
- Page 45 10.2.5 Transfer of Warranty Rights If you purchase a second-hand KARMA wheelchair while it is still within the warranty period, bring this manual and the wheelchair to the authorized dealer and perform necessary product inspection, maintenance and warranty inheritance procedure.
- Page 48 KARMA MOBILITY S.L European Support Center www.karmamobility.es +34 984 390 907 karma@karmamobility.es KARMA MOBILITY LTD. UK representative www.karmamobility.co.uk +44 845 630 3436 info@karmamobility.co.uk KARMA MEDICAL PRODUCTS CO., LTD. www.KarmaMedical.com +886 5 206 6688 globalsales@karma.com.tw (110400001422) Release Date: Jun. 2024 V.01...
Need help?
Do you have a question about the Ergo Recline Series and is the answer not in the manual?
Questions and answers