
Subscribe to Our Youtube Channel
Related Manuals for Supermicro AOC-S3908L-H8iR


Summary of Contents for Supermicro AOC-S3908L-H8iR
- Page 1 AOC-S3908L-H8iR AOC-S3908L-H8iR-32DD AOC-S3908L-H8iR-16DD AOC-S3916L-H8iR AOC-S39016L-H8iR-32DD USER'S MANUAL Revision 1.0c...
- Page 2 State of California, USA. The State of California, County of Santa Clara shall be the exclusive venue for the resolution of any such disputes. Supermicro's total liability for all claims will not exceed the price paid for the hardware product.
- Page 3 Preface About This Manual This user's guide is written for system integrators, IT technicians, and knowledgeable end users. It provides information for the installation and use of the AOC-S3908L-H8iR, AOC- S3908L-H8iR-32DD, AOC-S3908L-H8iR-16DD, AOC-S3916L-H16iR, and AOC-S3916L- H16iR-32DD add-on card. About This Add-On Card...
- Page 4 • Product safety info: http://www.supermicro.com/about/policies/safety_information.cfm • If you have any questions, please contact our support team at: support@supermicro.com This manual may be periodically updated without notice. Please check the Supermicro website for possible updates to the manual revision level.
- Page 5 Preface Naming Convention for Networking Adapters AOC- S 3108 L - H 8 iR Prefix Character (Set) Representation Options (SAS AOC) • Prefix Product Family AOC = Add On Card • Form Factor U = UIO • S = Standard PCI-E •...
- Page 6 Super AOC-S3908L-H8iR(-32DD/16DD)/AOC-S3916L-H16iR(-32DD) User's Manual Contacting Supermicro Headquarters Address: Super Micro Computer, Inc. 980 Rock Ave. San Jose, CA 95131 U.S.A. Tel: +1 (408) 503-8000 Fax: +1 (408) 503-8008 Email: marketing@supermicro.com (General Information) Sales-USA@supermicro.com (Sales Inquiries) Government_Sales-USA@supermicro.com (Gov. Sales Inquiries) support@supermicro.com (Technical Support) RMA@supermicro.com (RMA Support)
- Page 7 Preface Asia-Pacific Taiwan (R.O.C) Tel: +886-(2) 8226-3990 Fax: +886-(2) 8226-3992 Email: Sales-Asia@supermicro.com.tw (Sales Inquiries) Support@supermicro.com.tw (Technical Support) RMA@supermicro.com.tw (RMA Support) Website: www.supermicro.com.tw...
-
Page 8: Table Of Contents
Super AOC-S3908L-H8iR(-32DD/16DD)/AOC-S3916L-H16iR(-32DD) User's Manual Table of Contents Chapter 1 Introduction 1.1 Overview ..........................9 1.2 Key Features ........................9 Chapter 2 Hardware Components 2.1 Add-On Card Image and Layout ..................11 2.2 Major Components ......................13 2.3 SAS 3.0 Ports and Headers ....................14 2.4 Front LED Indicators ......................16 2.5 Rear LED Indicators ......................17... -
Page 9: Chapter 1 Introduction
Congratulations on purchasing your add-on card from an acknowledged leader in the industry. Supermicro products are designed with the utmost attention to detail to provide you with the highest standards of quality and performance. For product support and updates, please refer to our website at http://www.supermicro.com/products/nfo/networking.cfm#adapter. - Page 10 • UEFI Configuration Utility only • UEFI/Legacy Boot • Power consumption: 14 (AOC-S3908L-H8iR, AOC-S3908L-H8iR-16DD, and AOC-S3908L- H8iR-32DD) or 18 (AOC-S3916L-H16iR and AOC-S3916L-H16iR-32DD) watts • Thermal operating range: system-dependent (55°C or higher with sufficient airflow) • Dimensions 2.71" (H) x 6.6" (L) (68.83cm (H) x 167.64cm (L)
-
Page 11: Chapter 2 Hardware Components
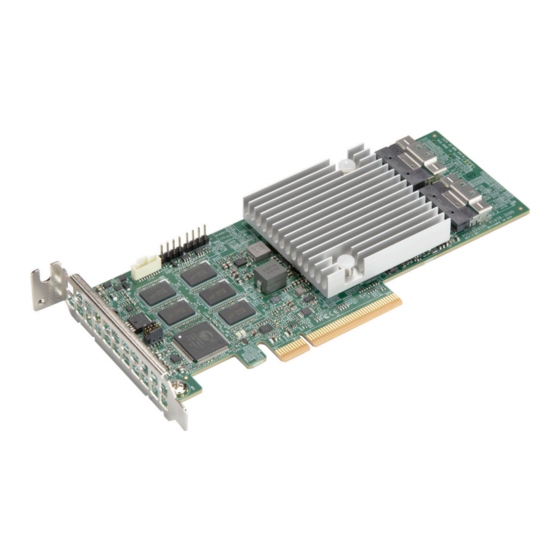
Chapter 2: Hardware Components Chapter 2 Hardware Components 2.1 Add-On Card Image and Layout AOC-S3916L-H16iR-32DD Image... - Page 12 Super AOC-S3908L-H8iR(-32DD/16DD)/AOC-S3916L-H16iR(-32DD) User's Manual AOC-S3916L-H16IR-32DD DESIGNED IN USA REV:1.01 AOC-S3916L-H16iR-32DD Front Layout AOC-S3916L-H16IR-32DD DESIGNED IN USA REV:1.01 BAR CODE AOC-S3916L-H16iR-32DD Bottom Layout...
-
Page 13: Major Components
Chapter 2: Hardware Components 2.2 Major Components The following major components are installed on the AOC-S3908L-H8iR(-32DD/16DD)/AOC- S3916L-H16iR(-32DD): AOC-S3908L-H8iR(-32DD/16DD)/AOC-S3916L-H16iR(-32DD) Major Components Component Name Definition 3908/3916 SAS CTRL SAS controller SAS ports 0-7 SAS ports 8-15 (3916 only) System Heartbeat LED System Error LED... -
Page 14: Sas 3.0 Ports And Headers
Super AOC-S3908L-H8iR(-32DD/16DD)/AOC-S3916L-H16iR(-32DD) User's Manual 2.3 SAS 3.0 Ports and Headers SAS Ports Eight SAS ports, supported by the CN0 connector on the Broadcom 3908 SAS controller, ® or 16 SAS ports, supported by the CN0 and CN1 connectors on the Broadcom 3916 SAS ®... - Page 15 Chapter 2: Hardware Components Serial Debug UART Header A four-pin Serial Debug header, located at J2, is used for the manufacturer's diagnostic purposes only. See the layout below for the location. UART0 Header The universal asynchronous receiver/transmitter (UART) header is located on J3 and is for engineering diagnostic purposes only.
-
Page 16: Front Led Indicators
Super AOC-S3908L-H8iR(-32DD/16DD)/AOC-S3916L-H16iR(-32DD) User's Manual 2.4 Front LED Indicators PSoC Heartbeat LED The PSoC Heartbeat LED is located at D7 on the add-on card. When D7 is blinking, the system is functioning normally. See the table below for more information. System Heartbeat LED Status... -
Page 17: Rear Led Indicators
Chapter 2: Hardware Components 2.5 Rear LED Indicators System Error LED The System Error LED is located at D4 on the add-on card. When D4 is illuminated, a fault has occurred with the controller chip. See the table below for more information. System Error LED Status Color/State Definition... - Page 18 Super AOC-S3908L-H8iR(-32DD/16DD)/AOC-S3916L-H16iR(-32DD) User's Manual System Heartbeat LED The System Heartbeat LED is located at D3 on the add-on card. When D3 is blinking at 1Hz, the controller is functioning normally. See the table below for more information. System Heartbeat LED Status...
-
Page 19: Chapter 3 Installation
Chapter 3: Installation Chapter 3 Installation Note: Your system came with the adapter pre-installed as a part of an integrated solu- tion. We do not recommend removing and reinstalling any part of your system compo- nents. However, if you do need to remove or re-install a system component, including this add-on card, please follow the instructions below to ensure proper system setup. -
Page 20: Before Installation
Super AOC-S3908L-H8iR(-32DD/16DD)/AOC-S3916L-H16iR(-32DD) User's Manual 3.2 Before Installation To install the add-on card properly, be sure to follow the instructions below. 1. Power down the system. 2. Remove the power cord from the wall socket. 3. Use industry-standard anti-static equipment (such as gloves or wrist strap) and follow the instructions listed on page 3-1 to avoid damage caused by ESD. -
Page 21: Chapter 4 Configuring The Broadcom
OS installation. 4.1 RAID Minimum Drive Requirements The add-on cards support up to 240 HDDs (AOC-S3908L-H8iR/AOC-S3916L-H16iR), 32 HDDs (AOC-S3916L-H16iR-32DD/AOC-S3908L-H8iR-32DD), or 16 HDDs (AOC-S3908L- H8iR-16DD) with RAID 0, 1, 5, 6, 10, 50, and 60. Use the table below to determine the minimum number of hard drives needed to set up a RAID environment. -
Page 22: Using The Broadcom ® Megaraid ® Configuration Utility
Super AOC-S3908L-H8iR(-32DD/16DD)/AOC-S3916L-H16iR(-32DD) User's Manual ® ® 4.2 Using the Broadcom MegaRAID Configuration Utility Follow the steps below to start the Broadcom MegaRAID Configuration Utility. 1. Power on the system. 2. When the following screen displays, use the up arrow and down arrow keys to move... - Page 23 Chapter 4: Configuring the Broadcom MegaRAID Setting ® ® 3. In the Advanced tab of the Aptio Setup display, use the up arrow and down arrow keys to move your selection to the Broadcom MegaRAID Configuration Utility, then press <Enter>.
-
Page 24: Broadcom ® Megaraid ® Main Screen
Super AOC-S3908L-H8iR(-32DD/16DD)/AOC-S3916L-H16iR(-32DD) User's Manual ® ® 4.3 Broadcom MegaRAID Main Screen In the Broadcom MegaRAID Configuration Utility, the main menu is the first option displayed. Press <Enter> to be taken to a list of configurable menus. - Page 25 Chapter 4: Configuring the Broadcom MegaRAID Setting ® ® Press the up arrow or down arrow to select a menu. The main screen includes the following menus: • Configuration Management • Controller Management • Virtual Drive Management • Drive Management •...
-
Page 26: Creating A Virtual Drive
Super AOC-S3908L-H8iR(-32DD/16DD)/AOC-S3916L-H16iR(-32DD) User's Manual 4.4 Creating a Virtual Drive When you enter the main menu of the MegaRAID Configuration Utility, Configuration Management is the first menu screen listed, as shown below. This screen provides information about the configuration of controllers, drive groups, and virtual drives. To select a submenu item, use the up arrow and down arrow keys. - Page 27 Chapter 4: Configuring the Broadcom MegaRAID Setting ® ® To create new virtual drives, use the down arrow key to select the Create Virtual Drive screen and press <Enter>, as shown below. Navigate to Select RAID Level and press <Enter> when the following screen displays.
- Page 28 Super AOC-S3908L-H8iR(-32DD/16DD)/AOC-S3916L-H16iR(-32DD) User's Manual Use the up arrow and down arrow keys to select the RAID level, as shown below, and press <Enter>. Note: The corresponding RAID level(s) will display based on the number of hard drives connected to the selected controller.
- Page 29 Chapter 4: Configuring the Broadcom MegaRAID Setting ® ® Navigate to Select Drives and press <Enter> to open the screen for selecting drives for the new virtual drive.
- Page 30 Super AOC-S3908L-H8iR(-32DD/16DD)/AOC-S3916L-H16iR(-32DD) User's Manual Use the up arrow and down arrow to navigate the list of drives and press <Enter> to select one. When the following display appears, use the up arrow or down arrow to select whether a drive will be enabled or disabled and then press <Enter>.
- Page 31 Chapter 4: Configuring the Broadcom MegaRAID Setting ® ® Once you are ready to create the new virtual drive, navigate to the Save Configuration option and select it. This will create a virtual drive with the parameters you have chosen.
-
Page 32: Drive Management
Super AOC-S3908L-H8iR(-32DD/16DD)/AOC-S3916L-H16iR(-32DD) User's Manual 4.5 Drive Management Press the up arrow or down arrow to select the Drive Management menu, as shown below. This screen provides information about hard drives connected to the selected controller. Information about a specific device is displayed by selecting it from the list of devices. - Page 33 Chapter 4: Configuring the Broadcom MegaRAID Setting ® ® To select a device, use the up arrow or down arrow and then press <Enter>. Press <Enter> to perform a command, such as rebuilding a failed drive, locating a drive, or making a drive offline, as shown below.
-
Page 34: Controller Management
Super AOC-S3908L-H8iR(-32DD/16DD)/AOC-S3916L-H16iR(-32DD) User's Manual 4.6 Controller Management The Controller Management screen is the second item listed on the main menu, as shown below. This menu provides information about the settings of the selected controller. - Page 35 Chapter 4: Configuring the Broadcom MegaRAID Setting ® ® Navigate to Advanced Controller Management and press <Enter> to open the submenu.
- Page 36 Super AOC-S3908L-H8iR(-32DD/16DD)/AOC-S3916L-H16iR(-32DD) User's Manual The following screen allows you to view and change settings, such as the link speed or the drive security.
-
Page 37: Properties
Chapter 4: Configuring the Broadcom MegaRAID Setting ® ® 4.7 Properties From the Controller Management menu, use the up arrow or down arrow to select the Advanced Controller Properties menu, as shown below. This menu provides information about and allows changes to the properties of the selected controller. - Page 38 Super AOC-S3908L-H8iR(-32DD/16DD)/AOC-S3916L-H16iR(-32DD) User's Manual The following screen allows you to view and change properties related to power save, hot spare drives, and other items shown below.
-
Page 39: Foreign Configuration Management
Chapter 4: Configuring the Broadcom MegaRAID Setting ® ® 4.8 Foreign Configuration Management The Foreign Configuration Management menu provides information about the foreign configurations and allows you to import or clear the foreign configurations. To reach it, navigate from the main menu to Configuration Management and press <Enter>. - Page 40 Super AOC-S3908L-H8iR(-32DD/16DD)/AOC-S3916L-H16iR(-32DD) User's Manual Press the down arrow key to navigate to the Manage Foreign Configuration menu and select it, as shown below. Please note that the Manage Foreign Configuration menu displays only when a foreign configuration has been connected to the controller.
- Page 41 Chapter 4: Configuring the Broadcom MegaRAID Setting ® ® Foreign View Menu Screen...
-
Page 42: Flashing Firmware Using Storcli Under Dos
Super AOC-S3908L-H8iR(-32DD/16DD)/AOC-S3916L-H16iR(-32DD) User's Manual Chapter 5 MegaRAID Controller Firmware Update ® Procedures This chapter provides instructions on how to flash MegaRAID controller firmware. Please visit ® our website at www.supermicro.com for more information about firmware/utilities downloads. 5.1 Flashing Firmware Using StorCLI under DOS 1. - Page 43 Chapter 5: MegaRAID Controller Firmware Update Procedures ® 3. Reboot the system and check the firmware version in the controller banner during the boot up, as shown below.
-
Page 44: Flashing Firmware Using Lsi Storage Authority
Super AOC-S3908L-H8iR(-32DD/16DD)/AOC-S3916L-H16iR(-32DD) User's Manual 5.2 Flashing Firmware Using LSI Storage Authority You need the LSI Storage Authority software and ROM file (smc3908.rom/smc3916.rom) to flash the MegaRAID firmware. Follow the steps below to use the LSI Storage Authority software on the following platforms: Microsoft Windows operating system and Linux operating system. - Page 45 Chapter 5: MegaRAID Controller Firmware Update Procedures ® 3. Press the Browse button to search for new firmware. 4. Select the new MegaRAID controller firmware as shown below.
- Page 46 Super AOC-S3908L-H8iR(-32DD/16DD)/AOC-S3916L-H16iR(-32DD) User's Manual 5. Click Update to continue. 6. Check Confirm in the dialog box and click Flash Firmware to continue, as shown below.
- Page 47 Chapter 5: MegaRAID Controller Firmware Update Procedures ® 7. Do not reboot the system until the firmware update is completed, as shown below.
- Page 48 Super AOC-S3908L-H8iR(-32DD/16DD)/AOC-S3916L-H16iR(-32DD) User's Manual 8. Reboot the system and check the firmware version using the LSI Storage Authority application as shown below.
-
Page 49: Chapter 6 Booting
Chapter 6: Booting Chapter 6 Booting Depending on the system, motherboard, and BIOS version, use this feature to configure Boot Settings to boot as UEFI or Legacy mode. 6.1 Configuring Boot Settings 1. If the boot mode changes to “Legacy”, the PCIe settings change to “Legacy”. - Page 50 Super AOC-S3908L-H8iR(-32DD/16DD)/AOC-S3916L-H16iR(-32DD) User's Manual 2. If the boot mode changes to “UEFI”, the PCIe settings change to “UEFI”.
- Page 51 Chapter 6: Booting 3. The add-on card installed in the riser slot changes to EFI mode. 4. The controller configuration utility can only be supported under UEFI mode.
- Page 52 (Disclaimer Continued) The products sold by Supermicro are not intended for and will not be used in life support systems, medical equipment, nuclear facilities or systems, aircraft, aircraft devices, aircraft/emergency communication devices or other critical sys- tems whose failure to perform be reasonably expected to result in significant injury or loss of life or catastrophic property damage.
Need help?
Do you have a question about the AOC-S3908L-H8iR and is the answer not in the manual?
Questions and answers