Table of Contents
Advertisement
Quick Links
Download this manual
See also:
Service Manual
FCC STATEMENT
This device complies with Part 15 of the FCC Rules. Operation is subject to the following
two conditions:
(1).
This device may not cause harmful interference, and
(2).
This device must accept any interference received, including interference that may
cause undesired operation.
Note:
This equipment has been tested and found to comply with the limits for Class B digital
devices, pursuant to Part 15 of the FCC rules. These limits are designed to provide
reasonable protection against harmful interference in a residential installation. This
equipment generates uses and can radiate radio frequency energy and, if not installed
and used in accordance with the instructions, may cause harmful interference to radio
communications.
However, there is no guarantee that interference will not occur in a particular installation.
If this equipment does cause harmful interference to radio or television reception, which
can be determined by turning the equipment off and on, the user is encouraged to try to
correct the interference by one or more of the following measures:
Reorient or relocate the receiving antenna
Increase the separation between the equipment and receiver
Connect the equipment into an outlet on a circuit different from that to which the
receiver is connected
Use of shielded cable is required to comply with Class B limits in Subpart B of Part 15 of
the FCC rules.
Do not make any changes or modifications to the equipment unless otherwise specified in
the manual. If such changes or modifications should be made, you could be required to
stop operation of the equipment.
Product Information
Product design and specifications are subject to change without notice. This includes
1.
primary product specifications, software, software drivers, and user's manual. This User
Manual is a general reference guide for the product.
English
-1-
Advertisement
Table of Contents

Related Manuals for Genius P534


Summary of Contents for Genius P534
- Page 1 Connect the equipment into an outlet on a circuit different from that to which the receiver is connected Use of shielded cable is required to comply with Class B limits in Subpart B of Part 15 of the FCC rules.
- Page 2 The product and accessories that come with your camera may be different from those described in this manual. This is due to the fact that different retailers often specify slightly different product inclusions and accessories to suit their market requirements, customer demographics, and geographical preferences.
- Page 3 This might cause damage to the person’s eyesight. Do not subject the LCD monitor to impact. This might damage the glass on the screen or cause the internal fluid to leak. If the internal fluid enters your eyes or comes into contact with your body or clothes, rinse with fresh water.
- Page 4 The camera may feel warm when being used continuously or for an extended period of time. This is normal and not a malfunction. If you will not be using the batteries for an extended period of time, remove them from the camera to prevent leakage or corrosion.
-
Page 5: Table Of Contents
Sports Mode Night Mode PREPARING THE CAMERA 14-17 ADDVANCED SHOOTING 30-32 Inserting the Battery Burst Using the AC Power Adapter (optional Auto Exposure Bracketing Selecting the Metering Mode accessory) Inserting and Removing an SD Memory PLAY MODE Card -THE BASIC... - Page 6 English Deleting Images/Video Clips (same as USB driver) Protecting Images/Video Clips Step 2: Connecting the digital still Camera Setting the DPOF to your computer Connecting to a PictBridge Compliant Step 3: Run your application software (i.e. Printer Windows NetMeeting) TRANSFERRING FILES...
-
Page 7: Introduction
INTRODUCTION Overview Thank you for purchasing the new digital still camera! Equipped with a 5.0 Mega pixels CCD sensor, your camera delivers good quality, 2560 x 1920 resolution images. Other features provided by the camera include the following: 5.0 Mega pixels A high-resolution CCD sensor provides 5.0 mega pixels for good quality of images. -
Page 8: Package Contents
Package contents Carefully unpack your package and make sure that you have the following items. In the event that any item is missing or if you find any mismatch or damage, promptly contact your dealer. Digital still camera... -
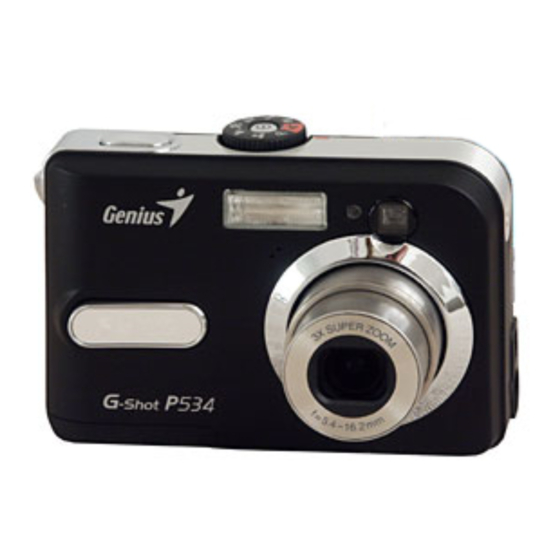
Page 9: Getting To Know The Camera
2. Flash 3. Microphone 4. Lens 5. Power button 6. Mode dial 7. Self-timer LED 8. Viewfinder window 9. PC (USB) / AV Out terminal 10. DC in 3V terminal Rear view Viewfinder Rec-play button Menu button Delete button OK /... -
Page 10: Mode Dial
Arrow button (Down) Arrow button (Left) Flash button 14. Battery / SD card cover Mode Dial You can select from seven shooting modes and setup mode according to shooting conditions to achieve the desired effect. Mode Description Power button Press to turn on/off the power. -
Page 11: Lcd Monitor Information
English Select this option to take photographs of people Night against a dusk or nighttime background. Setup Select this mode to adjust the camera settings. LCD Monitor Information Camera Mode ] FINE ] NORMAL ] ECONOMY 3. Image size ] 2560 x 1920... - Page 12 ] Red Eye 9. Capture mode indicator ] Forced flash ] SINGLE ] No Flash Video mode 1. Video mode 2. Recordable movie time available 3. SD memory card indicator (if present) 4. Battery power indicator 5. Focus area -12-...
-
Page 13: Preparing The Camera
6. Playback information PREPARING THE CAMERA Installing the Battery You can use 2 AA size batteries to turn on the camera. Make sure that the power of the digital camera is off before inserting or removing the batteries. 1. Make sure the camera is turned off. -
Page 14: Using The Ac Power Adapter
3. Connect the other end to an electrical outlet. NOTE Make sure to use only the AC power adapter specified for the camera. Damage caused by the use of an incorrect adapter is not covered under the warranty. To prevent unexpected auto power off resulting from no battery power left during the process of transferring your images to the computer;... -
Page 15: Attaching The Camera Strap
(on the side of the SD memory card) to “LOCK”. To save, edit, or erase data on an SD memory card, you must unlock the card. Attaching the Camera Strap Attach the strap as shown in the illustration. -
Page 16: Getting Started
Choosing the Screen Language When the camera is turned on for the first time, a language-selection screen will be displayed in the monitor. Follow the steps below to choose the desired language. 1. Rotate the mode dial to and turn your camera on by pressing the button. -
Page 17: Setting The Date And Time
5. Press the button to confirm. Setting the Date and Time Follow the steps below to set the date display style, current date and time. Rotate the mode dial to and turn your camera on by pressing the button. -
Page 18: Formatting An Sd Memory Card Or
NOTE When you format an SD memory card, be aware that all data of which will be permanently erased. Protected images are also erased. To format the internal memory, do not insert a memory card into the camera. Otherwise, you will format the memory card. -
Page 19: Using The Lcd Monitor
English Using the LCD Monitor Your camera is equipped with a 1.8" full color LPTS LCD monitor to help you compose images, replay recorded images/video clips or adjust menu settings. The mode icons, text and numbers displayed on the monitor may very according to the current settings. -
Page 20: Setting Image Resolution And Quality
Press the shutter button the rest of the way down to capture the image. NOTE The actual captured image appears to be larger than the one on LCD after the image is captured. Pressing the button switches the LCD monitor display mode. -
Page 21: Using The Zoom Function
The possible number of shots and recording time depend on the storage size, resolution and quality settings and the subject of the image to be captured. You can resize the images later. (Please refer to section in this manual titled “Resizing an Image” for further detail.) Using the Zoom Function This camera is equipped with 3x optical zoom. -
Page 22: Using The Flash
Using the Flash The flash is designed to function automatically when lighting conditions warrant the use of flash. You can take an image using a desired flash mode to suit your circumstances. Rotate the mode dial to A , P ,... -
Page 23: Using The Self-Timer
Using the Self-Timer The self-timer can be used in situations such as group shots. When using this option, you should either mount the camera on a tripod (recommended) or rest it on a flat, level surface. -
Page 24: Adjusting The Exposure
If you wish to take another image using the self-timer, repeat these steps. Adjusting the Exposure (EV Compensation) You can manually adjust the exposure determined by the digital camera. Use this mode when the proper exposure cannot be obtained, for example, when the contrast (different between light and dark) between the subject and the background is extremely large. -
Page 25: Setting White Balance
English Setting White Balance This feature lets you make adjustments to compensate for different lighting types according to your shooting conditions. Rotate the mode dial to P , , or Press the button to turn on the power. Press , then toggle to select the [AE/AWB] menu. -
Page 26: Program Mode
English Rotate the mode dial to A mode and turn your camera on by pressing the button. Compose your subject within the focus frame. Press the shutter button down halfway to focus the image. When you press the shutter button down half way, the camera’s Auto Focus feature automatically focuses the image and exposure. -
Page 27: Portrait Mode
Compose your subject within the focus frame. Press the shutter button to capture the image. Landscape Mode This mode allows you to take photographs of distant scenery or landscapes. Rotate the mode dial to mode and turn your camera on by pressing the button. -
Page 28: Sports Mode
English Sports Mode This mode allows you to shoot fast moving objects. Rotate the mode dial to mode and turn your camera on by pressing the button. Compose your subject within the focus frame. Press the shutter button to capture the image. -
Page 29: Addvanced Shooting
English ADVANCED SHOOTING Burst This mode is used for continuous shooting. Pictures are taken continuously while the shutter release button is pressed. Rotate the mode dial to P , , or and turn your camera on by pressing the button. -
Page 30: Auto Exposure Bracketing
In AEB mode, the flash mode will be set to OFF automatically. Selecting the Metering Mode You can select the metering mode that sets which part of the subject to measure to determine the exposure. Rotate the mode dial to P ,... -
Page 31: Play Mode -The Basic
AVERAGE]: Averages the light metered from the entire frame, but gives greater weight to the subject matter at the center. SPOT]: Meters the area within the spot automatic exposure point frame at the center of the LCD monitor. To exit from the menu, press the button. -
Page 32: Magnifying Images
NOTE The playback information displayed on the LCD monitor will disappear after seconds of time. If there is no image stored in the internal memory or on the memory card. [NO IMAGE] message will appear on the monitor. Magnifying Images While reviewing your images, you may enlarge a selected portion of an image. -
Page 33: Thumbnail Display (Index Playback)
English NOTE The magnification factors range from 1x to 4x (within 7 stages: 1.0x, 1.5x, 2.0x, 2.5x, 3.0x, 3.5x and 4.0x). Thumbnail Display (Index Playback) This function allows you to view four or nine thumbnail images on the LCD monitor simultaneously so you may search for a particular image. -
Page 34: Resizing An Image
NOTE You can adjust the slide show display interval within the range of 3 SEC., 5 SEC., 10 SEC. Resizing an Image You can change the image size of a captured image to one of the following sizes: 2560 x 1920 pixel, 2048 x 1536 pixel, 1280 x 960 pixel and 640 x 480 pixel. -
Page 35: Movie Mode
MOVIE MODE Recording Video Clips This mode allows you to record video clips with sound via the built-in microphone. Rotate the mode dial to mode and turn your camera on by pressing the button. -
Page 36: Playing Back Video Clips
English NOTE The function of optical zoom (3x) can be activated before you start to record video clips. Pressing the button switches the LCD monitor display mode. Each time you press the button, the display changes in the following order: Focus Frame On → Indicators Off →Composition Line On →LCD Off. -
Page 37: Play Mode-Advanced Functions
The sound recorded with video clips can only be played back on TV or computers. Deleting Images/Video Clips Use this function to delete one or all images/video clips stored in the internal memory or memory card. Please note that the deleted images or video clips cannot be recovered. Exercise caution before deleting a file. - Page 38 [THIS IMAGE] or [ALL IMAGES] by your preference, then press button. When the delete message appears, use to select [YES], then press button to confirm the deletion. If you wish to cancel the deletion, select [NO]. -38-...
-
Page 39: Protecting Images/Video Clips
English NOTE Protected images cannot be deleted with the delete function. Protecting Images/Video Clips Set the data to read-only to prevent images from being erased by mistake. Press the (Playback) button. The last recorded image appears on the LCD monitor. -
Page 40: Setting The Dpof
DPOF (Digital Print Order Format) allows you to embed printing information on your memory card. By using DPOF, you can select an image to be printed and then specify how many prints or which image you would like. Take your memory card to a DPOF enabled printer that accepts memory cards. - Page 41 [QUANTITY]: Allows you to select image quantity (0~10). Use to set the image quantity. [DATE]: The date of recording can be printed directly on the images. Press the button to choose [YES] or [NO] with [RETURN]: To exit the mark function, use to select [RETURN], then press button.
-
Page 42: Connecting To A Pictbridge Compliant
You cannot print movies. Connecting to a PictBridge Compliant Printer Even if you do not have a computer, you can connect the camera directly to a printer that supports PictBridge to perform image selection and printing using the camera monitor screen and controls. - Page 43 English In [PRINT] Mode: Lets you print the specified image with PictBridge. Figure Procedure Step to select the [PRINT] mode, then press the button. * The [PRINT PAPER] screen is displayed. to access in the selection of paper setting, then press the button to confirm.
- Page 44 [FILE NAME]: If you select WITH, images are printed with the file name. [CANCEL]: To cancel the print settings, use to select [CANCEL]. After step 4 is finished, you can still use to change the image by your preference, then press the button to print.
- Page 45 English In [PRINT ORDER] Mode: This function only lets you print the specified image based on the previous Figure Procedure Step to select the [PRINT ORDER] mode, then press the button. * The [PRINT PAPER] screen is displayed. to access in the selection of...
-
Page 46: Computer
Web. In order to do this, you must install the USB driver onto your computer first. Note that before you begin to install the software, you need to check your system according to the table as shown below. -
Page 47: Step 3: Downloading Images/Video Clips
Mac users: Double-click the “untitled” or “unlabeled” disk drive icon on our desktop. iPhoto may automatically launch. Step 3: Downloading images/video clips When the camera is turned on and connected to your computer, it is considered as a disk drive, just like a floppy disk or CD. -47-... -
Page 48: Editing Software Installation
“Edit” menu. After that, open the destination location and choose “Paste” from the “Edit” menu. For computers running Mac OS Open the “untitled” disk window and the hard disk or the destination location. Drag and drop from the camera disk to the desired destination. NOTE Memory card users may prefer to use a memory card reader (highly recommended). -
Page 49: Installing Photo Express
For more information about the operation of Photo Explorer application software, refer to its respective help documentation. For Windows 2000/XP users, please make sure to install and use the Photo Explorer in “Administrator” mode. Photo Explorer is not supported on the Mac. iPhoto or iPhoto2is recommended. -
Page 50: Using The Digital Still Camera As Apc Camera
USING THE DIGITAL STILL CAMERA AS A PC CAMERA Your digital still camera can act as a PC camera, which allows you to videoconference with business associates, or have a real-time conversation with friends or family. To use the digital still camera for videoconferencing, your computer system must include the... -
Page 51: Step 3: Run Your Application Software (I.e. Windows Netmeeting)
Position the digital camera steadily on top of your computer monitor or use a tripod. NOTE When using this digital still camera as a PC camera, it is necessary to install the battery into the digital still camera. Step 3: Run your application software (i.e. Windows... -
Page 52: Menu Options
For more information about the operation of videoconference application software, refer to its respective help documentation. MENU OPTIONS Camera Menu This menu is for the basic settings to be used when capturing still images. Rotate the mode dial to A , P , and turn your camera on. Press... - Page 53 640 x 480 Sets the quality (compression rate) at which the image is QUALITY captured. FINE NORMAL ECONOMY You can take images with the distance to the subject set by FOCUS auto focus, macro or infinity. * AUTO MACRO INFINITY CAPTURE MODE Sets the recording method at the time of taking pictures.
- Page 54 English In P , Mode Item Description IMAGE SIZE Refer to “Camera Menu - In A (Auto) Mode” in LIST OF MENU OPTIONS. QUALITY Refer to “Camera Menu - In A (Auto) Mode” in LIST OF MENU OPTIONS. SHARPNESS Sets the level of image sharpness.
- Page 55 English Item Description FOCUS Refer to “Camera Menu - In A (Auto) Mode” in LIST OF MENU OPTIONS. CAPTURE Refer to “Camera Menu - In A (Auto) Mode” in LIST OF MENU MODE OPTIONS. METERING Refer to section in this manual titled “Selecting the Metering Mode”...
-
Page 56: Video Menu
(grainer) the image will appear. *AUTO / 50 / 100 / 200 Video Menu This menu is for the basic settings to be used when recording video clips. Rotate the mode dial to mode and turn your camera on. Press , then use to select the [COLOR]. -
Page 57: Play Menu
English Play Menu In the (Playback) menu, set which settings are to be used for playback. Press the (Playback) button. The last recorded image appears on the LCD monitor. Press , then use to select the desired setting and press the button. - Page 58 “Setting the DPOF” for further details. Allows you to copy your files from the digital camera’s internal COPY TO CARD memory to a memory card. Of course, you can only do this if you have a memory card installed and some files in internal memory.
-
Page 59: Setup Menu
English Setup Menu This feature allows you to set up the default settings by preference for using your camera. Rotate the mode dial to (Setup) mode and turn your camera on. Press to select the [BASIC] / [CUSTOM] menu. to select the desired option item, then press the button. - Page 60 English Item Description DIGITAL ZOOM This sets whether or not to use digital zoom at the time of photography. * ON / OFF Returns all basic settings to the digital camera’s default SET TO DEFAULT settings. The time setting will not be reset.
- Page 61 CUSTOM Settings Item Description This sets the date and the time. DATE & TIME Refer to section in this manual titled “Setting the Date and Time” for further details. * Y/M/D * D/M/Y * M/D/Y Sets video output system of the video equipment that you are going to connect to the camera.
-
Page 62: Devices
English CONNECTING THE CAMERA TO OTHER DEVICES -62-... -
Page 63: Specifications
Item Description Image Sensor Effective 5.0 Mega pixels pixels Still image: 2560 x 1920, 2048 x 1536, 1280 x 960, 640 x 480 Image size Video clip: 320 x 240 Still image: Fine, Normal, Economy Image quality Movie image: Economy... -
Page 64: Appendix
AC-DC Adapter (3V/2.5A) (Optional) Dimension Approx. 91 x 61 x 27 mm Weight Approx. 130g (without batteries and the SD memory card) * Design and specifications are subject to change without notice. APPENDIX Troubleshooting Guide Symptom Possible causes Solutions / Corrective Actions Power does not The battery has run out. -
Page 65: Possible Number Of Recordable Image
SD memory card. The number of recordable images may vary depending on the recorded subject, the capacity of the memory card, there are files other than images or when the recording is made while switching the picture quality or resolution. -
Page 66: Approximate Duration Of Recording Time
1320 2640 5280 10560 ECONOMY (1/16) * The data shows the standard testing results. The actual capacity varies according to the shooting conditions and settings. Approximate Duration of Recording Time The table below indicates the approximate duration of recording time depending on the capacity of the SD memory card.
Need help?
Do you have a question about the P534 and is the answer not in the manual?
Questions and answers