Advertisement
Quick Links
Advertisement

Related Manuals for Bitspower BPM-CPUESA


Summary of Contents for Bitspower BPM-CPUESA
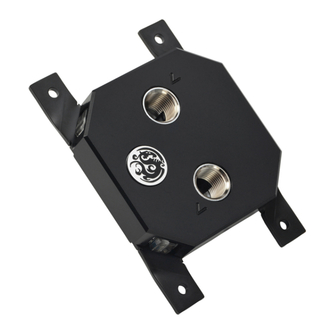
- Page 1 EN ver.1 BPM-CPUESA Bitspower CPU Block Summit ES AMD Edition...
- Page 2 As such, if you feel uncomfortable with the steps involved in installing this product, please reach out to our customer support for assistance. We recommend the use of a leak tester, such as our Bitspower Digital Leak Detector, after completing the assembly of your liquid cooling loop to make sure there are no leaks prior to filling up your loop with coolant.
- Page 3 Installation Guide Bitspower CPU Block Summit ES AMD Edition Accessories CPU block 1 PCS Thumb Screw + Spring 4 PCS AMD Screw 4 PCS CPU socket compatibility AMD AM5/AM4 [ 3 ]...
- Page 4 Assembly steps Installation Follow the right sequence to install. Prior to securing the block to the motherboard, please verify there are no components in the way of the block. Do not proceed if the block makes contact with any component on the motherboard and contact us for assistance. step 1 step 2 Please refer to the original installation guide to install the...
- Page 5 Assembly steps step 5 step 6 Use an appropriate amount of Thermal Paste. Install the CPU block to AMD screw. step 7 step 8 Install the 'thumb Screw + Spring' to CPU block . The installation is complete. [ 5 ]...
- Page 6 Assembly steps Reference Exploded view Use an appropriate amount of Thermal Paste. Please arrange the direction of water flow according to the diagram and do not make any changes. Installation Dimension 24.7 [ 6 ]...
- Page 7 TC ver.2 BPM-CPUESA Bitspower CPU Block Summit ES AMD Edition...
- Page 8 知識。 因此,如果您對安裝的步驟感到不了解, 請聯繫我們的客戶支援以獲得幫助。 我們建議在組裝完您的水路系統後使用測漏計測試,例如我們的 Bitspower 數位測漏計,以 免在注入水冷液後發生洩漏狀況。 禁止在水路有水或水泵運作時使用測漏計。 使用測漏計時,壓力不得超過 0.5 kg/cm 或 7.0 PSI。對您的水冷系統施加過高的壓力可能 會造成您的水冷零件損壞。 Bitspower 不對使用測漏計造成的任何潛在損壞負責。 在安裝任何零件時絕對不要過度擰緊,除非在說明中另有說明,否則過度擰緊會導致您的零 件損壞。 建議使用我們的 Bitspower 透明水冷液來獲得最佳的冷卻效果,同時使用 Bitspower 染料 來達成您想要的顏色。我們建議不要使用純蒸餾水,因為長時間使用可能會導致水垢與藻類 的產生。請避免使用任何其他非推薦的水冷液或液體。使用非推薦的水冷液或液體可能會導 致異常狀況,如硬體塗層剝落、沉積物或殘渣積聚導致管路或 O 圈的損壞和變形及水泵的不 正常運作。Bitspower 不因使用非推薦水冷液而出現的任何問題負責。 絕對不要混用或使用不同種類的金屬製成的零件至您的水冷系統中。絕對不要使用鋁底的水 冷零件與 Bitspower 產品一起使用,會導致您的水冷零件嚴重損壞和漏水,並使您的保固失 效。如果您對使用的零件有任何疑問或問題,請聯繫我們的客戶支援以獲得幫助。 Bitspower 保留更改我們產品設計和解釋的權利,恕不另行通知。產品的實際設計和顏色可 能與我們的網站上顯示的不同。 [ 8 ]...
- Page 9 使用說明書 Bitspower CPU Block Summit ES AMD Edition 配件 CPU 冷頭 1 個 手轉螺絲 + 彈簧 4 個 AMD 螺絲 4 支 CPU 插槽兼容 AMD AM5/AM4 [ 9 ]...
- Page 10 組裝步驟 使用說明 請按照正確的順序進行安裝 在將冷頭安裝到主機板上之前,請確認沒有任何干涉。 如果冷頭與主機板上的任何組件干涉,請勿繼續操作,並聯絡我們尋求協助。 步驟 1 步驟 2 請參考原廠安裝指南來安裝 CPU。 拆除原廠扣具螺絲。 注意 : 圖示為背插式主機板,與您的實際主機板設計和風格可能 會有所不同。 步驟 3 步驟 4 拆除扣具。 安裝 AMD 螺絲。 [ 10 ]...
- Page 11 組裝步驟 步驟 5 步驟 6 使用適量的導熱膏。 將 CPU 冷頭安裝至 AMD 螺絲上。 步驟 7 步驟 8 將手轉螺絲 + 彈簧鎖至 CPU 冷頭上。 完成安裝。 [ 11 ]...
- Page 12 組裝步驟 參考 爆炸圖 進 出 使用適量的導熱膏 請依圖示安排水流方向,勿隨意改變。 使用說明 尺寸參考 24.7 [ 12 ]...
- Page 13 SC ver.2 BPM-CPUESA Bitspower CPU Block Summit ES AMD Edition...
- Page 14 知识。因此,如果您对安装的步骤感到不了解, 请联系我们的客户支援以获得帮助。 我们建议在组装完您的水路系统后使用测漏计测试,例如我们的 Bitspower 数位测漏计,以 免在注入水冷液后发生泄漏状况。 禁止在水路有水或水泵运作时使用测漏计。 使用测漏计时,压力不得超过 0.5 kg/cm 或 7.0 PSI。对您的水冷系统施加过高的压力可能 会造成您的水冷零件损坏。 Bitspower 不对使用测漏计造成的任何潜在损坏负责。 在安装任何零件时绝对不要过度拧紧,除非在说明中另有说明,否则过度拧紧会导致您的零 件损坏。 建议使用我们的 Bitspower 透明水冷液来获得最佳的冷却效果,同时使用 Bitspower 染料 来达成您想要的颜色。我们建议不要使用纯蒸馏水,因为长时间使用可能会导致水垢与藻类 的产生。请避免使用任何其他非推荐的水冷液或液体。使用非推荐的水冷液或液体可能会导 致异常状况,如硬体涂层剥落、沉积物或残渣积聚导致管路或 O 圈的损坏和变形及水泵的不 正常运作。 Bitspower 不因使用非推荐水冷液而出现的任何问题负责。 绝对不要混用或使用不同种类的金属制成的零件至您的水冷系统中。绝对不要使用铝底的水 冷零件与 Bitspower 产品一起使用,会导致您的水冷零件严重损坏和漏水,并使您的保固失 效。如果您对使用的零件有任何疑问或问题,请联系我们的客户支援以获得帮助。 Bitspower 保留更改我们产品设计和解释的权利,恕不另行通知。产品的实际设计和颜色可 能与我们的网站上显示的不同。 [ 14 ]...
- Page 15 使用说明书 Bitspower CPU Block Summit ES AMD Edition 配件 CPU 冷头 1 个 手转螺杆 + 弹簧 4 个 AMD 螺丝 4 支 CPU 插槽兼容 AMD AM5/AM4 [ 15 ]...
- Page 16 组装步骤 使用说明 请按照正确的顺序进行安装 在将冷头安装到主机板上之前,请确认没有任何干涉。 如果冷头与主机板上的任何组件干涉,请勿继续操作,并联络我们寻求协助。 步骤 1 步骤 2 请参考原厂安装指南来安装 CPU。 拆除原厂扣具螺丝。 注意 : 圖示為背插式主機板,與您的實際主機板設計和風格可能 會有所不同。 步骤 3 步骤 4 拆除扣具。 安装 AMD 螺丝。 [ 16 ]...
- Page 17 组装步骤 步骤 5 步骤 6 使用适量的导热膏。 将 CPU 冷头安装至 AMD 螺丝上。 步骤 7 步骤 8 将手转螺丝 + 弹簧锁至 CPU 冷头上。 完成安装。 [ 17 ]...
- Page 18 组装步骤 参考 爆炸图 进 出 使用适量的导热膏 请依图示安排水流方向,勿随意改变。 使用说明 尺寸参考 24.7 [ 18 ]...
Need help?
Do you have a question about the BPM-CPUESA and is the answer not in the manual?
Questions and answers