Advertisement
Important Information
Be sure to obey the following information so as not to harm yourself or others or damage this instrument or other external equipment.
Power adapter:
- Please use only the specified AC adapter supplied with the product. An incorrect or faulty adapter can cause damage to the electronic keyboard.
- Do not place the AC adapter or power cord near to any source of heat such as radiators or other heaters.
- To avoid damaging the power cord, please ensure that heavy objects are not placed on it and that it is not subject to stress or over bending.
- Check the power plug regularly and ensure it is free from surface dirt. Do not insert or unplug the power cord with wet hands.
Do not open the body of the electronic keyboard:
- Do not open the electronic keyboard or try to disassemble any part of it. If the device is not functioning correctly, please stop using it and send it to a qualified service agent for repair.
Use of the electronic keyboard:
- To avoid damaging the appearance of the electronic keyboard or damaging the internal parts please do not place the electronic keyboard in a dusty environment, in direct sunlight or in places where there are very high or very low temperatures.
- Do not place the electronic keyboard on an uneven surface. To avoid damaging internal parts do not place any vessel holding liquid onto the electronic keyboard as spillage may occur.
Maintenance:
- To clean the body of the electronic keyboard wipe it with a dry, soft cloth only.
Connection:
- To prevent damage to the speaker of the electronic keyboard please adjust the volume of any peripheral device to the lowest setting and gradually adjust the volume accordingly to an appropriate level once the music is playing.
During operation:
- Do not use the keyboard at the loudest volume level for a long period.
- Do not place heavy objects onto the keyboard or press the keyboard with undue force.
- The packaging should be opened by a responsible adult only and any plastic packaging should be stored or disposed of appropriately.
Specification
- Specifications are subject to change without notice.
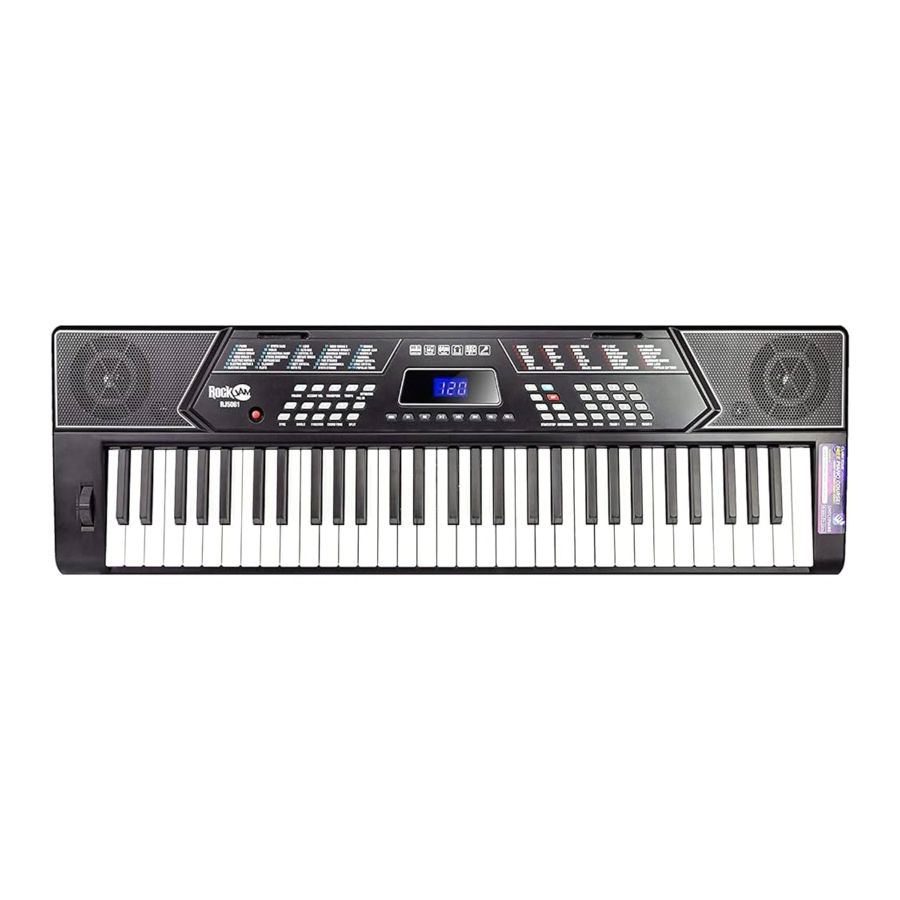
Controls/Indicators and External Connections
Front Panel

- Stereo Speakers
- Power Switch
- Sync
- Single Finger Chords
- Fingered Chords
- Chord Tone
- Split keyboard
- Fill In
- Main Volume +/-
- Accompaniment Volume +/-
- Transpose +/-
- Tempo [Fast/Slow]
- Intro/Ending
- Memory
- Memory Storage 1
- Memory Storage 2
- Play/Pause
- Previous Track
- Next Track
- Music Volume -
- Music Volume +
- Start/Stop
- Metronome
- Vibrato
- Sustain
- Teach 1
- Teach 2
- Teach 3
- Number Buttons
- Demo
- Program
- Rhythms
- Playback
- Tones
- Record
- Keyboard Playing Area
- Chord Keyboard Area
- Pitch Wheel
- Tones List
- LED Screen
- Rhythms List
External Connections

- USB Input (For MP3 Playback)
- AUX IN (For Music Playback)
- MIC Input (For Electret Microphone)
- Headphone Output
- DC 9V Power Input
LED Display

- 3-Digit LED Display
Preparation Before First Use
Stand Assembly
Please first assemble the stand using the screws and allen key supplied. The keyboard can then be secured to the stand using the straps and screws connected to the top bars.

Power
Use of AC/DC power adapter:
Please use the AC/DC power adapter that came with the electronic keyboard or a power adapter with DC 9V output voltage and 500mA output current with a centre positive plug. Connect the DC plug of the power adapter into the DC 9V power socket on the rear of the keyboard and then connect the other end into the mains wall socket and switch on.


When the keyboard is not in use you should unplug the power adapter from the mains power socket.
Battery operation:
Open the battery lid on the underneath of the electronic keyboard and insert 6 x 1.5V Size AA alkaline batteries. Ensure the batteries are inserted with the correct polarity and replace the battery lid.
Do not mix old and new batteries. Do not leave batteries in the keyboard if the keyboard is not going to be used for any length of time. This will avoid possible damage caused by leaking batteries.
Auto power off:
The keyboard has a power save function that switches the keyboard off after a period of around 4 to 5 minutes when not being played. Press the power on / off button to switch back on.
Jacks and Accessories
Using headphones:
Connect the 3.5mm headphone plug into the [PHONES] jack on the rear of the keyboard. The internal speaker will cut off automatically once headphones are connected.

Connecting an Amplifier or Hi-Fi Equipment:
This electronic keyboard has a built in speaker system but it can be connected to an external amplifier or other hi-fi equipment. First turn off the power to the keyboard and any external equipment you are looking to connect. Next insert one end of a stereo audio cable (not included) into the LINE IN or AUX IN socket on the external equipment and connect the other end into the [PHONES] jack on the rear of the electronic keyboard.

Connecting a phone or audio device to the AUX Input to play music through the keyboard:
This keyboard has a built-in speaker system that can be used to play music from your phone or mobile device. Insert one end of a stereo audio cable into the AUX IN socket on the back of the keyboard and connect the other end into your phone or audio device. Make sure the keyboard is switched on. Use the volume control of the phone to control the music volume. AUX in cable not included.

Connecting a Microphone:
Connect the 3.5mm microphone plug into the [MIC] jack on the rear of the keyboard. Note that the keyboard requires an electret or condenser microphone, not supplied.

Playing MP3 Music Files from a USB Memory Stick:
Insert the USB memory stick into the USB input at the rear of the keyboard. Press the PLAY/PAUSE key to start and stop the music playback. Once the music has started playing you can skip forward and backward through the MP3 tracks by pressing the control buttons. Adjust the volume of the music playback with the VOL – and + keys. Use the keys on the keyboard to play along.

Device Operation
Power and Volume
Power control:
Press the [POWER] button to turn the power on and again to turn the power off. The LED display will light to indicate power on.

Adjustment of the Master Volume:
The keyboard has 16 levels of volume from V00(off) - V15. To change the volume, press the [VOLUME  ] buttons. The volume level is indicated by the LED display. Pressing both the [VOLUME ] buttons at the same time will make the Main Volume return to the default level (level V10). The main volume level will revert to level V10 after power off and on.

Tone
Tone Selection:
When the keyboard is switched on the default TONE is ''t00'' Grand Piano. To change the tone, press the [TONE] button first and then directly input the number code on the keypad by pressing the corresponding digits 0-9. The tones can also be changed by using the + / - buttons. Refer to Tone Table for a list of the available tones.

Effect & Control
Split Keyboard:
To switch on Split Keyboard mode press the [SPLIT] button, the LED will show [SPL]. The keyboard will split into two keyboards at the 24th key from the left. You can adjust the TONE of the right hand side of the keyboard by pressing the corresponding digits 0-9 on the numerical keypad. The TONE of the left hand side of the keyboard will remain set to the tone chosen before the Split Keyboard mode was entered. In Split Keyboard mode the pitch of the left hand keys are raised by one octave and the right hand keys lowered by one octave. Press the [SPLIT] button again to exit Split Keyboard mode.

Sustain:
Press the [SUSTAIN] button to enter Sustain mode. The LED display will briefly display [SUS] to indicate sustain is on. Once this mode is selected the sound of each note played is prolonged. Pressing the [SUSTAIN] button again will turn the sustain feature off and exit this mode.

Vibrato:
Press the [VIBRATO] button to enter Vibrato mode. The LED display will briefly display [Vib] to indicate that vibrato is on. Once this mode is selected each time a note is played a trembling effect is added to the the note. Pressing the [VIBRATO] button again will turn the Vibrato feature off and exit this mode.

Transpose:
Pressing the [TRANSPOSE ] buttons alters the musical scale of the note being played. You can adjust the scale by 6 levels upwards or downwards. Pressing both the [TRANSPOSE ] buttons at the same time will make the musical scale revert to 00. The transpose level will be reset to 00 after power off and on.

Metronome:
Press the [METRONOME] button to start the tick-tock beat. There are four beats to choose from. Depending on what the performance needs, you can press the [TEMPO ▲/▼] buttons to speed up or slow down. Press the [METRONOME] button repeatedly to cycle through to the required beat pattern. The LED display will indicate the beat you have chosen. The metronome effect is added to the music once you start playing. To exit this mode press the [START/STOP] or [METRONOME] button again.

Panel Percussion Instruments:
To access the Percussion sounds, press the [TONE] button first and then select tone number 128 on the keypad. Once the tone has been selected the keyboard's keys turn into percussion instruments and play the percussion sounds accourdingly. Refer to "Percussion Instruments" section for a table showing the percussion sounds available.

Using the Pitch Wheel:
Use the Pitch bend wheel to adjust the pitch of a note up or down for a continuous pitch variation between notes. This feature can help recreate an authentic playing sound for sounds such as strings and trombone where the original instrument can slide up between notes. It is also a common tool used for synthesiser compositions.

Rhythm
Selecting the rhythm:
You can choose from any of the 200 built in rhythms. Please refer to Rhythm Table for the detailed rhythm table. Press the [RHY] button to enter the rhythm selection function. The LED display will show the current rhythm number. You can select the rhythm you require by pressing the corresponding digits on the numerical keypad or by pressing the + / - buttons.

Start / Stop:
Press the [START / STOP] button to play the rhythm selected. Press the [START / STOP] button again to stop the rhythm playback

Sync:
Press the [SYNC] button to select the sync accompaniment function. Pressing any of the first 19 keys on the left hand side of the keyboard will start the rhythm playing. Press the [START / STOP] button to stop the rhythm and exit the sync function.

Fill in:
You can fill in a length of interlude if you press the [FILL IN] button during the rhythm playback. After the fill in, the rhythm will continue playing as normal.

Accompaniment Volume Adjustment:
The Accompaniment Volume can be adjusted by pressing the [ACCOMP VOLUME ] buttons. The LED display will show the volume as you are adjusting it. The adjustment range has 16 levels which are displayed as 000 – 015 and indicated by the LED display. Pressing both the [ACCOMP VOLUME ] buttons at the same time will make the Accompaniment Volume return to the default level (level 010). The Main Volume control will also affect the output level of the accompaniment. At power on the acccompaniment volume will reset to the default level.

Tempo Adjustment:
Pres and hold the [TEMPO ] buttons to adjust the playing tempo of the rhythm, metronome and demo song. The adjustment range is 30-240 bpm. Pressing both the [TEMPO ] buttons at the same time will make the tempo revert to the default tempo for the rhythm selected. At power on the tempo will revert to 120 bpm.

Chord Accompaniment
Single Finger Chords:
Press the [SINGLE] button to activate the single finger chord function. The LED screen will display [C-1] Chords are played by pressing certain keys in the chord area on the left hand side of the keyboard (keys 1-19). The finger patterns required are shown in Demo Song Table. Press the [START / STOP] button to start or stop the chord accompaniment. Press the [SINGLE] button again to exit single finger chord mode.

Fingered Chords:
Press the [FINGERED] button to activate the fingered chord function. The LED screen will display [C-2] Chords are played by pressing certain keys in the chord area on the left hand side of the keyboard (keys 1-19). The finger patterns required are shown in Demo Song Table. Press the [START / STOP] button to start or stop the chord accompaniment. Press the [FINGERED] button again to exit fingered chord mode.
Note that no sound will be produced unless the correct finger patterns are formed.

Chord Tone:
In either fingered or single finger chord mode, press the [CHORD TONE] button repeatedly to select the desired chord tone. There are 7 chord tones to choose from, indicated on the LCD as [00] to [06]. The chord tone is reset to [00] after power off / on.

Intro / Ending

Press the [INTRO / END] button to enable the intro section, the display will show [int]. When the intro finishes playing, accompaniment shifts to the main section. Press [INTRO / END] button again to enable the ending section, the display will show [End]. When the ending is finished, the auto accompaniment stops automatically.
Recording Function

Press the [REC] button to enter the recording mode. The LED will indicate that the recording function is on by showing [rEC] on the LED display. Press any key to start recording. The maximum recording capacity is 46 notes. When the recording capacity is full the LED display will show [FUL]. Each time you press the [REC] button, the previous memory will be cleared and the keyboard will enter the recording mode again.

Press the [PLAY] button to play back the recorded notes.
Rhythm Programming

Press the [PROG] button to activate the Rhythm Program mode. The LED will indicate that the rhythm program function is on by showing [Pr9]. You can then play the keyboard and record your percussion track (up to 46 percussion beats). To listen to your piece press the [PLAY] button and the keyboard will playback your edited percussions. You can then play along to your recorded percussion. You can also adjust the speed of the playback using the [TEMPO ] buttons. To cancel the Programming mode, press the [PROG] button again.
Demo Songs

Press the [DEMO] button to play a demo song. The LED display will show [dXX] where XX is the number of the demo song, from 00 to 39. By pressing the + and - button on the numerical keypad you can choose the demo song you require. There are 40 demo songs to choose from in total. The keyboard will finish the chosen song and then play the next song. Press the [DEMO] button again to exit the demo mode. Refer to Demo Song Table for a list of the available Demo songs.
Setting Memories M1 and M2
The keyboard has two built in memories for saving specific tones, rhythms, and tempos. Before performing, select the TONE, RHYTHM and TEMPO you wish to use. While holding the [MEM] button, press the [M1] or [M2] button to store the settings, the LED display will show [S1] or [S2] and this will save the keyboard settings to that memory. You can access the stored settings by pressing the [M1] or [M2] buttons before performing, the LED display will show [n1] or [n2].
Note that the M1 and M2 memories will be cleared after the keyboard is switched off and back on again.

Teaching Modes
Beginner Course:
Press the [TEACH 1] button to enter the Beginner Course teaching mode. This mode is suitable for beginners to familiarise themselves with the rhythm and tempo of the song The LED display will show [dXX] where XX is the number of the song selected, from 00 to 39 (refer to Demo Song Table for the list of songs). Use the keypad or + - keys to select the desired song. The beat point will flash on the LED display to indicate the tempo. The LED display will indicate which key should be pressed, for example C 6. Use the key stickers provided with the keyboard applied to the keys in order to know which key to press. The keyboard will play the main melody in time with any key presses, even incorrect ones.

Intermediate Course:
Press the [TEACH 2] button to enter the Intermediate Course teaching mode. This mode is suitable for intermediate users. The LED display will show [d00] where XX is the number of the song selected, from 00 to 39 (refer to Demo Song Table for the list of songs). Use the keypad or + - keys to select the desired song. The beat point will flash on the LED display to indicate the tempo. The LED display will indicate which key should be pressed, for example C 6. Once the correct key has been pressed it will then move onto the next section of the song. Use the key stickers provided with the keyboard applied to the keys in order to know which key to press.
Advanced Course:
Press the [TEACH 3] button to enter the advanced Course teaching mode. This mode is suitable for more advanced users. The LED display will show [d00] where XX is the number of the song selected, from 00 to 39 (refer to Demo Song Table for the list of songs). Use the keypad or + - keys to select the desired song. The beat point will flash on the LED display to indicate the tempo. The LED display will show which key should be pressed, for example C 6. Use the key stickers provided and press the specified keys as the main melody plays. Note that the song will carry on playing even if an incorrect key is pressed.
Progressive Learning:
- In general, follow the sequence below to master any of the included songs.
- Listen to the song in DEMO mode to get an idea of the note timings and beat. When confident move on to the next stage.
- Access the same song in Beginner Course mode (TEACH 1) and duplicate the note timings and key presses. When mastered move onto the Intermediate Course (TEACH 2) and then the Advanced course (TEACH 3).
Percussion Instruments

Rhythm Table
| No. | Rhythm Name | No. | Rhythm Name |
| 00 | Mambo | 18 | Cha Cha |
| 01 | 16 Beat | 19 | Salsa |
| 02 | Waltz | 20 | Brazil Mambo |
| 03 | Rhumba | 21 | POP 8 Beat |
| 04 | Reggae | 22 | POP Mambo |
| 05 | Rock | 23 | Smooth Country |
| 06 | Slow Rock | 24 | POP Reggae |
| 07 | Bossanova | 25 | Lieder Mambo |
| 08 | Disco | 26 | Hard 8 Beat |
| 09 | Tango | 27 | Country Bossanova |
| 10 | Country | 28 | Hard Mambo |
| 11 | Pop | 29 | Bluegrass Tango |
| 12 | Beguine | 30 | South Country |
| 13 | Latin | 31 | Lieder POP |
| 14 | March Polka | 32 | Bluegrass Beguine |
| 15 | Samba | 33 | Rock Latin |
| 16 | Swing | 34-199 | Popular Rhythms |
| 17 | 8 Beat |
Tone Table
| No. | Tone Name | No. | Tone Name |
| 00 | Piano | 18 | String |
| 01 | Vibraphone | 19 | Soft Crystal |
| 02 | Church Organ | 20 | Koto FX |
| 03 | Reed Organ1 | 21 | Reed Organ2 |
| 04 | Electric Guitar1 | 22 | Drawbar Organ1 |
| 05 | Electric Guitar2 | 23 | Drawbar Organ2 |
| 06 | Electric Bass | 24 | Digital Piano |
| 07 | Synth Bass | 25 | The Strings |
| 08 | Violin | 26 | Sweet Harmonica |
| 09 | Orchestral Harp | 27 | Synth Strings |
| 10 | String Ensemble | 28 | Chorus |
| 11 | Soprano Sax | 29 | Square Lead |
| 12 | Clarinet | 30 | Mandolin |
| 13 | Flute | 31 | Marimba |
| 14 | Lead | 32 | Bright Crystal |
| 15 | Alto Sax | 33 | Lyric Crystal |
| 16 | Crystal FX | 34-199 | Popular Tones |
| 17 | Rotary Organ |
Demo Song Table
| No. | Name of Song | No. | Name of Song |
| 00 | Lambada | 20 | Fur Elise |
| 01 | Mozart piano sonata | 21 | Mary had a little lamb |
| 02 | Let it go | 22 | If you're happy and you know it |
| 03 | Passionate | 23 | Dream wedding |
| 04 | Music box dancer | 24 | He's got the whole world in his hands |
| 05 | Canon | 25 | A maiden's prayer |
| 06 | Brown | 26 | Spanish guitar |
| 07 | The cherry blossom | 27 | Greensleeves |
| 08 | Come back | 28 | Rainstorm |
| 09 | Dream | 29 | Bagpipe |
| 10 | Amazing Grace | 30 | Classical concert |
| 11 | Flight of the bumble bee | 31 | Imperial garden |
| 12 | Happy birthday to you | 32 | Carcassi etude, op. 60, no. 3 |
| 13 | Twinkle twinkle little star | 33 | A state of mind |
| 14 | The cherry tree | 34 | Italian polka |
| 15 | Four seasons spring march | 35 | The fountain |
| 16 | Heipanpo | 36 | Cuckoo waltz |
| 17 | Loch Lomond | 37 | Clementine sonata |
| 18 | Red river valley | 38 | Chopin nocturnes |
| 19 | Serenade - Haydn | 39 | Mozart sonata k 284 |
Troubleshooting
| Problem | Possible Reason / Solution |
| A faint noise is heard when turning the power on or off. | This is normal and nothing to worry about. |
| After turning the power on to the keyboard there was no sound when the keys were pressed. | Check the master volume is set to the correct volume. Check that headphones or any other equipment are not plugged into the keyboard as these will cause the built-in speaker system to cut off automatically. Check that fingered chord mode is not selected. Incorrect key presses in fingered chord mode will not produce any sound. |
| Sound is distorted or interrupted and the keyboard is not working properly. | Use of incorrect power adapter. Use the power adapter supplied or the batteries may need replacing. |
| There is a slight difference in timbre of some notes. | This is normal and is caused by the many different voice sampling ranges of the keyboard. |
| When using the sustain function some tones have long sustain and some short sustain. | This is normal. The best length of sustain for different tones has been pre-set. |
The main volume or accompaniment volume is not right | Check that the main (master) volume and accompaniment volume are set correctly. Note that the main volume also affects the accompaniment volume. |
In SYNC status the auto accompaniment does not work | Check to make sure that Chord mode has been selected and then play a note from the first 19 keys on the left hand side of the keyboard. |
The pitch of the note is not correct | Check that the transpose is set to 00. |
The unit switches off unexpectedly | This is not a fault. The keyboard has a power save function that switches the keyboard off after a period of not being played. Press the power on / off button to switch back on. |
| The left side keys (first 19 keys) make no sound | Check that FINGERED CHORD mode has not been selected. Note a sound will only be produced when a correct chord pattern is played. Refer to Demo Song Table, Fingered Chords. |
Chord Tables
Single Finger Chords

Fingered Chords

Technical Specification
- Display
LED Display, 3-Digit - Tone
200 unique tones - Rhythm
200 unique rhythms - Demo
40 different demo songs - Effect and Control
Split keyboard, Sustain, Vibrato, Transpose, Pitch bend - Chords
Single Finger mode, Fingered mode, 7 Chord tones - Recording and Programming
46 Note record memory, Playback, 46 Beat rhythm programming - Percussion
12 different instruments - Accompaniment Control
Start / Stop, Sync, Fill in, Intro/Ending, Tempo - Intelligent Teaching
Metronome, 3 Teaching modes - External Jacks
Power input, Headphone output, Microphone Input (Electret), AUX Input, USB MP3 playback - Diapason (Range of Keyboard)
C2- C7 (61 keys) - Intonation
<3cent - Weight
3.2 kg - Power Adapter
DC9V, 500mA - Output Power
2 W x 2 - Accessories included
Power adapter, Sheet music stand, Keyboard stand, Stool, Headphones, User guide, Key stickers
PDT Ltd. Unit 4B, Greengate Industrial Estate, White Moss View, Middleton, Manchester,
M24 1UN, United Kingdom - info@pdtuk.com
Documents / ResourcesDownload manual
Here you can download full pdf version of manual, it may contain additional safety instructions, warranty information, FCC rules, etc.
Advertisement


Need help?
Do you have a question about the 5061 and is the answer not in the manual?
Questions and answers