Table of Contents
Advertisement
Quick Links
Enjoy Your
USE AND CARE GUIDE
Assembly, Care And Use Instructions
Read Carefully Important:Retain These
Instructions For Future Reference.
quality products designed to enhance your home. Visit us online to see our full line of products available for your home improvement needs.
E02GR014
Questions, problems, missing parts? Before returning to the store,
please contact our Customer Service
service@alphamarts.com
Thank you for choosing Captiva Desings!
h
This appliance is for Household use only.
This is not a commercial appliance.
THANK YOU
inually create
Advertisement
Table of Contents

Related Manuals for Captiva Designs E02GR014


Summary of Contents for Captiva Designs E02GR014
- Page 1 Enjoy Your USE AND CARE GUIDE E02GR014 This appliance is for Household use only. Assembly, Care And Use Instructions This is not a commercial appliance. Read Carefully Important:Retain These Instructions For Future Reference. Questions, problems, missing parts? Before returning to the store, please contact our Customer Service service@alphamarts.com...
-
Page 2: Table Of Contents
Table of Contents Safety Information Curing your smoker 11-12 General Operating Instructions 12-15 Warning Cleaning and Maintenance Preparation Environmental Protection & Disposal Components Warranty Assembly Instructions 6-10 Safety Information Assembler/Installer This instruction manual contains important information necessary for the proper assembly and safe use of this appliance. -
Page 3: Warning
Warning WARNING: Risk of burning! • Make sure that the smoker plastic. WARNING: This smoker will become very hot, do not move it during operation! • Always wear smoker gloves when grilling or adjusting the vents as well as when using a chimney starter. -
Page 4: Preparation
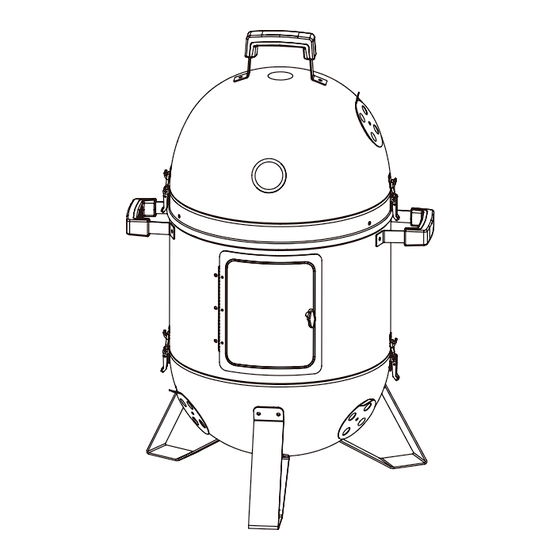
Preparation Before beginning assembly of product, make sure all parts are present. Compare parts with package contents list and hardware contents above. If any part is missing or damaged, do not attempt to assemble the product. Contact customer service for replacement parts. Tools Required for Assembly: Wrench (not included) and Phillips Screwdriver (not included) Components Hardware Contents... - Page 5 Components Description Part Handle Ventilation plate Chamber Door Support Bottom Foot Thermometer Charcoal grid Cooking grid Water bowl Charcoal bowl...
-
Page 6: Assembly Instructions
Assembly Instructions assembly. Before starting assembly, clear an area measuring approximately two to three square meters. Remove the item from the packaging. Lay out all of the parts and any necessary tools so that they are within easy reach. 12 X 12 X 12 X... - Page 7 Assembly Instructions...
- Page 8 Assembly Instructions...
- Page 9 Assembly Instructions You can adjust the tightness with these adjustable latches.
- Page 10 Assembly Instructions Water Smoking Grilling...
-
Page 11: Curing Your Smoker
Curing Your Smoker IMPORTANT: To protect your smoker from excessive rust, the unit must be properly cured and covered at all times when not in use. Step1 Lightly coat all interior surfaces of the smoker with vegetable oil or vegetable oil spray. Do not coat charcoal grate or inner bowl. -
Page 12: General Operating Instructions
Curing Your Smoker Step5 With charcoal burning strong, close the lid. Allow the temperature to reach 225°F (107°C) on temperature gauge. Maintain this temperature for 2 hours. Step6 Increase the temperature to 400°F(205°C) on temperature gauge. This can be achieved by adding more charcoal and / or wood . - Page 13 General Operating Instructions Step3 Step4 With smoker lid open, stand back and carefully light charcoal. Allow to burn until covered with a light ash (approximately 20 minutes). WARNING: Step5 Place cooking grate on smoker body. WARNING: Always wear oven mitts / gloves, use lifter (not included) when remove cooking grate and / or charcoal grid to protect your hands from burns.
- Page 14 General Operating Instructions WATER SMOKING Step1 Put the charcoal in the charcoal bowl and light it up, that are listed on pages 11-13. Step2 Once unit is lit, position water bowl so rim is resting securely on notched out step of all support brackets. Step3 to 1"...
- Page 15 General Operating Instructions GRILLING Step 1 Put the charcoal bowl in the grill bottom and put the charcoal grate in the charcoal bowl. safely away from grill. explosion when lid is opened We recommend the use of a Charcoal Chimney Starter to avoid the dangers associated with charcoal Step 2 Place a cooking grate on the top support brackets.
-
Page 16: Cleaning And Maintenance
Cleaning and Maintenance WARNING: Risk of burning! Allow the smoker to cool down completely before cleaning it. Never use water to quench the hot smoker. This could result in burning or scalding. Occasional cleaning is necessary to preserve the beautiful appearance of the smoker. Do not use any scouring agents. -
Page 17: Warranty
Warranty LIMITED WARRANTY This warranty is a limited warranty, and applies to the original purchase is required. This is a residential warranty and does not apply to commercial use. This collection carries a (1) year limited warranty and is valid from original date of purchase to the original owner (proof of purchase required).
Need help?
Do you have a question about the E02GR014 and is the answer not in the manual?
Questions and answers