Table of Contents
Advertisement
Quick Links
185, Jiraeul-ro, Jijeong-myeon, Wonju-si,
Gangwon-do, Korea
TEL : +82-33-730-0001 / FAX : +82-33-730-0007
http://www.nuga.kr
ENGLISH / CE H/H / B / Rev. 01
2021.03.24
www.nuga.kr
[ ENGLISH ]
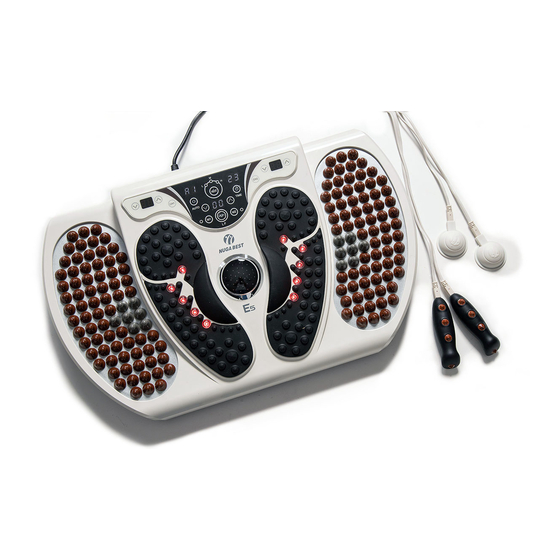
E5
User Manual
Thank you for purchasing this product.
Before use...
Please read the cautions for safety in the
user manual to use this product safely.
Quality Warranty Enclosed
Advertisement
Table of Contents

Subscribe to Our Youtube Channel
Related Manuals for Nuga E5


Summary of Contents for Nuga E5
- Page 1 [ ENGLISH ] www.nuga.kr User Manual Thank you for purchasing this product. Before use... Please read the cautions for safety in the user manual to use this product safely. Quality Warranty Enclosed 185, Jiraeul-ro, Jijeong-myeon, Wonju-si, Gangwon-do, Korea TEL : +82-33-730-0001 / FAX : +82-33-730-0007 http://www.nuga.kr...
-
Page 2: Table Of Contents
Contents Cautions for your safety Cautions for your safety · These cautions include descriptions for the safety of users and prevention of any damage Product Introduction to properties among others. · Read through the following details to use the product appropriately. Product Components ·... - Page 3 Danger Warning Avoid pulling out the power cord parts or touching the power plug with the wet hands. Do not allow children use the product alone. (Otherwise, it might cause electrical shock or fire.) Do not place any heavy objects or other heating Do not use it for other usages than the described appliances on this product.
-
Page 4: Product Introduction
Caution Please abide by defined time and methods. User manual When the product is not used, push the power button POWER on the back of the product to turn off the power. (Otherwise, it might cause a thermal damage of the product.) Separate the power cord while the product is not being in use for a long time. -
Page 5: Product Components
Please inquire from your supplier if there is any missing or damaged component. Low frequency unit Some specifications and/or designs are subject to change for improving the product performance. [ ENGLISH ] www.nuga.kr Controller Low frequency output display unit User Manual Thank you for purchasing this product. -
Page 6: Main Body
- Main body 9 10 Name Function Low frequency auto mode display It is a display unit (FND) for displaying the auto mode unit (FND) of the low frequency. Low frequency auto mode button It sets the auto mode of the low frequency. Low frequency output intensity It controls the output intensity of the low frequency. -
Page 7: Controller
- Controller Name Function How to Use Product CH 1 start/stop button It starts/stops the CH 1 operation. How to Use Product CH 1 output intensity controlling It controls the CH 1 low frequency intensity. How to use a low frequency button How to use a low frequency patch (low frequency stick) CH 2 start/stop button... -
Page 8: How To Use A Low Frequency
How to Use Product How to use a low frequency Introduction ·Do not use it for other usages than the described purposes of uses. Press the start/stop button (LF) ·Check out the working voltage before use. of the foot low frequency of the controlling unit to start the operation. - Page 9 [Memory function operation – Put your both feet on the product Import stored low frequency while using. setting] When you hold the M1 (or M2) Notice button while the low frequency If you do not put your both feet is operating after pressing together on the product, you the low frequency button(LF).
-
Page 10: How To Use A Low Frequency Patch (Low Frequency Stick)
How to Use Product How to Use Product - How to use Channel 1 - How to use a low frequency patch (low frequency stick) How to use channel 1 (CH1) How to use low frequency patch Introduction ·Do not use it for other usages than the described purposes of uses. ·Check out the working voltage before use. - Page 11 Press the channel 1 start/stop Set the channel 1 low frequency button (CH1) to finish the mode by pressing the channel 1 HEAT HEAT operation while operating. start/stop button (CH1) of the controlling unit. AUTO TIME AUTO TIME Notice It is automatically stopped in the set time (30 minutes) Separate the power cord from the power outlet after use.
-
Page 12: How To Use Channel
How to Use Product - How to use Channel 2 How to use channel 2 (CH2) Introduction · Set the channel 2 low frequency Connect the power cord to the mode by pressing the channel 2 HEAT start/stop button (CH2) of the AUTO TIME Power... -
Page 13: How To Use Thermal Function
How to Use Product - How to use thermal function How to use thermal function Introduction Press the channel 2 start/stop ·Do not use it for other usages than the described purposes of uses. button (CH2) to finish the operation while operating. HEAT ·Check out the working voltage before use. - Page 14 Press the thermal function Press the thermal function start/stop button (HEAT) start/stop button (HEAT) HEAT HEAT to finish the operation while shortly to set the temperature. operating. AUTO TIME AUTO TIME L: within 50 M: within 60 H: within 70 HEAT Separate the power cord from the power outlet after use.
-
Page 15: How To Use Controller
How to Use Controller - Low frequency Introduction ·Do not use it for other usages than the described purposes of uses. Start the product by pressing ·Check out the working voltage before use. low frequency start/stop button ·Point the controller only towards the controller receive sensor when operating. of the controller. -
Page 16: How To Use Channel
How to Use Controller - How to use Channel 1,2 Introduction ·Do not use it for other usages than the described purposes of uses. Start product operation by pressing ·Check out the working voltage before use. CH1 Start/Stop button (CH1) of the ·Point the controller only towards the controller receive sensor when operating. -
Page 17: How To Take Emergency Actions During Use
How to Take Emergency Actions during Use Stop using the product immediately and remove the power plug if there is any lightning. Stop using the product immediately and contact your supplier branch or our company if you smell any burn or detect any smoke from the product. -
Page 18: How To Store And Clean Product After Use
How to Store and Clean Product after Use Self-check Items Introduction Caution There might be risk of injuries or fire if you fail to check out the followings. Make sure that you check out the following. Check before use air containing dust, salt, sulfur, etc. How to clean Caution Otherwise, it might cause electric shocks. -
Page 19: Before Any A/S Request
Before any A/S Request Controlling Unit Checking Display Caution Caution Do not disassemble the product arbitrarily if any error occurs, but Ensure checking out the followings before applying for A/S if any abnormality remove the power plug, turn off the power switch, and then contact occurs in the product. -
Page 20: Product Specifications
Product Specifications Product name and Electric massager E5 model name NUGA MEDICAL CO.,LTD. Manufacturer 185, Jiraeul-ro, Jijeong-myeon, Wonju-si, Gangwon-do, Korea Date of manufacture / Marked on the product number of manufacture Product weight 6.5 kg Product size 607 X 375 X 107 (mm)
Need help?
Do you have a question about the E5 and is the answer not in the manual?
Questions and answers
Опишите словами назначения режимов: А1 А2 А3 и А4. Воздействие на какие системы организма они оказывают.