Table of Contents
Advertisement
Available languages
Available languages
Quick Links
Item:
1002 748 445
Model:
CER6CP6743C-4PK
USE AND CARE GUIDE
____________________________________
6 INCH LED RETROFIT TRIM KIT
Questions, problems, missing parts? Before returning to the store,
call Commercial Electric Customer Service
8 a.m. – 7 p.m., EST, Monday – Friday
9 a.m. – 6 p.m., EST, Saturday
1-877-527-0313
HOMEDEPOT.COM.
THANK YOU
We appreciate the trust and confidence you have placed in Commercial Electric through the purchase of this 6 inch
LED retrofit trim. We strive to continually create quality products designed to enhance your home. Visit us online to see
our full line of products available for your home improvement needs. Thank you for choosing Commercial Electric!
Advertisement
Chapters
Table of Contents

Subscribe to Our Youtube Channel
Related Manuals for Commercial Electric CER6CP6743C-4PK


Summary of Contents for Commercial Electric CER6CP6743C-4PK
- Page 1 THANK YOU We appreciate the trust and confidence you have placed in Commercial Electric through the purchase of this 6 inch LED retrofit trim. We strive to continually create quality products designed to enhance your home. Visit us online to see...
-
Page 2: Table Of Contents
Table of Contents Table of Contents General Installation Safety Information Dimming Warranty Operation Pre-Installation Care and Cleaning Planning the Installation Exterior Maintenance Tools Interior Maintenance Package Contents Light Distribution Map Joist Installation FCC Notice Drop Ceiling Installation Troubleshooting Safety Information ... -
Page 3: Pre-Installation
Pre-Installation PLANNING THE INSTALLATION Read all instructions before assembly and installation. Before starting installation of the fixture or removal of a previous fixture, disconnect the power by turning off the circuit breaker or by removing the fuse at the fuse box. To avoid damaging this product, assemble it on a soft, non-abrasive surface such as carpet or cardboard. -
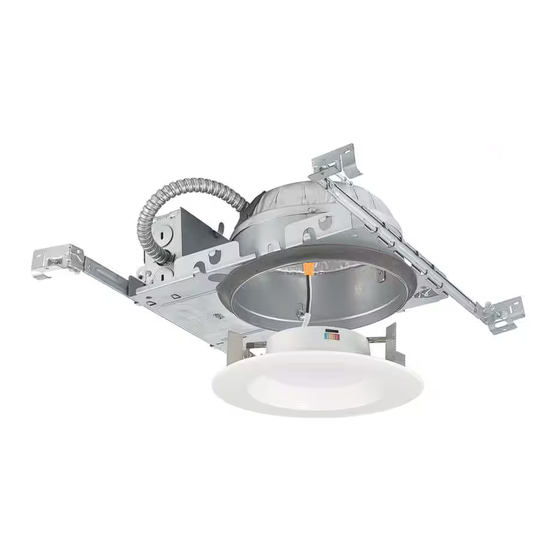
Page 4: Package Contents
Pre-Installation (continued) PACKAGE CONTENTS Part Description Quantity Housing/Hanger Bar Assembly Retrofit Trim Cardboard Template... -
Page 5: Joist Installation
Joist Installation Preparing the location Choose the location for the fixture, taking into WARNING: Use only cables that are consideration the 4 in. depth clearance rated for 90°C or higher. requirement, the location of ceiling joists and the accessibility for the electrical supply. NOTE: Do not make the hole larger than specified by the template. - Page 6 Joist Installation (continued) Securing the hanger bars Raise the housing/hanger bar (A) assembly to the desired location between the two ceiling joists. Adjust the width of both hanger bars (A) to the distance between the joists. Position the assembly so that the mounting clips of the hanger bars (A) cup underneath the bottom edges of the joists.
-
Page 7: Drop Ceiling Installation
Drop Ceiling Installation Preparing the location Choose the location for the fixture, taking into consideration the required 4 inch clearance and the accessibility to the electrical supply. Remove a ceiling tile from the T-bar grid at the installation location. ... -
Page 8: General Installation
General Installation Preparing for the wire connections WARNING: First disconnect the electricity at Using BX (armored) or NM (Romex) cable, run the circuit breaker or the fuse box. the supply wiring from the power supply source Disconnecting power by using the wall switch to the fixture location. - Page 9 General Installation (continued) Connecting the fixture NOTE: If you have electrical questions consult your local electrical code for approved grounding methods. Fasten ground wire to sheet metal of the housing with screw. Plug the male connector to the female connector of top of the retrofit trim (B).
-
Page 10: Dimming
Dimming For an up-to-date list of compatible dimmers, visit HOMEDEPOT.COM. Operation Turn on power at the circuit breaker or fuse box. Turn the light switch on to activate the fixture. Care and Cleaning EXTERIOR MAINTENANCE NOTE: Do not use any cleaners with chemicals, ... -
Page 11: Fcc Notice
FCC Notice WARNING: Changes or modification to this unit FCC responsible party: Cordelia Lighting not expressly approved by the party responsible Company name: Cordelia Lighting for compliance could void the user’s authority to Address: 20101 S Santa Fe Avenue operate the equipment. East Rancho Dominguez, CA 90221 Phone: (800) 345-0542... - Page 12 Questions, problems, missing parts? Before returning to the store, call Commercial Electric Customer Service 8 a.m. – 7 p.m., EST, Monday-Friday 9 a.m. – 6 p.m., EST, Saturday 1-877-527-0313 HOMEDEPOT.COM. Retain this manual for future use.
- Page 13 HOMEDEPOT.COM. GRACIAS Le agradecemos la confianza que han depositado en Commercial Electric a través de la compra de esta luminaria LED empotRada de 6 pulgadas. Nos esforzamos continuamente para crear productos de calidad diseñados para mejorar su casa. Visite nuestra página web para ver nuestra completa línea de productos disponibles para mejorar tu...
-
Page 14: Tabla De Contenidos
Tabla de Contenidos Tabla de Contenidos Instalación General Información de Seguridad Atenuación Garantía Operación Pre-Instalación Cuidado y Limpieza Planificación de la Instalación Mantenimiento del Exterior Herramienta Mantenimiento del Interior Contenido del Paquete Mapa de Distribución de Luz Instalación en Vigas Aviso de FCC Instalación en Techo Suspendido Solución de Problemas... -
Page 15: Pre-Instalación
Pre-Instalación PLANIFICACIÓN DE LA INSTALACIÓN Lea todas las instrucciones antes del montaje e instalación. Antes de comenzar la instalación de la luminaria o el retiro de un artefacto anterior, desconecte la alimentación apagando el disyuntor o quitando el fusible en la caja de fusibles. Para evitar daños a este producto, montarlo en una superficie suave y no abrasiva, como una alfombra o cartón. -
Page 16: Contenido Del Paquete
Pre-Instalación (continuado) CONTENIDO DEL PAQUETE Parte Descripción Cantidad Barras de suspensión Luminario Plantilla Circular de Cartón... -
Page 17: Instalación En Vigas
Instalación en Vigas Preparando la ubicación Elija la ubicación de la luminaria, teniendo ADVERTENCIA: Utilice únicamente cables clasificados para 90 °C o más. en cuenta los 4 pulgadas requisito de espacio libre de profundidad, la ubicación de las vigas del techo y la accesibilidad NOTA: No haga el agujero más grande para el suministro eléctrico. - Page 18 Instalación en Vigas (continuado) Asegurando las barras de suspensión Alcé el ensamblaje de la caja/barra (A) hasta la posición deseada entre las dos vigas del techo. Ajusta el ancho de las dos barras (A) para colgar según la distancia entre las vigas. ...
-
Page 19: Instalación En Techo Suspendido
Instalación en Techo Suspendido Preparando la ubicación Elija el lugar para la lámpara, sin olvidar que se necesitan 4 pulgadas (10.16 cm) de holgura y acceso al suministro de electricidad. Remueva una placa de techo en el sistema de suspensión en T donde irá... -
Page 20: Instalación General
Instalación General Preparando para el cableo ADVERTENCIA: Primero desconecta la Usa un cable BX (blindado) o cable NM electricidad en el cortacircuitos o en la caja (Romex) para llevar la electricidad del cable de fusibles. Desconectar la electricidad en el de suministro de electricidad hasta la lámpara. - Page 21 Instalación General (continuado) Conectando el luminario NOTA: Si tiene dudas con las conexiones eléctricas, consulte el código eléctrico de su localidad para los métodos aprobados de conexione a tierra. Fije el cable de tierra a la lámina de metal de la lata con el tornillo.
-
Page 22: Atenuación
Atenuación Para una lista completa de atenuadores compatibles, visite HOMEDEPOT.COM. Operación Conecte la alimentación en el disyuntor o caja de fusibles. Gire el interruptor de la luz para activar el aparato. Cuidado y Limpieza MANTENIMIENTO DEL EXTERIOR NOTA: No use limpiadores con químicos, ... -
Page 23: Aviso De Fcc
Aviso de FCC Partido responsable de la FCC: Cordelia Lighting ADVERTENCIA: Cambios o modificaciones a Nombre de la empresa: Cordelia Lighting esta unidad no aprobados expresamente por la Dirección: 20101 S Santa Fe Avenue parte responsable del cumplimiento podrían East Rancho Dominguez, CA 90221 anular la autoridad del usuario para operar el Teléfono: (800) 345-0542... - Page 24 Preguntas, problemas, o piezas faltantes? Antes de regresar a la tienda, llama al Servicio al Cliente de Home Decorators Collection 8 a.m. – 7 p.m., Hora del Este, Lunes – Viernes 9 a.m. – 6 p.m., Hora del Este, Sábado 1-877-527-0313 HOMEDEPOT.COM.
- Page 25 HOMEDEPOT.COM. MERCI Nous apprécions la confiance que vous avez placée dans Commercial Electric grâce à l'achat de cette Lumière LED encastrée de 15.25 cm. Nous nous efforçons de créer continuellement la qualité des produits conçus pour améliorer votre maison. Rendez-nous visite en ligne pour voir notre gamme complète de produits disponibles pour votre maison...
-
Page 26: Consignes De Sécurité
Table des Matières Table des Matières Installation Générale Consignes de Sécurité Gradation Garantie Opération Pré-Installation Entretien et Nettoyage Planification du l’Installation Entretien Extérieur Outils Entretien Intérieur Contenu du Paquet Carte de Répartition Lumineuse Installation sur Solives de Plafond Avis de la FCC Installation dans un Plafond Suspendu 31 Dépannage Consignes de Sécurité... -
Page 27: Pré-Installation
Pré-Installation PLANIFICATION DE L'INSTALLATION Lire toutes les instructions avant assemblage et l'installation. Avant de commencer l'installation du luminaire ou la dépose d'un précédent luminaire, débrancher l'alimentation en désactivant le disjoncteur ou en retirant le fusible de la platine de fusibles. Pour éviter d'endommager le produit, assembler sur un doux et non abrasif surface tels que tapis ou un morceau de carton. -
Page 28: Contenu Du Paquet
Pré-Installation (continue) CONTENU DU PAQUET Partie Description Quantité Boîtier avec barre de suspension Luminaire Gabarit circulaire en carton... -
Page 29: Installation Sur Solives De Plafond
Installation sur Solives de Plafond Préparation de l'emplacement Choisissez l’emplacement du luminaire en AVERTISSEMENT : Utilisez uniquement des câbles conçus pour tenant compte du dégagement minimal 90°C ou plus. requis de 10,16 cm (4 po.) et de l’accès à une source d’alimentation électrique. - Page 30 Installation sur Solives de Plafond (continue) Fixation des barres de suspension Soulevez la niche avec barres de suspension (A) vers l’emplacement désiré entre les deux solives de plafond. Ajustez la largeur des deux barres de suspension (A) en fonction de la distance qui sépare les deux solives.
-
Page 31: Installation Dans Un Plafond Suspendu
Installation dans un Plafond Suspendu Préparation de l'emplacement Choisissez l’emplacement du luminaire en tenant compte du dégagement minimal requis de 10,16 cm (4 po.) et de l’accès à une source d’alimentation électrique. Retirer un carreau pour plafond sur les barres en T, à... -
Page 32: Installation Générale
Installation Générale Préparation des connexions filaires Passez le câble BX (armé) ou le câble NM AVERTISSEMENT : First disconnect the electricity at the circuit breaker or the fuse (Romex) de la source d’alimentation électrique box. Disconnecting power by using the wall jusqu’à... - Page 33 Installation Générale (continue) Connexion du luminaire Fixez le fil de terre à la tôle du boîtier avec la vis. Branchez le connecteur mâle au connecteur femelle du haut du luminaire (B). Installation de la garniture Déplacez la position du commutateur sur la température de couleur souhaitée (CCT) .
-
Page 34: Gradation
Gradation Pour une liste complète des gradateurs compatibles visite HOMEDEPOT.COM. Opération Mettez sous tension au niveau du disjoncteur ou des fusibles. Allumez l'interrupteur pour activer l'appareil. Entretien et Nettoyage ENTRETIEN EXTÉRIEUR NOTE: N’utilisez aucun produit de nettoyage contentant des agents chimiques, des solvants ... -
Page 35: Avis De La Fcc
Avis de la FCC AVERTISSEMENT : Changements ou Partie responsable de la FCC : Cordelia Lighting modifications de cette unité non expressément Nom de l'entreprise : Cordelia Lighting approuvées par la partie Adresse : 20101 S Santa Fe Avenue responsable de la conformité pourraient annuler East Rancho Dominguez, CA 90221 l'autorisation de l'utilisateur d'utiliser Téléphone :... - Page 36 Questions, problèmes, pièces manquantes? Avant de retourner au magasin, appeler Commercial Electric Service à la clientèle 8:00 – 19:00, HNE, Lundi – Vendredi 9:00 – 18:00, HNE, Samedi 1-877-527-0313 HOMEDEPOT.COM. Conserver ce manuel pour un utilisation ultérieure.
Need help?
Do you have a question about the CER6CP6743C-4PK and is the answer not in the manual?
Questions and answers