Table of Contents
Advertisement
Quick Links
Advertisement
Table of Contents

Related Manuals for Keysight M9046A

Summary of Contents for Keysight M9046A
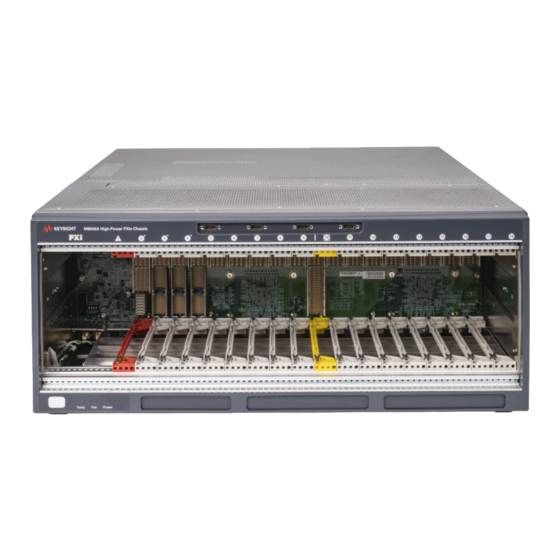
- Page 1 M9046A 18-Slot PXIe Chassis USER GUIDE...
- Page 3 Warranty © Keysight Technologies, Inc. 2022-2023 No part of this manual may be repro- To contact Keysight for sales and techni- THE MATERIAL CONTAINED IN THIS duced in any form or by any means cal support, refer to the support links on DOCUMENT IS PROVIDED “AS IS,”...
- Page 5 The following general safety precau- Cleaning In Case of Damage tions must be observed during all Clean the outside of the Keysight mod- Instruments that appear damaged or phases of operation of this instrument. ule/chassis with a soft, lint-free, defective should be made inoperative Failure to comply with these precau- slightly dampened cloth.
- Page 6 Industry Canadian Interference-Causing Equipment Standard (ICES/NMB-001). Frame or chassis Terminal The Keysight email address is This is also a symbol of an Industrial required by EU directives applicable Scientific and Medical Group 1 Class A to our product.
- Page 7 August 13, 2005. All electric and electronic equipment are required to be separated from normal waste for disposal. To return unwanted products, contact your local Keysight office, or for more information see http:// about.keysight.com/en/companyinfo/ environment/takeback.shtml. Universal recycling symbol. This Universal recycling symbol.
-
Page 8: Table Of Contents
M9046A Advanced Power Monitoring and Control (Option 002) ..14 M9046A Push-Pull Cooling (Option 003) ......15 Interactive Block Diagram . - Page 9 Rack Mount Accessory Kits........77 viii Keysight M9046A 18-Slot PXIe Chassis User Guide...
- Page 10 M9046A-QS1 ........
- Page 11 Temperature LED ......... . 120 12 Index Keysight M9046A 18-Slot PXIe Chassis User Guide...
-
Page 12: Introduction To The M9046A Pxie Chassis
– M9019A – a Gen 3, 24 GB/s, 18-Slot PXI chassis (www.keysight.com/find/M9019A) – M9046A – a Gen 3, 24 GB/s, 18-Slot PXI chassis, with high power and exceptional cooling (www.keysight.com/find/M9046A) The PXIe chassis is the backbone of a PXIe system. These chassis have a high performance backplane providing PXI modules in the chassis the ability to communicate rapidly with one another and to PC. -
Page 13: Key Chassis Features
Introduction to the M9046A PXIe Chassis Key Chassis Features Key Chassis Features The Keysight M9046A 18-Slot PXIe Chassis is designed to deliver the highest power and cooling capability out of all current available PXIe chassis. The Keysight M9046A 18-Slot PXIe Chassis have these key features: –... -
Page 14: M9046A Advanced Rear Trigger Access (Option 001)
This option provides per slot power monitoring and control through a licensed software. For example, DC/DC switching frequency phase. See Figure 3 page 15. No additional hardware is installed. Refer to the M9046A Per-Slot Power Monitor and Control Soft Front Panel (SFP) help file in the software for more detail. -
Page 15: M9046A Push-Pull Cooling (Option 003)
Per-Slot Power Monitor and Control Soft Front Panel M9046A Push-Pull Cooling (Option 003) The M9046A chassis has three fans that push air from the rear of the chassis and an optional top fan tray with four fans pulls air out from above the module slots. -
Page 16: Interactive Block Diagram
Interactive Block Diagram Introduction to the M9046A PXIe Chassis Interactive Block Diagram An interactive Block Diagram exists for all Keysight PXIe. This Block Diagram is usable for training and understanding how the chassis works. You can download the block diagram from: www.keysight.com/find/pxi-blockdiagram... - Page 17 Chassis (Static) Block Diagram Figure 5 Chassis (Static) Block Diagram Keysight M9046A 18-Slot PXIe Chassis User Guide...
-
Page 18: Chassis Maintenance And Inspection
A low fan speed possibly indicates that a fan is wearing out or a fan blade is partially obstructed. Keysight recommends using the chassis Soft Front Panel to check the fan speeds yearly as well. See “Monitoring Chassis Fan Speeds”... -
Page 19: Static-Safe Handling Procedures
Introduction to the M9046A PXIe Chassis Chassis Maintenance and Inspection The weight of an empty M9046A PXIe chassis (no modules installed in the chassis) is approximately 41.14 lbs (18.66 kg). Lift the chassis using a single side handle only when the total chassis weight (chassis plus installed modules) does not exceed 75 lbs (34.0 kg). -
Page 20: Terminology
M9025A PXIe System Module can be used to connect the PXIe chassis to PC or laptop. An embedded controller, such as the Keysight M9038A Embedded Controller, is a small form-factor, Windows-based PC that is designed for installation in the system controller slot of the chassis (slot 1). An embedded controller consumes two or three expansion slots to the left of chassis slot 1. -
Page 21: Installing Pxi Modules In The Chassis
The M9046A chassis has three fans that push air from the rear of the chassis and an optional top fan tray with four fans pull air out from above the module slots. - Page 22 Installing PXI Modules in the Chassis Introduction to the M9046A PXIe Chassis 1 Make sure that the line cord is plugged in to establish earth ground and that the chassis power switch is Off. 2 Ensure that the Fan switch (on the chassis rear panel) is set to AUTO and the Inhibit switch is set to DEF.
-
Page 23: Avoiding Bent Pins
Introduction to the M9046A PXIe Chassis Installing PXI Modules in the Chassis Avoiding Bent Pins The chassis backplane contains hundreds of pins. These pins mate with the sockets on the module when you slide the module into the chassis. When you first insert the module, you insert it between the top and bottom rails. -
Page 24: Periodic Chassis Inspection
Installing PXI Modules in the Chassis Introduction to the M9046A PXIe Chassis Although rare, it is possible to spread damage with the use of a single defective module. If you have a module with an undetected damaged connector and move it from slot to slot or from chassis to chassis, you might be damaging every slot you slide the module into. -
Page 25: For M9046A
When operating the instrument at 100/120 VAC 50/60/400 Hz or 220/240 VAC 50/60 Hz, a ground cable (not provided by Keysight) must be connected to the rear panel of the instrument to a proper ground socket of the building. Install a... - Page 26 Installing PXI Modules in the Chassis Introduction to the M9046A PXIe Chassis Step 1. Use the screwdriver and remove the screw in the following figure: Figure 7 Remove screw from ground point Step 2. Attach the ground wire with the ring terminal into screw thread and...
-
Page 27: Chassis Front Panel Leds
The following table lists each LED and describes the information it provides. The M9046A has a protective algorithm to monitor the DC output for undervoltage, overvoltage and overcurrent. It will automatically power-off if the mentioned fault case happen.When automatically powered-off, the chassis will continually blink the power LED 2 times per cycle. - Page 28 Chassis Front Panel LEDs Introduction to the M9046A PXIe Chassis Table 1 Chassis LEDs On Continuously Flashing All three LEDs flash (color) Temp LED This LED is off if This LED is never on Indicates one or more All three LEDs on for 10...
-
Page 29: Related Documentation
– Keysight M9022A/M9023A/M9024A/M9025A PXIe System Module Data Sheet – Tested PC and PXI/AXIe Chassis Configurations. This document lists the PCs that have been verified to work with the Keysight PXIe chassis. (see www.keysight.com/find/PXIAXIeTestedPC) – PXIe Chassis Block Diagram (see http://www.keysight.com/find/pxi-blockdiagram) –... -
Page 30: Chassis Related Products And Accessories
Accessories Y1213A PXI EMI Filler Panel Kit: 5 single-slot panels Y1257A M9046A rack mount kit with rails Y1258A M9046A recess rack mount kit with rails Y1259A M9046A advanced cooling spacer kit Y1218A Cable tray kit Y1270A Front panel interfacing kit for 18-slot PXIe chassis... - Page 31 Introduction to the M9046A PXIe Chassis Chassis Related Products and Accessories Keysight M9046A PXIe Chassis User Guide...
-
Page 32: Pxie Chassis Management Capabilities
IVI.COM drivers. See the IVI Foundation website for a description of these drivers. Keysight also provides a LabVIEW driver for the chassis. Keysight recommends that you use the Soft Front Panel to learn the chassis management capabilities. Because the programmatic capabilities largely parallel the capabilities provided by the SFP, learning the SFP first provides a basis for learning how the IVI.NET and IVI-C drivers interface to the chassis. -
Page 33: Summary Of Chassis Management Capabilities
TRIG 3, TRIG 4, TRIG 5, TRIG 6, TRIG 7 and TRIG 8) inputs/outputs. – Configuring and monitoring the parallel trigger bus signals in PXI-9 standard (not available in the Soft Front Panel, use the Keysight IO Libraries Suite). – Executing a chassis self test. -
Page 34: The Chassis Alarm Architecture
The chapter also describes how alarms operate if multiple processes are using the same alarm. Keysight M9046A PXIe Chassis User Guide... - Page 35 PXIe Chassis Management Capabilities The Chassis Alarm Architecture Keysight M9046A PXIe Chassis User Guide...
-
Page 36: Chassis And Host Controller Power Up Or Down Sequence
The following description of power up and power down sequences apply only to using an external host controller PC. They do not apply to an embedded controller (such as the Keysight M9038A) installed in the chassis because the embedded controller and chassis are powered together. -
Page 37: Methods Of Powering Up The Chassis
Standby—hence, this push button is known as the ON/Standby push button. Using this push button requires that a module is installed in the system controller slot (slot 1). This can be a module such as the Keysight M9022A, M9023A, M9024A, or M9025A PXIe System Module or an embedded controller. -
Page 38: Power Up Sequencing
PC properly enumerates all of the modules within the chassis. Power Down Sequencing The PC should be shut down before the chassis is powered down. This will prevent the chassis, as it is being powered down, from disrupting operation of the PC. Keysight M9046A PXIe Chassis User Guide... -
Page 39: Performing A System Power Cycle
Figure 13 Power Sequence for a System Restart If the chassis contains an embedded controller, a system power cycle consists simply of power cycling the chassis, which will also power cycle the embedded controller. Keysight M9046A PXIe Chassis User Guide... -
Page 40: Performing A Chassis Hard Reset
Figure 14 Power Sequence for a Chassis Hard Reset In essence, a chassis hard reset is a system power cycle that includes unplugging the chassis from AC power after the chassis is powered down. Keysight M9046A PXIe Chassis User Guide... - Page 41 Chassis and Host Controller Power Up or Down Sequence Performing a System Power Cycle Keysight M9046A PXIe Chassis User Guide...
-
Page 42: Chassis Alarm Architecture
The figure also describes how alarms operate if multiple processes are using the same alarm. The M9046A has eight temperature sensors in the chassis. The M9046A has a default minimum fan speed of 1200 RPM. -
Page 43: Power-On Default Alarm Thresholds
Minimum Fan Speed Alarm Threshold will be restored to the power-on default limit RPM value when the chassis is power cycled. Table 3 Power-on Default Alarm Thresholds for the M9046A Chassis Threshold Default Threshold Settable Range... - Page 44 At SFP startup, the modified minimum fan speed threshold (which is maintained by the chassis) will be read and Fan Alarm Enabled displayed by the SFP. Figure 15 PXIe Chassis Family Alarm Architecture Keysight M9046A PXIe Chassis User Guide...
- Page 45 Keysight M9046A PXIe Chassis User Guide...
-
Page 46: Events Which Re-Establish The Power-On Default Thresholds
If the parameter being monitored then returns to below its threshold (for example, the room temperature is lowered, causing the chassis temperature sensors to report lower temperatures), Threshold Exceeded goes False. This causes the LED to cease flashing. However, the alarm latch remains latched. This Keysight M9046A PXIe Chassis User Guide... -
Page 47: Soft Front Panel Alarm Thresholds
As long as the particular chassis alarm has not been changed earlier (for example, during a prior SFP session), the chassis power-on default alarm threshold will still be in effect and will be read and displayed by the SFP. Keysight M9046A PXIe Chassis User Guide... -
Page 48: Power Supply Operation
Keysight M9046A 18-Slot PXIe Chassis User Guide Power Supply Operation The Primary Power Module (PPM) provides a 24V output voltage that is converted down to 12V and 3.3V for each individual slot, while the 5V is shared across slots 1 through 4, and -12V is shared across Slots 2 through 4 listed below. -
Page 49: Power Supply Capacity
The total amount of power available to modules depends on the AC voltage. For example, for the M9046A chassis at low line AC (100/120V), the total power drawn from the PPM is 887.5 W available to all modules; at high line AC (220/240V), the total power drawn from the PPM is 1675 W. - Page 50 After the above information is entered, the spreadsheet indicates if any power supply limits are exceeded. The Power Calculators are available at www.keysight.com/find/M9046A. Figure 17 M9046A PPM Block Diagrams and Power Ratings at 45 ° C Keysight M9046A PXIe Chassis User Guide...
-
Page 51: Over Temperature Protection
Additionally, the regulators also have an internal current limit (14A for -12V and 10A for 5V ) threshold to protect against over-current conditions. Keysight M9046A PXIe Chassis User Guide... -
Page 52: Short Circuit Protection
Internal Fuses Each PPM connects directly to AC power line and is protected by an internal fuse. These fuses are not customer-replaceable. Contact Keysight if you suspect a fuse is blown. Internal Fans Each PPM contains small internal fans that run constantly when the AC power line is connected. -
Page 53: Measuring The Ppm Main Voltage Rails Directly
The SFP and the chassis drivers can set voltage limits around the rails such that an alarm will be generated if a rail voltage falls outside of the specified limits. The front panel Power LED provides collective information about all three rails. Keysight M9046A PXIe Chassis User Guide... - Page 54 Limits such that the voltage rail is within the limits does not reset the latch. As described in the Keysight PXIe Chassis User Guide section Relationship between Alarm Occurred and the front panel LEDs, it is possible for Alarm Occurred to indicate an out-of-range voltage condition while the front panel Power LED indicates the voltages are normal.
- Page 55 True, Occurred will be set True. Enabled default value = True. rail latches. falls below its LowerLimit voltage, the Alarm Latch will be set again. Figure 20 Voltage Monitoring Using the IVI-C Driver and C++ Keysight M9046A PXIe Chassis User Guide...
- Page 56 True, Occurred will be set True. Enabled default value = True. falls below its LowerLimit voltage, the Alarm Latch will be set again. Figure 21 Voltage Monitoring Using the IVI.NET Driver and C# Keysight M9046A PXIe Chassis User Guide...
- Page 57 The spread spectrum modulation is a triangular modulation with a frequency of 3.125 kHz and amplitude of 320 ns. Figure 22 Per-slot Power Supply Control Using the IVI-C Driver and C++ Keysight M9046A PXIe Chassis User Guide...
- Page 58 Clears all the frequency settings. spread spectrum modulation is a triangular modulation with a frequency of 3.125 kHz and amplitude of 320 ns. Figure 23 Per-Slot Power Supply Control Using the IVI.NET Driver and C# Keysight M9046A PXIe Chassis User Guide...
- Page 59 Keysight M9046A PXIe Chassis User Guide...
-
Page 60: Chassis Cooling And Rack Mounting
Overview of chassis cooling The key points regarding chassis cooling are: – For the M9046A, three 210 cubic feet per minute (CFM) fans, provide a total airflow of up to 630CFM. These fans are mounted on the chassis rear panel. They pull air from the rear panel and push air through the chassis. - Page 61 (obstruction, fan failed etc.) and correct it before powering on the chassis. – The M9046A chassis have eight temperature sensors mounted above of the modules to monitor the air flow temperature downstream from the modules. These temperatures can be read using the SFP or programmatically.
-
Page 62: Monitoring The Chassis Temperature
Chassis Cooling and Rack Mounting Monitoring the Chassis Temperature Keysight PXIe chassis allows you to monitor each of the air flow exit temperature sensors using either the SFP, the IVI drivers, or the LabVIEW driver. In addition, the SFP and IVI drivers can be used to set an upper temperature threshold such that an alarm will be generated if any temperature sensor reports a temperature above the specified threshold. - Page 63 Chassis Cooling and Rack Mounting Monitoring the Chassis Temperature Keysight M9046A PXIe Chassis User Guide...
- Page 64 Max Temp Threshold, the current value of the Default value = 70 °C Alarm Enabled hottest temperature sensor is displayed. Default value = True (checked) Figure 26 Using the Soft Front Panel to monitor Chassis Temperature Keysight M9046A PXIe Chassis User Guide...
- Page 65 LEDs, it is possible for Alarm Occurred to indicate an over temperature Alarm Enabled Default value = 70 °C PXIe Chassis User Guide Default value = True (checked) KtMPxi_TemperatureAlarmConfigure() Figure 27 Temperature Monitoring using the IVI-C Driver and C++ Keysight M9046A PXIe Chassis User Guide...
- Page 66 Default value = True (checked) driver.TemperatureSensors.Alarm.Configure() Configures the temperature alarm behavior by allowing setting of both the Maximum Temperature Alarm Threshold (MaxTemperature) property and the Enabled property. Figure 28 Temperature Monitoring using the IVI.NET Driver and C# Keysight M9046A PXIe Chassis User Guide...
- Page 67 Keysight M9046A PXIe Chassis User Guide...
-
Page 68: Monitoring Chassis Fan Speeds
Default Minimum Fan Speed Threshold Limit The M9046A has a default minimum fan speed limit of 1200 RPM. This default limit is applied on chassis power on. The following diagrams apply to chassis M9046A, the examples show the default minimum fan speed of 1200 RPM. - Page 69 Chassis Cooling and Rack Mounting Monitoring Chassis Fan Speeds Keysight M9046A PXIe Chassis User Guide...
- Page 70 Minimum Fan Speed to a value lower than the three fans are currently operating at does not reset the latch. As described in the Keysight PXIe Chassis User Guide section Relationship between Alarm Occurred and the front panel LEDs, it is possible for Alarm Occurred to indicate a low fan speed while the front panel Fan LED indicates that fan speeds are normal.
- Page 71 Minimum Fan Speed Alarm Threshold and the Enabled disp p p lay y y ed. property. Figure 30 Chassis Fan Speed Monitoring using the IVI-C Driver and C++ Keysight M9046A PXIe Chassis User Guide...
- Page 72 Minimum Fan Speed Alarm disp p p lay y y ed. Threshold (MinRPM) and the Enabled property. Figure 31 Chassis Fan Speed Monitoring using the IVI.NET Driver and C# Keysight M9046A PXIe Chassis User Guide...
- Page 73 MaxRPMTemperature is reached. To maximize cooling, MaxRPMTemperature should be set lower while, to minimize eight backplane temperature sensors fan noise, MaxRPMTemperature should be set higher. Figure 32 Using the Soft Front Panel to Set the Chassis Temperature for Maximum Fan Speed Keysight M9046A PXIe Chassis User Guide...
- Page 74 MaxRPMTemperature is reached. To maximize cooling, MaxRPMTemperature should be set lower while, to minimize eight backplane temperature sensors fan noise, MaxRPMTemperature should be set higher. Figure 33 Setting the temperature for Maximum Fan Speed using the IVI-C Driver and C++ Keysight M9046A PXIe Chassis User Guide...
- Page 75 MaxRPMTemperature is reached. To maximize cooling, MaxRPMTemperature should be set lower while, to minimize eight backplane temperature sensors fan noise, MaxRPMTemperature should be set higher. Figure 34 Setting the temperature for Maximum Fan Speed using the IV.NET Driver and C# Keysight M9046A PXIe Chassis User Guide...
-
Page 76: Rack Mounting The Chassis
1U of space is required for ventilation above the chassis when you rack mount it. The weight of an empty M9046A PXIe chassis (no modules installed in the chassis) is approximately 41.14 lbs (18.66 kg). Lift the chassis using a single side handle only when the total chassis weight (chassis plus installed modules) does not exceed 75 lbs (34.0 kg). -
Page 77: Rack Mount Accessory Kits
The kit is designed to ensure proper cooling performance when a single chassis is installed into a rack. Rack rails may be needed in a non-Keysight rack. – Y1259A Advanced Cooling Spacer Kit: This optional kit is used along with... -
Page 78: Reference Clock Source
Keysight M9046A 18-Slot PXIe Chassis User Guide Reference Clock Source PXIe Chassis timing is based on a 10 MHz reference clock. The 10 MHz Reference Clock can originate from any of the three sources listed below. These sources are listed in low to high precedence order if multiple 10 MHz reference clock sources are available: –... - Page 79 Alarm Enabled False does not reset the latch—this can only be done using Clear Alarm, Reset on the SFP Utility dropdown menu, or programmatically. Alarm Enabled Default value = True (checked) Figure 35 Using the Soft Front Panel to Monitor the 10 MHz Clock Reference Keysight PXIe Chassis Family User Guide...
- Page 80 Alarm, Reset on the SFP Utility dropdown menu, or programmatically. KTMPXICHASSIS_ATTR_REFCLK_ALARM_ENABLED Used to enable or disable the 10 MHz reference clock source change alarm Alarm Enabled Default value = True (checked) Figure 36 10 MHz Reference Clock Source Monitoring using IVI-C and C++ Keysight PXIe Chassis Family User Guide...
- Page 81 Used to enable or disable the 10 MHz reference clock source change alarm Alarm Enabled Default value = True (checked) Figure 37 10 MHz Reference Clock Source Monitoring using IVI.NET and C# Keysight PXIe Chassis Family User Guide...
-
Page 82: Chassis Options M9046A-Qs1, M9046A-Qs2, And M9046A-Qs3
Reference Clock Source Chassis Options M9046A-QS1, M9046A-QS2, and M9046A-QS3 In addition to the 10MHz clock sources, the M9046A-QS1 and M9046A-QS3 options include the High Performance Reference Clock Source, which provides a low-phase-noise reference to the chassis backplane and front panel. All of the QS# options also provide additional reference clock outputs on the chassis front panel. -
Page 83: M9046A-Qs1
Required for the primary chassis in a single or multi-chassis systems utilizing the following modules: M5200A, M5201A, M5300A, and M5301A. These chassis also come pre-configured with the M9046A Push- Pull Cooling (option 003) to provide additional cooling capacity. They are not compatible with the Advanced Rear Trigger Access (option 001). -
Page 84: Pxie Chassis Soft Front Panel (Sfp) With Qs# Options
Reference Clock Source PXIe Chassis Soft Front Panel (SFP) with QS# Options The PXIe Chassis SFP allows the configuration of the M9046A-QS1, M9046A-QS2, and M9046A-QS3 option-related clock sources and outputs. For M9046A-QS1 and M9046A-QS3 options with the High Performance Reference Clock Source, the chassis reference source can be configured to lock to the 2.4GHz source. - Page 85 Figure 41 Automatic Configuration using Configure Chassis Clocks This function will configure the chassis reference source and output clocks to a pre-defined configuration based on the chassis option code, as shown in Table 5, “Chassis Option Code,” on page 86. Keysight PXIe Chassis Family User Guide...
- Page 86 FP 2400MHz Ref Out Enabled For more information on using the SFP, see the SFP Help File. Launch the SFP and click on the Help > SFP Help menu. Figure 42 SFP Help Menu Keysight PXIe Chassis Family User Guide...
-
Page 87: Configuring The Pxi Trigger Bus
Alliance. PXI-9-compliant trigger managers provide a way for applications, including Keysight Connection Expert (part of the IO Libraries Suite), to dynamically query to see if a trigger line is reserved, and if not, reserve it for use by that application. -
Page 88: Chassis Trigger Lines
2 to bus segment 1. Viewing chassis trigger routes and reservations graphically can be done using the Keysight IO Libraries Suit Connection Expert which provides the Chassis Triggers View. Figure 43 Keysight IO Libraries Connection Expert Chassis Triggers View... -
Page 89: Trigger Bus Segments
The following graphic shows all eight trigger lines; each line is showing a different route so that all eight may be seen. Any of these combinations can be applied to each of the eight trigger lines PXI_TRIG[0:7]. Keysight M9046A PXIe Chassis User Guide... - Page 90 Persistent Trigger Reservations with the Client ID of Keysight_Persistent for a Graphical User Interface control We strongly recommend that you make Trigger Bus Reservations before you actually use the Trigger Lines in your application programs. Keysight M9046A PXIe Chassis User Guide...
-
Page 91: Persistent Versus Volatile Reservations
Chassis Trigger Lines Configuring the PXI Trigger Bus Some multi-slot PXI instruments, such as the Keysight M9381A PXIe Vector Signal Generator, use peer-to-peer (module-to-module) triggering to function. If you install these modules on the same trigger bus segment, no routes are needed. -
Page 92: Configuring Pxi Trigger Bus Connections
Persistent routes and reservations can only be made through the Keysight Connection Expert Chassis Triggers view. For detailed information on using Connection Expert and the Chassis Triggers view, see the Keysight IO Libraries help file. Keysight M9046A PXIe Chassis User Guide... -
Page 93: Using Ktmtrig Trigger Manager Ivi Driver
The IVI Shared Components installers are available from: http://www.ivifoundation.org/shared_components/Default.aspx VISA.NET Any compliant implementation is acceptable. Typically, VISA.NET is installed with VISA and other I/O library modules. The latest version of Keysight's IO Libraries Suite is recommended and includes VISA.NET. Download the latest version from: http://www.keysight.com/find/iosuite... -
Page 94: Uninstall
IVI Shared Components. Do not uninstall the KtMPxiChassis IVI.NET Driver 1.x.xxx, KtMPxiChassis IVI-C Driver 1.x.xxx, KtMTrig IVI.NET Driver 1.x.xxx, or KtMTrig IVI-C Driver 1.x.xxx files without also uninstalling the Keysight PXIe Chassis Family Driver. Keysight M9046A PXIe Chassis User Guide... - Page 95 Any combination can be applied to each of the eight PXI_TRIG lines. KtMTrig_SetReservation() SetTriggerPathBetweenSlots creates both the Reservation and the . Setting the reservation reserves Route. ClearTriggerPathBetweenSlots KtMTrig_ClearReservation() clears the segment. Figure 47 Configuring the PXIe Chassis Trigger Bus Using the IVI-C Driver and C++ Keysight M9046A PXIe Chassis User Guide...
- Page 96 Any combination can be applied to each of the eight PXI_TRIG. lines. SetReservation() SetTriggerPathBetweenSlots creates both the Reservation and the Route. . Setting the reservation reserves ClearTriggerPathBetweenSlots ClearReservation() clears the segment. Figure 48 Configuring the PXIe Chassis Trigger Bus Using the IVI.NET Driver and C# Keysight M9046A PXIe Chassis User Guide...
-
Page 97: Multiple Chassis Operation
Keysight M9046A 18-Slot PXIe Chassis User Guide Multiple Chassis Operation You can use multiple chassis configurations to increase the number of chassis, measurement modules, or switching modules; The number of chassis you can connect is determined by the number of PCIe addresses your host computer can enumerate. -
Page 98: Multiple Chassis Power Sync
– Time base and triggering for each chassis operates independent of the other chassis. However, you can tie the time bases together using the reference clock output and input, and with M9046A, you can bridge triggers using the rear panel trigger ports. - Page 99 LAN to these connectors. In a multiple chassis system, the time base and triggering for each chassis operates independent of the other chassis. For more information, refer to Keysight's Multiple PXIe and AXIe Chassis Configuration tool. This tool is available on-line at: www.keysight.com/find/pxie-multichassis.
-
Page 100: Power Sync Cabling
Each cable used for multiple chassis power-up synchronization purposes should not exceed 2 meters in length. Straight CAT5 or better cables are required. CAT5 (or better) cables Figure 51 Connection Sequence for Multiple Chassis Power Synchronization Keysight M9046A PXIe Chassis User Guide... -
Page 101: Power Sync And Other Features
Wake-on-LAN feature, it can be used to power up all connected chassis. Wake on PCIe The M9046A chassis assert the PCIe WAKE signal on the cable when they power on. This signal propagates through the PCIe cable to the host controller. If the host controller has Wake on PCIe enabled, turning on these chassis will also result in the host controller turning on. -
Page 102: Power Sync With Multiple Pxie Chassis
8. Turning off the external host PC will not turn off all chassis. A power button push on any chassis is required to turn off all chassis. Upon a power button push on any chassis, all chassis will immediately turn off even if the remote host is still powered on. Keysight M9046A PXIe Chassis User Guide... -
Page 103: Connect Multiple Pxie Or Axie Chassis Together With A Single Controller
Connect Multiple PXIe or AXIe Chassis Together with a Single Controller? The Keysight Multi-Chassis Designer helps you design a system consisting of up to four PXIe and AXIe chassis. These chassis may be connected to either an embedded controller (installed in the chassis) or an external PC connected by cable(s) to the chassis. - Page 104 Multiple Chassis Operation Connect Multiple PXIe or AXIe Chassis Together with a Single Controller? Keysight M9046A PXIe Chassis User Guide...
-
Page 105: Pcie Link Configuration
The PCIe Link configuration is fixed at 2 Link x8 x16 Gen 3 speed. You cannot change or modify the PCIe Link Configuration on this chassis. View the PCIe link configuration from the Soft Front Panel tab as follows: Figure 54 M9046A Soft Front Panel PCIeLink Tab... - Page 106 PCIe Link Configuration Keysight M9046A PXIe Chassis User Guide...
-
Page 107: Chassis Maintenance
Fan Speeds” on page 68. – Chassis firmware — Keysight recommends that you periodically check to see if there is a chassis firmware revision available that is later than your current chassis firmware revision. If so, you should download and install the latest firmware revision available as described in “Updating Chassis... -
Page 108: Chassis Firmware And Revision
Figure 55 Chassis Firmware Shown in the Soft Front Panel The row, labeled Hardware Revision, contains version numbers representing chassis firmware components. The Chassis Manager revision is the first number listed. Information on upgrading chassis firmware is provided below. Keysight M9046A PXIe Chassis User Guide... -
Page 109: Viewing The Chassis Revision Information Using The Ivi Drivers
2 Power cycle the chassis after the firmware installation is complete, and verify that your host controller PC can communicate to the chassis. Keysight M9046A PXIe Chassis User Guide... -
Page 110: Chassis Backplane Switches
Chassis Maintenance Chassis Backplane Switches Chassis Backplane Switches On the M9046A chassis, just to the left of slot 1 (see Figure 56 below), is a bank of four switches. These switches are for Keysight authorized service personnel only. Figure 56 PXIe Chassis Backplane Switches Here is a brief description of the switches (numbered left to right): Switch # 1: FPGA image. - Page 111 Chassis Maintenance Switch # 4: PWREN. This switch enables the PWREN control signal to modules to provide backplane control of module power. Note, this switch should be left in the default ON (up) position. Keysight M9046A PXIe Chassis User Guide...
-
Page 112: Performing A Chassis Self Test
PXIe chassis Soft Front Panel (SFP). Note that the Allow Control check box must be checked in order to perform a self test. Figure 57 Running the Chassis Self Test from the Soft Front Panel Keysight M9046A PXIe Chassis User Guide... -
Page 113: Performing Self Test Using The Ivi Drivers
Refer to the IVI help system for information on performing self test programmatically. As noted above, executing self test programmatically is very similar to the SFP implementation of self test. Keysight M9046A PXIe Chassis User Guide... -
Page 114: Self Test Codes And Messages
“Chassis fan speed selector switch is in HIGH position, but one or more fans not operating at maximum speed.” “Chassis fans are operating at dissimilar speeds.” “Chassis fan AUTO speed control is not functioning properly.” “IO failure during self test. If problem persists, contact Keysight Technical Support.” unused unused “Reading from non-volatile chassis memory failed.”... - Page 115 Error Code ”Chassis Manager operating on backup (read-only) firmware image. See Keysight Technical Support.” ”Chassis Manager firmware was updated since power-up. Power cycle the chassis and reboot system controller.” ”Chassis memory structure corrupted. Run IVI driver (or SFP utility) Reset command, and then rerun self test to validate.”...
- Page 116 Known chassis NV memory access issue, you must power cycle to restore proper chassis operation. M9046A is self identifying as an M9046A. Fix by running PCIe Switch Fabric Configuration utility. Previous firmware update on Chassis Manager Firmware is not complete, please rerun firmware update again to complete the operation.
-
Page 117: Troubleshooting With Chassis Shutdowns And Front Panel Leds Behaviors
Error found while reading dirty byte. Chassis Manager operating on Gen 1 fabric switch image. DIP switch 2 is flipped to on. Monitor Process Software is operating on backup (read-only) firmware image. See Keysight Technical Support. “Too many self-test codes generated, aborting.”... -
Page 118: 60 Seconds Safety Shutdown State
If the fan LED blinks for 6 times, the top fan #6 is the culprit. (applicable if the top fan tray is installed) If the fan LED blinks for 7 times, the top fan #7 is the culprit. (applicable if the top fan tray is installed) - Repeat Keysight M9046A PXIe Chassis User Guide... - Page 119 The only way to exit from this fault condition is to cycle AC power. AC power needs to be removed for at least 10s to allow the standby voltage to bleed down to 0V so that the chassis controller is shut off. Keysight M9046A PXIe Chassis User Guide...
-
Page 120: Other Faulty States
- On Continuously: All fans running above factory default/user-defined limit. - Blink: One or more fans running below factory default/user-defined limit. Temperature LED - Off: Chassis temperature OK. - Blink: One or more temperature sensors above factory default/user-defined limit. Keysight M9046A PXIe Chassis User Guide... - Page 121 If all 3 LEDs are blinking at the rate of 10 seconds On and 1 second Off, the Serial Peripheral Interface between the power fan control board and chassis FPGA is broken. Contact Keysight at keysight.com/find/contactus to have your chassis sent to the local service center for repair.
-
Page 122: Index
Chassis Hard Reset Internal Fuses Rack Mounting Configure chassis IVI Driver Unistallation Rack Mounting Chassis parameters Rear panel trigger ports Connectors, RJ-45 Related Documentations Controller M9022A Remote controller Embedded M9023A Remote Power On Remote Keysight M9046A PXIe Chassis User Guide... - Page 123 Sync, power System Restart System Controller Temperature chassis sensors temperature sensors Temperature Derating Temperature protection Terminology Thresholds alarm defaults Trigger Bus Segments Persistent vs. Volatile Reservations Reservations Routes Trigger ports Uninstall IVI Drivers Keysight M9046A PXIe Chassis User Guide...
- Page 124 This information is subject to change without notice © Keysight Technologies 2022-2023 Second Edition, May 2023 *M9046-90003* M9046-90003 www.keysight.com...
Need help?
Do you have a question about the M9046A and is the answer not in the manual?
Questions and answers