
Subscribe to Our Youtube Channel
Related Manuals for Mercusys MB230-4G


Summary of Contents for Mercusys MB230-4G
- Page 1 User Guide 4G+ Cat6 AC1200 Wireless Dual Band Gigabit Router MB230-4G © 2024 MERCUSYS 1910080119 REV1.0.0...
- Page 2 WCDMA: B1/B5/B8(24dBm+1/-3dBm) LTE: B1/B3/B7/B8/B20/B28/B38/B40 (23dBm±2dBm) EU Declaration of Conformity Mercusys hereby declares that the device is in compliance with the essential requirements and other relevant provisions of directives 2014/53/EU, 2009/125/EC, 2011/65/EU and (EU)2015/863. The original EU Declaration of Conformity may be found at http://www.mercusys.com/en/ce.
- Page 3 are not permitted. Limited outdoor use: If used outdoors, equipment shall not be attached to a fixed installation or to the external body of road vehicles, a fixed infrastructure or a fixed outdoor antenna. Use by unmanned aircraft systems (UAS) is limited to within the 5170 - 5250 MHz band.
- Page 4 • 不要私自拆開機殼或自行維修,如產品有故障請與原廠或代理商聯繫。 • 應避免影響附近雷達系統之操作。 限用物質含有情況標示聲明書 設備名稱: 4G+ Cat 6 AC1200 Wireless Dual 型號(型式):MB230-4G Band Gigabit Router Type designation (Type) Equipment name 限用物質及其化學符號 Restricted substances and its chemical symbols 單元 六價鉻 多溴聯苯 多溴二苯醚 鉛 汞 鎘 Unit Hexavalent Polybrominated Polybrominated Lead Mercury Cadmium chromium biphenyls diphenyl ethers (Pb) (Hg) (Cd) (PBB) (PBDE) ○ ○ ○ ○ ○ ○...
- Page 5 Ǵ Keep the device away from water, fire, humidity or hot environments. Ǵ Do not attempt to disassemble, repair, or modify the device. If you need service, please contact us. Ǵ Do not use damaged charger or USB cable to charge the device. Ǵ...
- Page 6 Energy efficiency Marking Protective earth Earth Frame or chassis Functional earthing Caution, hot surface Caution Operator’s manual Stand-by “ON”/”OFF” (push-push) Fuse Fuse is used in neutral N RECYCLING This product bears the selective sorting symbol for Waste electrical and electronic equipment (WEEE). This means that this product must be handled pursuant to European directive 2012/19/EU in order to be recycled or dismantled to minimize its impact on the environment.
- Page 7 Disconnection, all power plugs Switch of mini-gap construction Switch of micro-gap construction (for US version) µ Switch of micro-gap / micro-disconnection construction (for other versions except US) ε Switch without contact gap (Semiconductor switching device)
-
Page 8: Table Of Contents
4. 1. 1. Add Mercusys ID to Manage the Router ...... - Page 9 8. 1. Create a Network for Guests ..........21 8.
- Page 10 13. 7. Change the Administrator Account......... . 54 13.
-
Page 11: Conventions
More Info Specifications and the latest software can be found at the product page at the official website http://www.mercusys.com. The Quick Installation Guide can be found where you find this guide or inside the package of the router. -
Page 12: Chapter 1. Introduction
1. 1. Product Overview MB230-4G supports the 4G+ Cat 6, which uses Carrier Aggregation technology, to achieve superfast LTE speeds up to 300 Mbps download and 50 Mbps upload. It can also share a dual band 1200 Mbps Wi-Fi network for gaming, streaming, and more. -
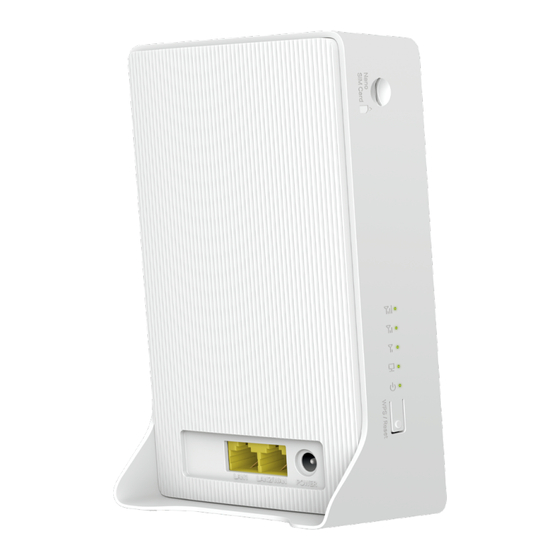
Page 13: Rear And Side Panels
Chapter 1 Introduction Status Indication Indicates the signal strength received from the mobile internet network. More lit LEDs signify a better signal strength. There is no mobile internet signal. 1. 2. 2. Rear and Side Panels The following items are located on the rear and bottom panels. Item Description Press and hold this button for more than 5 seconds to reset the router. -
Page 14: Chapter 2. Quick Setup
Chapter 2 Quick Setup Chapter 2. Quick Setup 2. 1. Position Your Router With the router, you can access your network from anywhere within the wireless network coverage. However, the wireless signal strength and coverage varies depending on the actual environment where your router is in. Many obstacles may limit the range of the wireless signal, for example, concrete structures, thickness and number of walls. -
Page 15: Set Up The Router In Wireless Router Mode
• Make sure your SIM card is unlocked. If not, you can a. Set up the router via the MERCUSYS app and follow the app instructions to unlock your SIM card. b. Log in to the router’s web management page and go to Advanced > Network > PIN Management to verify. - Page 16 Chapter 2 Quick Setup 5. Go to Quick Setup and follow the step-by-step instrutions to complete the setup. Tip: In wireless router mode, you can use 3G/4G network as a backup solution for internet access. With 3G/4G Backup enabled, your router will connect to the 3G/4G network in case the original network service fails. To enable or disable 3G/4G Backup, go to Advanced >...
-
Page 17: Chapter 3. Log In To The Router
Chapter 3 Log In to the Router Chapter 3. Log In to the Router With the web-based utility, it is easy to configure and manage the router. The web- based utility can be used on any Windows, Macintosh or UNIX OS with a Web browser, such as Microsoft the Internet Explorer, Mozilla Firefox or Apple Safari. -
Page 18: Chapter 4 Mercusys Cloud Service
3. Click Register Now and follow the instructions to register a Mercusys ID. 4. After activating your Mercusys ID, come back to the Mercusys ID page to log in. The Mercusys ID used to log in to the router for the first time will be automatically bound as an Admin. -
Page 19: Manage The User Mercusys Ids
Chapter 4 Mercusys Cloud Service 4.2 Manage the User Mercusys IDs The Mercusys ID used to log in to the router for the first time will be automatically bound as the Admin account. An admin account can add or remove other Mercusys IDs to or from the same router as User accounts. -
Page 20: Remove Mercusys Id(S) From Managing The Router
Chapter 4 Mercusys Cloud Service 4. The new Mercusys ID will be displayed in the Bound Accounts table as a User. 4. 1. 2. Remove Mercusys ID(s) from Managing the Router 1. Visit http://mwlogin.net, and log in with your Mercusys ID. -
Page 21: Chapter 5. Network Security
Chapter 5 Network Security Chapter 5. Network Security 5. 1. Protect the Network from Cyber Attacks The SPI Firewall can prevent cyber attacks and validate the traffic that is passing through the router based on the protocol. This function is enabled by default, and it’s recommended to keep the default settings. - Page 22 Chapter 5 Network Security To block specific device(s) 1 ) Select Blacklist. 1 ) Select the device(s) to be blocked in the Online Devices table. 2 ) Click Add. The selected devices will be added to Devices in Blacklist automatically. To allow specific device(s) 1 ) Select Whitelist and click Save.
-
Page 23: Ip & Mac Binding
Chapter 5 Network Security 4 ) Click Add. Done! Now you can block or allow specific client devices to access your network (via wired or wireless) using the Blacklist or Whitelist. 5. 3. IP & MAC Binding IP & MAC Binding, namely, ARP (Address Resolution Protocol) Binding, is used to bind network device’s IP address to its MAC address. - Page 24 Chapter 5 Network Security To bind the unconnected device 1 ) Click Add. 2 ) Enter the MAC Address and IP Address that you want to bind. 3 ) Select the checkbox to enable the entry and click Save. Done! Now you don’t need to worry about ARP spoofing and other ARP attacks.
-
Page 25: Chapter 6. Parental Controls
For example, I want to allow my children’s devices (e.g. a computer or a tablet) to access https://www.mercusys.com and https://www.wikipedia.org from 18:00 (6 P.M.) to 22:00 (10 P.M.) on weekdays only. - Page 26 Chapter 6 Parental Controls 4. Select the device of your kid and click ADD. 5. Customize Content Filter. Filter inappropriate content and block specific websites...
- Page 27 Chapter 6 Parental Controls 6. Click Next to set “No internet” bedtime and online time limits. 7. Click Save. Done! Now you can control your children’s internet access according to your needs.
-
Page 28: Chapter 7. Sms
Chapter 7 SMS Chapter 7. 7. 1. View Messages 1. Visit http://mwlogin.net, and log in with the password you set for the router. 2. Go to Advanced > SMS > Inbox page. 3. Click the envelope icon to unfold and read the content of the message. 7. -
Page 29: View Sent Messages
Chapter 7 SMS 4. Enter your message in the Message field. Tips: You can enter up to 160 letters or numbers, and any exceeding characters will be sent in the next message. You can send up to 5 messages each time. 5. - Page 30 Chapter 7 SMS 2. Go to Advanced > SMS > SMS Settings page and enable Message Center. 3. The Message Center Number is auto-populated. Change it according to your needs.
-
Page 31: Chapter 8. Guest Network
Chapter 8 Guest Network Chapter 8. Guest Network This function allows you to provide Wi-Fi access for guests without disclosing your main network. When you have guests in your house, apartment, or workplace, you can create a guest network for them. In addition, you can customize guest network options to ensure network security, privacy, and fluency. - Page 32 Chapter 8 Guest Network 2. Go to Advanced > Wireless > Guest Network. Locate the Guest Permission section. 3. Customize guest network options according to your needs. • Allow Guests to Access Each Other Select this checkbox if you want to allow the wireless clients on your guest network to communicate with each other via methods such as network neighbors, Samba, Ping, and FTP.
-
Page 33: Chapter 9. Nat Forwarding
Chapter 9 NAT Forwarding Chapter 9. NAT Forwarding Router’s NAT (Network Address Translation) feature makes the devices in the LAN use the same public IP address to communicate in the internet, which protects the local network by hiding IP addresses of the devices. However, it also brings about the problem that external host cannot initiatively communicate with the specified device in the local network. - Page 34 Chapter 9 NAT Forwarding 1. Set your PC to a static IP address, for example 192.168.1.100. 2. Visit http://mwlogin.net, and log in with your Mercusys ID or the password you set for the router. 3. Go to Advanced > NAT Forwarding > Port Forwarding.
-
Page 35: Open Ports Dynamically By Port Triggering
Chapter 9 NAT Forwarding • The WAN IP should be a public IP address. For the WAN IP is assigned dynamically by the ISP, it is recommended to apply and register a domain name for the WAN referring to Dynamic DNS. Then users on the internet can use http:// domain name to visit the website. -
Page 36: Make Applications Free From Port Restriction By Dmz
Chapter 9 NAT Forwarding 9. 3. Make Applications Free from Port Restriction by DMZ When a PC is set to be a DMZ (Demilitarized Zone) host in the local network, it is totally exposed to the internet, which can realize the unlimited bidirectional communication between internal hosts and external hosts. -
Page 37: Make Xbox Online Games Run Smoothly By Upnp
Chapter 9 NAT Forwarding 9. 4. Make Xbox Online Games Run Smoothly by UPnP UPnP (Universal Plug and Play) protocol allows the applications or host devices to automatically find the front-end NAT device and send request to it to open the corresponding ports. -
Page 38: Chapter 10. Qos
Chapter 10 QoS Chapter 10. QoS This chapter introduces how to create a QoS (Quality of Service) rule to specify prioritization of traffic and minimize the impact caused when the connection is under heavy load. I want to: Specify priority for some devices or applications. For example, I have several devices that are connected to my wireless network. - Page 39 Chapter 10 QoS 2 ) Click Save. Done! Now QoS is implemented to prioritize internet traffic.
-
Page 40: Chapter 11. Ipv6
Chapter 11 IPv6 Chapter 11. IPv6 This function allows you to enable IPv6 function and set up the parameters of the router’s Wide Area Network (WAN) and Local Area Network (LAN). 1. Visit http://mwlogin.net, and log in with the password you set for the router. 2. - Page 41 Chapter 11 IPv6 2 ) Configure the LAN settings. Fill in Address Prefix provided by your ISP. 3 ) Click Save. • PPPoE: Select this type if your ISP uses PPPoEv6, and provides a username and password. 1 ) Configure the WAN settings. 2 ) Configure the LAN settings.
- Page 42 Chapter 11 IPv6 • Tunnel 6to4: Select this type if your ISP uses 6 to 4 deployment fort assigning address. 1 ) Configure the WAN settings. 2 ) Configure the LAN settings. • If you select Pass-Through (Bridge): Click SAVE. No configuration is required.
-
Page 43: Chapter 12. Specify Your Network Settings
Chapter 12 Specify Your Network Settings Chapter 12. Specify Your Network Settings 12. 1. Create a Connection Profile If your ISP settings are not detected by the router, you can create an internet connection profile by following the steps below: 1. -
Page 44: Upgrade Your Isp Information
6. Download the latest ISP upgrade file from the Support page at https://www.mercusys.com to your computer. 1. Visit http://mwlogin.net, and log in with the password you set for the router. 2. Go to Advanced > MBB > ISP Upgrade. -
Page 45: Pin Management
Chapter 12 Specify Your Network Settings 3. Click Browse to locate and select the latest file. 4. Click Upgrade. Note: 3. If you fail to dial-up Internet access after upgrading to the latest version, please contact the technical support. 4. If your ISP settings are still not detected after upgrading, refer to Create a Connection Profile to add a new internet connection profile. -
Page 46: Data Settings
Chapter 12 Specify Your Network Settings • PIN - Enter the PIN to unlock the SIM card. It consists of 4-8 digits. • PUK - PIN Unlocked Key, also known as Personal Unlock Code (PUC), is used to reset a PIN that has been lost or forgotten. The PUK is a SIM-specific code assigned by the service provider. -
Page 47: Lan Settings
Chapter 12 Specify Your Network Settings 4. Enter the allowed amount of total/monthly data in the Total/Monthly Allowance field. When data usage exceeds the allowed level, the router will disconnect from the internet and notify you on the Basic > Network Map Page. 5. -
Page 48: Use The 4G Lte Router As A Dhcp Server
Chapter 12 Specify Your Network Settings 6. Leave the rest of the default settings as they are. 7. Click Save to make the settings effective. 12. 5. 2. Use the 4G LTE Router as a DHCP Server You can configure the router to act as a DHCP server to assign IP addresses to its clients. To use the DHCP server function of the router, you must configure all computers on the LAN to obtain an IP Address automatically. -
Page 49: Reserve Lan Ip Addresses
Chapter 12 Specify Your Network Settings 12. 5. 3. Reserve LAN IP Addresses You can view and add a reserved address for a client. When you specify an IP address for a device on the LAN, that device will always receive the same IP address each time when it accesses the DHCP server. - Page 50 Chapter 12 Specify Your Network Settings ¾ To enable or disable the wireless function: Enable the 2.4GHz or 5GHz Wireless Network. If you don’t want to use the wireless function, just uncheck the box. If you disable the wireless function, all the wireless settings won’t be effective.
-
Page 51: Use Wps For Wireless Connection
Chapter 12 Specify Your Network Settings • 802.11g/n mixed - Select if you are using both 802.11g and 802.11n wireless clients. • 802.11b/g/n mixed - Select if you are using a mix of 802.11b, 11g, and 11n wireless clients. Note: When 802.11n only mode is selected, only 802.11n wireless stations can connect to the router. - Page 52 Chapter 12 Specify Your Network Settings 2. Press the WPS button of the client device within two minutes. Method 2 Enter the client device’s PIN on the router 1. Visit http://mwlogin.net, and log in with the password you set for the router. 2.
-
Page 53: Schedule Your Wireless Function
Chapter 12 Specify Your Network Settings 3. Take a note of the Current PIN of the router. You can also click the Generate button to get a new PIN. 4. On the client device, enter the router’s PIN. (The default PIN is also labeled on the bottom of the router.) 12. -
Page 54: Set Up A Dynamic Dns Service Account
2. Go to Advanced > Network> Dynamic DNS. 3. Select the DDNS Service Provider (Mercusys, Dyndns or NO-IP). It is recommended to select Mercusys so that you can enjoy superior DDNS service of Mercusys. To use Mercusys DDNS service, log in with your Mercusys ID and register new domain names. - Page 55 Chapter 12 Specify Your Network Settings I want to: Visit multiple networks and multiple servers at the same time. For example, in a small office, my PC can surf the internet, but I also want to visit my company’s server. Now I have a switch and another router. I connect the devices as shown in the following figure so that the physical connection between my PC and my company’s server is achieved.
-
Page 56: Ussd
Chapter 12 Specify Your Network Settings • Network Destination - The destination IP address that you want to assign to a static route. This IP address cannot be on the same subnet with the WAN IP or LAN IP of the router. In the example, the IP address of the company network is the destination IP address, so here enters 172.30.30.1. - Page 57 Chapter 12 Specify Your Network Settings 1. Visit http://mwlogin.net, and log in with the password you set for the router. 2. Go to Advanced > MBB > USSD. 3. Enter the USSD request supported by the carrier and click Send. You will see the message returned from the carrier in the USSD Result box.
-
Page 58: Chapter 13. Administrate Your Network
Chapter 13 Administrate Your Network Chapter 13. Administrate Your Network 13. 1. Set System Time & Language System time is the time displayed while the router is running. The system time you configure here will be used for other time-based functions like Parental Controls and Wireless Schedule. -
Page 59: Led Control
Chapter 13 Administrate Your Network 6. After setting the system time, you can set Daylight Saving time according to your needs. Tick the checkbox to enable Daylight Saving, set the start and end time and then click Save to make the settings effective. 13. -
Page 60: Test Internet Connectivity
Chapter 13 Administrate Your Network 2. Specify a time period in the Night Mode Period as needed. 3. Click Save, and then the LEDs will be off during this period. 13. 3. Test Internet Connectivity After manually set up the internet connection, you need to know the internet connectivity. The router provides a diagnostic tool to help you locate the malfunction. -
Page 61: Update The Firmware
Chapter 13 Administrate Your Network 13. 4. Update the Firmware MERCUSYS is dedicated to improving and richening the product features, giving you a better network experience. We will inform you through the web management page if there’s any update firmware available for your router. -
Page 62: Back Up And Restore Configuration Settings
Chapter 13 Administrate Your Network 4. Focus on the Device Information section. Make sure the downloaded firmware file matches with the Hardware Version. 5. Focus on the Local Upgrade section. Click Browse to locate the downloaded new firmware file, and click Upgrade. 6. - Page 63 Chapter 13 Administrate Your Network 2. Go to Advanced > System > Backup & Restore page. ¾ To back up configuration settings: Click BACK UP to save a copy of the current settings to your local computer. A conf. bin file will be stored to your computer. ¾...
-
Page 64: Reboot The Router
Chapter 13 Administrate Your Network 13. 6. Reboot the Router The Reboot feature cleans the cache to enhance the running performance of the router. 1. Visit http://mwlogin.net, and log in with the password you set for the router. 2. Go to Advanced > System > Reboot. ¾... -
Page 65: Local Management
Chapter 13 Administrate Your Network 2. Go to Advanced > System> Administration page. Locate the Change Password section. 3. Enter the old password. Enter the new password and enter again to confirm. 4. Click Save to make the settings effective. 13. -
Page 66: Remote Management
Chapter 13 Administrate Your Network 13. 9. Remote Management By default, the remote devices are not allowed to manage the router from the internet. Follow the steps below to allow remote devices to manage the router. 1. Visit http://mwlogin.net, and log in with the password you set for the router. 2. -
Page 67: System Log
Chapter 13 Administrate Your Network 13. 10. System Log System Log can help you know what happens to your router, facilitating you to locate the malfunctions. For example when your router does not work properly, you will need to save the system log and send it to the technical support for troubleshooting. 1. -
Page 68: Cwmp
Chapter 13 Administrate Your Network 13. 11. CWMP CWMP (CPE WAN Management Protocol, also called TR-069) allows Auto-Configuration Server (ACS) to perform auto-configuration, provision, connection, and diagnostics to this device. You may configure this function under your ISP’s instructions. 1. Visit http://mwlogin.net, and log in with the password you set for the router. 2. - Page 69 Chapter 13 Administrate Your Network 9. Click SAVE to get the methods that support CWMP. 10. Save the settings.
-
Page 70: Faq
Q1. How do I restore my router to its factory default settings? With the router powered on, press and hold the WPS/RESET button on the rear panel for more than 5 seconds to reset the router. Note: Once the router is reset, the current configuration settings will be lost and you will need to re-configure the router. Q2. - Page 71 4 ) Click LAN settings, deselect the following three options and click OK; 5 ) Go to Advanced > Restore advanced settings, click OK to save the settings.
- Page 72 • Use another web browser or computer to log in again. • Reset the router to factory default settings and try again. If the login still fails, please contact the technical support. Note: You’ll need to reconfigure the router to surf the internet once the router is reset. Q4.
- Page 73 If the parameters are incorrect, click Create Profile and enter the correct parameters, then select the new profile from the Profile Name list. 6. Check the PIN settings: 1 ) Open a web browser and log in to the web management page. 2 ) Go to Advanced >...
- Page 74 2. Make sure the wireless adapter driver is installed successfully and the wireless adapter is enabled. On Windows 7 1 ) If you see the message No connections are available, it is usually because the wireless function is disabled or blocked somehow; 2 ) Clicking on Troubleshoot and windows might be able to fix the problem by itself.
- Page 75 5 ) Select Wireless Zero Configuration, right click it, and then select Properties; 6 ) Change Startup type to Automatic, click on Start button and make sure the Service status is Started. And then click OK.
- Page 76 7 ) Connect to wireless network. ¾ If you can find other wireless network except your own, please follow the steps below: 1. Make sure your computer/device is still in the range of your router/modem, move closer if it is currently too far away; 2.
- Page 77 2 ) If you cannot find the PIN or PIN failed, you may choose Connecting using a security key instead, and then type in the Network Security Key/Wireless Password; 3 ) If it continues saying network security key mismatch, it is suggested to confirm the wireless password on your wireless router/modem;...
- Page 78 1 ) Check the wireless signal strength of your network, if it is weak (1~3 bars), please move the router closer and try again; 2 ) Change the wireless Channel of the router to 1,6,or 11 to reduce interference from other networks; 3 ) Re-install or update the driver for your wireless adapter of the computer;...
- Page 79 2. In wireless router mode, you can set up your router for an IPTV connection. To enable and configre IPTV, go to Advanced > IPTV.
Need help?
Do you have a question about the MB230-4G and is the answer not in the manual?
Questions and answers