Advertisement
Available languages
Available languages
Quick Links
4x1 HDMI 4K60 Multiview Seamless Switch
User Manual
English
Benutzerhandbuch
Deutsch
Manuel Utilisateur
Français
Manuale
Italiano
Manual de Usuario
Español
No. 38228
lindy.com
© LINDY Group - FIRST EDITION
(November 2023)
Advertisement

Subscribe to Our Youtube Channel
Related Manuals for Lindy 38228


Summary of Contents for Lindy 38228
- Page 1 4x1 HDMI 4K60 Multiview Seamless Switch User Manual English Benutzerhandbuch Deutsch Manuel Utilisateur Français Manuale Italiano Manual de Usuario Español No. 38228 lindy.com © LINDY Group - FIRST EDITION (November 2023)
- Page 2 User Manual English Safety Instructions ! WARNING ! Please read the following safety information carefully and always keep this document with the product. Failure to follow these precautions can result in serious injuries or death from electric shock, fire or damage to the product. Touching the internal components or a damaged cable may cause electric shock, which may result in death.
- Page 3 Thank you for purchasing the 4x1 HDMI 4K60 Multiview Seamless Switch. This product has been designed to provide trouble free, reliable operation. It benefits from both a LINDY 2-year warranty and free lifetime technical support. To ensure correct use, please read this manual carefully and retain it for future reference.
- Page 4 User Manual English ▪ Color: Black ▪ Dimension: 220mm [W] x 100mm [D] x 30mm [H] ▪ Weight: 620g ▪ Power Supply: o Input: AC 100- 240V 50/60Hz o Output: DC 12V/2.5A (US/EU Standard, CE/FCC/UL certified) ▪ Power Consumption: 10W (Max) ▪...
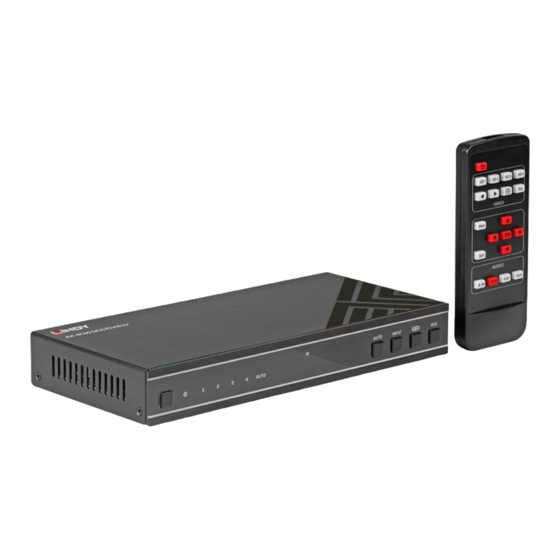
- Page 5 User Manual English AUTO Button Automatic switching button, only available in single screen display mode. INPUT Button Input source switching button, only available in single screen display mode. Multiview Multiview display mode switching button. Button ▪ Short press this button to circularly select SINGLE - PIP - PBP (1) - PBP (2) - Triple (1) - Triple (2) - Quad (1) - Quad (2).
- Page 6 User Manual English IR Pin Definition IR Receiver pin’s definition is as below: Remote Control Power on or standby: Press this button to power on the switcher or set it to standby mode. HD 1/2/3/4 press these buttons to select input source on single screen display mode, and the corresponding input LED on the front panel with light in green.
- Page 7 User Manual English EDID Settings User can select following EDID modes via RS-232 commands, OSD Menu navigation or Controller software. EDID Mode EDID Mode 4K60-2.0CH 1680x1050-2.0CH 4K60-5.1CH 1600x1200-2.0CH 4K60-7.1CH 1440x900-2.0CH 4K30-2.0CH 1360x768-2.0CH 4K30-5.1CH 1280x1024-2.0CH 4K30-7.1CH 1024x768-2.0CH 1080P-2.0CH 720P-2.0CH 1080P-5.1CH AUTO 1080P-7.1CH USER1 1920x1200-2.0CH...
- Page 8 User Manual English OSD Menu Navigation 1) A total of seven buttons on the IR Remote are used for OSD menu navigation, including Menu, Exit, UP, DOWN, LEFT, RIGHT, OK. Menu contents are as follows: 4096x2160p 60Hz/ 4096x2160p 50Hz/ 3840x2160p 60Hz/ 3840x2160p 50Hz/ 3840x2160p 30Hz/ 3840x2160p 25Hz/...
- Page 9 User Manual English Win 1 HDMI1, HDMI2, HDMI3, HDMI Audio Select AUDIO Volume 0.. 100 Audio-Mute On, Off 4K60-2.0, 4K60-5.1CH, 4K60-7.1CH, 4K30-2.0CH, 4K30-5.1CH, 4K30-7.1CH, 1080P-2.0CH, 1080P-5.1CH, 1080P-7.1CH, 1920x1200- System EDID 4K60-2.0 2.0CH, 1680x1050-2.0CH, 1600x1200-2.0CH,1440x900- 2.0CH, 1360x768-2.0CH, 1280x1024-2.0CH, 1024x 768-2.0CH, 720P-2.0CH, AUTO, USER1 115200, 57600, 38400, 19200, Baud Rate...
- Page 10 User Manual English Step 3. Select the installation path and click “install”, After the installation is completed, click “Finish”, to start using the Controller software. Follow the steps below to connect the Controller software and the device. Step 1. Connect the RS-232 port of the switcher to a PC with an RS-232 serial cable and a USB To RS- 232 serial cable, as shown in the figure below.
- Page 11 User Manual English Step 2. Launch the newly installed Controller software. (The default language is English, and you can set the language in the upper right corner of the main page.) Select “COM Control Mode”, on the “General” Page, then select the Port number and Baud Rate (default: 115200), and finally click “Connect”.
- Page 12 User Manual English ▪ Output Page You can do the following operations on the Output page: Multi-View Adjustment: Click to select the desired screen display mode. There are eight modes available: SINGLE - PIP - PBP(1) - PBP(2) - Triple(1) - Triple(2) - Quad(1) - Quad(2). ...
- Page 13 User Manual English ▪ System Page You can do the following operations on the System page: EDID Mode Control: Click the drop-down list on the right to select the EDID mode. Firmware Upgrade: Click the folder icon on the right ot import the firmware upgrade file, then click “Upgrade”...
- Page 14 User Manual English System initializing… Initialization Finished! MCU FW version x.xx.xx Scaler FW Version x.xx.xx Reset to factory deafaults… Reset! Reset to factory Reset! System initializing… defaults Initialization Finished! MCU FW version x.xx.xx Scaler FW Version x.xx.xx Output Setting Set Output Resolution (x=1~14) 1.
- Page 15 User Manual English Command Code Function Description Example Feedback Default r output itc! Get output video mode r output itc! Output ITC: Video Mode EDID Setting Set HDMI input EDID mode (x=1~19) 1. 4K2K60_444,Stereo Audio 2.0 2. 4K2K60_444,Dolby/DTS 5.1 3. 4K2K60_444,HD Audio 7.1 4.
- Page 16 User Manual English Command Code Function Description Example Feedback Default User EDID data: r edid user1! Get user1 EDID Data r edid user1! 00 FF FF FF FF FF FF 00 Audio Setting Set output audio source (x=0~4) Output 0. Follow window 1 audio: Output audio: follow selected source.
- Page 17 User Manual English Command Code Function Description Example Feedback Default s output audio s output audio Output audio Decrease output audio volume vol-! vol-! volume: 50 s output audio vol s output audio Output audio Set output audio volume (x=0~100) vol 30! volume: 30 r output audio...
- Page 18 User Manual English Command Code Function Description Example Feedback Default Multi-viewer Mode Setting s window x in y! Select one input for one display window for the current Multiview mode. (x=1~4) 1. Window 1 2. Window 2 Window 1 3. Window 3 s window 1 in 1! select HDMI 1 4.
- Page 19 User Manual English Command Code Function Description Example Feedback Default s window x Set the border color of the border color y! specified window. (x=1~4) 1. Window 1 2. Window 2 3. Window 3 4. Window 4 (y=1~9) window 1 s window 1 border 1.
- Page 20 User Manual English s PBP mode x! Set PBP Windows display s PBP mode 1! PBP Mode 1 PBP Mode 1 Mode (x=1~2) 1. PBP mode 1 2. PBP mode 2 r PBP mode! Get PVP Windows display r PBP mode! PBP Mode 1 mode s PBP aspect!
- Page 21 User Manual English Application Example...
- Page 22 User Manual English Troubleshooting ▪ Check that the DC plug and jack used by the external power supply is firmly connected to the unit and that the power LED is illuminated. ▪ Check the HDMI Cable connection and reseat if required. ▪...
- Page 23 Benutzerhandbuch Deutsch Sicherheitshinweise ! GEFAHR ! Bitte lesen Sie die folgenden Sicherheitshinweise sorgfältig durch und bewahren Sie dieses Dokument immer zusammen mit dem Produkt auf. Die Nichtbeachtung dieser Vorsichtsmaßnahmen kann zu schweren Verletzungen oder zum Tod durch Stromschlag, Feuer oder Schäden am Produkt führen. Das Berühren der internen Komponenten oder eines beschädigten Kabels kann einen elektrischen Schlag verursachen, der zum Tod führen kann.
- Page 24 Vielen Dank, dass Sie sich für den 4x1 HDMI 4K60 Multiview Seamless Switch entschieden haben. Dieses Produkt wurde entwickelt, um einen störungsfreien und zuverlässigen Betrieb zu gewährleisten. Es profitiert sowohl von der 2-Jahres-Garantie von LINDY als auch vom kostenlosen, lebenslangen technischen Support. Bitte lesen Sie dieses Handbuch sorgfältig durch und bewahren Sie es zum späteren Nachschlagen auf, um eine korrekte Verwendung zu gewährleisten.
- Page 25 Benutzerhandbuch Deutsch ▪ Eingangsanschlüsse: 4 x HDMI IN [Typ A, 19-polige Buchse] ▪ Ausgangsanschlüsse: o 1 x HDMI-Ausgang [Typ A, 19-polige Buchse] o 1 x L/R-Ausgang [RCA] o 1 x Optischer Ausgang [S/PDIF] ▪ Gehäuse: Metall-Gehäuse ▪ Farbe: Schwarz ▪ Abmessungen: 220mm [B] x 100mm [T] x 30mm [H] ▪...
- Page 26 Benutzerhandbuch Deutsch Name Funktion Beschreibung ▪ Drücken Sie kurz auf diese Taste, um das Gerät einzuschalten. Einschalttaste ▪ Halten Sie diese Taste 1 Sekunde lang gedrückt, um in den Standby-Modus zu wechseln. Power-LED Die Power-LED leuchtet grün, wenn das Gerät eingeschaltet ist, und rot, wenn es sich im Standby-Modus befindet.
- Page 27 Benutzerhandbuch Deutsch Rückseite Name Funktion L/R-Anschluss PCM2.0 Analoger Audio-Ausgangsanschluss. Optischer Anschluss Digitaler Audioausgang über Glasfaser. HDMI- HDMI-Signalausgang, angeschlossen an ein HDMI-Anzeigegerät wie Ausgangsanschluss z. B. einen Fernseher oder Monitor mit HDMI-Kabel. HD 1-4 INPUT- HDMI-Signaleingänge, die über ein HDMI-Kabel an ein HDMI- Anschlüsse Quellgerät wie einen DVD-Player oder eine Set-Top-Box angeschlossen werden.
- Page 28 Benutzerhandbuch Deutsch IR-Pin-Definition IR-Empfängerpin Fernsteuerung Einschalten oder Standby: Drücken Sie diese Taste, um den Switch einzuschalten oder ihn in den Standby-Modus zu setzen. HD 1/2/3/4 Drücken Sie diese Tasten, um die Eingangs- quelle im Einzelbildschirmmodus auszuwählen. Die entsprechende Eingangs-LED auf der Vorderseite leuchtet dann grün.
- Page 29 Benutzerhandbuch Deutsch EDID-Einstellungen Der Benutzer kann die folgenden EDID-Modi über RS-232-Befehle, OSD-Menüführung oder Controller- Software auswählen. EDID Mode EDID Mode 4K60-2.0CH 1680x1050-2.0CH 4K60-5.1CH 1600x1200-2.0CH 4K60-7.1CH 1440x900-2.0CH 4K30-2.0CH 1360x768-2.0CH 4K30-5.1CH 1280x1024-2.0CH 4K30-7.1CH 1024x768-2.0CH 1080P-2.0CH 720P-2.0CH 1080P-5.1CH AUTO 1080P-7.1CH USER1 1920x1200-2.0CH Video & Audio Der Umschalter unterstützt Videoeingänge mit Auflösungen bis zu 3840x2160@60Hz sowie mehrere Audioformate wie LPCM, AC3, DD+, DTS, DTS-HD bis hin zur 7.1-Kanal-Pass-Through-Funktion über HDMI-Kabel.
- Page 30 Benutzerhandbuch Deutsch OSD-Menüführung 1 ) Insgesamt sieben Tasten auf der IR-Fernbedienung werden für die OSD-Menünavigation verwendet, darunter Menü, Beenden, AUF, AB, LINKS, RECHTS, OK. Die Menüinhalte sind wie folgt: 4096x2160p 60Hz/ 4096x2160p 50Hz/ 3840x2160p 60Hz/ 3840x2160p 50Hz/ 3840x2160p 30Hz/ 3840x2160p 25Hz/ 1920x1200p60Hz RB/ Output Resolution...
- Page 31 Benutzerhandbuch Deutsch Win 1 HDMI1, HDMI2, HDMI3, Audio Select HDMI 4 AUDIO Volume 0.. 100 Audio-Mute On, Off 4K60-2.0, 4K60-5.1CH, 4K60-7.1CH, 4K30-2.0CH, 4K30-5.1CH, 4K30-7.1CH, 1080P-2.0CH, 1080P- 5.1CH, 1080P-7.1CH, 1920x1200- System EDID 4K60-2.0 2.0CH, 1680x1050-2.0CH, 1600x1200- 2.0CH,1440x900-2.0CH, 1360x768-2.0CH, 1280x1024-2.0CH, 1024x 768-2.0CH, 720P-2.0CH, AUTO, USER1 115200, 57600, 38400, Baud Rate...
- Page 32 Benutzerhandbuch Deutsch Controller Software Betriebsanleitung Installation und Anschluss Führen Sie die folgenden Schritte aus, um die Controller-Software zu installieren. Schritt 1. Doppelklicken Sie auf den folgenden Treiber, um die Controllersoftware zu installieren. Schritt 2. Wählen Sie "Anyone who uses this computer (all users)", und klicken Sie dann auf "Next". Schritt 3.
- Page 33 Benutzerhandbuch Deutsch Schritt 2. Starten Sie die neu installierte Controller-Software. (Die Standardsprache ist Englisch, und Sie können die Sprache in der oberen rechten Ecke der Hauptseite einstellen). Wählen Sie auf der Seite "Allgemein" bzw. “General” die Option "COM-Steuermodus" bzw. “COM Control Mode”, wählen Sie dann die Portnummer und die Baudrate (Standard: 115200) und klicken Sie schließlich auf "Verbinden/Connect".
- Page 34 Benutzerhandbuch Deutsch Controller Hauptschnittstelle ▪ General / Allgemein Auf der Seite Allgemein können Sie die folgenden Vorgänge durchführen: Control Mode Select / Steuermodus auswählen: Wählen Sie den "COM-Control Mode". Die TCP/IP- Steuerung wird vorübergehend nicht unterstützt, daher ist der TCP/IP-Steuermodus deaktiviert. ...
- Page 35 Benutzerhandbuch Deutsch Output 1 / Ausgabe ▪ Auf dieser Seite können Sie die folgenden Vorgänge durchführen: Multi-View-Anpassung: Klicken Sie darauf, um den gewünschten Bildschirmmodus auszuwählen. Es sind acht Modi verfügbar: SINGLE - PIP - PBP(1) - PBP(2) - Triple(1) - Triple(2) - Quad(1) - Quad(2). ...
- Page 36 Benutzerhandbuch Deutsch System ▪ Auf der Seite System können Sie die folgenden Vorgänge durchführen: EDID-Mode-Control: Klicken Sie auf die Dropdown-Liste auf der rechten Seite, um den EDID-Modus auszuwählen. Firmware-Upgrade: Klicken Sie auf das Ordnersymbol auf der rechten Seite, um die Firmware- Upgrade-Datei zu importieren, und klicken Sie dann auf "Upgrade", um das Upgrade zu starten.
- Page 37 Benutzerhandbuch Deutsch Command Funktionsbeschreibung Beispiel Rückmeldung Standard Code r power! Get current power state r power! Power On / Power Off Reboot… reboot! Reboot the device reboot! System initializing… Initialization Finished! MCU FW version x.xx.xx Scaler FW Version x.xx.xx Reset to factory deafaults… Reset! Reset to factory defaults Reset!
- Page 38 Benutzerhandbuch Deutsch r output itc! Get output video mode r output itc! Output ITC: Video Mode EDID Einstellung Set HDMI input EDID mode (x=1~19) 1. 4K2K60_444,Stereo Audio 2. 4K2K60_444,Dolby/DTS 5.1 3. 4K2K60_444,HD Audio 7.1 4. 4K2K30_444,Stereo Audio 5. 4K2K30_444,Dolby/DTS 5.1 6.
- Page 39 Benutzerhandbuch Deutsch 3. HDMI 3 input audio 4. HDMI 4 input audio Output Audio: Output Audio: Follow Follow r output audio! Get output audio source r output audio! window 1 selected window 1 source selected source Increase output audio Output audio: s output audio vol+! r output audio! volume...
- Page 40 Benutzerhandbuch Deutsch Command Code Funktionsbeschreibung Beispiel Rückmeldung Standard Multi-viewer Mode Setting s window x in y! Select one input for one display window for the current Multiview mode. (x=1~4) 5. Window 1 6. Window 2 Window 1 7. Window 3 s window 1 in 1! select HDMI 1 8.
- Page 41 Benutzerhandbuch Deutsch Command Code Funktionsbeschreibung Beispiel Rückmeldung Standard s window x Set the border color of the border color y! specified window. (x=1~4) 5. Window 1 6. Window 2 7. Window 3 8. Window 4 (y=1~9) window 1 s window 1 border 10.
- Page 42 Benutzerhandbuch Deutsch Command Code Funktionsbeschreibung Beispiel Rückmeldung Standard s PBP mode x! Set PBP Windows display s PBP mode 1! PBP Mode 1 PBP Mode Mode (x=1~2) 3. PBP mode 1 4. PBP mode 2 r PBP mode! Get PVP Windows display r PBP mode! PBP Mode 1 mode...
- Page 43 Benutzerhandbuch Deutsch Anwendungsbeispiel Fehlersuche ▪ Prüfen Sie, ob der Stecker und die Buchse des externen Netzteils fest mit dem Gerät verbunden sind und ob die Netz-LED leuchtet. ▪ Überprüfen Sie den Anschluss des HDMI-Kabels und verbinden Sie es gegebenenfalls erneut. Prüfen Sie, ob die analogen R/L-Kabel für Audio richtig angeschlossen sind.
-
Page 44: Manuel De L'utilisateur
Manuel de l'utilisateur Français .Consignes de sécurité ! ATTENTION ! Merci de lire attentivement ces instructions de sécurité et de les conserver avec le produit. Le non-respect de ces pr écautions peut causer un choc électrique entrainant des blessures graves, voire mortelles, un incendie ou des dommages au produit. - Page 45 Merci d'avoir acheté le commutateur 4x1 HDMI 4K60 Multiview Seamless. Ce produit a été conçu pour offrir un fonctionnement fiable et sans problème. Il bénéficie d'une garantie LINDY de 2 ans et d'un support technique gratuit à vie. Pour garantir une utilisation correcte, veuillez lire attentivement ce manuel et le conserver pour toute référence ultérieure.
- Page 46 Manuel de l'utilisateur Français ▪ Boîtier : Boîtier métallique ▪ Couleur : Noir ▪ Dimension : 220mm [L] x 100mm [P] x 30mm [H] ▪ Poids : 620g ▪ Alimentation électrique : o Entrée : AC 100- 240V 50/60Hz o Sortie : DC 12V/2.5A (norme US/EU, certifié CE/FCC/UL) DC 12V/2.5A (Standard US/EU, certifié...
- Page 47 Manuel de l'utilisateur Français Auto LED Lorsque l'appareil est en mode AUTO, la LED AUTO s'allume en vert et le HDMI est automatiquement identifié, c'est-à-dire que lorsque le signal source actuellement affiché est déconnecté, le commutateur identifie automatiquement le prochain port d'entrée HDMI connecté. Fenêtre IR Fenêtre de réception du signal IR.
- Page 48 Manuel de l'utilisateur Français Panneau arrière Non. Description de la fonction L/R port PCM2.0 Port de sortie audio analogique. Port OPTIQUE Port de sortie audio numérique en fibre optique. Port de sortie HDMI Port de sortie du signal HDMI, connecté à un dispositif d'affichage HDMI tel qu'un téléviseur ou un moniteur à...
- Page 49 Manuel de l'utilisateur Français Définition des broches IR La définition de la broche du récepteur IR est la suivante :...
- Page 50 Manuel de l'utilisateur Français Télécommande Mise sous tension ou veille : appuyez sur ce bouton pour mettre le sélecteur sous tension ou en mode veille. en mode veille. HD 1/2/3/4 Appuyez sur ces boutons pour sélectionner la source d'entrée en mode d'affichage à écran unique. d'écran, et la LED d'entrée correspondante sur le panneau avant s'allume en vert.
- Page 51 Manuel de l'utilisateur Français Paramètres EDID L'utilisateur peut sélectionner les modes EDID suivants via les commandes RS-232, la navigation dans le menu OSD ou le logiciel du contrôleur. EDID Mode EDID Mode 4K60-2.0CH 1680x1050-2.0CH 4K60-5.1CH 1600x1200-2.0CH 4K60-7.1CH 1440x900-2.0CH 4K30-2.0CH 1360x768-2.0CH 4K30-5.1CH 1280x1024-2.0CH 4K30-7.1CH...
- Page 52 Manuel de l'utilisateur Français 1 ) Au total, sept boutons de la télécommande IR sont utilisés pour la navigation dans le menu OSD, notamment Menu, Exit, UP, DOWN, LEFT, RIGHT, OK. Le contenu des menus est le suivant 4096x2160p 60Hz/ 4096x2160p 50Hz/ 3840x2160p 60Hz/ 3840x2160p 50Hz/...
- Page 53 Manuel de l'utilisateur Français Volume 0.. 100 Audio-Mute On, Off 4K60-2.0, 4K60-5.1CH, 4K60-7.1CH, 4K30-2.0CH, 4K30-5.1CH, 4K30-7.1CH, 1080P-2.0CH, 1080P- 5.1CH, 1080P-7.1CH, 1920x1200- System EDID 4K60-2.0 2.0CH, 1680x1050-2.0CH, 1600x1200- 2.0CH,1440x900-2.0CH, 1360x768-2.0CH, 1280x1024-2.0CH, 1024x 768-2.0CH, 720P-2.0CH, AUTO, USER1 115200, 57600, 38400, Baud Rate 115200 19200, 9600 System...
- Page 54 Manuel de l'utilisateur Français Étape 3 : Sélectionnez le chemin d'installation et cliquez sur "Installer". Sélectionnez le chemin d'installation et cliquez sur "installer". Une fois l'installation terminée, cliquez sur "Terminer" pour commencer à utiliser le logiciel du contrôleur. Suivez les étapes ci-dessous pour connecter le logiciel du contrôleur et l'appareil. Étape 1.
- Page 55 Manuel de l'utilisateur Français Une fois la connexion réussie, la page "Général" affiche les informations relatives à l'appareil connecté et la barre d'état en bas affiche "Connecté". Interface principale du contrôleur ▪ Page générale Vous pouvez effectuer les opérations suivantes sur la page Général : ...
- Page 56 Manuel de l'utilisateur Français Device Information : Affiche le nom de l'appareil, la version et l'état de la connexion d'entrée/sortie. Cliquez sur "Device Status" pour actualiser l'état de l'appareil. Connection : Cliquez sur ce bouton pour définir l'état de la connexion. ...
- Page 57 Manuel de l'utilisateur Français page système ▪ Vous pouvez effectuer les opérations suivantes sur la page Système : EDID Mode Control (Contrôle du mode EDID): Cliquez sur la liste déroulante à droite pour sélectionner le mode EDID. Mise à niveau du micrologiciel : Cliquez sur l'icône de dossier à droite pour importer le fichier de mise à...
- Page 58 Manuel de l'utilisateur Français Commande RS-232 Le produit prend également en charge le contrôle des commandes RS-232. Connectez le port RS-232 du produit à un PC à l'aide d'un câble série RS-232 vers USB. Ouvrez ensuite un outil de commande série sur le PC pour envoyer des commandes ASCII afin de contrôler le produit.
- Page 59 Manuel de l'utilisateur Français Code de Description de la Exemple Réaction Standard commande fonction Out resolution: r output res! Get output resolution r output res! 3840x2160p60 Set output HDCP (x=1~3) s output hdcp 7. HDCP 1.4 s output Output HDCP: HDCP 1.4 8.
- Page 60 Manuel de l'utilisateur Français Code de Description de la fonction Exemple Réaction Standard commande EDID Einstellung Set HDMI input EDID mode (x=1~19) 1. 4K2K60_444,Stereo Audio 2.0 2. 4K2K60_444,Dolby/DTS 5.1 3. 4K2K60_444,HD Audio 7.1 4. 4K2K30_444,Stereo Audio 2.0 5. 4K2K30_444,Dolby/DTS 5.1 6.
- Page 61 Manuel de l'utilisateur Français Audio Setting Set output audio source (x=0~4) Output Follow window 1 audio: selected source. Output audio: follow Follow output audio x! HDMI 1 input audio s output audio 0! window 1 selected window 1 HDMI 2 input audio source selected HDMI 3 input audio...
- Page 62 Manuel de l'utilisateur Français Code de Description de la Exemple Réaction Standard commande fonction Multi-viewer Mode Setting Get multi-viewer r multiview! r Multiview! Single Screen display mode Select one input for one display window for the current Multiview mode. (x=1~4) Window 1 Window 2 Window 1 select...
- Page 63 Manuel de l'utilisateur Français Command Code Function Description Example Feedback Default s window x Set the border color of the border color y! specified window. (x=1~4) 9. Window 1 10. Window 2 11. Window 3 12. Window 4 (y=1~9) window 1 s window 1 border 19.
- Page 64 Manuel de l'utilisateur Français Command Code Function Description Example Feedback Default s PBP mode x! Set PBP Windows display s PBP mode 1! PBP Mode 1 PBP Mode 1 Mode (x=1~2) 5. PBP mode 1 6. PBP mode 2 r PBP mode! Get PVP Windows display r PBP mode! PBP Mode 1...
- Page 65 Manuel de l'utilisateur Français Exemple d'application Dépannage ▪ Vérifiez que la fiche et la prise DC utilisées par l'alimentation externe sont fermement connectées à l'appareil et que le voyant d'alimentation est allumé. ▪ Vérifiez la connexion du câble HDMI et réinstallez-la si nécessaire. ▪...
- Page 66 Grazie per aver acquistato lo Switch Seamless 4x1 HDMI 4K60 Multiview. Questo prodotto è stato progettato per garantire un funzionamento affidabile e senza problemi. È dotato di una garanzia LINDY di 2 anni e di un'assistenza tecnica gratuita a vita. Per garantire un uso corretto, leggere attentamente il presente manuale e conservarlo per riferimenti futuri.
- Page 67 Manuale d'uso Italiano Caratteristiche ▪ Le risoluzioni di ingresso e uscita supportano fino a 4k@60Hz. ▪ Commutazione senza soluzione di continuità in modalità di visualizzazione a schermo singolo ▪ Supporto del controllo del volume e della selezione audio indipendente ▪ Controllo tramite pulsanti del pannello frontale, telecomando IR, comandi RS-232 Specifiche ▪...
- Page 68 Manuale d'uso Italiano Operazione Pannello Frontale Nome Descrizione della funzione ▪ Premere brevemente questo tasto per accendere il dispositivo. Descrizione ▪ Premere a lungo questo tasto per 1 secondo per entrare in modalità della funzione standby. LED di Il LED di alimentazione si accende in verde quando il prodotto è acceso e in alimentazione rosso quando è...
- Page 69 Manuale d'uso Italiano Pannello Posteriore Nome Descrizione della funzione L/R port PCM2.0 Porta di uscita audio analogica. Porta Ottica Porta di uscita audio digitale in fibra ottica. Porta di uscita Porta di uscita del segnale HDMI, collegata a un dispositivo di HDMI visualizzazione HDMI come un televisore o un monitor con un cavo HDMI.
- Page 70 Manuale d'uso Italiano Telecomando Accensione o standby: premere questo pulsante per accendere il commutatore o impostarlo in modalità standby. in modalità standby. HD 1/2/3/4 Premere questi pulsanti per selezionare la sorgente di ingresso in modalità di visualizzazione a schermo singolo.
- Page 71 Manuale d'uso Italiano Impostazioni EDID L'utente può selezionare le seguenti modalità EDID tramite comandi RS-232, navigazione nel menu OSD o software di controllo. EDID Mode EDID Mode 4K60-2.0CH 1680x1050-2.0CH 4K60-5.1CH 1600x1200-2.0CH 4K60-7.1CH 1440x900-2.0CH 4K30-2.0CH 1360x768-2.0CH 4K30-5.1CH 1280x1024-2.0CH 4K30-7.1CH 1024x768-2.0CH 1080P-2.0CH 720P-2.0CH 1080P-5.1CH AUTO...
- Page 72 Manuale d'uso Italiano Navigazione del menu OSD 1 ) Per la navigazione nel menu OSD vengono utilizzati in totale sette pulsanti del telecomando IR, tra cui Menu, Exit, UP, DOWN, LEFT, RIGHT, OK. I contenuti del menu sono i seguenti: 4096x2160p 60Hz/ 4096x2160p 50Hz/ 3840x2160p 60Hz/...
- Page 73 Manuale d'uso Italiano Win 1 HDMI1, HDMI2, HDMI3, Audio Select HDMI 4 AUDIO Volume 0.. 100 Audio-Mute On, Off 4K60-2.0, 4K60-5.1CH, 4K60-7.1CH, 4K30-2.0CH, 4K30-5.1CH, 4K30-7.1CH, 1080P-2.0CH, 1080P- 5.1CH, 1080P-7.1CH, 1920x1200- System EDID 4K60-2.0 2.0CH, 1680x1050-2.0CH, 1600x1200- 2.0CH,1440x900-2.0CH, 1360x768-2.0CH, 1280x1024-2.0CH, 1024x 768-2.0CH, 720P-2.0CH, AUTO, USER1 115200, 57600, 38400,...
- Page 74 Manuale d'uso Italiano Guida operativa del software del controllore Installazione & Connessione Per installare il software del controllore, procedere come segue. Passo 1. Fare doppio clic sul seguente driver per installare il software del controllore. Passo 2. Selezionate "Chiunque utilizzi questo computer (tutti gli utenti)", quindi fate clic su "Avanti". Passo 3.
- Page 75 Manuale d'uso Italiano Passo 2. Avviare il software Controller appena installato. (La lingua predefinita è l'inglese; è possibile impostare la lingua nell'angolo superiore destro della pagina principale). Selezionare "Modalità di controllo COM", nella sezione "Generale", quindi selezionare il numero di porta e la velocità di trasmissione (predefinita: 115200) e infine fare clic su "Connetti".
- Page 76 Manuale d'uso Italiano Interfaccia principale del controllore ▪ Generale Nella pagina Generale è possibile eseguire le seguenti operazioni: Selezione della modalità di controllo: Selezionare la "Modalità di controllo COM". Il controllo TCP/IP non è temporaneamente supportato, pertanto la modalità di controllo TCP/IP è disattivata). ...
- Page 77 Manuale d'uso Italiano ▪ pagina di uscita Nella pagina Output è possibile eseguire le seguenti operazioni: Regolazione multivisione: Fare clic per selezionare la modalità di visualizzazione dello schermo desiderata. Sono disponibili otto modalità: SINGOLO - PIP - PBP(1) - PBP(2) - Triplo(1) - Triplo(2) - Quad(1) - Quad(2).
- Page 78 Manuale d'uso Italiano ▪ Pagina del sistema Nella pagina Sistema è possibile eseguire le seguenti operazioni: Controllo della modalità EDID: Fare clic sull'elenco a discesa a destra per selezionare la modalità EDID. Aggiornamento del firmware: Fare clic sull'icona della cartella a destra per importare il file di aggiornamento del firmware, quindi fare clic su "Aggiorna"...
- Page 79 Manuale d'uso Italiano ASCII Commands Protocollo dell'interfaccia seriale. Baud rate: 115200 (default), 57600, 38400, 19200, 9600 Data bits: 8bit Stop bits:1; Check bit: 0 x - Parameter 1; y - Parameter 2; ! - Delimiter Codice Descrizione della Esempio Reazione Standard d'ordine funzione...
- Page 80 Manuale d'uso Italiano s output vka Set output video keep s output vka Output VKA pattern: Black screen active pattern. (x=1~2) black screen 6. Black screen Blue screen r output vka! Get output video keep r output vka! Output VKA Pattern: active pattern.
- Page 81 Manuale d'uso Italiano Codice Descrizione della funzione Esempio Reazione Standard d'ordine EDID Impostazione Set HDMI input EDID mode (x=1~19) 1. 4K2K60_444,Stereo Audio 2.0 2. 4K2K60_444,Dolby/DTS 5.1 3. 4K2K60_444,HD Audio 7.1 4. 4K2K30_444,Stereo Audio 2.0 5. 4K2K30_444,Dolby/DTS 5.1 6. 4K2K30_444,HD Audio 7.1 7.
- Page 82 Manuale d'uso Italiano Codice Codice d'ordine Descrizione Esempio Reazione d'ordine della funzione Audio Setting Set output audio source (x=0~4) Follow window 1 selected source. Output audio: Output audio: s output audio output audio x! HDMI 1 input audio follow window 1 Follow window 1 HDMI 2 input audio selected source...
- Page 83 Manuale d'uso Italiano Code de Description de la Exemple Réaction Standard commande fonction Multi-viewer Mode Setting Get multi-viewer r multiview! r Multiview! Single Screen display mode Select one input for one display window for the current Multiview mode. (x=1~4) Window 1 Window 2 Window 1 select s window x in y!
- Page 84 Manuale d'uso Italiano Command Code Function Description Example Feedback Default s window x Set the border color of the border color y! specified window. (x=1~4) 13. Window 1 14. Window 2 15. Window 3 16. Window 4 (y=1~9) window 1 s window 1 border 28.
- Page 85 Manuale d'uso Italiano Command Code Function Description Example Feedback Default s PBP mode x! Set PBP Windows display s PBP mode 1! PBP Mode 1 PBP Mode 1 Mode (x=1~2) 7. PBP mode 1 8. PBP mode 2 r PBP mode! Get PVP Windows display r PBP mode! PBP Mode 1...
- Page 86 Manuale d'uso Italiano Esempio di applicazione Risoluzione dei problemi ▪ Verificare che la spina e il jack DC utilizzati dall'alimentatore esterno siano saldamente collegati all'unità e che il LED di alimentazione sia acceso. ▪ Controllare il collegamento del cavo HDMI e, se necessario, riposizionarlo. ▪...
-
Page 87: Manual Del Usuario
Gracias por adquirir el conmutador 4x1 HDMI 4K60 Multiview sin interrupciones. Este producto ha sido diseñado para proporcionar un funcionamiento fiable y sin problemas. Cuenta con 3 años de garantía LINDY y soporte técnico gratuito de por vida. Para garantizar un uso correcto, lea atentamente este manual y consérvelo para futuras consultas. - Page 88 Manual Del Usuario Español Características ▪ Las resoluciones de entrada y salida admiten hasta 4k@60Hz. ▪ Conmutación sin interrupciones en el modo de visualización de pantalla única ▪ Soporta control de volumen y selección de audio independiente Control mediante botones del panel frontal, mando a distancia IR, comandos RS-232 ▪...
- Page 89 Manual Del Usuario Español Funcionamiento Panel Frontal Name Function Description ▪ Pulse brevemente este botón para encender el dispositivo. Botón de ▪ Pulse prolongadamente este botón durante 1 segundo para entrar encendido en el modo de espera. LED de El LED de encendido se iluminará en verde cuando el producto esté encendido encendido y en rojo cuando esté...
- Page 90 Manual Del Usuario Español RES antes de que desaparezca el OSD para cambiar circularmente la resolución de salida. (Consulte la lista de resoluciones de salida de "8. Vídeo y audio"). ▪ Mantenga pulsado el botón RES durante 3 segundos para cambiar la resolución de salida a 720P60.
- Page 91 Manual Del Usuario Español Definici ón del pin IR Mando a distancia Encendido o espera: Pulse este botón para encender el aparato o ponerlo modo de espera. HD 1/2/3/4 Pulse estos botones para seleccionar la fuente de entrada en el modo de visualización de pantalla única y el LED de entrada correspondiente en el panel frontal con se iluminará...
- Page 92 Manual Del Usuario Español Configuración EDID El usuario puede seleccionar los siguientes modos EDID mediante comandos RS-232, navegación por el menú OSD o software del controlador. EDID Mode EDID Mode 4K60-2.0CH 1680x1050-2.0CH 4K60-5.1CH 1600x1200-2.0CH 4K60-7.1CH 1440x900-2.0CH 4K30-2.0CH 1360x768-2.0CH 4K30-5.1CH 1280x1024-2.0CH 4K30-7.1CH 1024x768-2.0CH 1080P-2.0CH...
- Page 93 Manual Del Usuario Español Navegación por el menú OSD 1 ) Se utiliza un total de siete botones del mando a distancia por infrarrojos para navegar por el menú OSD, incluyendo Menú, Salir, ARRIBA, ABAJO, IZQUIERDA, DERECHA, OK. El contenido del menú...
- Page 94 Manual Del Usuario Español Win 1 HDMI1, HDMI2, HDMI3, Audio Select HDMI 4 AUDIO Volume 0.. 100 Audio-Mute On, Off 4K60-2.0, 4K60-5.1CH, 4K60-7.1CH, 4K30-2.0CH, 4K30-5.1CH, 4K30-7.1CH, 1080P-2.0CH, 1080P- 5.1CH, 1080P-7.1CH, 1920x1200- System EDID 4K60-2.0 2.0CH, 1680x1050-2.0CH, 1600x1200- 2.0CH,1440x900-2.0CH, 1360x768-2.0CH, 1280x1024-2.0CH, 1024x 768-2.0CH, 720P-2.0CH, AUTO, USER1 115200, 57600, 38400,...
- Page 95 Manual Del Usuario Español Paso 3. Seleccione la ruta de instalación y haga clic en "Instalar". Seleccione la ruta de instalación y haga clic en "Instalar". Una vez finalizada la instalación, haga clic en "Finalizar" para empezar a utilizar el software del controlador. Siga los pasos que se indican a continuación para conectar el software del controlador y el dispositivo.
- Page 96 Manual Del Usuario Español Paso 2: Inicie el software del controlador recién instalado. (El idioma por defecto es el inglés, y puede configurar el idioma en la esquina superior derecha de la página principal). Seleccione "Modo de Control COM", en la página "General", luego seleccione el número de Puerto y la Velocidad en Baudios (por defecto: 115200), y finalmente haga clic en "Conectar".
- Page 97 Manual Del Usuario Español Página De Salida Puede realizar las siguientes operaciones en la página salidas: Ajuste Multi-Vista: Haga clic para seleccionar el modo de visualización de pantalla deseado. Hay ocho modos disponibles: SINGLE - PIP - PBP(1) - PBP(2) - Triple(1) - Triple(2) - Quad(1) - Quad(2). ...
- Page 98 Manual Del Usuario Español ▪ Página del Sistema Puede realizar las siguientes operaciones en la página Sistema: Control del modo EDID: Haga clic en la lista desplegable de la derecha para seleccionar el modo EDID. Actualización del Firmware: Haga clic en el icono de carpeta de la derecha para importar el archivo de actualización del firmware y, a continuación, haga clic en "Actualizar"...
- Page 99 Manual Del Usuario Español Código de Descripción de la función Ejemplo Reacción Estándar pedido Configuración del sistema help! Lista todos los comandos help! r type! Da el modelo del dispositivo r type! 4x1 HDMI multiviewer r fw Da la version del firmware r fw MCU FW version version!
- Page 100 Manual Del Usuario Español s output Ajusta el patron activo de salida s output Output VKA pattern: Black screen vka x! de video. (x=1~2) vka 1! black screen 1. Pantalla Negra Pantalla azul r output Da el patron activo de salida de r output Output VKA Pattern: vka!
- Page 101 Manual Del Usuario Español Código de Descripción de la función Ejemplo Reacción Estándar pedido Audio Setting Ajusta fuente de audio de salida (x=0~4) Follow window 1 selected source. Output audio: Output audio: s output audio output audio x! HDMI 1 input audio follow window 1 Follow window 1 HDMI 2 input audio...
- Page 102 Manual Del Usuario Español Código de Descripción de la Ejemplo Reacción Estándar pedido función Multi-viewer Mode Setting r multiview! Da el modo de r Multiview! Single Screen imagen multi-viewer Selecciona una entrada para una imagen en Ventana para el modo actual Multiview.
- Page 103 Manual Del Usuario Español Command Code Function Description Example Feedback Default s window x border Ajusta el color de borde de la color y! ventana especificada. (x=1~4) 1. Window 1 2. Window 2 3. Window 3 4. Window 4 window 1 (y=1~9) s window 1 border...
- Page 104 Manual Del Usuario Español Command Code Function Description Example Feedback Default s PBP mode x! Ajusta el modo de s PBP mode 1! PBP Mode PBP Mode 1 visualización de ventana PBP (x=1~2) 1. PBP mode 1 9. PBP mode 2 r PBP mode! Da el modo de visualización de r PBP mode!
- Page 105 Manual Del Usuario Español Ejemplo de aplicación Solución de problemas ▪ Compruebe que el enchufe y la clavija de CC utilizados por la fuente de alimentación externa estén firmemente conectados a la unidad y que el LED de alimentación esté iluminado. ▪...
-
Page 106: Recycling Information
Recycling Information WEEE (Waste of Electrical and Electronic Equipment), Recycling of Electronic Products Europe, United Kingdom In 2006 the European Union introduced regulations (WEEE) for the collection and recycling of all waste electrical and electronic equipment. It is no longer allowable to simply throw away electrical and electronic equipment. - Page 107 Recycling Information Datenschutz-Hinweis Altgeräte enthalten häufig sensible personenbezogene Daten. Dies gilt insbesondere für Geräte der Informations- und Telekommunikationstechnik wie Computer und Smartphones. Bitte beachten Sie in Ihrem eigenen Interesse, dass für die Löschung der Daten auf den zu entsorgenden Altgeräten jeder Endnutzer selbst verantwortlich ist.
-
Page 108: Ce/Fcc Statement
Standard IEC 60950-1 or 60065 or 62368-1. LINDY Herstellergarantie – Hinweis für Kunden in Deutschland LINDY gewährt für dieses Produkt über die gesetzliche Regelung in Deutschland hinaus eine zweijährige Herstellergarantie ab Kaufdatum. Die detaillierten Bedingungen dieser Garantie finden Sie auf der LINDY Website aufgelistet bei den AGBs.
Need help?
Do you have a question about the 38228 and is the answer not in the manual?
Questions and answers