
Subscribe to Our Youtube Channel
Related Manuals for Dometic RUA5308X


Summary of Contents for Dometic RUA5308X
- Page 1 REFRIGERATION RUA5308X, RUA6508X, RUA8508X Absorption refrigerator Installation Manual...
- Page 2 © 2023 Dometic Group. The visual appearance of the contents of this manual is protected by copyright and design law. The underlying technical design and the products contained herein may be protected by design, patent or pending patent. The trademarks mentioned...
-
Page 3: Table Of Contents
This product manual, including the instructions, guide- lines, and warnings, and related documentation, may be subject to changes and updates. For up-to-date product information, please visit documents.dometic.com. Contents 1 Explanation of symbols ..............3 2 Safety instructions . -
Page 4: Safety Instructions
Safety instructions RUA 5308X, RUA 6508X, RUA 8508X 2 Safety instructions 2.1 General safety WARNING! Failure to obey these warnings could result in death or serious injury. Electrocution hazard • Installation and removal of the refrigerator may only be carried out by qualified personnel. - Page 5 RUA 5308X, RUA 6508X, RUA 8508X Safety instructions • Children aged from 3 to 8 years are allowed to load and unload the refrigerator. • Cleaning and user maintenance shall not be made by children without supervision. • Children must be supervised to ensure that they do not play with the refrigerator. Risk of child entrapment •...
-
Page 6: Scope Of Delivery
Scope of delivery RUA 5308X, RUA 6508X, RUA 8508X WARNING! Failure to obey these warnings could result in death or serious injury. Fire hazard • Ensure clean and residue-free handling if silicon sealant or similar is used. There is a risk of fire if silicone filaments come into contact with hot parts or naked flames. -
Page 7: Accessories
• Incorrect maintenance or use of spare parts other than original spare parts provided by the manufacturer • Alterations to the product without express permission from the manufacturer • Use for purposes other than those described in this manual Dometic reserves the right to change product appearance and product specifications. -
Page 8: Installation
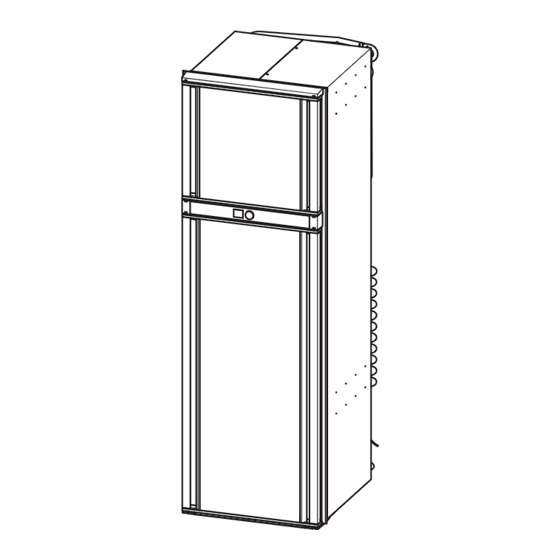
Installation RUA 5308X, RUA 6508X, RUA 8508X 6 Installation CAUTION! Risk of injury The refrigerator has sharp edges. Use gloves during installation. NOTICE! Damage hazard Do not install the refrigerator in the rear of motor homes with the door facing the direc- tion of travel. - Page 9 RUA 5308X, RUA 6508X, RUA 8508X Installation RUA 5308X RUA 6508X RUA 8508X Refrigerator Dimension in mm Height (A) 1194 1451 1661 Width (B) Depth (C) (excluding control knob, 5 mm) Recess Dimension in mm Height (H) 1184 – 1189 1442 –...
- Page 10 Installation RUA 5308X, RUA 6508X, RUA 8508X 6.2 Installing the refrigerator See fig. 4, page 11 and fig. 5, page 12: ➤ Apply insulation wool (1) to the top and sides of the cabinet. ➤ Make air inlet and air outlet vents (4a and 4b) in the outer wall and install the LS ventilation grille (accessories) so that the air can circulate and the heat generated can dissipate to the outside (see chapter “Making air inlet and outlet vents”...
- Page 11 RUA 5308X, RUA 6508X, RUA 8508X Installation Installation with two side vents No. in No. in Description Description fig. 4 fig. 4 Insulation wool on top and sides of Minimum height cabinet (height of the cabinet) Clearance (10 – 25 mm) Air baffle LS300 ventilation grille (accessories) Gas flue kit 3776 (accessories)
- Page 12 Installation RUA 5308X, RUA 6508X, RUA 8508X Installation with one side vent and one roof vent No. in No. in Description Description fig. 5 fig. 5 Insulation wool on top and sides of Minimum height cabinet (height of the cabinet plus 150 mm) Clearance (10 –...
- Page 13 RUA 5308X, RUA 6508X, RUA 8508X Installation No. in fig. 6 Description Roof vent Roof air conditioner 6.3 Making air inlet and outlet vents NOTE Observe the required dimensions specified in the installation manual for the LS ventila- tion grille and the roof vent kit. ➤...
- Page 14 Installation RUA 5308X, RUA 6508X, RUA 8508X 6.4 Making a gas outlet opening A gas outlet opening must be installed if the air inlet vent cannot guarantee that all unburned gas can be completely evacuated (e.g. ventilation grille is located too high, see chapter “Position of the air inlet vent” on page 13). 1.
- Page 15 RUA 5308X, RUA 6508X, RUA 8508X Installation No. in fig. 8 Description Slider Grille Mounting frame 1. Apply sealant to the inner edge of the mounting frame to ensure the installation is water resistant (fig. 9, page 15). 2. Insert the mounting frame into the prepared openings in the outer wall (see chapter “Making air inlet and out- let vents”...
- Page 16 Installation RUA 5308X, RUA 6508X, RUA 8508X 6.6 Installing the roof vent NOTE Use the roof vent kit (accessories). No. in fig. b Description Hood Mounting frame 1. Apply sealant to the inner edge of the mounting frame to ensure the installation is water resistant (fig. c, page 16).
- Page 17 RUA 5308X, RUA 6508X, RUA 8508X Installation 2. Insert the mounting frame into the prepared opening in the outer wall (see chapter “Making a gas outlet open- ing” on page 14) and screw the mounting frame to the mounting holes (fig. d 1). 3.
- Page 18 Installation RUA 5308X, RUA 6508X, RUA 8508X No. in No. in Description Description fig. e fig. e Air outlet vent with ventilation grille Screw Mounting plate Coil Flue pipe Flue pipe of the refrigerator T-piece Outer wall of the vehicle Adapter Cover min.
- Page 19 RUA 5308X, RUA 6508X, RUA 8508X Installation 11. Attach the cover to the outside of the outer wall of the vehicle (fig. h). 6.8 Installing the drain water hose NOTICE! Damage hazard • Position the opening for the drain hose so that the drain hose does not touch the boiler housing to avoid damage to the drain hose.
- Page 20 Installation RUA 5308X, RUA 6508X, RUA 8508X 6.9 Sealing the refrigerator Gas-powered refrigerators in caravans or motor homes must be installed in an enclosed space so that combustion air and exhaust gases cannot enter the living space directly. For this purpose, a suitable seal must be installed between the rear wall of the refrigerator and the interior of the vehicle in order to seal the interior of the vehicle from the cooling unit and ventilation area of the refrigerator.
- Page 21 RUA 5308X, RUA 6508X, RUA 8508X Installation 6.10 Securing the refrigerator CAUTION! Electrocution hazard and damage hazard • Only screw through the holes provided on the refrigerator for fastening to prevent injury from damaged electrical cables or damage to foamed components. •...
-
Page 22: Connecting The Refrigerator
Connecting the refrigerator RUA 5308X, RUA 6508X, RUA 8508X 7 Connecting the refrigerator NOTICE! Damage hazard Lay the connection cables so that they do not come into contact with hot parts of the device or with sharp edges. 7.1 Connecting to the gas supply The assembly and installation of the gas connection must be performed by a qual- ified person who has demonstrated skill and knowledge related to the construc- tion, installation and operation of gas appliances and has received safety training... - Page 23 RUA 5308X, RUA 6508X, RUA 8508X Connecting the refrigerator 1. Connect the refrigerator to the gas supply using a wrench (fig. k). 2. Have a leak test and a flame test performed by an authorised specialist after professional installation. Ensure you are issued with a certificate of inspection.
- Page 24 Connecting the refrigerator RUA 5308X, RUA 6508X, RUA 8508X No. in No. in Description Description fig. l fig. l Connection cable for AC connection Frame heater ( RUA6508X, RUA8508X only) Heater 240 Vw Gas valve Ground (CU) Temperature sensor Protective grounding Lamp Electrode Door sensor...
- Page 25 RUA 5308X, RUA 6508X, RUA 8508X Connecting the refrigerator Connecting to DC power supply The electrical power supply must be connected by a qualified electrician who has demonstrated skill and knowledge related to the construction and operation of electrical equipment and installations, and who is familiar with the applicable regulations of the country in which the equipment is to be installed and/or used, and has received safety training to identify and avoid the hazards involved.
- Page 26 Connecting the refrigerator RUA 5308X, RUA 6508X, RUA 8508X Observe the following instructions when connecting the refrigerator: • Observe the recommended cable length: – 12 V DC starting battery to heater connection: ≥ 10 mm (fig. l 23, page 23) –...
- Page 27 RUA 5308X, RUA 6508X, RUA 8508X Connecting the refrigerator Connection variant B (fig. o) Refrigerator DC connections Power Module Heater House Battery Anderson Plug Anderson cables must be the Vehicle Anderson plug must recommended size. be controlled by ignition relay. •...
- Page 28 Connecting the refrigerator RUA 5308X, RUA 6508X, RUA 8508X Connection variant D (fig. q) Refrigerator DC connections Power Module Heater Fridge House Battery Switch Anderson Plug Anderson cables must be the Vehicle Anderson plug must recommended size. be controlled by ignition relay. •...
-
Page 29: Disposal
RUA 5308X, RUA 6508X, RUA 8508X Disposal 8 Disposal NOTICE! Damage hazard The insulation of the refrigerator contains flammable cyclopentane and requires special disposal procedures. Deliver the refrigerator at the end of its life-cycle to an appropri- ate recycling center. ➤... - Page 32 YOUR LOCAL YOUR LOCAL YOUR LOCAL DEALER SUPPORT SALES OFFICE dometic.com/dealer dometic.com/contact dometic DOMETIC GROUP AB...
Need help?
Do you have a question about the RUA5308X and is the answer not in the manual?
Questions and answers