Table of Contents
Advertisement
Quick Links
Hyper Heat
Wired Thermostat
Installation
& Owner's
Manual
MODEL:
16117100003415
Read this manual carefully before installation and keep it where
the operator can easily find it for future reference.
Due to updates and constantly improving performance, the
information and instructions within this manual are subject to
change without notice.
Version Date: 02/22/24
Please visit www.mrcool.com/documentation
to ensure you have the latest version of this manual.
Advertisement
Table of Contents

Related Manuals for MrCool 16117100003415


Summary of Contents for MrCool 16117100003415
- Page 1 Due to updates and constantly improving performance, the information and instructions within this manual are subject to change without notice. Version Date: 02/22/24 Please visit www.mrcool.com/documentation to ensure you have the latest version of this manual.
-
Page 2: Table Of Contents
In order to ensure accurate servicing and repair, read this manual carefully before performing maintenance. • All of the illustrations in this manual are for explanatory purposes only. There may be slight differences • between the illustration and the purchased thermostat. mrcool.com... -
Page 3: Safety Precautions
Do not mix old and new batteries or different brands of types of batteries, such as alkaline, carbon-zinc, or rechargeable batteries. • Remove and immediately recycle or dispose of batteries from equipment not used for an extended period of time according to local regulations. • Battery type: CR2032 • Battery Power Supply: 3.0V mrcool.com... -
Page 4: Packing List
(One M4x8-Connective Wire Group Mount) Wall Plugs (For wall-mounting) Plastic Screw Bars (For attaching to switch box) Battery To Be Prepared by Installer: 1. Switch Box 3.2 x 3.2 inches (82 x 82 mm) 2. Wiring Tube Insulating Sleeve and Tightening Screw mrcool.com... -
Page 5: Product Overview
Rotation & Backup • Temperature Setting • Layout Dual Control • Follow Me • Design Group Control • Turbo • Room • Child Lock • Temperature 24-Hour System • Clock Display • 12-Hour System • Weekly Timer • Sleep • mrcool.com... -
Page 6: Lcd Display
PRODUCT OVERVIEW 3.5 LCD Display mrcool.com... -
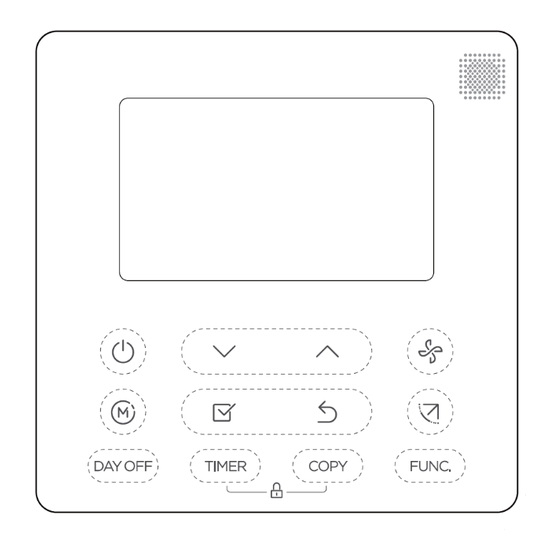
Page 7: Controller Buttons
1. FAN SPEED button 7. COPY button 2. MODE button 8. POWER button 3. FUNC. button 9. CONFIRM button 4. SWING button 10. BACK button 5. ADJUST button 11. DAY OFF/DELAY button 6. TIMER button 12. CHILD LOCK button mrcool.com... -
Page 8: Installation
Use 2 M4X25 screws to install the back cover of the 86 switch box, and use 1 ST3.9*25 screw to attach to the wall. NOTE Attach to a flat surface. Be careful not to distort the back plate of the wire controller by over- tightening the mounting screws. mrcool.com... - Page 9 HB). (HA and HB do not have polarity. See Fig. 4-5.) NOTE • DO NOT allow water to enter the wired controller. Use the trap and putty to seal the wires. • The connecting wires must be fixed and cannot be pulled. mrcool.com...
- Page 10 The wired controllers connect to the unit's HA and HB ports through the HA and HB port on the controller. There is no polarity between HA and HB. See Fig. 4-7. NOTE Wired controller with wireless function does not have this function. mrcool.com...
- Page 11 Adjust the upper section, then attach. Avoid accidental clamping of the wiring when reattaching the front face of the controller. See Fig. 4-10. NOTE The illustrations in this manual are for explanatory purposes only. Your actual controller design may vary from what is shown here. mrcool.com...
-
Page 12: Operation
8° heating function. Press the Power, Mode, Adjust, Fan Speed, Timer, or Swing button to cancel the 8°F heating function. NOTE For some models, the 8° heating function can only be set by remote control. It cannot be chosen via the wired controller. mrcool.com... -
Page 13: Set Operation Mode
°C and °F scale. 5.6 Set Fan Speed Press the Fan speed button to set the fan speed. (This button is unavailable when in Auto or Dry mode.) If stepless speed regulation is supported, press the fan speed key to cycle through: mrcool.com... -
Page 14: Set Keypad Tone
When the PTC function is activated, the symbol is displayed. Note: The electric auxiliary heating function of the AHU model is switched by the MODE button, and the FUNC. button acts as a turbo function. mrcool.com... -
Page 15: Intelligent Eye Display
When cleaning is needed, the filter cleaning prompt icon will light up. Press the function key to select the filter cleaning prompt icon, and press the OK key to reset the filter screen time. The filter cleaning reminder icon will no longer be lit. mrcool.com... -
Page 16: Humidity Setting Function
2. Set the high temperature. (If the ambient temperature is between 78.8~89.6°F (26~32°C), this function is invalid. If the ambient temperature is between 78.8~89.6° (26~32°C), or is greater than or equal to the set temperature, the two machines will run at 75.2°F (24°C) in cool mode at the same time. mrcool.com... -
Page 17: Set Timer Functions
On or Off Timer: 1. Press the Timer button to select the Day On or Day Off icon. 2. Press the Confirm button and the Timer display will flash. mrcool.com... - Page 18 3. Press the "\/" or "/\" button to set the time for the On timer, then press the Confirm button to confirm the setting. Up to 4 timer settings can be saved for each day of the week to best accommodate individual needs. mrcool.com...
- Page 19 The unit will turn on automatically at the set time of the timer. Example: If the power button is pressed once quickly at 10:00, the unit will turn on at 14:00. 2. When you press the power button for 2 seconds, the unit will turn off completely, and cancel the timer. mrcool.com...
- Page 20 All of the timer settings of the selected day of the week will be copied. 1. When in the weekly timer function, press the Confirm button. 2. Press the "\/" or "/\" button to select the day of the week to copy from. mrcool.com...
- Page 21 Press the Confirm button to confirm the setting. IMPORTANT: Up to 8 scheduled events can be set on one day. Various events can be scheduled in either MODE, TEMPERATURE, and FAN speeds. mrcool.com...
- Page 22 The weekly timer setting can be returned to the previous step by pressing the Back button. The current setting is restored. The controller will not save the weekly timer settings if there is no operation within 30 seconds. 2nd Weekly Timer-Activation: Press the Timer button to select WEEK2, and the timer starts automatically. mrcool.com...
- Page 23 2. Press the "\/" or "/\" button to select the day of the week to copy from. 3. Press the Copy button, and the letters "CY" will be displayed. 4. Press the "\/" or "/\" button to select the day of the week to copy to. mrcool.com...
- Page 24 2. Press the "\/" or "/\" button to select the day of the week, then press the Confirm button. 3. Press the "\/" or "/\" button to select the time to be deleted. The set time, mode, temperature, and fan speed will be displayed. Press the DEL (Day Off) button to delete. mrcool.com...
-
Page 25: Wireless Control Connection
Applicable systems: iOS, Android (iOS 9.0 and above, Android 6.0 and above suggested) • Not all of the Android and iOS systems are compatible with the app. MRCOOL is not responsible for any issues as a result of this incompatibility. - Page 26 OPERATION Network Configuration via Bluetooth Note: Ensure bluetooth is enabled and working properly on your mobile device. mrcool.com...
- Page 27 OPERATION mrcool.com...
- Page 28 • In the case that your device connected to the wireless network before but needs to reconnect, press "+" on the app's home page, and add your controller again by the device category and model according to the instructions on the app. mrcool.com...
- Page 29 "/\" to select the temperature, then press Confirm to complete. When the unit is off, in the query function of temperature, press "\/" or "/\" to select type. Press Confirm to enter setting state, press "\/" or "/\" to select the type, then press Confirm to complete. mrcool.com...
- Page 30 • Cool and Heat/Single Cool mode is restored to Cool and Heat mode. • Restore the temperature range to the factory setting. • The remote receiving function is restored. • The address of the two-control first-line controller is restored to the code switch. mrcool.com...
-
Page 31: Troubleshooting
EH63 If the error displayed on the wired controller is different from that on the unit, check the unit's installation and user manual, the unit's service manual, or contact our technical support team at (270) 366-0457 for further assistance. mrcool.com... - Page 32 Hyper Heat Wired Thermostat The design and specifications of this product and/or manual are subject to change without prior notice. Consult with the sales agency or manufacturer for details.
Need help?
Do you have a question about the 16117100003415 and is the answer not in the manual?
Questions and answers