Advertisement
Quick Links
USA office: Fontana
AUS office: Truganina
GBR office: Ipswich
If you're having difficulty, our friendly
customer team is always here to help.
FRA office: Saint Vigor d'Ymonville
USA:cs.us@costway.com
AUS:cs.au@costway.com
GBR:cs.uk@costway.com
FRA:cs.f r @costway.com
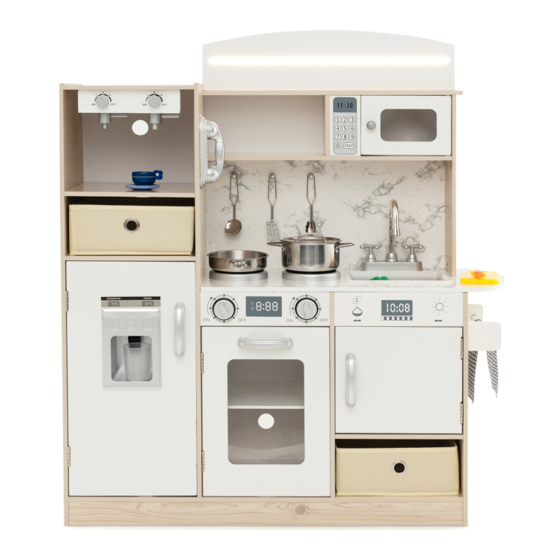
Toy Kitchen with Light
Cuisine Jouets avec Lumière
TP10130WH
THIS INSTRUCTION BOOKLET CONTAINS IMPORTANT SAFETY INFORMATION. PLEASE READ AND KEEP FOR FUTURE REFERENCE.
Advertisement

Subscribe to Our Youtube Channel
Related Manuals for Costway TP10130WH


Summary of Contents for Costway TP10130WH
- Page 1 GBR office: Ipswich FRA office: Saint Vigor d'Ymonville USA:cs.us@costway.com If you're having difficulty, our friendly AUS:cs.au@costway.com customer team is always here to help. GBR:cs.uk@costway.com THIS INSTRUCTION BOOKLET CONTAINS IMPORTANT SAFETY INFORMATION. PLEASE READ AND KEEP FOR FUTURE REFERENCE. FRA:cs.f r @costway.com...
-
Page 2: Before You Start
Avant de Commencer Before You Start Veuillez lire attentivement toutes les instructions et les conserver pour la référence ultérieure. Please read all instructions carefully and keep it for future reference. Avertissement de Sécurité Générale General Security Warning Attention : Les enfants doivent utiliser ce produit sous la surveillance de leurs parents. Caution: Children should use this product under the parental supervision. - Page 4 Step 3 Insert No.6 and 7 panel in backside groove. Step 1 Use A screw to lock No.2 panel on No.1 panel. Étape 3 Étape 1 Insérer les panneaux N° 6 et 7 Utiliser une vis A pour verrouiller le panneau N° dans la rainure arrière.
- Page 5 Step 7 Insert H(wooden dowels) in No.11 and 12 panel leftside, connect it to No.10 panel. Insert H(wooden dowels) in No.13 panel leftside and topside, connect it to No.1 and 2 panel. Step 5 Use C screw to lock L(button) on No.9 panel, then insert H(wooden dowels) in No.9 panel leftside, connect it to...
- Page 6 Step 9 Use F screw to lock P(plastic supports) on No.1,8 and 10 panel. Insert No.15,16 in backside groove. Étape 9 Utiliser la vis F pour verrouiller P (supports en plastique) sur les panneaux N° 1, 8 et 10. Insérer N° 15,16 dans la rainure arrière.
- Page 7 Step 12 Step 13 Use E screw to lock N(female hinge) on No.10 Use E screw to lock N(female hinge) on No.10 panel. Use E screw to lock N(male hinge) on panel. Use E screw to lock N(male hinge) on No.19 panel.
- Page 8 Step 15 Turn over the No.26 panel, then put M(plastic buckle) in No.26 panel, use E screw to lock M on No.26 panel. Use B screw to lock the tap and burner on No.26 panel. Étape 15 Retourner le panneau N° 26, puis placez M (boucle en plastique) dans le panneau N°...
- Page 9 Step 17 Insert H(wooden dowels) in No.27 panel rightside, connect it to No.30 panel, then use A screw to lock it on No.30 panel. Étape 17 Insérer des chevilles en bois en H dans le panneau N° 27 côté droit, les relier au panneau N° 30, puis utiliser une vis A pour les Step 19 bloquer sur le panneau N°...
- Page 10 Step 21 Use B screw to lock R(plastic hooks) on No.32 panel, then insert No.31 and 32 panel in groove. Étape 21 Utiliser la vis B pour bloquer R (crochets en plastique) sur le panneau N° 32, puis insérez les panneaux N°...
- Page 11 Step 23 Step 24 Step 24 Insert H(wooden dowels) in No.28 and 27 panel Open the burner, use A screw to lock the Open the burner, use A screw to lock the leftside, connect it to No.8 panel, then use A counter-table on No.10 panel.
- Page 12 Return / Damage Claim Instructions Step 25 Put inside the DO NOT discard the box / original packaging. Non-woven fabric In case a return is required, the item must be returned in original box. Without this your return will not be accepted. drawer in the kitchen.
Need help?
Do you have a question about the TP10130WH and is the answer not in the manual?
Questions and answers