Advertisement
Quick Links
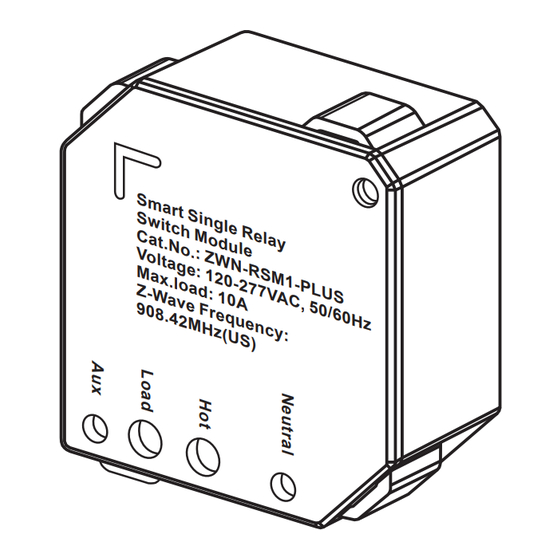
INSTALLATION INSTRUCTIONS
Smart Single Relay Switch Module
S
m
a
r
t
S
S
i
n
w
g l
i
t
c
e
h
R
C
M
e la y
a
o
t
.
d
N
u l
o
e
V
.
:
o lt a
Z W
N
g
- R
M
e
: 1 2
S
a x
M
.l
0
1
o
-
2
-
a
7
P
Z
d
7
-
W
: 1
V
a
A
v
0
A
C
e
,
9
F
0 8 .
r e
4 2 M
q
u
e
n
H z ( U
c
y
:
S )
FEATURES
• 700 series Z-Wave™ chip for better range and faster control
• SmartStart and S2 Security for a safer network
• Manual or Z-Wave on/off control with instant status updates
• Installs behind your existing wall switch (single pole)
• Works with LED and incandescent bulbs
SPECIFICATIONS
Voltage ..................................................................120-277VAC, 50/60Hz
Resistive .............................................................................................10A
Z-Wave Frequency...........................................................908.42MHz(US)
Wireless Range................................................up to 131 feet line of sight
System Requirements.....................................................Z-Wave Network
Operating Temperature.............................................32°-104°F (0°-40°C)
This Switch Module can be included and operated in any Z-Wave network
with other Z-Wave certified devices from other manufacturers and/or other
applications. All non-battery operated nodes within the network will act as
repeaters regardless of vendor to increase reliability of the network.
This Switch Module features the latest Security 2 (S2) framework to remove
smart home network hacking risks. This device is equipped with a unique
authentication code for trusted wireless communication.
WARNING
Turn the POWER OFF at the circuit breaker before
installing the Switch.
Read and understand these instructions before installing. This device is intended for installation
in accordance with the National Electric Code and local regulations. It is recommended that a
qualified electrician performs this installation.
Use copper wire only.
Use wires with a minimum temperature rating of 75ºC (167ºF)
WIRING DIRECTIONS:
the wall box, then wire the ZWN-RSM1-PLUS this way
ZWN-RSM1-PLUS
L
U
S
5
0 /
6 0 H
z
If Hot and Neutral are located in the ceiling box, then wire
the ZWN-RSM1-PLUS this way
If Hot and Neutral are located in
Wall box
NOTE: Aux wire not required if
mechanical ON/OFF switch is not
present.
Z-Wave Control
1. ADD DEVICE to your hub. Initiate inclusion (pairing) in the app
2. Finalize inclusion at the relay. Press and released the program
button or toggle the connected switch 5 times quickly if using the
traditional Z-Wave inclusion
3. The connected load will turn on/off 3 times if inclusion is successful
Z-Wave SmartStart
1. Scan the QR code / Enter the 5-Digit Pin
2. The SmartStart security PIN is located on the back of the relay,
next to the Z-Wave Plus logo
3. The connected load will turn on/off 3 times if inclusion is successful
4. SmartStart enabled products can be added into a Z-Wave network
by scanning the Z-Wave QR Code present on the product with a
controller providing SmartStart inclusion. No further action is required
and the SmartStart product will be added automatically within 10
minutes of being switched on in the network vicinity.
Z-Wave Inclusion with SmartThings Hub
1. Power the relay up
2. Tap the plus icon in the home screen of the SmartThings app
3. Tap Device
4. Tap "Scan QR code." Scan the QR code printed on the inside of
the cover of the realy
5. Input the 5-digit pin
6. On the SmartThings app, select the hub and room you'd like the
device added to and click Next
7. When the app says "Get your device ready to connect", press and
released the program button on the back of the relay
8. A few seconds later, the app will display a new device on the
screen
9. Click Done
Z-Wave Exclusion with SmartThings Hub
1. Tap on your hub in the home page of the app or find it under
Devices in the SmartThings app
2. Tap the three dots in the top right
3. Tap Z-Wave Utilities
4. Tap Z-Wave Exclusion
5. While the app is searching for a device, press and released the
program button on the back of the relay
6. The app will indicate when the device is successfully removed.
EXCLUSION (REMOVING / UNPAIRING DEVICE)
1. Bring your Z-Wave gateway (hub) close to the relay if possible
2. Put the Z-Wave hub into exclusion mode
3. Press and released the Z-WAVE program button or toggle the
connected switch 5 times quickly
4. The app will indicate when the device is successfully removed
Advertisement

Related Manuals for Enerwave ZWN-RSM1-PLUS


Summary of Contents for Enerwave ZWN-RSM1-PLUS
- Page 1 If Hot and Neutral are located in 1. ADD DEVICE to your hub. Initiate inclusion (pairing) in the app the wall box, then wire the ZWN-RSM1-PLUS this way ZWN-RSM1-PLUS 2. Finalize inclusion at the relay. Press and released the program...
- Page 2 To reset the relay, press and hold neglect, alteration, modification, or improper installation. To the fullest extent permitted by the applicable state law, Enerwave shall not be liable to the Long press to start the program button for 10 seconds.
Need help?
Do you have a question about the ZWN-RSM1-PLUS and is the answer not in the manual?
Questions and answers
I have just bought two enerwave devices, a ZWM-RSM1-Plus and ZWM-RSM2-Plus to control three 110 volt solenoids running my drip irrigation system. I am used to seeing a neutral return from the Solenoid to the Wave device, but that's not present on these devices. So, not being an electrical engineer, I thought before installing the I would check with you folks. The load-line from your switches should go to one of the lines of the solenoid, and its neutral line should connect to the prime neutral. Yes? Probably a stupid question, but I don't want to blow anything up. :)