Table of Contents
Advertisement
Weather Station
(Save the Instructions for Future Reference)
Email
service@newentor.com
WhatsApp
+8613410031201
Weather station is a functional product, correct setting ensures its
normal use. If there are any questions about use, contact us through
above ways to get support.
Facebook
Search: Newentor
Telegram
NEWENTOR
Advertisement
Table of Contents

Subscribe to Our Youtube Channel
Related Manuals for Newentor NT3378


Summary of Contents for Newentor NT3378
- Page 1 Weather Station (Save the Instructions for Future Reference) Email Facebook service@newentor.com Search: Newentor WhatsApp Telegram +8613410031201 NEWENTOR Weather station is a functional product, correct setting ensures its normal use. If there are any questions about use, contact us through above ways to get support.
-
Page 2: Table Of Contents
TABLE OF CONTENTS 1. WEATHER STATION FEATURES 1.1 Package List ····················································· 1.2 Weather Station Appearance ····································· 1.3 Button Functions ················································· 2. INITIAL OPERATION ········································ 3. BACKLIGHT SETTING ······································ 4. TIME, TIME ZONE AND CALENDAR SETTING 4.1 Manual Time Setting ············································· 4.2 Automatic Time Setting ··········································... -
Page 3: Weather Station Features
EN - Weather Station WEATHER STATION FEATURES 1.1 Package List ITEM NO. PART NAME FIGURE Weather Station Outside Sensor Power Charger User Manual Button Function Manual... -
Page 4: Weather Station Appearance
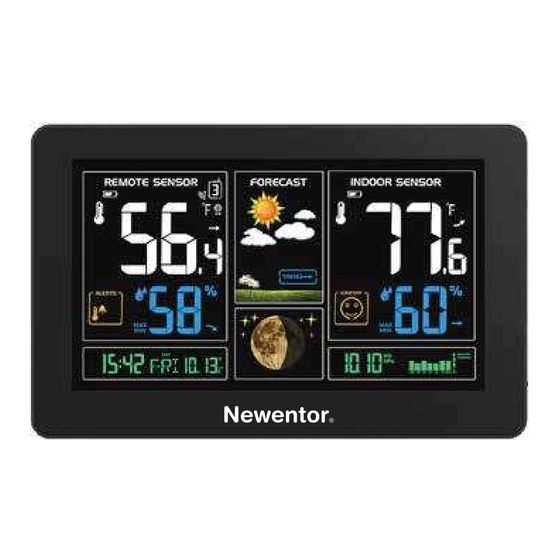
1.2 Weather Station Appearance Part A – Weather Station Front A1: Remote Battery Signal ( 14th page) A2: Remote Temperature ( 15th page) A3: Remote Humidity ( 15th page) A4: Remote Temperature Alert ( 12th page) A5: Radio Mast Icon, DST, Time/Calendar or Alarm Time( 7-9th page) A6: Outside Channel ( 14th page) - Page 5 Part B – Weather Station Back B1: “ ” Touch Field ( 6th page ) B2: “ ” Button ( 8th page ) B3: “ ” Button ( 9th page ) B4: “ ▲ ” Button ( 6th page ) B5: “...
- Page 6 Part C – Wireless Outdoor Sensor C1: Remote Sensor – Temperature C2: Remote Transmission Signal C3: Remote Channel ( 14th page) C4: Transmit Signal LED C5: Remote Sensor – Humidity C6: “ °C/°F ” Switch Button C7: “TX” Reset Button ( 14th page ) C8: 3 Channels Select ( 14th page )
-
Page 7: Button Functions
1.3 Button Function Function Weather Outdoor Normal Time Alarm Temperature Forecast Mode Setting Setting Setting Alert Setting Press Hold Press Hold Press Hold Press Hold Press Hold Button Backlight Backlight Backlight Backlight Backlight Backlight Backlight Backlight On for 15 On for 15 On for 15 On for 15 On for 15... -
Page 8: Initial Operation
INITIAL OPERATION · Plug in the original power cord or insert 2 x AA batteries observing polarity [ “+" and “-" marks]. All icons on the screen of main unit will light up for 3 seconds, you will hear a beep, and the main unit will begin to detect the indoor temperature and humidity. -
Page 9: Backlight Setting
BACKLIGHT SETTING · When powered by batteries, to save power, the backlight is only on for 15 seconds by pressing “ ". · When plugged in the power cord, the backlight brightness button is “ " button, right side. Press it to turn on the backlight full brightness. Press it again to begin dimming the light. -
Page 10: Automatic Time Setting
4.2 Automatic Time Setting · Before searching Radio signal (WWVB signal), choose a right Time Zone according to your location. · After the main unit is connected to the remote sensor,the main unit will start to search WWVB signal and the radio mast icon starts to flash. If the signal is weak, the icon will be showed as “... -
Page 11: Weather Forecast And Barometric
WEATHER FORECAST AND BAROMETRIC 6.1 Weather Forecast · The device calculates a weather forecast for the next 12-24 hours based on the barometric pressure trend, NOT the current weather. · Of course this forecast can’t compare to that of professional weather services supported by satellites and high performance computers, but merely provides an approximate indication of current developments. -
Page 12: Barometric Trend Display
6.3 Barometric Trend Display The barometric pressure continued to rise more than 1 hPa within 1 TREND hour. The cumulative value of the barometric pressure rising or falling TREND continuously does not exceed 1 hPa within 1 hour. The barometric pressure continued to drop more than 1 hPa TREND within 1 hour. -
Page 13: Temperature, Humidity And Comfort Display
TEMPERATURE, HUMIDITY AND COMFORT DISPLAY 8.1 °C or °F Temperature Display · Press “▲” button to change the temperature unit to °C or °F. 8.2 Current Temperature and Temperature Trend Display The temperature continued to rise more than 1℃/1.8℉ within 1 hour. The cumulative value of the temperature rising or falling continuously does not exceed 1℃... -
Page 14: Comfort Display
8.5 Comfort Display · Indoor comfort level is calculated according to the indoor temperature and humidity, there are 5 levels. Comfortable too cold or too hot 8.6 Current Humidity and Humidity Trend Display The humidity continued to rise more than 5% within 1 hour. The cumulative value of the humidity rising or falling continuously does not exceed 5% within 1 hour. -
Page 15: Remote Sensor Transmission
8.8 Remote Sensor Transmission · When the batteries are installed in the remote sensor, the main unit will automatically connect to it. · The main unit can connect up to 3 remote sensors at the same time, please make sure that the channels of the remote sensors are different. ·... -
Page 16: Product Specification
PRODUCT SPECIFICATION · LED screen size: 7.5 inches · Indoor temperature measurement range: 15°F (-9.9°C) to 122°F (50°C) · Outdoor temperature measurement range: -4°F (-20°C) to 140°F (60°C) Temperature unit: °F or °C · Indoor & Outdoor humidity measurable range: 20%RH ~ 95%RH ·... - Page 17 Incorrect maintenance will seriously endanger user safety. GUARANTEE ◆The device has been manufactured in accordance with strict quality guidelines and has been inspected carefully before delivery. ◆Newentor guarantees that the warranty period of this device is 1 year from the date of purchase.
- Page 18 All batteries must be handed in at a collection point in your community, suburb, or at the retailer. Such batteries can thus be disposed of in an environmentally friendly way. Technical support email: service@newentor.com...
Need help?
Do you have a question about the NT3378 and is the answer not in the manual?
Questions and answers
My indoor monitor shows the time on the top half. To the right, it shows a temperature that does not match the temperature of the pool water showing on the thermometer in the water or the temperature outside. Under the time, the temperature of the pool water is gone and only two black lines are showing. Please help me reprogram the inside monitor.
The Newentor NT3378 indoor monitor displays temperature from its outdoor sensor, but it does not directly support measuring pool water temperature unless the outdoor sensor is placed appropriately. To display the correct pool water temperature:
1. Place the outdoor sensor near or in the pool area, ensuring it is protected from direct sunlight and water damage (use a waterproof enclosure if necessary).
2. Ensure the sensor is transmitting properly to the indoor monitor (check the Remote Temperature display).
3. No reprogramming is needed, just proper placement of the sensor.
The device does not support direct water temperature probes or calibration for specific applications like pools.
This answer is automatically generated
Newentor indoor outdoor thermometer FJ 3378 was newly purchased. Connects to outdoor sensor but then loses connection in < 1 hour. Have to reset outdoor sensor and indoor to get it back. Useless this way. Any help would be appreciated, or we will have to return it.
To fix the connection issue with the Newentor NT3378 indoor-outdoor thermometer:
1. Press and hold the “▼” button on the main unit for 3 seconds to manually reconnect to the remote sensor.
2. At the same time, press the “TX” button on the remote sensor to speed up the connection.
3. Ensure the main unit is set to the same channel as the remote sensor.
4. Check that the outdoor sensor has fresh batteries if the battery icon appears.
5. Make sure the weather station is powered by the original power cord, not batteries only, if using the USB charger.
If a channel is not connected, it will display “--”.
This answer is automatically generated
How do I reset indoor sensor. “?
To reset the indoor sensor for the Newentor NT3378, press and hold the “MEM” button for about 2 seconds. This will clear and re-record the maximum and minimum temperature and humidity readings.
This answer is automatically generated