Burkert 2063 Series Operating Instructions Manual
Piston-controlled diaphragm valve
Hide thumbs
Also See for 2063 Series:
- Operating instructions manual (31 pages) ,
- Quick start manual (17 pages) ,
- Installation instructions manual (28 pages)

Subscribe to Our Youtube Channel
Related Manuals for Burkert 2063 Series


Summary of Contents for Burkert 2063 Series
- Page 1 Type 2063, 2064, 2065 Piston-controlled diaphragm valve Kolbengesteuertes Membranventil Vanne à membrane commandée par piston Operating Instructions Bedienungsanleitung Manuel d‘utilisation...
- Page 2 We reserve the right to make technical changes without notice. Technische Änderungen vorbehalten. Sous réserve de modifications techniques. © Bürkert Werke GmbH & Co. KG, 2016 - 2023 Operating Instructions 2309/03_EUml_00810533 / Original DE...
-
Page 3: Table Of Contents
Type 2063, 2064, 2065 OPERATING INSTRUCTIONS ..........4 INSTALLATION ..............21 1.1 Definition of terms ............4 Installation position 2/2-way valves ......21 1.2 Means of representation ..........4 Installation into the pipeline ........23 7.3 Removing actuator from the valve body ....23 INTENDED USE ..............5 Installing valve body ..........24 Mount the actuator with diaphragm on the BASIC SAFETY INSTRUCTIONS .......... -
Page 4: Operating Instructions
Type 2063, 2064, 2065 Operating instructions OPERATING INSTRUCTIONS Means of representation DANGER! The operating instructions describe the entire life cycle of the device. Keep these instructions in an easily accessible location for Warns of an immediate danger. every user. The instructions must be available to each new owner ▶ Failure to observe these instructions will result in death or of the device. -
Page 5: Intended Use
▶ Only use the devices for media that do not attack the body of responsibility, including those relating to the installation and sealing materials (see type label). Information on the personnel. resistance of the materials to the media is available from your Bürkert sales office or on the Internet at: → resistApp country.burkert.com Risk of injury from high pressure and discharge of medium. ▶ Only use equipment that is approved for this type of poten- ▶ Before working on the device or system, switch off the pressure. tially explosive area. These devices are identified by a sepa- rate Ex type label. Before use, observe the information on the Vent or empty the lines. separate Ex type label and the Ex additional instructions or the Danger of bursting from overpressure. - Page 6 Type 2063, 2064, 2065 Intended use Risk of injury when opening the actuator. The actuator contains a tensioned spring. If the actuator is opened, General hazardous situations. there is a risk of injury from the spring jumping out. To prevent injuries, ensure: ▶ Do not open the actuator. ▶ Do not transport, install or remove heavy devices without the Risk of injury due to moving parts in and on the device. aid of a second person and using suitable auxiliary equipment.
-
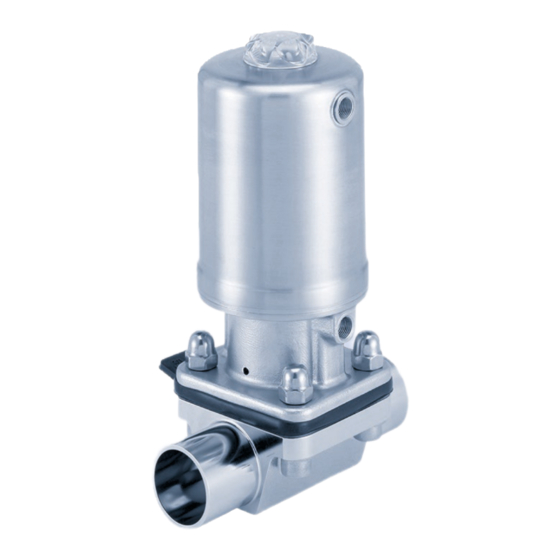
Page 7: General Information
D-74653 Ingelfingen 5.1.1 2/2-way valve type 2063 Tel.: + 49 (0) 7940 - 10 91 111 Fax : + 49 (0) 7940 - 10 91 448 Transparent cap with E-mail: info@burkert.com position indicator Pilot air port 2 CFB and CFI / International Exhaust port CFA The contact addresses can be found on the back pages of the Actuator housing printed Quickstart. - Page 8 Type 2063, 2064, 2065 Product description 5.1.2 T-valve type 2064 5.1.3 Tank bottom valve type 2065 Transparent cap with Tank bottom body with position indicator welding flange Port connection Pilot air port 2 CFB and CFI / exhaust port CFA Diaphragm Diaphragm socket Actuator housing Pilot air port 1 CFA and CFI / Pilot air port 1 CFA and CFI / exhaust port CFB...
-
Page 9: Application Range
Type 2063, 2064, 2065 Product description Application range 5.3.2 Device variants The diaphragm valve is available for the following actuator sizes: ø 32 mm, ø 50 mm, ø 70 mm, ø 90 mm, ø 130 mm. Observe the maximum pressure range on the type label! Function • Contaminated, aggressive, abrasive, high-purity or sterile media. Spring force (SFA) or pneumatic pilot pressure (CFB and CFI) generate the closing force of the diaphragm pressure piece. • Higher viscosity media. Force is transmitted through a spindle connected to the actuator piston. -
Page 10: Technical Data
Type 2063, 2064, 2065 Technical data TECHNICAL DATA Control function B (CFB) Opened by spring force in rest position Standards and directives The device complies with the relevant EU harmonisation leg- islation. In addition, the device also complies with the require- ments of the laws of the United Kingdom. The harmonised standards that have been applied for the con- formity assessment procedure are listed in the current version of the EU Declaration of Conformity/UK Declaration of Conformity. Control function I (CFI) Actuating function via reciprocal Labelling of forged steel valve pressurization body Batch number XX F Production number... -
Page 11: Labelling Of Tube Valve Body (Vp)
Type 2063, 2064, 2065 Technical data Labelling of tube valve body (VP) Type label Material Company logo Heat WARNING! Risk of injury from high pressure. Excessive pressure can damage the device. 1.4435 316L(VP) ▶ Comply with pressure range values on the type label. XXXXXXXX Orifice Nominal... -
Page 12: Operating Conditions
Type 2063, 2064, 2065 Technical data Operating conditions Permissible medium temperature for diaphragms The indicated medium temperatures apply only to media 6.5.1 Temperature ranges which do not corrode or swell the diaphragm materials. The behaviour of the medium with respect to the diaphragm Permissible ambient temperature for actuators may be changed by the medium temperature. Actuator size Actuator material Temperature... - Page 13 Type 2063, 2064, 2065 Technical data 6.5.2 Pressure ranges Medium pressure for control function A The values are valid for stainless steel valve bodies. Maximum permitted pilot pressure Max. sealed medium pressure [bar] Actuator size Max. permitted Actuator material Pressure on one Pressure on both [mm] pilot pressure side sides ø 32 ø 50...
- Page 14 Type 2063, 2064, 2065 Technical data Required minimum pilot pressure depending on the medium pressure ø 50 CFB The following graphs illustrate the required minimum pilot EPDM pressure depending on the medium pressure for control func- tions B and I. The values are valid for stainless steel valve bodies. Control function B / elastomer diaphragm ø 32 CFB EPDM Pilot pressure [bar] Fig. 8: Pressure diagram, actuator ø 50 mm, control function B, elastomer diaphragm ø...
- Page 15 Type 2063, 2064, 2065 Technical data Control function B / PTFE elastomer diaphragm ø 32 CFB ø 90 CFB EPDM PTFE/EPDM Pilot pressure [bar] Pilot pressure [bar] Fig. 12: Pressure diagram, actuator ø 32 mm, control function B, PTFE Fig. 10: Pressure diagram, actuator ø...
- Page 16 Type 2063, 2064, 2065 Technical data ø 70 CFB ø 130 CFB PTFE/EPDM PTFE/EPDM Pilot pressure [bar] Pilot pressure [bar] Fig. 14: Pressure diagram, actuator ø 70 mm, control function B, PTFE Fig. 16: Pressure diagram, actuator ø 130 mm, control function B, elastomer diaphragm PTFE elastomer diaphragm ø...
- Page 17 Type 2063, 2064, 2065 Technical data Control function I / elastomer diaphragm ø 50 CFI ø 90 CFI EPDM EPDM Pilot pressure [bar] Pilot pressure [bar] Fig. 17: Pressure diagram, actuator ø 50 mm, control function I, Fig. 19: Pressure diagram, actuator ø 90 mm, control function I, elastomer diaphragm elastomer diaphragm ø...
- Page 18 Type 2063, 2064, 2065 Technical data Control function I / PTFE elastomer diaphragm ø 50 CFI ø 90 CFI PTFE/EPDM PTFE/EPDM Pilot pressure [bar] Pilot pressure [bar] Fig. 21: Pressure diagram, actuator ø 50 mm, control function I, PTFE Fig. 23: Pressure diagram, actuator ø...
-
Page 19: Flow Rate Values
Type 2063, 2064, 2065 Technical data Flow rate values Diaphragm Orifice Seal Kv values [m /h] as per standard size connection material ASME BS 6.6.1 Flow rate values for forged steel valve bodies EPDM 66.0 66.0 66.0 66.0 50 / 2" PTFE 66.0 67.0... -
Page 20: General Technical Data
Type 2063, 2064, 2065 Technical data 6.6.3 Flow values for tube valve bodies Diaphragm Sealing Kv values [m /h] as per standard size connection material ASME Diaphragm Sealing Kv values [m /h] as per standard EPDM 70.0 size connection material ASME 50 / 2”... -
Page 21: Installation
Type 2063, 2064, 2065 Technical data Ports CAUTION! Pilot air port Stainless steel threaded bushing G1/8 Risk of injury due to heavy device. M5 (for actuator size ø 32 mm) Port connection Welded connection: During transportation or installation work, a heavy device may according to EN ISO 1127 (ISO 4200), DIN fall down and cause injuries. 11850 R2, DIN 11866 (ASME-BPE) ▶ Transport, install and remove heavy device with the aid of a other connections on request second person only. ▶ Use suitable tools. INSTALLATION Installation position 2/2-way valves DANGER! - Page 22 The marking on the port connection of valve bodies serves When media is supplied: When medium is removed: as an orientation aid (see “Fig. 25”). The marking must point upwards. The actual self-drainage angle must be set with a suitable measuring tool. For valve bodies without angle specification, you will find information on the self-drainage angle on the Internet at country.burkert.com → Type → Manuals → Additional manual “Angles for self-draining of diaphragm valves”. Fig. 26: Installation position of the type 2064 Mark for 7.1.2 Installation position for tank bottom self-draining upwards body, type 2065 α...
-
Page 23: Installation Into The Pipeline
Type 2063, 2064, 2065 Technical data Installation into the pipeline Removing actuator from the valve body 7.2.1 Preparatory work NOTE! → Clean pipelines (sealing material, swarf, etc.). Damage to the diaphragm or the seat contour. → Support and align pipelines. ▶ When removing the actuator, ensure that the valve is in open 7.2.2 Installation requirements position. -
Page 24: Installing Valve Body
Type 2063, 2064, 2065 Technical data Installing valve body 7.4.2 Welding tank bottom body type 2065 WARNING! Recommendations Observe sequence! Risk of injury due to improper installation. ▶ Installation may only be performed by qualified and trained 1. Welding tank bottom body onto the base of the tank personnel. before installing the tank. Welding onto a tank which has ▶ Observe tightening torques. already been installed is possible but more difficult Weld the tank bottom body in the middle of the tank base so that the tank can be optimally drained. 7.4.1 Installation of 2-way valve body and 2. Weld the tank bottom body into the pipeline. -
Page 25: Mount The Actuator With Diaphragm On The Valve Body
Type 2063, 2064, 2065 Technical data Mount the actuator with diaphragm Observe the applicable laws and regulations of the on the valve body respective country with regard to the qualification of welders and the execution of welding work. NOTE! 1. Welding tank bottom body onto the tank. Damage to the diaphragm or the seat contour! NOTE! ▶ When installing the actuator, ensure that the valve is in open position. -
Page 26: Pneumatic Connection
Type 2063, 2064, 2065 Technical data Pneumatic connection → Pressurise pilot air port 2 with compressed air (value as indi- cated on the type label). WARNING! → Actuate the diaphragm valve twice to position the diaphragm correctly. Risk of injury from unsuitable connection hoses. ▶ Use only hoses which are authorized for the indicated pressure → With applying pressure, tighten the body screws in three and temperature range. -
Page 27: Disassembly
Type 2063, 2064, 2065 Disassembly DISASSEMBLY Actuator size ø 32 mm Actuator size ø 50...130 mm Pilot air port Pilot air port 2 CFB and CFI / DANGER! 1 or 2 exhaust port CFA Risk of injury from discharge of medium and pressure. It is dangerous to remove a device which is under pressure due to the sudden release of pressure or discharge of medium. -
Page 28: Maintenance
Type 2063, 2064, 2065 Maintenance MAINTENANCE → If leaks occur, replace the wearing part in question with a corre- sponding spare part (see chapter “11 Spare parts”). DANGER! → Periodic control of the relief bore (see “Fig. 29”). Risk of injury from high pressure in the system. Relief bore ▶ Before loosening lines and valves, turn off the pressure and for leakage vent the lines. Diaphragm monitoring socket... -
Page 29: Repair
Type 2063, 2064, 2065 Maintenance Repair 9.1.4 Service life of the diaphragm The service life of the diaphragm depends on the following 9.2.1 Replacing the diaphragm factors: DANGER! • Diaphragm material • Medium Risk of injury from discharge of medium and pressure. • Medium pressure It is dangerous to remove a device which is under pressure due •... - Page 30 Type 2063, 2064, 2065 Maintenance → Insert the body screws and lightly tighten them cross-wise until Replacement for control function A the diaphragm lies between the valve body and the actuator. → Clamp valve body in a collet Do not tighten the screws yet. (only for valves which have not yet been installed).
- Page 31 Type 2063, 2064, 2065 Maintenance → Pressurise pilot air port 2 with compressed air (value as indi- Replacement for control function B and I cated on the type label). → Clamp valve body in a collet → Actuate the diaphragm valve twice to position the diaphragm (only for valves which have not yet been installed). correctly. NOTE! → With applying pressure, tighten the body screws in three Damage to the diaphragm or the seat contour! stages (approx. 1/3, approx. 2/3, 3/3 of the full tightening When removing the actuator, ensure that the valve is open.
-
Page 32: Malfunctions
Type 2063, 2064, 2065 Malfunctions MALFUNCTIONS 9.2.2 Switching between PTFE and EPDM diaphragm Malfunction Cause / elimination Orifice DN8: Actuator does Pilot air port interchanged → Detach PTFE diaphragm and attach new EPDM diaphragm. not switch CFA: Connect pilot air port 1 Orifice DN15 and DN20: CFB: Connect pilot air port 2 →... -
Page 33: Spare Parts
Type 2063, 2064, 2065 Spare parts SPARE PARTS 11.1 Ordering tables for diaphragms DN (dia- CAUTION! Order numbers for diaphragms phragm size) EPDM Risk of injury and/or damage due to incorrect parts. (AD*) (FF*) Incorrect accessories and unsuitable spare parts may cause 688 421 E03/E04** 677 684... -
Page 34: Transportation, Storage, Disposal
▶ For longer storage, loosen the body screws to avoid defor- mation of the diaphragm. ▶ Mark loosened screws for safety reasons. * SAP code ** Marking on the diaphragm ▶ Store the device in a dry and dust-free location. Storage temperature –20 – +65 °C. If you have any questions, please contact your Bürkert Environmentally friendly disposal sales office. ▶ Follow national regulations regarding disposal and the environment. ▶ Collect electrical and electronic devices separately and dispose of them as special waste. Further information country.burkert.com. English... - Page 36 www.burkert.com...
Need help?
Do you have a question about the 2063 Series and is the answer not in the manual?
Questions and answers