Table of Contents
Advertisement
Advertisement
Table of Contents

Subscribe to Our Youtube Channel
Related Manuals for Samsung MR1034


Summary of Contents for Samsung MR1034
-
Page 1: Microwave Oven
Microwave Oven Owner’s Manual MR1034 Code No.: DE68-02980A... -
Page 2: Precautions To Avoid Possible Exposure To Excessive Microwave Energy
Safety RECAUTIONS TO OSSIBLE XPOSURE TO XCESSIVE ICROWAVE NERGY (a) Do not attempt to operate this oven with the door open since open-door operation can result in harmful exposure to microwave energy. It is important not to defeat or tamper with the safety interlocks. -
Page 3: Important Grounding Instructions
Safety Important Safety Instructions, continued • Do not store this appliance outdoors. Do not use near water – for example, near a kitchen sink, in a wet basement, or near a swimming pool, etc. • Keep the inside of the oven clean. Food particles or spattered oils stuck to the oven walls or floor can cause paint damage and reduce the efficiency of the oven. -
Page 4: Use Of Extension Cords
If you use an extension cord, the interior light may flicker and the blower may vary when the microwave oven is on. Cooking times may be longer, too. WARNING Do not cut or remove the third (ground) prong from the power cord under any circumstances. -
Page 5: Table Of Contents
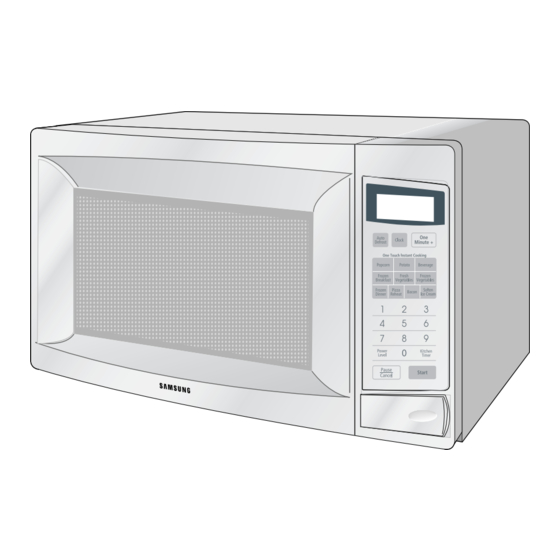
Specifications ...19 Guía Rápida(Spanish)...19 Quick Reference...20 Checking Parts Unpack your microwave oven and check to make sure that you have all the parts shown here. If any part is missing or broken, call your dealer. microwave oven registration card Installation... -
Page 6: Setting Up Your Microwave Oven
Your New Microwave oven Setting Up Your Microwave Oven Place the oven on a flat, sturdy surface and plug the cord into a grounded outlet. Make sure there is adequate ventilation for your oven by leaving at least four inches of space behind, above, and to the side of the oven. -
Page 7: Operation
Operation Turning on the Power and Selecting a Weight The first time you plug the power cord into an outlet, or after there has been an interruption in power, the display shows “ you can select the weight system for the display. You can choose between pounds (LBS) or kilograms (KG). -
Page 8: Using The Instant Cook Buttons
6 Slices towel. Remove paper towel immediately after cooking. • Use More or Less button for desired crispness. • Remove top of carton. Place carton in 1 pint center of microwave oven. ½ gallon • Let stand 2 minutes after microwaving. -
Page 9: Defrosting Automatically
Operation Defrosting Automatically To thaw frozen food, set the weight of the food and the microwave automatically sets the defrosting time, power level and standing time. Press the Auto Defrost button. The display shows “0.5 lbs.” (0.2Kg if you have set your oven for metric measure). To set the weight of your food, press the Auto Defrost button repeatedly. -
Page 10: Multi-Stage Cooking
“Note: The microwave does not turn on when the Kitchen timer is used. ” Setting the Child Protection Lock You can lock your microwave oven so it can’t be used by unsupervised children. Hold the “0” button and then press the “2” button.. -
Page 11: Cooking Instructions
Cooking Instructions Cooking Utensils Recommended Use • Glass and glass-ceramic bowls and dishes — Use for heating or cooking. • Microwavable browning dish — Use to brown the exterior of small items such as steaks, chops, or pancakes. Follow the directions provided with your browning dish. -
Page 12: Cooking Techniques
Keep this in mind to avoid burns. • Home canning in the microwave oven is not recommended because all harmful bacteria may not be destroyed by the microwave heating process. -
Page 13: Cooking Guide
Cooking Instructions Cooking Guide Guide for Cooking Meat in Your Microwave • Place meat on a microwave-safe roasting rack in a microwave-safe dish. • Start meat fat-side down. Use narrow strips of aluminum foil to shield any bone tips or thin meat areas. •... -
Page 14: Guide For Cooking Vegetables In Your Microwave
Cooking Instructions Guide for Cooking Seafood in Your Microwave • Cook fish until it flakes easily with a fork. • Place fish on a microwave-safe roasting rack in a microwave-safe dish. • Use a tight cover to steam fish. A lighter cover of wax paper or paper towel provides less steaming. -
Page 15: Auto Defrosting Guide
Cooking Instructions Auto Defrosting Guide • Follow the instructions below when defrosting different types of food. Standard Food Amount Roast 2.5-6.0 lbs. Start with the food placed fat side down. Beef, Pork After each stage, turn the food over and shield any warm portions with narrow strips of aluminum foil. -
Page 16: Broccoli And Cheese Casserole
Cooking Instructions Broccoli and Cheese Casserole ¼ cup butter or margarine ¼ cup chopped onion 1½ Tbs. flour ½ tsp. salt ¼ tsp. dry mustard tsp. pepper 1½ cups milk ¼ cup chopped red pepper 8 oz. (2 cups) cheddar cheese, shredded 1 pkg. -
Page 17: Appendix
Appendix Troubleshooting Guide Before you call a repair person for your oven, check this list of possible problems and solutions. Neither the oven’s display nor the oven operate. • Properly insert the plug into a grounded outlet. • If the outlet is controlled by a wall switch, make sure the wall switch is turned on. -
Page 18: Warranty
Warranty Warranty Information Limited Warranty for Original Purchaser This Samsung product is warranteed by Samsung Electronics America, Inc. (hereafter referred to as SEA) against manufacturing defects in material or workmanship for the following periods: Labor: 1 year (carry-in) Parts: 1 year Magnetron: 8 years SEA further warrants that if this product fails to operate properly within the specified warranty period and the failure is due to improper... -
Page 19: Appendix
Appendix Specifications Model Number MR1034 Oven Cavity 1.0cu.ft Controls 10 power levels, including defrost Timer 99 minutes, 99 seconds Power Source 120 VAC, 60 Hz Power Output 1000 Watts Power Consumption 1500 Watts 11/32 Outside Dimensions ”(W) X 13 7/32... -
Page 20: Quick Reference
Quick Reference Feature Set Clock 1. Press CLOCK. 2. Use number buttons to enter the current time. 3. Press CLOCK again. One Stage 1. Use number buttons to set cooking time. Cooking 2. Set power level or leave at High. 3.
Need help?
Do you have a question about the MR1034 and is the answer not in the manual?
Questions and answers