Table of Contents
Advertisement
Quick Links
Advertisement
Table of Contents

Subscribe to Our Youtube Channel
Related Manuals for baxter 6060 2M9832


Summary of Contents for baxter 6060 2M9832
- Page 1 Multi–Therapy Ambulatory Infusion Pump Product Code 2M9832 0543...
- Page 2 Sets designated for use with this device are identified in Chapter 3, “Using Admin- istration Sets.” Baxter’s warranty on this device will be null and void and Baxter will assume no responsibility for incidents which may occur if the product is not used in accor- dance with product labeling.
- Page 3 Change Record Original Issue: August 2000 Page or Range Revision Front cover Inside Front Cover i — vi 1-1 — 1-9 (1-10 blank) 2-1 — 2-8 3-1 — 3-17 (3-18 blank) 4-1 — 4-70 5-1 — 5-25 (5-26 blank) 6-1 — 6-10 7-1 —...
- Page 4 Medical Device Directive. Device: 6060™ Multi–Therapy Pump Catalogue 2M9832 Number: Manufacturer: Manufactured by an affiliate of: Baxter Healthcare Corporation Deerfield, IL 60015 USA Made in Singapore Authorized Baxter S.A. Representative: B-7860 Lessines, Belgium 6060™ Multi–Therapy Pump Operator’s Manual...
-
Page 5: Table Of Contents
Table of Contents Change Record..............i Meaning of the CE Mark Symbol........ii Table of Contents............iii Chapter 1 Introduction..............1-1 Overview..............1-1 Features................ 1-2 Safety Summary............1-4 General ..............1-4 Definitions ............1-5 Serial Number Format .......... 1-6 General Warnings ..........1-6 General Cautions .......... - Page 6 Table of Contents Delivery Profile Overview......... 3-10 Continuous ............3-11 ® Auto–Ramp Profile .......... 3-11 Intermittent ............3-11 25 Periods ............3-12 PCA ..............3-12 Programming an Infusion .......... 3-13 Delay Delivery ........... 3-15 Ready Screens / Final Confirmation Screens ..3-16 Reviewing Profile Parameters ........
- Page 7 Programming PCA Infusions........4-36 Begin Programming PCA Profile ....... 4-36 Choose Method of Limiting Amount of Medication ........... 4-38 Set PCA Profile Titration Limits ......4-42 Program Optional Loading Dose ......4-44 Check Programmed Parameters ......4-44 Select Appropriate PCA Security Level ..... 4-45 Completing PCA Programming ......
- Page 8 Table of Contents Switching From Lockout Mode to Programmable Mode ............5-19 Setting Infusion Data Parameters ......5-20 Infusion Data Parameters in Programmable Mode ............5-21 Infusion Data Parameters in Lockout Mode ..5-23 Displaying Volume and Time Remaining ..5-25 Chapter 6 Troubleshooting ..............
-
Page 9: Chapter 1 Introduction
Chapter 1 Introduction Chapter 1 Overview This manual provides operating instructions for the 6060™ Multi–Therapy Pump. The following information is provided in this chapter: “Features,” 1-2 ■ “Safety Summary,” 1-4 ■ The 6060™ Multi–Therapy Pump (referred to in this manual as “the pump”) provides accurate, safe, and reliable volumetric delivery and may be used for subcutaneous, arterial, intravenous, and epidural delivery routes. -
Page 10: Features
Features Features Versatile ■ The pump can be programmed for five primary delivery profiles: • Continuous ® • Auto–Ramp Profile • Intermittent • 25 Periods • Patient-Controlled Analgesia (PCA) Convenient ■ Small size and weight increase patient mobility and make pump suitable for many ambulatory clinical applications. - Page 11 Introduction Memory ■ Infusion status is saved if the pump is turned off before an infusion is completed. When the pump is restarted, the infusion may be resumed. Programmed infusion parameters for each of the five modes are saved until they are changed by the operator.
-
Page 12: Safety Summary
Safety Summary Safety Summary General Prior to operating this pump, carefully read this manual to fully understand the pump’s functionality and to ensure safe and proper operation. Although the pump has been designed and manufactured to exacting specifications, it is not intended to replace trained personnel in the supervision of infusions. -
Page 13: Definitions
Introduction Definitions Warning messages indicate a possible hazard which, if not avoided, could result in severe personal injury or death. Caution messages indicate a problem or unsafe practice which, if not avoided, could result in minor or moderate personal injury, product or property damage. -
Page 14: Serial Number Format
This pump should be used only with Baxter ! WARNING ! accessories specified in Table 8-3 on page 8-4. There are risks associated with using anything other than the recommended accessories with this pump. - Page 15 Introduction Do not operate the pump with the optional Battery ! WARNING ! Eliminator/Charger while the patient is immersed in water. Doing so can present an electrical shock hazard that may cause severe injury or death. Avoid excessive moisture near the battery door. ! WARNING ! Epidural administration of drugs other than those ! WARNING !
-
Page 16: General Cautions
If this happens, reposition the pump away from the source of interference. When infusing through a central line catheter, Baxter Caution recommends using sets with a luer lock adapter. -
Page 17: Notes
If this is an initial purchase from the manufac- turer, you may return a signed copy of the packing list to the manufacturer in order to comply with these requirements. Contact the Baxter Andover service facility at 1-800-343-0366 for additional information. 07-19-12-353 6060™ Multi–Therapy Pump Operator’s Manual... -
Page 19: Chapter 2 Pump Description
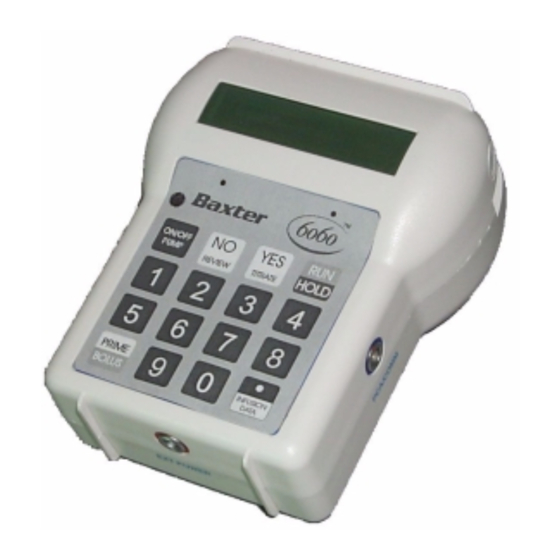
Chapter 2 Pump Description Chapter 2 Overview This chapter describes the pump’s controls and indicators. The following information is included: “Front Panel,” 2-1 ■ “Rear Panel,” 2-4 ■ “Cassette Chamber,” 2-6 ■ “Administration Set Components,” 2-8 ■ Front Panel Table 2-1 describes and Figure 2-1 shows items on the front of the pump. - Page 20 Front Panel Table 2-1 Front Panel Keys and Indicators — continued Item Name Description YES / • During programming, used to answer the pump’s TITRATE key prompts and accept the data being displayed. • During a Continuous or PCA infusion, used to access and program Titration functions.
- Page 21 Pump Description READY CONTINUOUS ON/OFF REVIEW TITRATE PUMP HOLD PRIME INFUSION BOLUS DATA Figure 2-1 Front View of Pump 07-19-12-353 6060™ Multi–Therapy Pump Operator’s Manual...
-
Page 22: Rear Panel
Rear Panel Rear Panel Table 2-2 describes and Figure 2-2 shows items on the rear of the pump. Table 2-2 Rear/Side Panel Items Item Name Description Rear attachment Attaches the lock box to the pump. rail Battery com- Allows access to self-contained 9-volt alkaline partment door batteries. - Page 23 Pump Description Figure 2-2 Rear/Side View of Pump 07-19-12-353 6060™ Multi–Therapy Pump Operator’s Manual...
-
Page 24: Cassette Chamber
Cassette Chamber Cassette Chamber Table 2-3 describes and Figure 2-3 shows items visible in the cassette chamber when the pump door is open. Table 2-3 Cassette Chamber Items Item Name Description Front attachment Attaches the lock box to the pump. rail Cassette Simultaneously pressing the two oval buttons... - Page 25 Pump Description Figure 2-3 Top View of Pump with Door Open 07-19-12-353 6060™ Multi–Therapy Pump Operator’s Manual...
-
Page 26: Administration Set Components
Administration Set Components Administration Set Components Use only administration sets specifically labeled for use with the 6060™ Multi–Therapy pump. Administration sets components are described in Table 2-4 and shown in Figure 2-4. Table 2-4 6060™ Pump Administration Set Components Item Name Description Bag spike... -
Page 27: Basic Operation
Chapter 3 Basic Operation Chapter 3 Overview You should be familiar with the topics described in this chapter before attempting to use the pump. This chapter provides instructions on the following: “Unpacking the Pump,” 3-1 ■ “Using Administration Sets,” 3-2 ■... -
Page 28: Using Administration Sets
Using Administration Sets Using Administration Sets Use only Baxter administration sets specifically ! WARNING ! labeled for use with the 6060™ Multi–Therapy Pump. The following is a list of administration sets available for use with the pump. 2L9000 ■ 2L9003 ■... -
Page 29: Loading The Administration Set
Basic Operation Loading the Administration Set Note: Use aseptic technique when priming and loading the administration set. Open the pump door by pressing both oval buttons on the sides of the pump. Place the tubing’s cassette into the cassette chamber, matching the shape of the cassette with the shape of the chamber –... -
Page 30: Using The Pump To Prime
Using Administration Sets Using the Pump to Prime The administration set MUST NOT be connected to ! WARNING ! the patient while priming. Note: Use aseptic technique when priming and loading the administration set. To prime the administration set using the pump: Load the administration set as described in “Loading the Administration Set”... -
Page 31: Using The 100 Ml Lock Box
Basic Operation The pump displays: READY To PRIME Press&Hold PRIME Press and hold PRIME/BOLUS . Solution begins to fill the administration set. While priming, the pump displays: PRIMING Volume: 0.1 ml When the set is filled, release PRIME/BOLUS . Note: After 6 ml has been pumped, the pump displays . - Page 32 Using Administration Sets RAIL GUIDES SLIDE ONTO PUMP INNER DOOR TUBING EXIT DOOR LOCK Figure 3-1 100 ml Lock Box (2L9361) Note: The 2L9361 Lock Box is for use only with administra- tion set 2L9000, which includes a 100 ml attached bag.
-
Page 33: Using The 250 Ml Lock Box
Basic Operation Using the 250 ml Lock Box The 250 ml lock box (product code 2L9354) is a reusable container made of translucent plastic so that the solution within the bag can be easily inspected. The 250 ml lock box stays securely on the pump when locked to prevent its removal from the pump. -
Page 34: General Notes On Programming And Delivery
General Notes on Programming and Delivery General Notes on Programming and Delivery All profiles may be programmed in ml, mg ■ or µ g. When programming in mg or µ g, a ■ concentration (per ml) must be entered. All profiles except PCA may be programmed ■... -
Page 35: Entering Infusion Parameters
Basic Operation Entering Infusion Parameters Use the numeric keys to enter values for an infusion’s parameters when prompted by the pump. You may enter values when a parameter’s value is zero, or enter a new value directly over a previously programmed value. -
Page 36: Delivery Profile Overview
Delivery Profile Overview Note: The pump will not deliver an infusion that has a zero value for any of its parameters, except delay delivery time and Titration rate and volume. If you try to start an infusion with a zero-value parameter, the pump displays . -
Page 37: Continuous
Basic Operation Continuous Continuous Profile The Continuous Delivery Profile allows the delivery of a single rate and a single volume. EXAMPLE: Hydration ® Auto–Ramp Profile ® Auto–Ramp Profile ® The Auto–Ramp Profile allows delivery of an infusion that automatically ramps up, reaches a predetermined level delivery rate, then automatically ramps down. -
Page 38: 25 Periods
Delivery Profile Overview 25 Periods 25 Periods Profile The 25 Periods Delivery Profile permits you to program and infuse up to twenty-five separate rates and volumes, or times and volumes, to be delivered sequentially for use in various custom regimens. EXAMPLE: Dobutamine or IVIG PCA Profile The PCA Delivery Profile can provide the following... -
Page 39: Programming An Infusion
If the error code or malfunction recurs, do not use the pump. Have it checked by Baxter’s authorized service center. After the self-test, you may see one or more of the following screens that alert you to current settings on the pump. - Page 40 Programming an Infusion Check Internal 9-Volt Batteries Indicates that one of the 9-volt batteries is dead or installed incorrectly, and the pump is running on only one battery. Note: The message will not automatically clear. Turn the pump off and replace/install both 9-volt batteries properly before using the pump.
-
Page 41: Delay Delivery
Basic Operation A profile name is displayed. Press YES to accept, or press NO repeatedly until the desired profile is displayed, then press YES . Delay Delivery When programming an infusion, you can delay the start of the infusion for a specified period of time. This option is available in all modes except PCA. -
Page 42: Ready Screens / Final Confirmation Screens
Programming an Infusion Ready Screens / Final Confirmation Screens When you have entered and/or reviewed all infusion parameters, the pump displays: READY (PROFILE) This indicates that the programmed parameters have been saved and will be retained until the profile is reprogrammed or the pump’s memory is cleared. -
Page 43: Reviewing Profile Parameters
Basic Operation Reviewing Profile Parameters To review the current programmed parameter values: If the pump is already running, press RUN/HOLD to temporarily stop the infusion. Press NO/REVIEW . The pump displays: REVIEW PROFILE PARAMETERS? Press YES . The pump displays the current option and limit settings, then the programmed infusion parameters. -
Page 45: Programming Infusions
Chapter 4 Programming Infusions Chapter 4 Overview This chapter provides instructions for programming infusions in each of the pump’s five infusion profiles. The following information is included: “Programming Continuous Profile,” 4-1 ■ ® “Programming Auto–Ramp Profile,” 4-10 ■ “Programming Intermittent Profile,” 4-18 ■... -
Page 46: Programming Continuous Profile
Programming Continuous Profile Power the pump on by pressing ON/OFF PUMP . The pump executes its self-test, then displays: YES to Program RUN to Repeat Press YES . The pump displays the current downstream occlusion pressure setting, then displays: CONTINUOUS? Press YES to select Continuous profile. - Page 47 Programming Infusions To program in milligrams, press YES and go to step 5.4 to enter concentration. If not, press NO . The pump displays: PROGRAM in ug’s? To program in micrograms, press YES and go to step 5.4 to enter concentration. If not, press NO and return to step 5.1.
- Page 48 Programming Continuous Profile The pump displays: PROGRAM Total Infusion Time? Press YES . The pump displays: CONTINUOUS Total Time: XX:XX Press YES to accept the displayed time period for the infusion, or enter a new time period and press YES to accept. The pump displays: CONTINUOUS Volume: XXX.X ml To program volume to be infused:...
- Page 49 Programming Infusions Note: If the calculated rate exceeds the pump’s maximum rate of 400 ml/hr, the pump displays an alert mes- sage and forces you to re-enter values that result in a rate less than 400 ml/hr. Press YES to confirm the displayed parameters and continue to step 10, Press NO to check or change the parameters.
-
Page 50: Titration In Continuous Profile
Programming Continuous Profile To deliver the programmed infusion at a later time, press the ON/OFF PUMP key to turn the pump off. When you want to begin the programmed infusion, follow the directions under “Shortcut Delivery of a Programmed Infusion,” 5-2. To begin the infusion immediately, press YES. - Page 51 Programming Infusions Changing Rate Without Stopping the Infusion Press YES /TITRATE while the infusion is running. The pump displays: TITRATION? Press YES . The pump displays: ENTER NEW Rate: 0.0 ml/hr Enter the new rate. Press YES to accept the new value and continue the infusion at the new rate.
-
Page 52: Programming Continuous Profile
Programming Continuous Profile Enter the new rate and press YES to accept. The pump displays: ENTER NEW Volume: 0.0 ml Enter a new volume if desired and press YES to accept. The pump displays the new infusion rate and the cumulative volume infused, alternating with ** HOLD ** Press RUN to resume the infusion. -
Page 53: Repeating A Continuous Infusion
Programming Infusions Repeating a Continuous Infusion To repeat a previously programmed continuous infusion: Turn the pump on by pressing ON/OFF PUMP . The pump executes its self-test, then displays: YES to Program RUN to Repeat To repeat the last program delivered, press RUN . The display alternates between the last programmed parameters and: CONTINUOUS... -
Page 54: Programming Auto-Ramp ® Profile
® Programming Auto–Ramp Profile ® Programming Auto–Ramp Profile ® The Auto–Ramp Profile allows delivery of an infusion that automatically ramps (tapers) up, reaches a level delivery rate, and then automatically ramps (tapers) down. You enter the infusion’s total volume, up- and down-ramp times, and the total delivery time or maximum level rate. - Page 55 Programming Infusions Do one of the following: • If you want to delay the start of the infusion, press YES , enter the delay time in hours:minutes, then press YES again. • If you want to start the infusion immediately after programming the pump, press NO.
- Page 56 ® Programming Auto–Ramp Profile • If you want to program by rate, press NO . The pump displays: PROGRAM Maximum Rate? Press YES . The pump displays the last maximum rate stored in memory. Maximum Rate: XXml/hr Press YES to accept the rate, or enter a new rate, then press YES to confirm.
- Page 57 Programming Infusions Press YES to accept the displayed value, or enter a new value and press YES to accept. The pump displays the previous down-ramp time period stored in memory. Down-Ramp TotalTime: X:XX Press YES to accept the displayed value, or enter a new value and press YES to accept.
- Page 58 ® Programming Auto–Ramp Profile • Press NO to check or change the parameters. The pump briefly displays: AUTO-RAMP: CHECK OR CHANGE? then returns to the DELAY DELIVERY? screen shown in step 4. Proceed through all the programming screens by pressing YES or NO to confirm or change parameter values.
- Page 59 Programming Infusions RATE/hr (ml) AMT When you have reconfirmed the programmed parameters, press RUN/HOLD to begin the infusion. The pump display alternates between the following: RATE/hr (ml) AMT XX.X -> UP-RAMP XX.X As the infusion progresses, the rate gradually increases throughout the up-ramp time period. When the up-ramp time period is complete, rate levels off at the maximum programmed rate and the following is displayed for 10 seconds:...
-
Page 60: Repeating An Auto-Ramp ® Profile Infusion
® Programming Auto–Ramp Profile ® Repeating an Auto–Ramp Profile Infusion ® To repeat a previously programmed Auto–Ramp Profile infusion: Power the pump on by pressing ON/OFF PUMP . The pump executes its self-test, then displays: YES to Program RUN to Repeat To repeat the last program delivered, press RUN . - Page 61 Programming Infusions Press YES to program early down-ramp, or NO to exit and continue with the infusion as originally programmed. Note: The LOW BAG warning may occur when you pro- gram an early down-ramp. After you press YES , the pump displays: Down-Ramp TotalTime: HH:MM Press YES to accept the down-ramp start time...
-
Page 62: Programming Intermittent Profile
Programming Intermittent Profile Programming Intermittent Profile The Intermittent profile delivers multiple doses of medication at regular intervals from a single fluid bag. You enter the total length of time over which to infuse the contents of the fluid bag. You may choose a delivery time up to 72 hours. - Page 63 Programming Infusions Press NO until the following is displayed: INTERMITTENT? Press YES to select Intermittent profile. The pump displays: DELAY DELIVERY? Do one of the following: • If you want to delay the start of the infusion, press YES , enter the delay time in hours:minutes, then press YES again.
- Page 64 Programming Intermittent Profile If the time displayed is correct, press YES . If not, enter desired total delivery time and press YES to accept. The pump displays: INTERMITTENT # Doses: Do one of the following: If the number of doses shown is correct for the 10.1 total delivery time entered, press YES .
- Page 65 Programming Infusions Note: You must select a programming unit. Note: You can program the doses by time or by rate. To program by time: When the pump displays: PROGRAM Doses in Time? Press YES. The pump displays: 12.1 INTERMITTENT DoseTime: 0:00 Press YES to accept the time, or enter a new 12.2...
- Page 66 Programming Intermittent Profile The pump displays the previous dose volume stored in memory. Dose Volume:XX.X ml/hr Press YES to accept the displayed value, or enter a new value and press YES to accept. The pump displays: INTERMITTENT KO Rate: X.X ml/hr Note: KO rate must be between 0.0 and 10.0 ml, and must be less than the dose rate.
- Page 67 Programming Infusions Do one of the following: • Press YES to confirm that the displayed parameters are acceptable and go to step 18, the Ready screen. • Press NO to check or change the parameters. The pump briefly displays: INTERMITTENT: CHECK OR CHANGE then returns to the DELAY DELIVERY?
-
Page 68: Interrupting An Intermittent Infusion
Programming Intermittent Profile The Final Confirmation screen displays the infusion rate and amount, alternating with INTERMITTENT Press Run . This gives you the opportunity to reconfirm the infusion parameters. When you have reconfirmed the programmed parameters, press RUN/HOLD to begin the infusion. Note: Intermittent infusions always begin with a dose period and end with a KO period unless Delay Delivery is... - Page 69 Programming Infusions Table 4-1 Resuming an Intermittent Infusion If pump is turned back on..Prompt Response YES : Interrupted dose con- Before the scheduled RESUME end of the interrupted tinues where it left off. DOSE X dose NO : YES to Program RUN to Repeat After more than 31 min- Dose is cancelled.
-
Page 70: Audible Alerts When Ko Rate Is 0.0 Ml/Hr
Programming Intermittent Profile Audible Alerts When KO Rate is 0.0 ml/hr If the KO rate is 0.0, a dose is finished and the pump is turned off, the pump sounds 4 alert beeps every 10 minutes, beginning 30 minutes before the scheduled start time of the next dose and ending 30 minutes after the scheduled start time of the next dose. - Page 71 Programming Infusions Change the fluid bag, then turn the pump back on. In Programmable or Lockout Mode, see “Shortcut Delivery of a Programmed Infusion,” 5-2. Changing the Fluid Bag During the Final KO Phase This method allows you to change the fluid bag during the final KO phase of an Intermittent program cycle and automatically start a new program cycle when the final KO phase is complete.
-
Page 72: Programming 25 Periods Profile
Programming 25 Periods Profile Press RUN/HOLD to resume the final KO phase of the previous infusion. When the KO phase is complete, the pump begins the new program cycle automatically. Programming 25 Periods Profile This profile permits programming and infusion of up to 25 different delivery periods, each with its own rate and volume, or time and volume. - Page 73 Programming Infusions Do one of the following: • To delay the start of the infusion, press YES , enter the delay time in hours:minutes, then press YES again, or • To start the infusion immediately, press NO. The pump displays: PROGRAM in ml’s? Select the programming units as follows: To program in ml, press YES and go to step 7.
-
Page 74: Programming 25 Periods Profile By Rate
Programming 25 Periods Profile Programming 25 Periods Profile by Rate Note: You must complete steps 1 through 7 of “Program- ming 25 Periods Profile,” 4-28, before performing this procedure. The pump displays the last rate programmed for the first period stored in memory. PERIOD 01 Rate: X.X ml/hr... - Page 75 Programming Infusions Press YES to confirm. The display alternates between: Bag Volume: XXX.X ml and: Rate: XXX ml/hr Confirm the infusion parameters, then press YES to continue to step 8, or NO to check or change the parameters. If you press NO , the pump briefly displays: 25 PERIODS CHECK or CHANGE then returns to...
-
Page 76: Programming 25 Periods Profile By Time
Programming 25 Periods Profile • To reprogram a parameter, press NO . The pump displays the DELAY DELIVERY? screen again so you can advance through all the programming screens by pressing YES and NO and change the values if desired. The Final Confirmation screen displays the infusion rate and amount, alternating with 25 PERIODS... - Page 77 Programming Infusions Press YES to accept the displayed volume, or enter a new volume for Period 1, then press YES to accept. The pump displays the prompt for programming the second period’s time duration: PERIOD 02 TotalTime: HH:MM Press YES to accept the displayed time for Period 2, or enter a new value and press YES to accept.
- Page 78 Programming 25 Periods Profile Confirm the infusion parameters. Press YES to continue to step 11, the Ready screen, or NO to check or change the parameters. If you press NO , the pump briefly displays: 25 PERIODS CHECK or CHANGE then returns to DELAY DELIVERY? .
-
Page 79: Repeating A 25 Periods Program
Programming Infusions The Final Confirmation screen is displayed: 25 PERIODS Press Run alternating with the infusion rate and volume: RATE/hr (ml) AMT When you have reconfirmed the programmed parameters, press RUN/HOLD to begin the infusion. The pump displays: RATE/hr(ml) XX.X ->... -
Page 80: Programming Pca Infusions
Programming PCA Infusions Programming PCA Infusions The PCA profile allows you a choice of three different PCA infusion patterns: Basal (constant) infusion rate only. ■ Basal rate with demand bolus doses (patient ■ activated bolus). Bolus doses on demand only. ■... - Page 81 Programming Infusions CONTINUOUS? Select PCA profile. Press NO until PCA? displayed. Press YES to select PCA profile. The pump displays: Delivery Route Intravenous? Select delivery route. You can select from intravenous, subcutaneous, or epidural delivery routes. If you want an intravenous delivery, press YES .
-
Page 82: Choose Method Of Limiting Amount Of Medication
Programming PCA Infusions Note: If you selected mg or µg, basal rate will display in terms of the selected unit. Note: The basal rate can range from 0.0 up to 50 ml/hr, depending on the selected delivery route. If the rate is programmed in mg/hr or µg/hr, the delivery range is determined by 50 ml equivalent and the concentra- tion. - Page 83 Programming Infusions Note: Select to enter Limit Med. by # Doses/Hour the number of bolus doses that may be delivered within a one-hour time frame. Examples: “6” = q10 min.; “2” = q30 min. Select Limit Med. by Tot Med. Allowed restrict the total amount of medication that may be infused within a certain time period, or to program bolus intervals greater than one hour.
- Page 84 Programming PCA Infusions Choose and program demand bolus dose if desired. DEMAND BOLUS DOSE? Press YES or NO . If you press NO , skip to “Set PCA Profile Titration Limits,” 4-42. If you press YES , the pump displays: Bolus Dose: 0.0 mg...
- Page 85 Programming Infusions Programming Demand Boluses - Limiting Medication by Total Medication Allowed Note: You must complete steps 1 through 10 of “Program- ming PCA Infusions,” 4-36, before performing these steps. Perform this procedure only if you selected . in step 10. LIMIT MED by Tot.
-
Page 86: Set Pca Profile Titration Limits
Programming PCA Infusions The pump displays: Medication Vol Limit: 0.0 mg Press YES to accept the displayed medication volume limit, or enter a new volume limit and press YES to accept. Proceed to “Set PCA Profile Titration Limits,” 4-42. Note: The Medication Volume limit should account for all hours of basal rate plus the bolus doses allowed dur- ing the specified time limit. - Page 87 Programming Infusions If you want to allow titration during a PCA infusion, press YES . The pump displays: MAXIMUM Basal Rate: XX mg/hr Enter the maximum basal rate you wish to allow for titration. The value shown will be the minimum basal rate set in the pump.
-
Page 88: Program Optional Loading Dose
Programming PCA Infusions MAXIMUM Bolus Doses/hr: Press YES to accept the displayed maximum number of bolus doses per hour allowed for titration, or enter a new value and press YES to accept. Program Optional Loading Dose Note: A loading dose can be given as the pump begins infusing. -
Page 89: Select Appropriate Pca Security Level
Programming Infusions Bag volume: XX.XXml/ XX.Xmg To check or change values, press YES. The pump returns to the DELIVERY ROUTE screen. Advance through the programmed parameters and check or change as desired. To continue without changing parameters, press NO and continue. Note: You may also review parameter values at the Final Confirmation screen. -
Page 90: Completing Pca Programming
Programming PCA Infusions Table 4-2 Security Level Parameters Level 1: Allow Level 2: Allow Level 3: Lockout Changes Titration Changes The clinician or patient may start, stop and resume the infusion. The patient cannot access a different profile. The clinician or patient The clinician or patient The patient may admin- may change any PCA... -
Page 91: Titrating A Pca Infusion
Programming Infusions PCA LEVEL X Press Run PCA programming is complete. Press RUN/HOLD to begin the infusion, or press NO/REVIEW to review parameters. Titrating a PCA Infusion Note: The infusion will not be interrupted while titrating. When the new values have been accepted, the pump will automatically switch to the new values for the present infusion. - Page 92 Programming PCA Infusions CHECK or CHANGE Parameters? If a Demand Bolus Dose IS programmed in the current PCA profile infusion, the pump will give you the option of titrating bolus dose, bolus interval and/or bolus doses/hr in the following three screens: Bolus Dose: X mg...
-
Page 93: Giving A Demand /Remote Bolus
Programming Infusions Giving a Demand /Remote Bolus If the PCA profile was programmed for demand bolus doses, the patient may activate a demand bolus dose by pressing the key or, if PRIME/BOLUS connected, the button on the PCA cord. Patient control over demand boluses is limited by one of the following settings: limits for the number of doses that may be ■... -
Page 94: Giving A Clinician-Activated Dose
Programming PCA Infusions Note: If the patient requests a bolus but the mandatory interval between bolus doses has not elapsed or the number of doses allowed per hour have already been given, the requested bolus dose will not be given. The pump records the request in the PCA data log, displays and beeps four... -
Page 95: Reviewing Pca Profile Parameters
Programming Infusions Note: If you enter or accept a dosage of 0.0, the Clinician Dose function is canceled. If you make an error, press NO to change your entry. When you press YES to accept an entered dosage parameter, the pump displays the Clinician Dose confirmation screen: CLINICIAN Dose:... - Page 96 Programming PCA Infusions The way in which you access the information, and the screen displayed when you are finished, depends on the state of the infusion when you access the information. Perform the access procedure appropriate to your situation, then review the data as described in “Reviewing PCA Data,”...
- Page 97 Programming Infusions To save the PCA data, press NO . To clear the data, press YES . The pump displays: ENTER CODE To clear the PCA data, enter the code: The PCA data is cleared and the pump displays: CLEAR VOLUME INFUSED DISPLAY? To save the volume infused data, press NO .
- Page 98 Programming PCA Infusions Accessing PCA Review Functions After Completion To review PCA data from the following screen: LOCKOUT RUN to Repeat Enter the code: The pump displays: REVIEW PCA DATA? To review the PCA bolus dose data, press YES . The pump displays the number of bolus doses given.
- Page 99 Programming Infusions To save the volume infused data, press NO . To clear the data, enter the code: The volume infused data is cleared and the pump displays: LOCKOUT RUN to Repeat Press RUN to repeat the infusion. Reviewing PCA Data After reviewing each displayed data item, press YES to advance to the next screen.
- Page 100 Programming PCA Infusions Each event shows you the average time elapsed between bolus attempts, then displays for each attempt the time of the request, whether the dose was given, and the amount given (if any). Press YES to step through the screens until all data has been reviewed.
-
Page 101: Changing Basal Rate And/Or Bolus Parameters Without Losing Pca Data
Programming Infusions The data is cleared. If the pump is on hold, it displays the volume remaining in the infusion, then returns to screen. Press RUN/HOLD to ***HOLD*** continue the infusion. If the infusion is running, the pump displays: PCA Level X If the infusion has completed, the pump displays: LOCKOUT RUN to Repeat... - Page 102 Programming PCA Infusions The current basal rate setting is displayed. Accept the value shown by pressing YES , or enter a new value and press YES to accept. If bolus doses have been programmed into the current PCA delivery, the pump gives you the option of changing the bolus dose and bolus interval, then proceed to step 8.
-
Page 103: Changing Preprogrammed Titration Limits Or Medication Volume Limits During An Infusion
Programming Infusions Changing Preprogrammed Titration Limits or Medication Volume Limits During an Infusion The pump allows changes to preprogrammed titration limits or medication volume limits during an infusion. You may also change basal rate and/or bolus parameters using this method. The procedure you use to change titration limits depends on whether the pump was programmed for limiting the number of doses per hour, or for limiting... - Page 104 Programming PCA Infusions Maximum Basal Rate: X.X ml/hr Enter a new maximum basal rate value, then press YES to accept. The pump displays: Maximum Bolus Dose: X.Xmg Enter a new maximum bolus dose value, then press YES to accept. The pump displays: Minimum Bolus Interval: 00:00...
- Page 105 Programming Infusions Press YES to change the titration limits. The pump displays: Maximum Basal Rate: X.X ml/hr Enter a new maximum basal rate value, then press YES to accept. The pump displays: Maximum Bolus Dose: X.Xmg Enter a new maximum bolus dose value, then press YES to accept.
- Page 106 Programming PCA Infusions Press YES . The pump displays: Basal Rate: mg/hr Enter a new basal rate, then press YES to accept. The pump displays: Bolus Dose XX mg Enter a new bolus dose amount, then press YES to accept. The pump displays: Bolus (Hr:Min) Interval:...
-
Page 107: Using Configuration Mode To Customize Available Pca Profile Options
Programming Infusions Using Configuration Mode to Customize Available PCA Profile Options Overview PCA Configuration Mode lets you not only customize the PCA options presented to the user but also limit the amount of medication that a patient may receive in a PCA profile infusion. PCA Configuration Mode allows the options that are displayed in the PCA profile to be customized to meet the specific needs of your organization. - Page 108 Programming PCA Infusions Note: The display advances through the settings automati- cally, but you may move through them more quickly by pressing YES or RUN/HOLD as each value is dis- played. When all parameters have been displayed, the pump displays: YES to Program RUN to Repeat Changing PCA Configuration Settings...
- Page 109 Programming Infusions • Press YES , to reset the settings to the factory default values. This exits the Configuration Mode, and returns to the following screen: YES to Program RUN to Repeat • To program your own settings, press NO and proceed to step 6.
- Page 110 Programming PCA Infusions If you want to allow a loading dose to be programmable during PCA programming, press YES . If not, choose NO , and the loading dose screen will not appear during normal programming. Select delivery routes and parameters The following three delivery routes are available for PCA infusions: •...
- Page 111 Programming Infusions Select Available Delivery Routes and Set Route Parameters. When the desired delivery route(s) is displayed, do one of the following: • Press YES to select. • Press NO if you do not want the displayed delivery route to be available for programming.
- Page 112 Programming PCA Infusions Set medication limit options Two options are available to limit further the amount of medication that may be received by a patient: Limit Med. by # of Doses/Hour? Limit Med. by Tot Med Allowed? You may select one or both to be available during programming.
- Page 113 Programming Infusions • Press YES to select. • Press NO if you do not want the displayed method to be available to patients. Select security level There are three security levels available. In order of increasing restrictions, they are: Level 1 ALLOW CHANGES ■...
- Page 114 Programming PCA Infusions Reviewing the Current PCA Configuration in Lockout Mode The Configuration Mode is not accessible for review or configuring when the pump is in Lockout Mode ® with Continuous, Auto–Ramp Profile, Intermittent and/or 25 Periods profiles locked out. When the PCA Profile is locked out, you may not configure, but you may review the current PCA configuration settings as follows:...
-
Page 115: Delivery Options And Advanced Functions
Chapter 5 Delivery Options and Advanced Functions Chapter 5 Overview This chapter contains information on the following: “Shortcut Delivery of a Programmed ■ Infusion,” 5-2 “Resuming Delivery of an Interrupted ■ Infusion,” 5-4 “Clearing the Volume Infused Display,” 5-8 ■ “Clearing the Memory,”... -
Page 116: Shortcut Delivery Of A Programmed Infusion
Shortcut Delivery of a Programmed Infusion Shortcut Delivery of a Programmed Infusion If the desired delivery profile has been programmed and is currently stored in the pump’s memory, you can shortcut directly to the preprogrammed infusion. Note: To deliver an infusion, its parameters must have been programmed and stored in the pump’s memory. -
Page 117: Shortcut Delivery In Lockout Mode
Delivery Options and Advanced Functions Shortcut Delivery in Lockout Mode Note: In Lockout Mode, only the available profiles will be offered for delivery. If your desired delivery profile is not listed, you must return to Programmable Mode and add it to the lockout program. See “Programma- ble Mode / Lockout Mode,”... -
Page 118: Resuming Delivery Of An Interrupted Infusion
Resuming Delivery of an Interrupted Infusion To delay the start of the infusion, press YES and enter the desired delay time in hours:minutes. Press YES again to accept the delay time. Note: If the pump is locked out in PCA, the option to delay delivery is not available. -
Page 119: Resetting An Interrupted Infusion To The Beginning
Delivery Options and Advanced Functions Resetting an Interrupted Infusion to the Beginning Note: This feature is helpful when you change the fluid bag. Programmable Mode When the pump is turned on after being interrupted during an infusion, it will display RESUME? , alternating with the name of the profile that was interrupted. -
Page 120: Selecting Or Programming A Different Infusion
Resuming Delivery of an Interrupted Infusion Press RUN/HOLD . The infusion rate and volume are displayed, alternating with the name of the profile, providing you with an opportunity to reconfirm the infusion parameters. Press RUN/HOLD . The pump displays: DELAY DELIVERY? If you want to delay the start of the infusion, press YES . - Page 121 Delivery Options and Advanced Functions Follow instructions in Chapter 3 to program a new infusion (Programmable Mode only), or see “Shortcut Delivery of a Programmed Infusion,” 5-2 to deliver an infusion currently in the pump’s memory. Lockout Mode When the pump is turned on after being interrupted during an infusion, it will display RESUME? , alternating with the name of the profile that was interrupted.
-
Page 122: Clearing The Volume Infused Display
Clearing the Volume Infused Display Clearing the Volume Infused Display You may reset the Volume Infused Display to zero while in Programmable Mode. This enables you to monitor volume infused from any point in time during an infusion. Press RUN/HOLD to pause the infusion. The pump displays: *** HOLD *** Press NO/REVIEW. -
Page 123: Clearing The Memory
Delivery Options and Advanced Functions Clearing the Memory All programmed values stay in the pump’s memory until they are changed (reprogrammed) or cleared using the following method. Clearing the memory erases all programmed delivery values and profile parameters. Only the infusion data parameters (audio volume, KO rate, pressure setting, display language, air detection setting and up occlusion) are not cleared. -
Page 124: Making The Pump Profile-Specific
Making the Pump Profile-Specific For example, if the programmed concentration is 10 mg/ml and the infusion rate is 10 mg/hr, and you change the concentration to 20 mg/ml, the pump will perform the necessary calculations and increase the rate of infusion to 20 mg/hr. In some instances you may want to change the concentration while keeping the infusion rate at its originally programmed value. - Page 125 Delivery Options and Advanced Functions Table 5-1 Profile Menus Display Enter by doing... • Press YES to allow (enable) PCA profile and Allow PCA? move to next profile choice. • Press NO to reject PCA and move to next profile choice.
- Page 126 Making the Pump Profile-Specific To select specific profiles: Turn the pump on. When the pump displays: YES to Program RUN to Repeat enter the code: The pump displays: SELECT ALLOWED PROFILES? Press YES . Press YES or NO in response to the pump’s prompts to allow each of the five profiles.
-
Page 127: Setting Volume Accrual
Delivery Options and Advanced Functions Setting Volume Accrual Volume Accrual allows total volume infused to accrue over repeated infusions in the Intermittent and PCA profiles. When enabled, it lets you monitor total volume/medication infused over the duration of a therapy. The Volume Accrual function is accessible from the profile-specific programming screen. -
Page 128: Setting Date And Time
Setting Date and Time Setting Date and Time You can view and set the time and date used by the pump’s internal clock. The clock uses 24-hour format. The date format is month/day/year (MMDDYY). To set the time and date: Power the pump on by pressing the ON/OFF key. -
Page 129: Entering The Patient's Identification Number
Delivery Options and Advanced Functions To keep currently displayed time, press YES . To change time, enter 24-hour time as 6-character string as follows: HHMMSS . Press YES to accept the time entered. If desired, verify date and time setting by repeating steps 3 through 5. -
Page 130: Programmable Mode / Lockout Mode
Programmable Mode / Lockout Mode Programmable Mode / Lockout Mode When the pump is in Programmable Mode, all programming functions are accessible and can be changed. In Lockout Mode, access is limited so that delivery profiles can be preprogrammed by the clinician, but cannot be changed by unauthorized users. - Page 131 Delivery Options and Advanced Functions At the ENTER CODE prompt, enter the code: The pump displays: PATIENT ID? Allow CONTINUOUS? Press YES if you want the preprogrammed Continuous profile to be available for delivery. If you do not want it to be available, press NO . The pump displays: Allow AUTO-RAMP?
-
Page 132: Delivering A Programmed Infusion In Lockout Mode
Programmable Mode / Lockout Mode Delivering a Programmed Infusion in Lockout Mode When the pump is in Lockout Mode, you may deliver only preprogrammed profiles that have been locked out for inclusion in Lockout Mode. To deliver a different profile, or to change any delivery parameters, you must return to Programmable Mode. -
Page 133: Switching From Lockout Mode To Programmable Mode
Delivery Options and Advanced Functions Press RUN/HOLD to continue. The pump displays: DELAY DELIVERY? To delay the start of the infusion, press YES . If not, press NO and the infusion will begin immediately. DELAY DELIVERY was selected, enter the delay time in HH:MM and press YES to accept the value. -
Page 134: Setting Infusion Data Parameters
Setting Infusion Data Parameters YES to Program RUN to Repeat You now have access to all Programmable Mode functions that are not profile-specific. Setting Infusion Data Parameters The pump allows you to set parameters for several pump functions known collectively as infusion data. Accessible via the INFUSION DATA key on the... -
Page 135: Infusion Data Parameters In Programmable Mode
Delivery Options and Advanced Functions Infusion Data Parameters in Programmable Mode In Programmable Mode, access the Infusion Data parameters by pressing from the INFUSION DATA *HOLD* screen, the YES to PROGRAM screen or any READY (Profile) screen. Note: See Table 9-1 for a list of the parameter limits. From a *HOLD* READY (Profile... - Page 136 Setting Infusion Data Parameters SET KO RATE? Press YES to review or change the KO rate setting, or press NO to continue to Display Language. The pump displays the KO rate screen: KO RATE:X.X ml/hr Note: KO rate can be set for 0.1 to 10 ml/hr. Press YES to accept the rate shown, or enter a new rate and press YES to accept.
-
Page 137: Infusion Data Parameters In Lockout Mode
Delivery Options and Advanced Functions Press YES to accept the displayed Air Detection setting, or press NO to display other options, then YES to accept. Note: Available air detection settings are 0.1 ml, 0.5 ml, 2 ml, or disabled. The pump displays: SET UP OCCLUSION ENTER CODE Enter the code:... - Page 138 Setting Infusion Data Parameters Note: In Lockout Mode, the code 911 is required to change any Infusion Data parameters except Audio Volume. Audio Volume may be changed without the code. , press YES to review or SET AUDIO VOLUME? change Audio Volume setting or NO to continue to other settings.
-
Page 139: Displaying Volume And Time Remaining
Delivery Options and Advanced Functions Note: To step through the current Infusion Data parameter screens more quickly, press YES as each is dis- played. You may also return to the *HOLD* LOCK- OUT/RUN to REPEAT READY (Profile) screen at any time by pressing RUN/HOLD. Displaying Volume and Time Remaining You may display the volume and time remaining in the infusion from any Final Confirmation screen, or... -
Page 141: Chapter 6 Troubleshooting
If a problem cannot be resolved using the methods in Table 6-1, have the pump serviced by an authorized Baxter service provider as soon as possible. When an alarm occurs, the infusion stops, the pump beeps regularly, and the red indicator flashes, with... - Page 142 Alarms When a Low Battery alarm occurs: The pump sounds a two-second tone every ■ 10 minutes, starting approximately 60 minutes before the battery is too depleted to run the pump. The red indicator light flashes. ■ The infusion does not stop. ■...
- Page 143 Troubleshooting Table 6-1 Alarm Messages Message Cause Corrective Action Air in tubing. Silence by pressing AIR-IN-LINE HOLD , then press RUN or expel air according to protocol. Remove the cassette, invert the cassette so that the patient end is up and tap cassette to expel air.
- Page 144 Alarms Table 6-1 Alarm Messages — continued Message Cause Corrective Action Lower clamp is Open clamp. DOWN OCCLUSION closed. Kink in lower tub- Remove occlusion between the ing. pump and the patient. Blockage in lower Consider changing pressure sen- tubing filter. sor setting from LO to HI.
- Page 145 Troubleshooting Table 6-1 Alarm Messages — continued Message Cause Corrective Action There are about 60 Replace the 9-volt batteries or LOW BATTERY minutes of battery rechargeable external battery power remaining. pack, or connect to a battery eliminator/charger. The pump has Turn the pump off, then on MALFUNCTION detected a system...
-
Page 146: Alert Messages
Alert Messages Alert Messages An alert message notifies you of an event that requires your attention. Alert messages that may occur during programming are shown in Table 6-2, along with the cause and action you must take to clear the alert message and successfully program the infusion. - Page 147 Troubleshooting Table 6-2 Alert Messages — continued Message Cause Corrective Action Occurs when the user The pump returns to the ALERT Maximum attempts to increase the titration bolus doses/hr Bolus Doses/hr number of doses/hr screen with the maxi- beyond the programmed mum value displayed.
- Page 148 Alert Messages Table 6-2 Alert Messages — continued Message Cause Corrective Action When programming the Enter a dose time that is DOSE TIME Intermittent profile, within range. EXCEEDS TOTAL occurs if a dose time is entered that is greater than the total infusion time.
- Page 149 Troubleshooting Table 6-2 Alert Messages — continued Message Cause Corrective Action Press YES or NO , then When programming the MINIMUM VOLUME PCA profile, the medica- enter the desired value. IS XX tion limit volume must be a minimum of the volume delivered due to a basal rate over the time period entered plus at...
- Page 150 Alert Messages Table 6-2 Alert Messages — continued Message Cause Corrective Action Press YES , then repro- You tried to start an infu- RE-PROGRAM! sion with a parameter gram the profile with inappropriately set to a appropriate parameter value of zero (for exam- values.
-
Page 151: Maintenance And Storage
Chapter 7 Maintenance and Storage Chapter 7 Overview This chapter contains the following information on maintaining the pump: “Powering the Pump,” 7-1 ■ “Cleaning,” 7-10 ■ “Preventive Maintenance,” 7-12 ■ “Storing the Pump,” 7-12 ■ Powering the Pump The pump can be powered by: Internal 9-volt batteries ■... -
Page 152: Powering The Pump
Powering the Pump Battery Eliminator/Charger ■ An AC power adapter that can be used to power the pump directly or to charge the Rechargeable External Battery Pack. See “Using the Battery Eliminator/Charger,” 7-9. Using the Internal Batteries The internal batteries power the pump whenever it is on but not connected to the Rechargeable External Battery Pack or the Battery Eliminator/Charger. - Page 153 Rechargeable External Battery Pack or Battery Eliminator/Charger for 16 to 24 hours. If voltage remains less than 3.6 volts after recharging from the Battery Eliminator/Charger for 24 hours, have the NiCad/NiMH battery replaced by the Baxter service center. 07-19-12-353 6060™ Multi–Therapy Pump Operator’s Manual...
-
Page 154: Powering The Pump
Powering the Pump Changing the Batteries Note: You can change batteries while the pump is running. Remove and replace each battery one at a time so at least one battery remains in position to power the pump while you change the other battery. ®... -
Page 155: Using The Rechargeable External Battery Pack
Maintenance and Storage Using the Rechargeable External Battery Pack The Rechargeable External Battery Pack contains rechargeable power cells, and operates for about twice as long as the internal 9-volt batteries. When the Rechargeable External Battery Pack is used to power the pump, the internal 9-volt batteries are not used, saving their power for later use. - Page 156 Powering the Pump To connect the Rechargeable External Battery Pack, insert its plug into the connector on the EXT POWER bottom of the pump (see Figure 7-2). READY CONTINUOUS ON/OFF PUMP REVIEW TITRATE HOLD Rechargeable External PRIME Battery Pack BOLUS INFUSION DATA Figure 7-2...
- Page 157 Maintenance and Storage Rechargeable External Battery Pack Alarms When the pump is powered by the Rechargeable External Battery Pack, the LOW BATTERY alarm will occur when the pack is within one hour of depletion. The pump will continue infusing. If the Rechargeable External Battery Pack’s voltage falls below the minimum required to power the pump, the EMPTY BATTERY alarm will occur and the pump will stop infusing.
- Page 158 Powering the Pump Checking the Rechargeable External Battery Pack To check the Rechargeable External Battery Pack: Connect Rechargeable External Battery Pack to pump. If the pump is not turned off, turn it off now. Press the ON/OFF PUMP key. Note: If pump was recently powered from internal 9-volt batteries, allow it to run for approximately 3 minutes on Rechargeable External Battery Pack power before...
-
Page 159: Using The Battery Eliminator/Charger
Maintenance and Storage Using the Battery Eliminator/Charger The Battery Eliminator/Charger is an adapter that plugs into an AC wall outlet. The Battery Eliminator/Charger can be used to power the pump directly, or to charge the Rechargeable External Battery Pack. The Battery Eliminator/Charger can recharge the Rechargeable External Battery Pack alone or while powering the pump, or may be connected directly to the pump. -
Page 160: Cleaning
Isolation Area, select those agents from the list below that both clean and disinfect. Contact the Baxter Service Center for assistance immediately if fluid enters the cassette chamber. The chamber should be cleaned as soon as possible by... -
Page 161: Cleaning Procedure
Maintenance and Storage Do not clean, disinfect, or sterilize any part of the pump Caution by autoclaving or with ethylene oxide gas. Doing so may damage the pump and void the warranty. Only external parts of the pump should be disinfected. Do not use the following chemicals on the pump, as Caution they will damage the front panel: acetone,... -
Page 162: Preventive Maintenance
Preventive Maintenance Preventive Maintenance Table 7-3 contains a schedule of basic maintenance tasks that should be performed on the pump. If the pump cannot be cleaned using the methods described earlier or components are missing or damaged, discontinue use and notify the appropriate authorized service personnel. -
Page 163: Chapter 8 Technical Specifications
2M9857 2M9858 2M9859 2M9860 2M9861 Power requirements 12 to 18 VDC, 50 mA maximum • Internal battery Note: For optimum performance, Baxter recommends you use only batteries manufactured by Duracell Corporation. Two 9-volt single use standard alkaline (DURA- ® ® CELL 9V No. - Page 164 Table 8-1 Technical Specifications — continued Item Characteristic • Battery life • 25 hours at 125 ml/hr and low pressure (internal alkaline) • 45 hours at 125 ml/hr and low pressure (internal lithium) • 40 hours at 125 ml/hr and low pressure (Rechargeable External Battery Pack) Backup audio power Internal NiCad or Nickel-Metal Hydride battery...
-
Page 165: Dose Limits
Technical Specifications Table 8-1 Technical Specifications — continued Item Characteristic Downstream occlusion detection time: • Flow rates above 10 Less than 4 minutes ml/hr: • Flow rates between Less than 20 minutes 1 and 10 ml/hr: Upstream occlusion detection time: •... -
Page 166: Accessories
Accessories Use only the accessories listed in Table 8-3 with the pump. Table 8-3 Accessories Product Code Description 2L9353 Lock Box for 100 ml pre-attached bag set 2L9354 Lock Box for 100 ml or 250 ml pre-attached bag set 2L9363 Generic Lock Box for up to 250 ml container - Top Hinge 2L9357 Locking Clamp... -
Page 167: Operating Environment
Technical Specifications Operating Environment Table 8-4 lists the environmental requirements for operating the pump. Table 8-4 Operating Requirements Temperature 4.5 ° C to 37.7 ° C (40 ° F to 100 ° F) Humidity 20% to 95%, non-condensing Barometric pressure 70 kPa to 106 kPa Storage Environment Table 8-5 lists the environmental requirements for... -
Page 168: Applicable Standards
Applicable Standards The pump has been designed in accordance with but not restricted to the following standards: NFPA 99. Standard for Health Care ■ Facilities; National Fire Protection Association, dated 2/12/93 ANSI/NFPA 99. UL2601-1. Medical Electrical Equipment, ■ Part 1: General Requirement For Safety, 24 October 1997. - Page 169 Chapter 9 Summary of Configurable Settings Chapter 9 This chapter contains the following summary information about the pump’s configurable settings and options: “Parameter Limits,” 9-1 ■ “Summary of Factory Default Settings,” 9-3 ■ “Summary of Numeric Codes,” 9-4 ■ Table 9-1 Parameter Limits Parameter Limit...
- Page 170 Table 9-1 Parameter Limits — continued Parameter Limit Intermittent Profile Other Total Time (HH:MM) 00:01 to 72:00 for a single dose 3:00 to 72:00 for multiple doses Number of Doses 1 to 24 Dose Time (HH:MM) 00:01 to 09:59 (up to 72:00 if number of doses is 1) Intermittent KO Rate 0.0 to 10.0 ml/hr (0.0 to 999 mg/hr, 0.0 to 9,000 µg/hr)
-
Page 171: Chapter 9 Summary Of Configurable Settings
Summary of Configurable Settings Table 9-2 Summary of Factory Default Settings Factory Option Available Settings Setting Audio volume 1 to 9 KO rate 0.1 to 10.0 ml/hr 0.1 ml/hr Downstream • HI (124 ± 34.5 kPa; 20 PSI ± 5 PSI) Occlusion •... - Page 172 Table 9-3 Summary of Numeric Codes Code Function Entering patient’s ID number (see “Entering the Patient’s Identi- fication Number,” 5-15). Required whenever ENTER CODE is displayed. Checking remaining battery life (see “Checking Internal and 2288 Backup Batteries,” 7-2). PCA Configuration Mode (see “Using Configuration Mode to 2663 Customize Available PCA Profile Options,”...
-
Page 173: Chapter 10 Warranty And Service Information
Warranty and Service Information Chapter 10 Warranty Baxter warrants that the equipment shall be free from defects in material and workmanship when delivered to the original purchaser. Baxter’s sole obligation shall be to repair or replace the product (excluding batteries), at Baxter’s option and expense, for a period of one year following the date of initial delivery. -
Page 174: Service Information
Andover Service Center In the U.S.: 1-800-343-0366 Outside the U.S.: 01-978-691-4100 Shipping costs for all pumps returned to Baxter shall be paid for by the customer. The pump must be packed in its original container or in another Baxter approved container that will provide adequate protection during shipment. - Page 175 Appendix A Spanish-English Display Text Translation Appendix A The Spanish translations for all of the pump’s display messages are provided below. Spanish English AIRE-EN-LINEA AIR-IN-LINE AJUSTE DE INFUSION? TITRATION? ALERTA DOSIS DE BOLSA ALERT MAXIMUM BOLUS MAXIMA/HR DOSES/HR ALERTA DOSIS MAXIMO PROG ALERT MAXIMUM PROGRAMMED DOSE ALERTA INTERVALO DE...
- Page 176 Spanish English CEBAR SET? PRIME SET? CEBANDO VOLUMEN PRIMING VOLUME CERRADO O PULSE ANDAR LOCKOUT OR PRESS RUN COMPLETO XXXX COMPLETE XXXX CONTINUR CONTINUOUS DETECTOR DE AIRE XX ML AIR DETECTION XX ML DETECTOR DE AIRE AIR DETECTION DISABLED DESACTIVADO DETECTOR DE AIRE ENTRE SET AIR DETECTOR ENTER CONDIGO...
-
Page 177: Appendix A Spanish-English Display Text Translation
Spanish-English Display Text Translation Spanish English FIJAR PRESION? SET PRESSURE? FIJAR VOLUMEN DE AUDIO? SET AUDIO VOLUME? FIJAR RITMO KO? SET KO RATE? FIJAR OCLUSION SUP SET UP OCCLUSION INGLES/ESPCANOL ENG/SPANISH INTERMITENTE INTERMITTENT INTERVALO DE BOLSA BOLUS INTERVAL KO DOSIS XX KO DOSE XX AUTO-RAMPCA LISTO READY AUTO-RAMP... - Page 178 Spanish English PUERTA ABIERTA DOOR OPEN RAMPCA BAJADA DOWN RAMP RAMPCA BAJADA ANTES DE EARLY DOWN-RAMP? TIEMPO? RAMPCA SUBIDA UP-RAMP RECALIBRAR! RECALIBRATE! REPCASAR PERFIL? REVIEW PROFILE? RITMO RATE RITMO BASICO BASAL RATE RITMO CONSTANTE LEVEL RATE RITMO MAXIMO ES: MAXIMUM RATE IS: RITMO REBASA LIMITES RATE EXCEEDS MICROSET MICROSET...
- Page 179 Spanish-English Display Text Translation Spanish English T-RESTANTE EN PERIODO XX TIME LEFT IN PERIOD XX T-RESTANTE RAMPCA BAJADA TIME LEFT IN DOWN-RAMP T-RESTANTE RAMPCA SUBIDA TIME LEFT IN UP-RAMP T-RESTANTE RITMO TIME LEFT IN LEVEL RATE CONSTANTE 25 PERIODOS 25 PERIODS VERIFICAR O CAMI\BIAR CHECK OR CHANGE PROG...
-
Page 181: Appendix B Glossary
Appendix B Glossary Appendix B AutoClamp ™ — A feature on the cassette that helps prevent free flow when the pump door is opened and when the cassette is removed from the pump’s cassette chamber. Cassette — The cassette is the portion of the administration set that rests in the cassette chamber. - Page 182 Infusion Data Parameters — Pump-wide settings that control the way the pump’s displays and performance. The Infusion Data Parameters include: audio volume, pressure, KO rate, display language, air detection and up occlusion. See Table 9-2 for complete information. KO Rate — The KO (Keep Open) rate is a reduced infusion rate administered during delay delivery phases and at the completion of infusions.
- Page 183 Glossary Profile-Specific — Advanced programming feature in which you may restrict the profiles available for delivery to specific profiles of your choosing. This feature is more restrictive than Lockout Mode alone, for any profiles excluded from your profile-specific program remain inaccessible even in Programmable Mode.
- Page 184 Volume-to-be-Infused — An accumulation of all the volumes scheduled to be delivered during a programmed infusion. It may represent a single volume, as in a Continuous profile infusion, or the sum of many volumes, as in an Intermittent profile infusion that contains a volume for each dose plus a KO volume for each period between doses.
-
Page 185: Index
Index Numerics dose frequency under 3 hours ..6-7 dose time exceeds 9:59 ....6-7 100 ml lock box......3-5 dose time exceeds total ....6-8 25 periods profile ......3-12 KO rate exceeds dose rate..6-8 programming......4-28 KO time computes under programming by rate.... - Page 186 confirmation screen ....... B-1 connectors back light ........2-2 EXT POWER ......2-4 batteries .......... 7-9 PCA/COMM....... 2-4 9-volt, changing......7-4 continuous profile checking........7-2 programming ......4-1 external ........8-1 titration........4-6 external battery pack alarms ......7-7 charging ......7-7 date..........
- Page 187 external .......... 8-1 screens........3-16 external battery pack intermittent profile ......3-11 alarms......... 7-7 interrupting ......4-24 charging ........7-7 programming......4-18 checking........7-8 international standards ....1-4 interrupted infusion resuming delivery ...... 5-4 factory settings....... 9-3 features........... 1-2 rear panel ........2-4 keep open ........
- Page 188 warranty........10-1 checking parameters ....4-44 malfunction alarm......6-5 completing programming ..4-46 maximum bolus doses/hr alert..6-7 configuration mode....4-63 maximum programmed dose alert.. 6-6 customizing options ....4-63 maximum programmed rate alert ... 6-6 giving a clinician dose ....4-50 memory giving a demand/remote clearing ........
- Page 189 setting infusion data front view........2-3 parameters......5-20 multi-therapy......1-1 setting volume accrual ..... 5-13 opening door ......2-4 using the pump to prime .... 3-4 part number ........ 8-1 product code........8-1 power requirements ....7-1 administration sets ..... 8-1 unpacking........
- Page 190 return shipping......10-2 time and date warranty........10-1 setting........5-14 sets time remaining administration ......3-2 displaying........5-25 settings titration mode factory default......9-3 definition........B-3 infusion data parameters... 5-20 total time exceeds 999:59 alert ..6-10 parameter limits......9-1 total time HH:MM alert....
- Page 192 This manual was printed on paper stock created with 20% de-inked post- consumer waste fiber and a total of 100% recycled fiber. *071912353V* Baxter Healthcare Corporation Deerfield, IL 60015 USA Authorized Representative: Baxter S. A. , B-7860 Lessines, Belgium © Copyright 2000, Baxter Healthcare Corporation. All Rights Reserved.
Need help?
Do you have a question about the 6060 2M9832 and is the answer not in the manual?
Questions and answers