Table of Contents
Advertisement
Quick Links
Advertisement
Table of Contents

Related Manuals for DKN technology WR 180


Summary of Contents for DKN technology WR 180
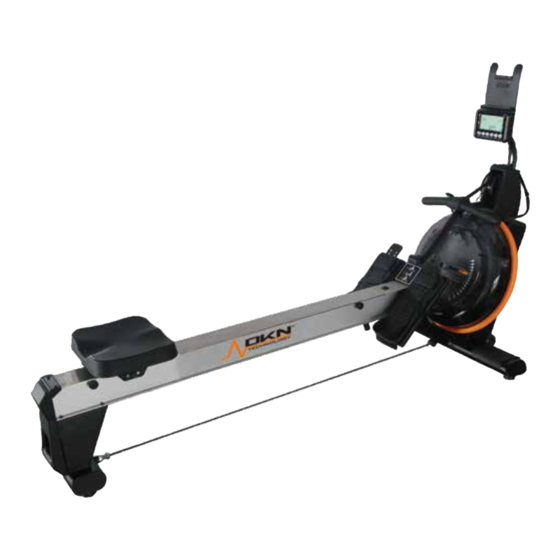
- Page 1 WR 180 OWNER’S MANUAL WEBSITE MANUAL...
- Page 2 IMPORTANT! Please read all instructions carefully before using this product. Retain this manual for future reference. The specifications of this product may vary slightly from the illustrations and are subject to change without notice.
-
Page 3: Important Safety Notice
IMPORTANT SAFETY NOTICE Note the following precautions before assembling and operating the machine. ►Read this Owner’s Manual and follow the instruction carefully before using the Rowing Machine. Make sure that it is properly assembled and tightened before use. ► Use only original parts as delivered. ►... - Page 4 pain, tightness in your chest or any discomfort. ► Do not place fingers or any other objects into the moving parts. ► Prior to any exercise, consult with your physician first to establish the exercise frequency, time and intensity appropriate for your particular age and condition. ►...
- Page 5 EXPLOADED DIAGRAM - 3 -...
-
Page 6: Parts List
PARTS LIST Description Description Main frame combination Hexagon bolt M10x135 Front stabilizer combination Arc washer D10.2xD25x2 Rear stabilizer combination Hexagon bolt M10x65 Pedal support combination Stabilizer pad Connecting tube Cross head screw M4x12 Handlebar combination Hexagon nut M10x145 Limit base Cross head screw M6x16 8L/R Rail board... - Page 7 ASSEMBLY INSTRUCTIONS STEP 1: 1.Remove the guide rail(69) from the limit base(21), insert the saddle (38) onto the rowing rail (69) from behind end, insert Cushion (11) on the up-end of the rear stabilizer combination(3). Tighten the rear stabilizer combination(3) and Cushion (11) to the rowing rail (69) with hexagon bolts (10) and nylon nuts (49).
- Page 8 STEP 2: 1.Lock the Front stabilizer combination(2) tightly on the main frame(1) with Hexagon bolt(39), Arc washer(40), Hexagon bolt(41) and Flat washer(29) 2. Lock the Connecting tube(5) on the main frame(1) with Hexagon bolt(52), Flat washer(51) and Nylon nut(54) 3. Insert the Wheels protective cover(56L/R) into the main frame(1), matched with the Seal ring(59), then lock tightly with Cross pan head screw(57) and (58).
- Page 9 STEP 3: 1.Lock the Pedal support(4) on the Guide rail(69) (Note: DO NOT FASTEN) with Hexagon bolt(26) and Flat washer(27), lock the Guide rail(69) on the Front stabilizer combination(2) (Note: DO NOT FASTEN) with Hexagon nut(44), Flat washer(29) and Nylon nut(13), lock the Pedal support(4) on the Connecting tube(5) (Note: DO NOT FASTEN) with Hexagon bolt(50) and Flat washer(51) 2.Fasten the Steel cable(18) to the Front stabilizer combination(2) with Hexagon bolt(36),...
- Page 10 STEP 4: 1. Connect the Extension wire (65) and the wire on the Display (68) crossing the Ipad shelf(67), then fasten the Ipad shelf (67) and Display(68) with Cross pan head screw(66). 2. Lock the Connecting tube cover (73) to th Cross pan head e Connecting tube (5) with screw(15).
- Page 11 INSTRUCTION MANUAL - DISPLAY 【 【 FUNCTION BUTTONS】 】 UP▲/ DOWN▼:To press these two buttons through available selection. To adjust the function value upward and downward. ENTER: To confirm your selection. During training, press the button to scan each display function. START / STOP:...
- Page 12 each increase/decrease setting is 1. The monitor will display user’s heart rate during training. The pulse measurement function is only used by chest belt system; CALENDAR: The monitor will display year, month, and day when monitor is in sleep mode. TEMPERATURE:...
- Page 13 (2) RACE (Fig.5): : A. Enter into the RACE mode and L1 will glitter, the TIME/500M may display with 8:00.Then, you can press UP or DOWN to set L1 ~ L15 immediately, press ENTER to confirm. Where after, you can set the distance of the race(500M~10000M)while the figure of the DISTANCE is blinking.
-
Page 14: Fill And Empty The Tank
FILL AND EMPTY THE TANK The amount of water in the Tank simulates the mass when moving an object in water. Changing the Water Level does not change the resistance, it simply changes the mass which the user is trying to move. Increasing the Water Level simulates a heavier load, similarly reducing the Water Level simulates a lighter load. -
Page 15: Bluetooth Function
BLUETOOTH FUNCTION Check the DKN-Technology website for more information about which apps the ProRUN is compatible with. Turn on Bluetooth function on your tablet or smartphone to connect it with the machine (pairing is not required). Download the app, open it on your device and follow the steps to set it up. For any technical questions on third party app functionality do consult the FAQ section on the specific app developper’s website. -
Page 16: Warm-Up And Cool-Down
WARM-UP and COOL-DOWN A successful exercise program consists of a warm-up, aerobic exercise, and a cool-down. Do the entire program at least two and preferably three times a week, resting for a day between workouts. After several months, you can increase your workouts to four or five times per week. -
Page 17: Warranty
WARRANTY DKN-Technology warrants this product to be free from defects in material at the time of the product’s tender of delivery. This ‘Carry-in’ Limited Warranty applies for a period of two (2) years, beginning on the date mentioned on your product invoice or proof of purchase of product issue by DKN-Technology. - Page 18 WEBSITE Make an Appointment to Visit our Showroom...
Need help?
Do you have a question about the WR 180 and is the answer not in the manual?
Questions and answers